I pulled out one of Nancy‘s blanks today, and did the experiment I’ve been itching to do for awhile. This blank was knitted up to have each row almost precisely the same length as the length of a single weft shot, the idea being that if you got it precisely right, you could line up the rows of knitting with the weft shots and thus do woven imagery.
It turned out to be every bit as fussy as I had imagined, and in the end I couldn’t get it to work with any precision. However, I think the method could be used for interesting color effects – just not anything with the precision of weft ikat.
Since even a “failed” experiment tells us something, here are the photos of the process and some of my thoughts on it, post-mortem.
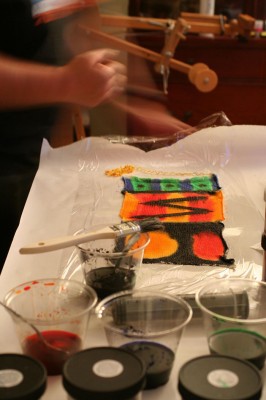
(Mike was kind enough to shoot this photo for me with my new-to-me digital SLR, which I plan to use for taking better photos of my shawls. But that’s another blog post…)
And here is how the blank looks woven up (I did not weave the blue and green sections):
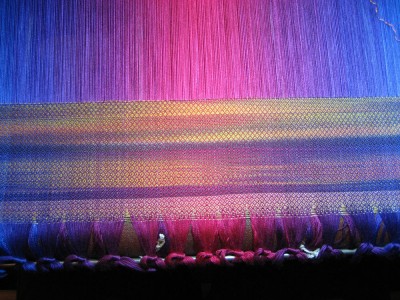
Since it is difficult to pick out detail, here is a photo showing some of the effects. The red oval is circling what was the yellow oval against a black background in the painted sample:
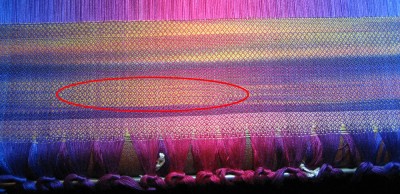
Note how dramatically the oval is shortened and widened! I had predicted something of this effect based on the properties of the knitted blank, which is both narrower than each weft shot (1/4 the width) and about 2.5 times longer than it will be woven up. Thus, anything painted on the blank will show up four times wider and about 1/3 the length that it appears on the blank.
I was pleased at having predicted this correctly, but still somewhat visually astonished by the degree of change.
I rapidly discovered that I had the width wrong, so the colors weren’t lining up correctly. I messed around with the number of warp ends somewhat, which you can see in this selvage photo:
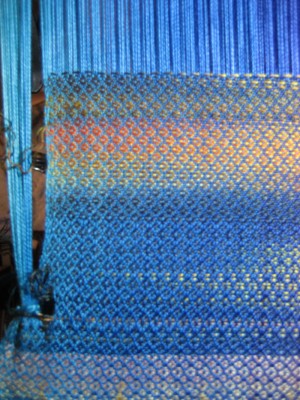
Finally, I didn’t like the pooling effects near the edges. As the weft shots got further and further misaligned, there were sections where things got pretty clearly muddled:
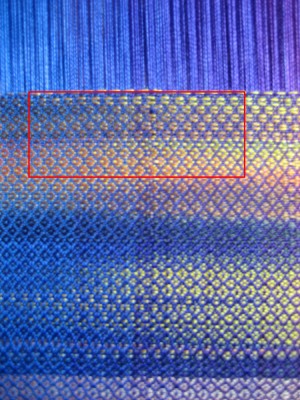
You can see where at the bottom of the rectangle, the threads are relatively well aligned. Towards the top, you get striping every other row where things got muddled. The effect was particularly pronounced near the edges.
My conclusion from all of this is that precision painted effects are going to be very difficult if not impossible, because it’s very hard to get the width precisely right. (My hat goes off to those mudmee weavers in Thailand who can do weft ikat. Dang, they must be good!) Even if it were possible, the drastic change in aspect ratio between the blank and the painted piece would make getting a real “image” difficult. So the original idea won’t work.
However, that does not mean that interesting effects are not possible! I am thinking that for this next shawl, I will dye the blank with two vertical stripes, one red-orange, one gold. This should (in theory) result in three distinct areas:
- places where the red-orange pools, making it mostly orange
- places where the gold pools
- places where the red-orange and the gold alternate.
I’m betting that the end result will be drifts and diagonal stripes of color, which will produce nice color effects. Because the colors are so closely related, they should blend gracefully, producing a nice mixed effect with not too much muddying. (The black and the orange in the sample, on the other hand, are clearly muddying each other.) Because the stripes are so large, there should be considerable sections of both red and gold – it won’t diffuse into mud.
That’s the idea, anyway. Tomorrow I will try dyeing another small sample.
I will also replace the simple rosepath design with a somewhat more complex design, not as complex as the ones I was using before, but with an undulating line. Might be too complicated but I really won’t know until I weave it.
This is really really cool! I can hardly wait to play with it more tomorrow.

Hmm, a whole new way to look at Nancy’s blanks. I really like the look, not expected.
What a great combination of knitting and weaving 🙂 I wonder what I could do with my knitted/dyed sock machine tubes. Can’t wait to see how the twill experiment turns out!