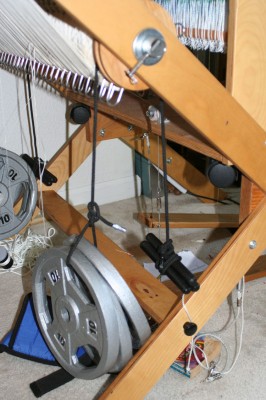
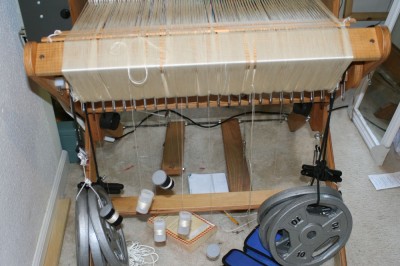
Sandra asked for photos of my setup, so here they are:

This photo shows the weight (30 lbs of iron plates) and the counterweight (3 lbs of iron bars). The cord connecting them, which you can’t see, makes one full loop around the warp beam. Two loops are what Kati Reeder Meek recommends in her book, but I couldn’t fit two full loops in the space I had, with the rope I was using, so I used one. It’s pretty rough rope so it seemed to work quite well.
(30 pounds times two weights = 60 pounds turns out to be WAY too much weight, by the way – I now use only 10 lbs for a 24″ warp, with a 1 lb counterweight, and it works just fine.)
How this works:
- The rope double-wrapped around the beam produces a lot of friction. It doesn’t slip easily.
- Therefore, as long as you keep the rope taut, even a small counterweight can keep the rope from sliding around the beam. This is why the big weight doesn’t fall down.
- The big weight, via the rope, pulls down on the warp beam and makes it rotate. The rotation, if you have set things up correctly, pulls the warp back towards the back beam. This puts tension on the warp.
- Advancing the warp pulls the big weight up, and brings the little weight down.
- The aha! moment: when the little weight reaches the floor, it sits on the floor and the tension on the rope is released.
- Since the tension is released, the friction of the rope around the warp beam drops, allowing the big weight to slide down.
- As the big weight descends, the little weight ascends, until it starts to put tension on the rope again.
- The rope becomes taut, friction increases, and the big weight stops descending.
- Voila!
There are a couple advantages to the live-weight system, so far as I know:
- Even tension. Always the same amount of weight pulling back on the warp. With most brake/ratchet systems, there’s always some unevenness as you advance the warp.
- Less stress on the warp threads (at least with a jack loom). The warp threads are no longer attached to immovable objects at both ends, so they don’t have to stretch as you raise the warp. Instead, as you raise the warp, the warp beam rolls slightly forward to accommodate, reducing the stress on the warp threads.
- Automatic tensioning. The thing self-adjusts as you weave (see steps 5-8), meaning you never have to touch it the entire time you’re weaving. In theory at least, It Just Works. No fiddling with a brake release. You just advance the warp. That’s all.
Here’s a second photo showing the weights on both sides. Kati, in her book, uses a barbell, but since the average barbell is 5 feet long (7 for Olympic weights) and I don’t have that much space, I simply hung one set of weights on either end of the warp beam.
The film canisters and broken threads are, um, there purely for decorative purposes. Decorative. Yeah, that’s the ticket. 🙂


Great! Thanks. I’m thinking of converting my 8-shaft Glimakra to a setup like this instead of the ratchet-and-pawl system it has now.
BTW, I use film canisters for the same purpose – purely artistic and nonfunctional. Yeah, right.
I have Meek’s book but appreciate your pictures and comments. My loom has 3 separate pawls for the ratchet (is that the right terminology, or is it the reverse?) which makes for greater refinement in getting the warp tension just right and also makes it easier to duplicate the tension when moving the warp forward. Still, I am intrigued by this.
Thanks so much for posting this with pictures! I was trying to imagine how this system might work on a loom I am thinking of buying that does not have a friction brake. This was very helpful!
Hi Tien …
Just to clarify: when you say you have 30 lbs of weight and 3 lbs of counter weight, is that 30 lbs and 3 lbs on each side, for a total of 60lbs of weight and 6 lbs of counterweight?
Also — I’m wondering if you could use 1″ iron pipe, like from a plumbing supply? I’m thinking that they might even sell it by the foot, and could give you a piece that’s the correct width …
— Constance
Hi Constance,
I had a total of 60 lbs on in that photo (30 lbs + 3 lbs counterweight on either side), but that was WAAAY too much…I later backed it down to 30 lbs (placed on one side only) and that seemed to work pretty well. I’d go with a barbell (if you have space for one) over iron pipe…the advantage to the barbell is that it’s meant to hold the plates in proper position. On iron pipe I’d worry about the weights sliding.
[WORDPRESS HASHCASH] The poster sent us ‘0 which is not a hashcash value.
Hi Tien …
Thanks for the info about the weight. I remembered reading recently that Kati Meek was weaving a tartan where she needed 60lbs to get the ppi she wanted, and it was the most she’d ever used. When I saw your setup, I wondered if she’d meant 60 lbs on each side, for a total of 120lbs. Good to know it probably wasn’t!
Today I’m trying to get the live-weight tensioning working for the first time, on my Glimakra Standard. I have 30 lbs on it right now (weaving towels in 16/2 and 8/2 cotton) but I think I’d like just a bit more tension — the 16/2 seems to want it, actually.
To keep the weights from sliding you can use weight collars. For example
A standard “spring collar”:
http://www.amazon.com/Valeo-SC1-Standard-Spring-Collars/dp/B000BKTBRC
A clamp-style collar:
http://www.fitnessgiant.com/loonere1copa.html
The kind made for “standard” weight plates (as opposed to olympic plates) could be used on 1″ iron pipe, because standard bars are 1″ in diameter. Olympic bars are 2″ in diameter. BTW — are your plates olympic or standard? If you’ve got olympic plates, you’d need 2″ pipe …
— Constance
I’ve got standard plates, but I don’t bother with the barbell/pipe; I just hang the plates from rope. Simpler, especially for someone (like me) with very limited space and a narrow loom. I have the weights attached to the rope using a piece of velcro strapping, so it’s very easy to add/remove weights as needed.
[WORDPRESS HASHCASH] The poster sent us ‘0 which is not a hashcash value.
What an honor to help Tien make her incredible cloth! To anyone contemplating the use of live weight tension for weaving, do not discard the cogs and pawls! Those are needed when first setting up the loom. The tie-on needs “fixed” resistance. I also still use the fixed tension for rug-weaving. Then the live-weight set-up serves to control the warp when the rock-hard tension is released for advancing the warp, saves warp-spill. Treadle with Joy, Kati
I just reread Kati’s note. I discovered a few months ago that a standard brake is wholly unnecessary, even when tying on. Instead, I set things up for tying on by wrapping the rope and the counterweight as if I were setting it up for live-weight tension, then carefully slipping the rope (without turning the warp beam) to lower the big plates until they are lying on the ground. That way they are not pulling back on the warp, but I can pull against the weight of the plates for “fixed” resistance while tying on.
I have not hooked up my “conventional” brake system once since discovering this trick!
Since discovering this about a month ago (a fellow weaver told me about it), I completely removed my loom’s brake system. This makes it obsolete! I can’t say enough about this technique. Everyone should try it, at least once. I use plastic milk jugs that have handles filled with water. Water weighs 8 lbs per gallon so you can figure how much you need. I use 1 gallon and then a 1/2 gallon. My loom is only 30″ wide and if I need more weight, I add another set of jugs to the other side of the beam but mostly I just use the 1 and the 1/2 gallon jugs for just about everything.
Initially, I didn’t have any chord but I did have some telephone wire (the round kind) that I cut up and used. Then I found some decorative drapery type chord that was slick and this works out the best…the big weight is always on the floor. It just works. The beam will roll when I advance and the weights never move (the bigger weight is always on the floor) yet the beam doesn’t back roll on me in the other direction. With the slicker chord you think it would, but it doesn’t.
Like you, I also discovered that by keeping the bigger weight on the floor, that this is the key to warping and then also setting the tension. I do this by pulling up on the end of the chord holding the lighter weight while beaming. Once I let go, the tension is set and the beam won’t back roll.
Wow – this is really amazing! thank you for sharing this excellent description with photos. I love the concept and plan try this!
So glad I found this blog, I have a second hand homemade loom ( 4 shafts , 6 treadles and jacks with only one set of lamms) but no braking system, just one ratchet and cog wheel on the front beam , so was wondering how to acheive a tensioned warp……….now I know,…. this is great………thankyou………..all I need to do now is find the space to put it all together…….and work out how to ‘string’ it (no connecting ropes/strings…….)