Tien Chiu

  • Home
  • About Tien
    • Honors, Awards, and Publications
  • Online Teaching
  • Gallery
  • Essays
  • Book
  • Blog
  • Dye samples
You are here: Home / All blog posts / Photoshopping pearls
Previous post: Trim on the ribbon
Next post: Fixing the dings

February 11, 2010 by Tien Chiu

Photoshopping pearls

You may recall that I was having trouble arriving at a pearl placement that made me happy.  So I took a couple photos into work and asked one of our graphic designers for advice.  He suggested something brilliant: take the photo into Photoshop, and cut, paste, and rearrange pearls electronically rather than laboriously pinning pearls onto fabric.

So I did:
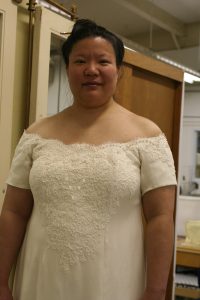
Photoshopped simulation of pearls on handwoven wedding dress
Photoshopped simulation of pearls on dress

Then, once I arrived at an arrangement I liked, I tried it out on fabric:
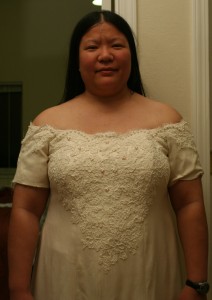
pearls basted onto handwoven wedding dress
real pearls, basted on
pearls basted onto handwoven wedding dress
pearls basted on, three-quarter view

I like this!  I may adjust the far right and far left clumps of pearls a little bit, to make it look as if the scallops are descending in a continuous “V” (there’s a bit of a break at the top), but this is what I will sew down today.

I “finished” the coat last night (for the purposes of the photo shoot anyway), so now I just have to work on the dress.  Still left to do: sew on the pearls, baste up the hem, hem the sleeves, and (if time) sew on the back lace.  The back will not actually be completed because I am short on pearls (I tried ordering more but it’s Chinese New Year and pretty much all of China is shut down for the holiday), but I’d like to get decent photos of it anyway, to send to various people and to post here.  This is my only chance with a professional photographer and a hair/makeup person, might as well make the most of it!

Off to sew down those pearls!

Share this post!

  • Tweet
  • More
  • Email
  • Share on Tumblr
  • Print

Filed Under: All blog posts, sewing, textiles Tagged With: wedding dress

Previous post: Trim on the ribbon
Next post: Fixing the dings

Comments

  1. Nancy Lea says

    February 11, 2010 at 8:31 am

    what would we do without photoshop! I passed this on at a workshop a few years back and noticed that it has caught on: when I was learning taquete, and not wanting to pull apart any of Lillian Whipple’s wonderful little card pictures, I happened on the idea of scanning them, back and front, at the highest resolution I could get and then blowing up details even more on the computer. Works like a charm! You can analyze most fabrics without having to damage them!

Subscribe to Blog via Email

Information resources

  • Dye samples
    • Procion MX fiber-reactive dye samples on cotton
    • How to "read" the dye sample sets
    • Dye sample strategy - the "Cube" method
  • How-Tos
    • Dyeing and surface design
    • Weaving
    • Designing handwoven cloth
    • Sewing

Blog posts

  • All blog posts
    • food
      • chocolate
    • musings
    • textiles
      • dyeing
      • knitting
      • sewing
      • surface design
      • weaving
    • writing

Archives

Photos from my travels

  • Dye samples
    • Procion MX fiber-reactive dye samples on cotton
    • How to "read" the dye sample sets
    • Dye sample strategy - the "Cube" method
  • Travels
    • Thailand
    • Cambodia
    • Vietnam
    • Laos
    • India
    • Ghana
    • China

Travel Blog

Entertaining miscellanies

© Copyright 2016 Tien Chiu · All Rights Reserved ·


Loading Comments...