The leaf dilemma is on hold until this weekend, when I’ll have time to play with surface design (painting, dyeing, etc. is messy, so best done outdoors on the weekend). Tentatively, I’m thinking I will add one very small drifting leaf so the two drifting leaves bracket the center rather than having a single central leaf.
I thought I’d share with you what I’m currently doing, which is binding the raw edge of the jacket hem. This is the same approach I took with the wedding-coat – it produces a nice neat edge, although a time-consuming one. (The fabric is thick enough that I won’t simply double over the hem and stitch; it would leave a bulky line that would show after pressing.)
Step 1: cut strips of your edge-binding fabric on the bias. I used a lightweight china silk and cut the strips 2″ wide, which was way overkill: 1″ would have done just as nicely. Join the strips into a single long strip, longer than the hem of your garment.
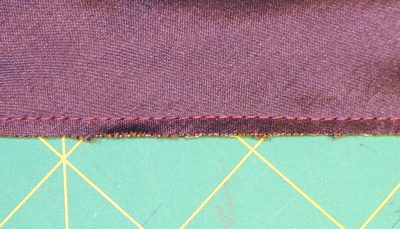
Step 2: sew your edge-binding fabric to the jacket, right sides together, with a 1/4″ seam allowance. Trim the seam allowance after sewing to 1/8″, or the minimum possible to avoid raveling (on thicker, coarser fabrics it will probably be more than 1/8″). The width of the seam allowance will be the width of your bound edge.
The fabric should now look like this:

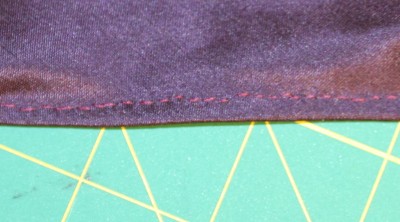
Step 3: flip the china silk to the wrong side, and prick stitch the china silk down. The prick stitch is essentially a backstitch that is only 1 thread wide on the “right” side of the fabric. So it is invisible from the front.
Here’s a pic of the back side of the prick-stitched china silk:

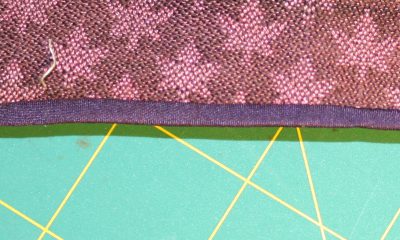
And here is what it looks like on the “right” side: a nice neat bound edge. Notice you don’t see any stitches, even though the thread doesn’ t quite match! That’s because on the top side, only one thread gets caught.

In this case the bound edge is 1/8″ wide, the width to which I trimmed my seam allowances. I love this edge because it looks so neat and perfect. It is time consuming, though, since you have to hand-stitch with tiny backstitches all along the edge. But, for a couture garment, who cares about time?
The next step, after I finish binding the edge, is to put a bias-cut piece of china silk into the hem and catchstitch it down three times: once above the hem, to attach the silk to the body of the cloth, once at the top of the hem, to attach the silk to the hem, and once at the midpoint of the hem, to strengthen the attachment to the hem and keep it flat. This will also be time-consuming, but will result in a perfect hem with no visible marks. If I attached the hem allowance to the body of the garment, it would pull at the body, making the hem more visible, especially in such a lightweight fabric. (In a heavier fabric, like what I used for Kodachrome, you could probably get away with it.) Adding the catchstitched silk gives it a bit more flexibility and give, making the hem less visible.
I expect the hems to take most of the rest of the week – after I finish the binding and catchstitching, I will need to do the lining hem. This one will be simpler, probably just double-folding the charmeuse and pressing. It’s a lighter-weight fabric, so that should be fine.
My goal is to get the hems done this week, the leaves done over the weekend, and the sleeve linings set in next week. That will finish off Autumn Splendor nicely before the photo shoot on Sunday the 12th – and if it isn’t quite done, that’s OK so long as all the visible sections are complete! I will be having hair and makeup done for the shoot as well – a nice little treat with which to celebrate the finish.
Sue asked for my marmalade recipe. It’s nothing special, an adaptation of the marmalade recipe on the back of the box of pectin. I scrubbed the lemons, then quartered them and chopped them into small slices. I packed the bits into a glass measuring cup, and when I had about 5.5 cups of chopped lemon (the amount specified on the box), I added just enough water to cover, and dumped it into the pan. Then I added 4 cups of sugar, as specified in the recipe, and a little more water and more sugar to taste. (The flavor will be quite bitter before adding sugar, but will become palatable as you add more sugar.) Simmered for about 10 minutes, then mixed the pectin with some sugar to prevent lumping, and dumped it in, stirring quickly. Then I put it into hot, sterile (=boiled in water) canning jars and sealed with a boiling-water bath for 10 minutes. Ta-daa!

I wonder… would any of the original devore samples be useful in this context? An entire long devore scarf would obscure the curved line of the front, but maybe there’s some way to attach a scarf-like flutter accent near the neck/shoulder for the kinetic element?