So much has gotten done in the last two days that I’m feeling quite bewildered at the prospect of telling you about it all. I finished threading, sleying, and tying on the loom yesterday and today. And then a miracle occurred…I made NO mistakes in threading or sleying! 960 threads and not a single one out of order. And perfect tension. I owe a fistful of incense to the weaving gods! I’m quite confident that someone was watching over me, as that’s the first time I’ve ever put on a warp and just been able to start weaving. (Whoever you are, please keep on doing it!)
Anyway, one of the things I considered as I started threading was motif size. I had planned to thread a double two-tie point threading, which would have made each repeat 84 threads – a bit over two inches wide. But did I want to keep the motif size the same? Threading for summer and winter would have doubled the size of the motif. So I printed out a few motifs and hung them on the dress form, like this:
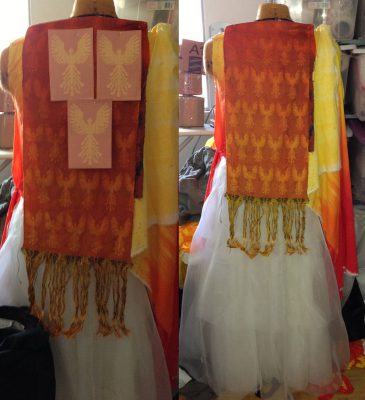
After thinking it over, and discussing with my critique partner, I decided that the smaller motif was better-sized for the garment. As my critique partner pointed out, the larger motifs had the feel of an emblem or logo, which is definitely not the effect I wanted. They were also overwhelmingly large for the garment, I felt.
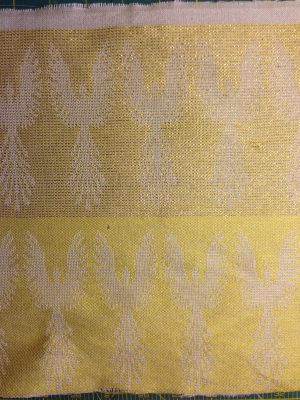
So I threaded up a double two-tie rather than a summer and winter threading, and upon discovering (thank you weaving gods!) that the warp was perfect and no corrections were necessary, I dove into weaving. I wove four samples, with the following weft combinations:
- yellow 10/2 cotton pattern weft
- yellow 10/2 cotton pattern weft alternating with a heavy-ish metallic gold pattern weft
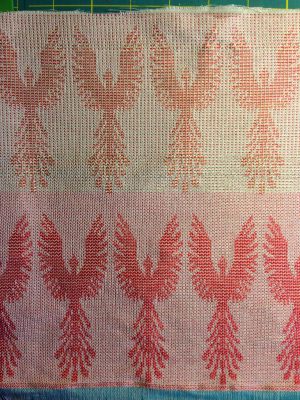
- scarlet 10/2 cotton pattern weft
- scarlet 10/2 cotton pattern weft alternating with a very thin metallic gold pattern weft
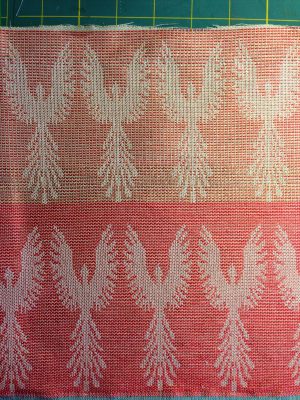
And those four samples looked like this (front and back):
Then I tried dyeing them. I started by trying to scrunch-dye the yellow-weft sample in shades of orange and red, using Lanaset Mustard and Polar Red, both of which were removable from cotton yarn during my experiments.
Unfortunately, I botched the dyeing and the result came out way too even, an ok but not impressive tomato red. Then I tried to remove the dyes from the yellow cotton, but unfortunately, when I simmered it in soapy water, the dyes mostly came out of the silk as well as the cotton, leaving this unfortunate result:
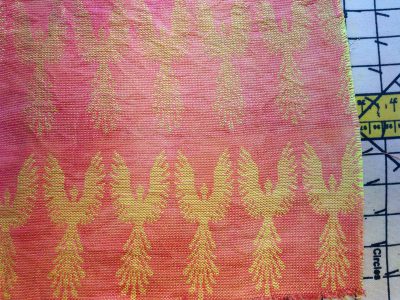
It’s not as pretty as it is in the photo – the colors look faded and tired. Definitely not what I wanted!
So next I dyed the scarlet sample. Because yellow and orange won’t change the color of a scarlet yarn much, I could simply overdye the entire piece. So I did, scrunch-dyeing it in yellows and oranges. The result? Stunning!
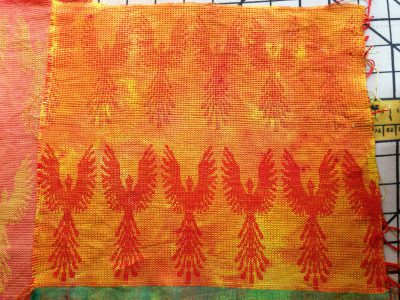
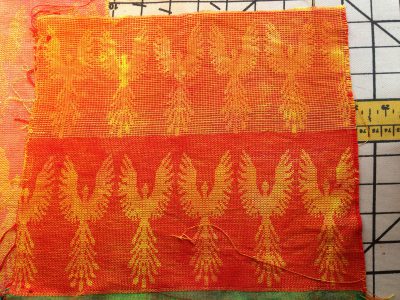
The top phoenix is woven with the scarlet 10/2 cotton pattern weft alternating with a metallic gold pattern weft. This diluted the color. The bottom phoenix was woven with just the scarlet pattern weft, and has much stronger color and contrast. I like the bottom one a lot better.
I am very pleased with the results from the scarlet sample. So pleased, in fact, that I wove up another twenty-two inches of fabric with a scarlet pattern weft. Then I ran out of pattern weft and had to stop, but I had enough to drape over the dress form:
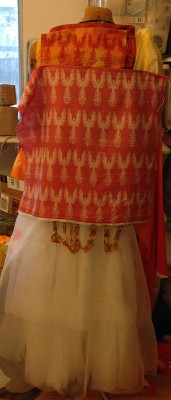
I think the aspect ratio is a little off (I would like to make the phoenixes about 10-15% shorter), but that is easy to adjust. Other than that I think the phoenixes are the right size.
Next steps? I need to figure out how to dye the sample. I think I will scrunch-dye this one with orange and yellow as well, but after that I may experiment with overdyeing certain portions black. It would be interesting to see if I could get dark red phoenixes on black in part of the fabric while keeping the fiery colors in another part of the fabric. There are all sorts of interesting dye techniques I could use to get more pattern into the fabric – I am contemplating both shibori and katazome as possibilities. I am guessing that most of these techniques will not work, design-wise. But I don’t plan to let that stop me; even if the end result doesn’t work, I will learn a lot from doing the experiment.
The catch, of course, is that I’m out of weft yarn, so this sample is all I have until my order arrives late next week. (It’s 10/2 cotton, “10 Red”, from Lunatic Fringe Yarns. Yes, occasionally I get lazy and order pre-dyed yarn!) So I am not sure I want to get too experimental with this sample yet. I may be conservative and simply flame-dye it and leave it at that (for now). I am running up to see Sharon, my sewing mentor, tomorrow, and I’d like to show her a largish sample of the flame-dyed scarlet fabric, to get her thoughts on the design.
Plans for tomorrow: dye the 22-inch sample, finish and put away the candied sour cherries and candied bergamot peel, visit with Sharon, clean the patio, and finish the kimono muslin. Oh, and make tomato soup, do laundry, and the usual chores. If I have time, I’ll cook some pig’s tails: I bought six of them at the farmer’s market last week, out of curiosity, and have an excellent-sounding recipe from a book The Whole Beast: Nose to Tail Eating.
So much to play with, so little time…!

For the back of the kimono, have you considered putting them on a slight slant? The pictures you showed before were with the phoenixes at a 45 degree angle, but I was thinking of a 10 degree angle. Just enough to suggest movement, but not enough to draw the eye too far.
LOVE your work , always inventive
I am absolutely gobsmacked….this is STUNNING! I can’t imagine all that time to weave, then overdyeing…. I’d be terrified! Do post to the dyeing list your progress… just incredible!
Quite beautiful! Thanks for sharing!
Beautiful. I agree with your decisions about smaller size and which sample colors to use. The end result will be breathtaking!