It started innocently enough. I was registering for Complex Weavers Seminars 2016, and I saw two seminars by Wendy Landry, on velvet weaving. “Velvet,” I thought. “Huh. That sounds kinda interesting. Not really my thing, but there’s nothing else compelling in that slot, so why not?” I signed up.
Well, Wendy’s lecture and samples blew me away. I wanted to weave velvet. But velvet weaving requires specialized tools, which I didn’t have. Plus I had just gotten a shiny new TC-2 jacquard loom. Velvet went on the shelf for several years.
Then Convergence 2018 rolled around. Barbara Setsu Pickett was offering a class on weaving velvet. I leapt at the opportunity.
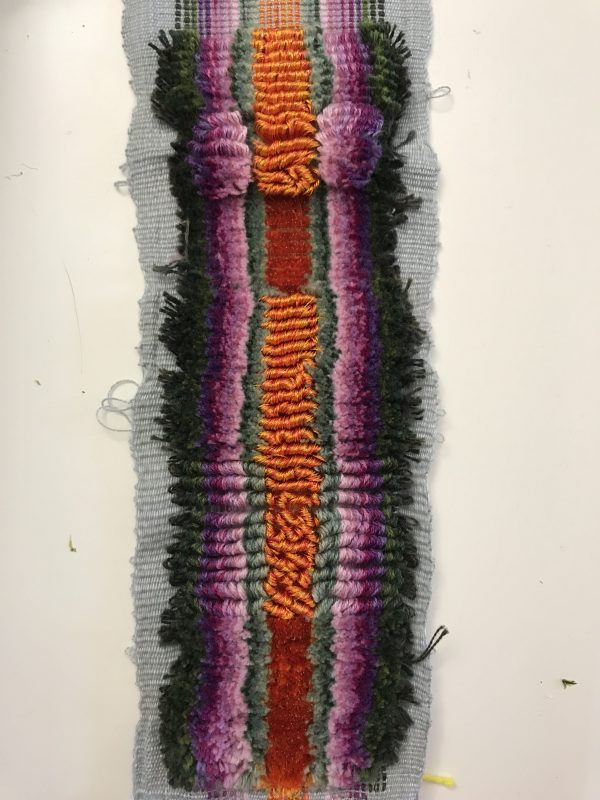
Here’s the velvet sampler I wove in class, which shows just a few of the possibilities:
A bit of explanation before I walk you through the sampler: Velvet is woven on two warps. One warp weaves the ground fabric, which holds everything together. (In this case, it’s the gray fabric visible on the edges.) The other warp is the pile warp, which produces the fluffy bits that stick up from the fabric. (In this case, the pile warp is all the colorful parts.)
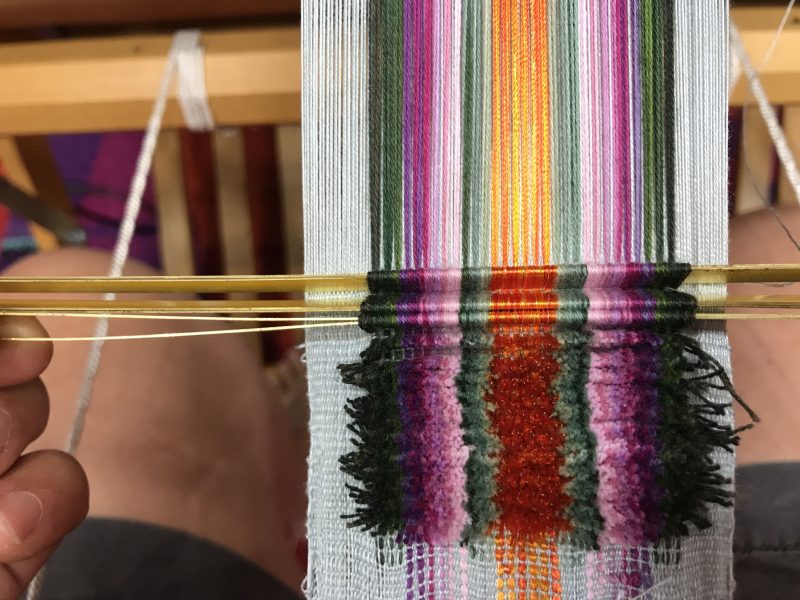
The fluffy bits are produced by lifting the pile warp and then inserting grooved rods under the pile warp to produce loops. Like this:

In this case the rods aren’t grooved. They’re a pair of brass strips that are inserted together.
You weave a few picks (threads) of ground cloth, then insert a rod, then weave a few more picks of ground cloth, then insert another rod. Repeat until you have three rods. Then you run a knife through the groove on the rod (or, in this case, between the brass strips) to cut the pile warp, releasing the rod and producing the fluffy cut-pile ends.
Alternately, you can simply remove the rods and leave the ends uncut, leaving loops, called uncut pile.
Now, let’s look at the sample again:
The pile is purple and green cotton, plus orange rayon machine embroidery thread, which is much glossier than the cotton. The bottom part is 100% cut-pile velvet, using the brass strips. The next section is uncut pile (loops). In the third section, I decided to accentuate the fiery sheen of the loops of orange machine embroidery thread by cutting the green and purple pile to deepen their colors, increasing the contrast with the uncut pile.
In the fourth section, Barbara offered to let me use her velvet rods, which produced much lower pile than the brass strips. In the fifth section, I tried making the orange and purple sections taller by using the brass strips in those sections and Barbara’s rods in the green sections, but didn’t like the effect. In the sixth section, I made the orange and green sections taller and the purple sections shorter, an effect I liked much better.
This is all structurally simple: the entire area is covered in velvet pile. All that’s changing is the height of the pile, and whether the loops are cut or left intact.
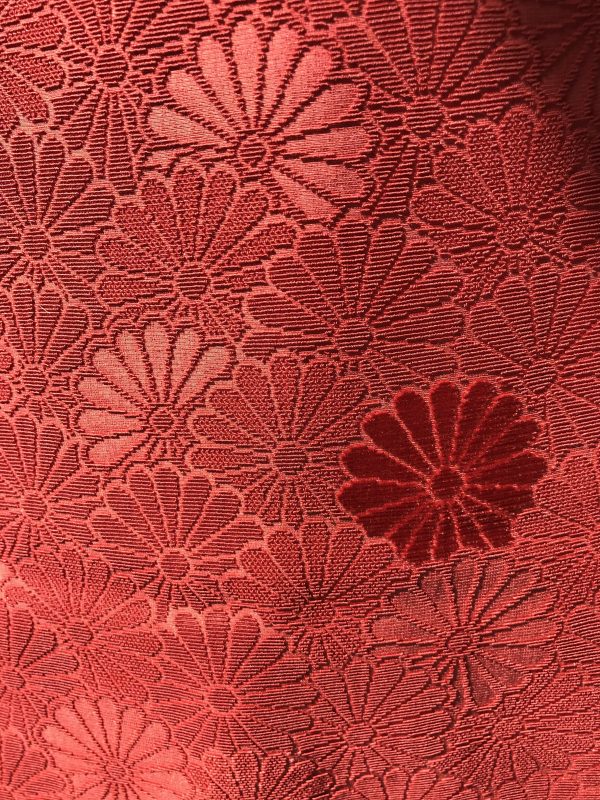
Here’s some much more complex work, done in monochrome by people who actually know what they’re doing. This is Japanese velvet, from John Marshall’s collection of amazing Japanese velvets. Bad photo, taken with iPhone. (Next blog post will have lots more photos of amazing velvets, taken by my friend Lieven, with much superior camera and much superior photographer.)

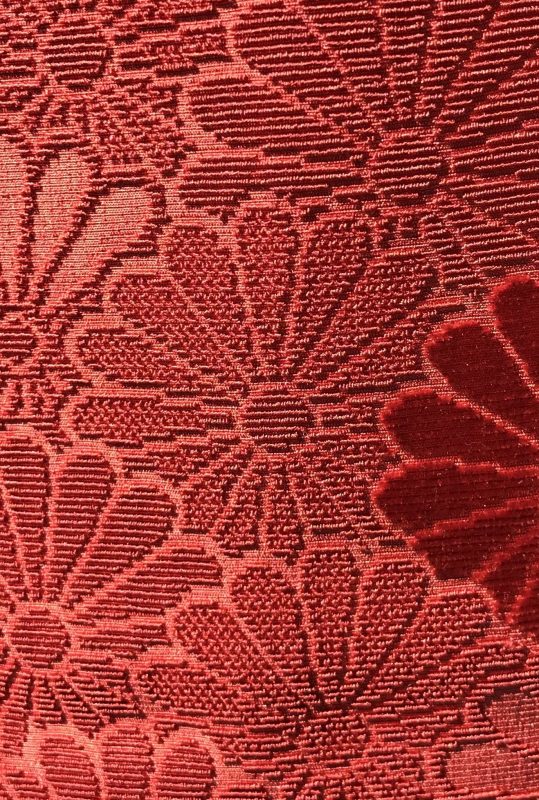
This piece is technically relatively simple – next blog post will have much more technically complex work. But it is one of my favorites, and unfortunately it’s not one of the ones I borrowed from John, so this is the only photo I have. Let’s look at it a bit closer up to see what’s going on.

You can see that there’s an intriguing mix of patterning here. The flowers are outlined by areas where there is no velvet pile whatsoever (voided velvet), except for one flower in the top left which is left “blank” and outlined in velvet loops!
You can also see that the flowers are not all the same. The flower in bottom left is made up of rows of pure pile loops, whereas the two flowers in the middle are made up of pile loops alternating with areas with no pile. And the flower in middle right is made of 100% cut-pile loops, giving it a deep, sumptuous red color that instantly catches the eye. Luxury.
The overall effect is a wide variety of textures and colors – all done with just one size of velvet loops! And the cloth is just beautiful, expertly composed.
I aspire to do work like this someday.
I love the sumptuousness of velvet, and I also love the incredible variety and complexity of what can be done with even “simple” velvet – monochrome, one height of pile, cut vs. uncut loops. Throw in all the other techniques and the possibilities become endless. I could explore this for the rest of my life. Perhaps I will.
More photos of the amazing possibilities in my next blog post…


Lovely, and a good explanation. Barbara is a wonderful teacher.
This is fascinating! I had no idea how it velvet handweaving was done. Thank you for sharing the technique and processes.