Tien Chiu

  • Home
  • About Tien
    • Honors, Awards, and Publications
  • Online Teaching
  • Gallery
  • Essays
  • Travels
  • Book
  • Blog
  • Dye samples
You are here: Home / Archives for All blog posts / food

November 17, 2018 by Tien Chiu 3 Comments

Presenting the 2018 fall collection

2018 chocolates
2018 chocolates

Alas, this is the last collection….the Chocolate Couture House of Tien has now officially closed. My friend Chris Cianci has inherited my equipment, however, and is gleefully planning to continue the tradition. In fact, he did much of the prep work this year, and since I threw out my lower back on the second day of Chocopalooza this year, he and the rest of my intrepid team of volunteers wound up doing most of the work, period. I cooked most of the centers (the flavor-critical parts); they did all the cutting and dipping. And they did a splendid job of it. I can retire from chocolatiering with a clear conscience, knowing the tradition is in good hands.

Here’s the Chocopalooza closing photo with me and Chris. I presented him with a heat-sensitive Star Wars mug when we were done, and poured a liberal dose of hot chocolate into it to make the light sabers come alive.

Use the Force well, young Jedi.
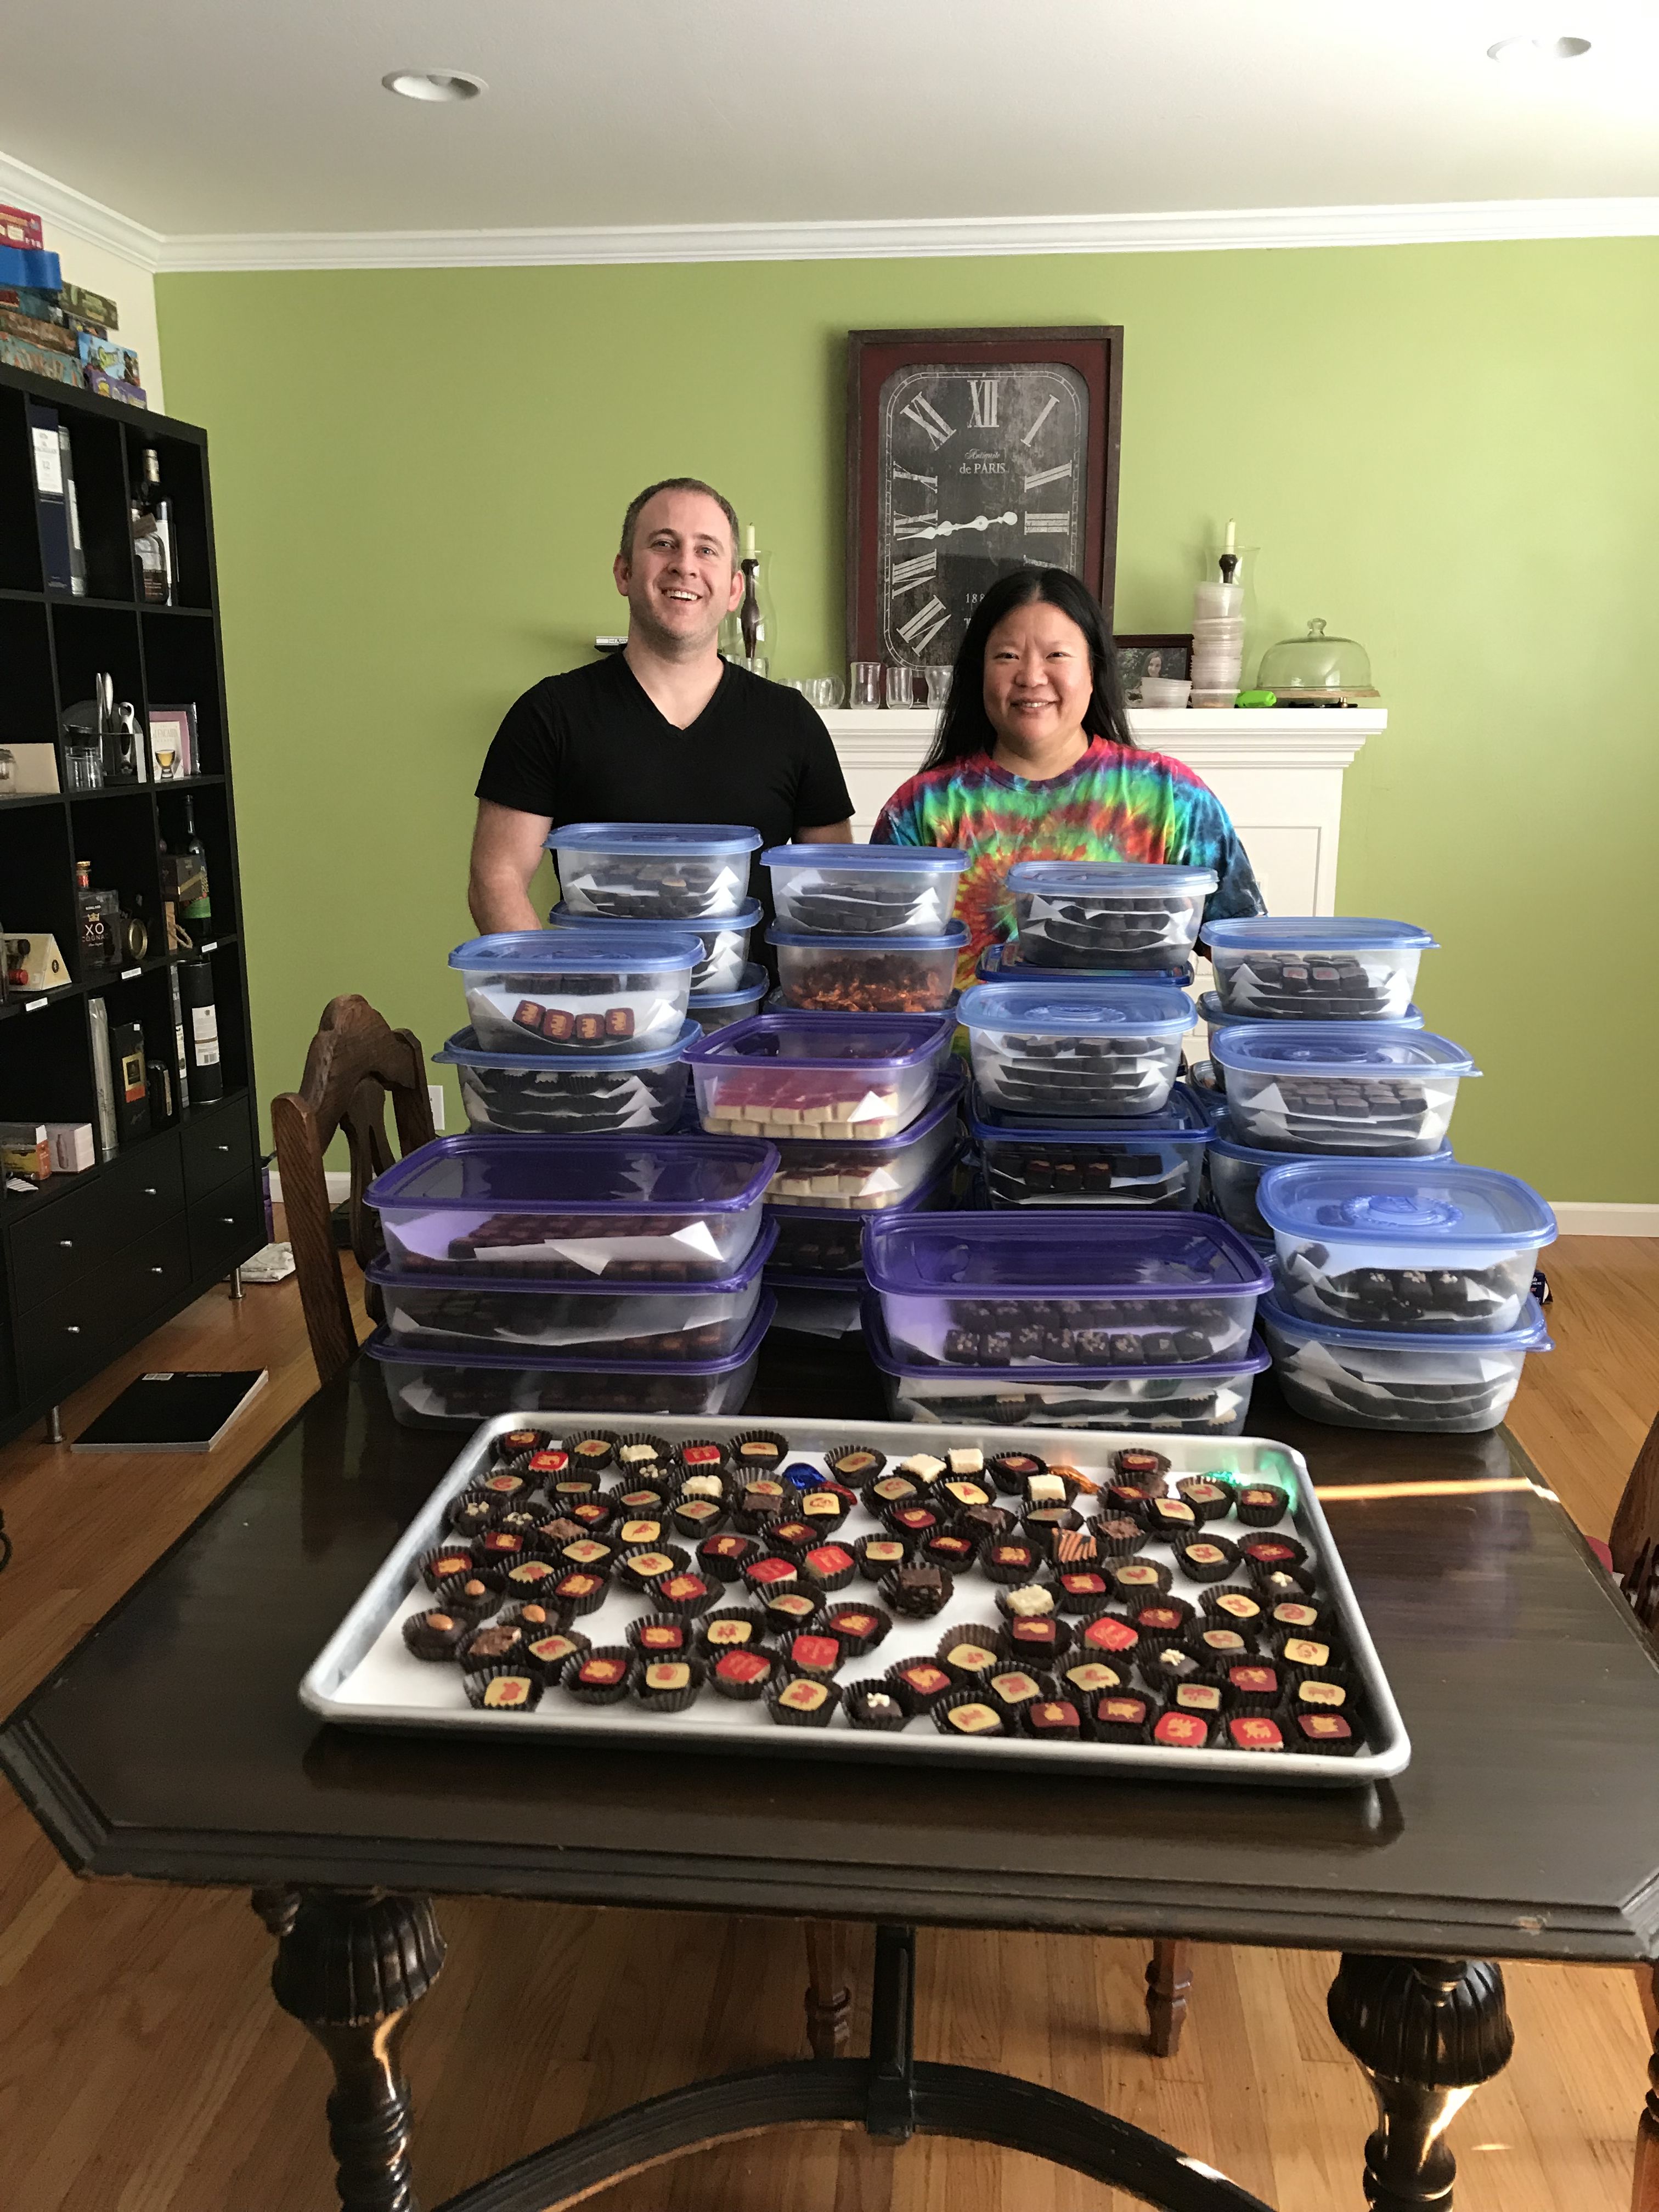
Tien and Chris
Tien and Chris

Filed Under: All blog posts, chocolate

October 13, 2018 by Tien Chiu 3 Comments

Chocolates for Charity is now closed

All 40 boxes of chocolates have been claimed! Thank you so much for your support over the years.

Filed Under: All blog posts, chocolate

October 12, 2018 by Tien Chiu 2 Comments

Chocolates for Charity 2018 – final bow!

All the boxes are now claimed! Chocolates for Charity is closed. Thanks for your support over the years.

box of chocolates

Yep, it’s that time of year again…with a twist!
 
The twist is that I’m getting ready to retire from chocolatiering. This year marks 30 years since I started cooking up chocolate bonbons in the kitchen of my college dorm. Since an Imperial ton is only 2,240 pounds (and a metric ton slightly less than that), I think I can safely say that I have made a ton of bonbons in the course of my gloriously excessive career as an amateur chocolatier. 
 
Chocolates for Charity, likewise, has been running since 2003. Your generous sweet teeth have raised over $50,000 over the last 15 years for the San Jose Museum of Quilts and Textiles, the American Textile History Museum, the Susan G Komen Foundation, and the San Francisco AIDS Foundation. Thank you.
 
This year, Chris (who’s been one of my chocolate helpers for some years now) and I are teaming up to do Chocolates for Charity. Chris is pretty expert by now, and is thinking about possibly-maybe-perhaps continuing the tradition next year, so he and I are working together and we’re going to do the chocolatiering at his place. We’re splitting the planning and the work 50-50, so he can get an idea of what’s involved, and then he’ll decide whether he wants to carry the tradition forward. (I hope he does! It’s a marvelous tradition and I would hate to see it die out.)
 
Anyway….this is a long way of saying “Get your chocolates while you can!”
 
This year’s beneficiary is, again, the San Jose Museum of Quilts and Textiles. Chocolates this year are $120/box, of which $90 will be tax-deductible. I have 30 boxes available.
 
(All the boxes have been claimed.)

A few other tidbits:

  • The chocolates are perishable, as good chocolates are wont to be. Eat them within a week or else put them in the fridge. If you put them in the fridge, my advice is to let the chocolates come to room temperature before eating them; you’ll get better flavor that way. (of course, I have never been disciplined enough to follow this advice, but maybe you have more willpower than I do!)
  • You can see the chocolates (and flavor lists) for the last few years here:
    • https://tienchiu.com/2016/11/presenting-the-2016-fall-collection/ 
    • https://tienchiu.com/2015/11/presenting-the-2015-fall-collection/
    • https://tienchiu.com/2014/11/presenting-the-2014-fall-collection/
    • https://tienchiu.com/2013/11/presenting-the-2013-fall-collection/
Tien's chocolates for 2016
Tien’s chocolates for 2016
 

A bit about my chocolatiering:

I’ve been chocolatiering for almost 30 years now, making about 90-120 pounds of bonbons every November for friends, family, and Chocolates for Charity donors. I spent one winter training with Richard Donnelly of Donnelly Chocolates (who frequently appears in Top 10 lists of American artisan chocolatiers – the most recent appearance was in National Geographic’s Top 10), so I’m pretty good at chocolatiering now. I’d put my work on par with some of the best artisan chocolatiers – though I don’t have the equipment to do some of the really fancy stuff, you won’t find better chocolates elsewhere. I also do a lot of exotic flavors that you won’t find elsewhere.

I have 30 boxes available this year. I’ll update this post when all the boxes are claimed. (Don’t wait – they’re usually gone within hours!)

Filed Under: All blog posts, chocolate, food

April 2, 2018 by Tien Chiu 7 Comments

Spring is here!!

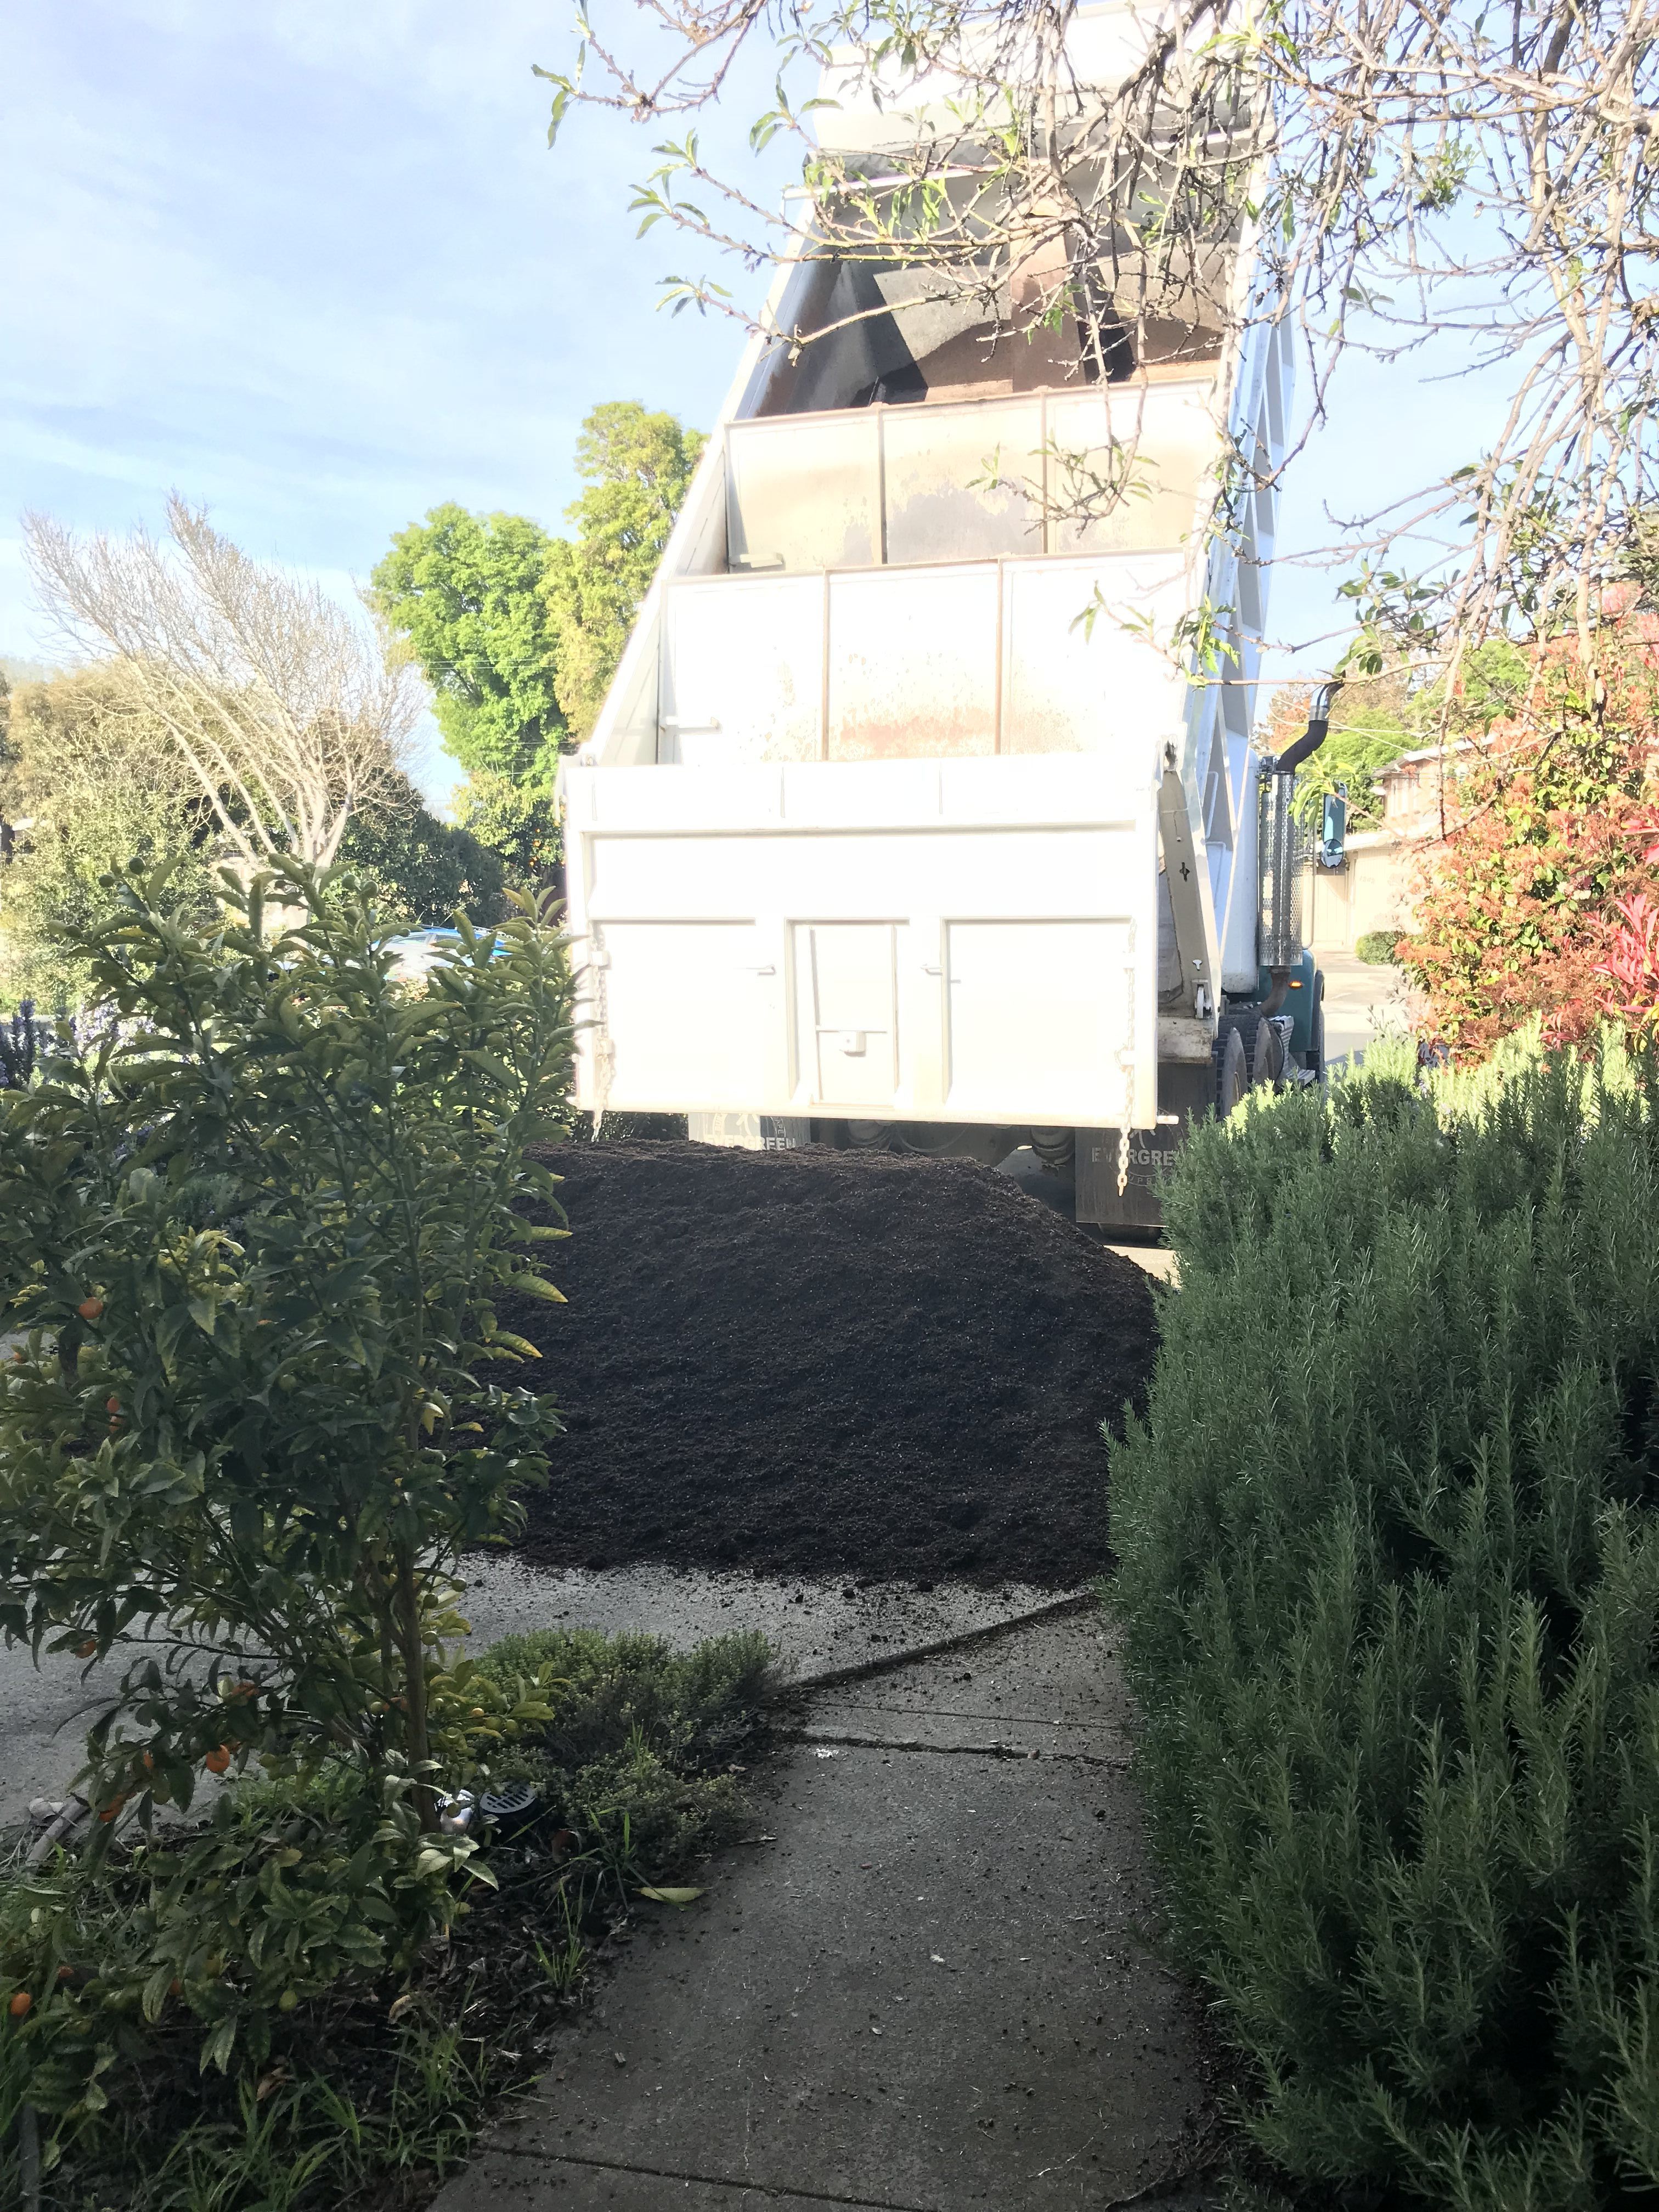
The air is warm, the flowers are blooming…but nothing really says “spring” like a dump truck full of potting soil!

A cute little dump truck!
First harbinger of spring! A cute little dump truck!

This was, by Tien standards, a very modest amount of soil – three cubic yards, delivered in a cute little dump truck. (The ten cubic yards of compost that I ordered the last time I had a tomato farm made a much bigger pile, and arrived in a big-daddy dump truck.)

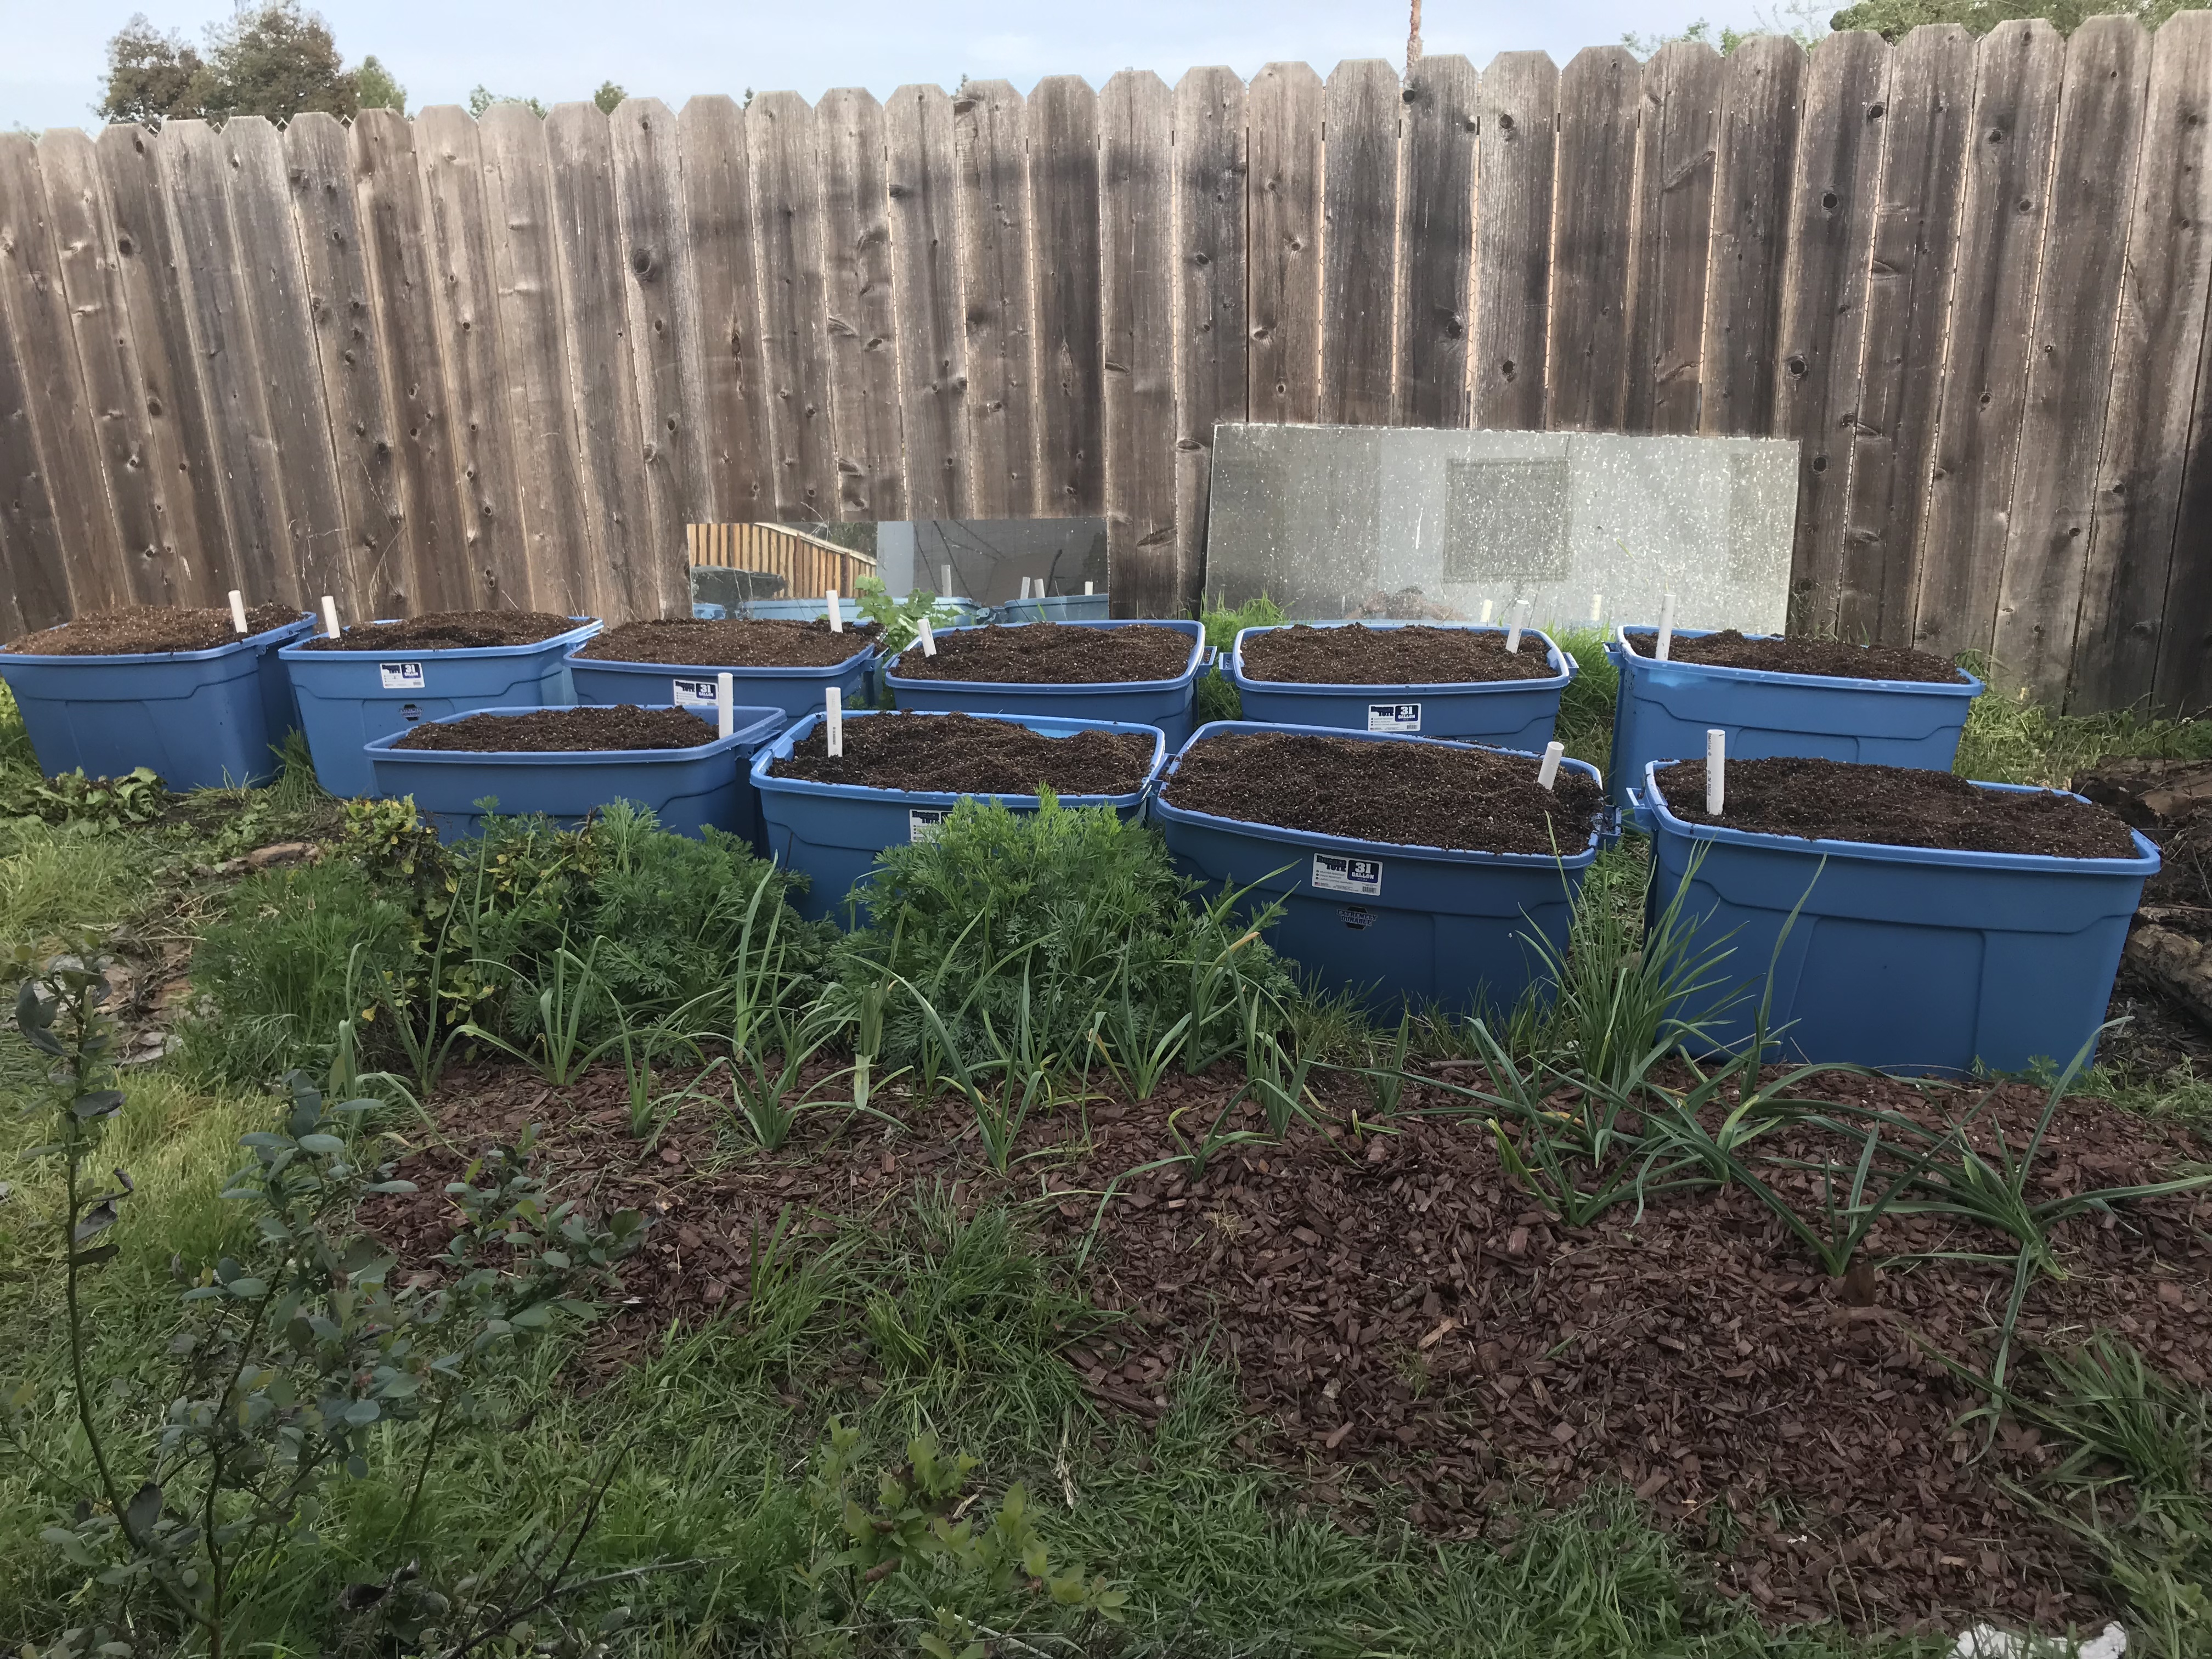
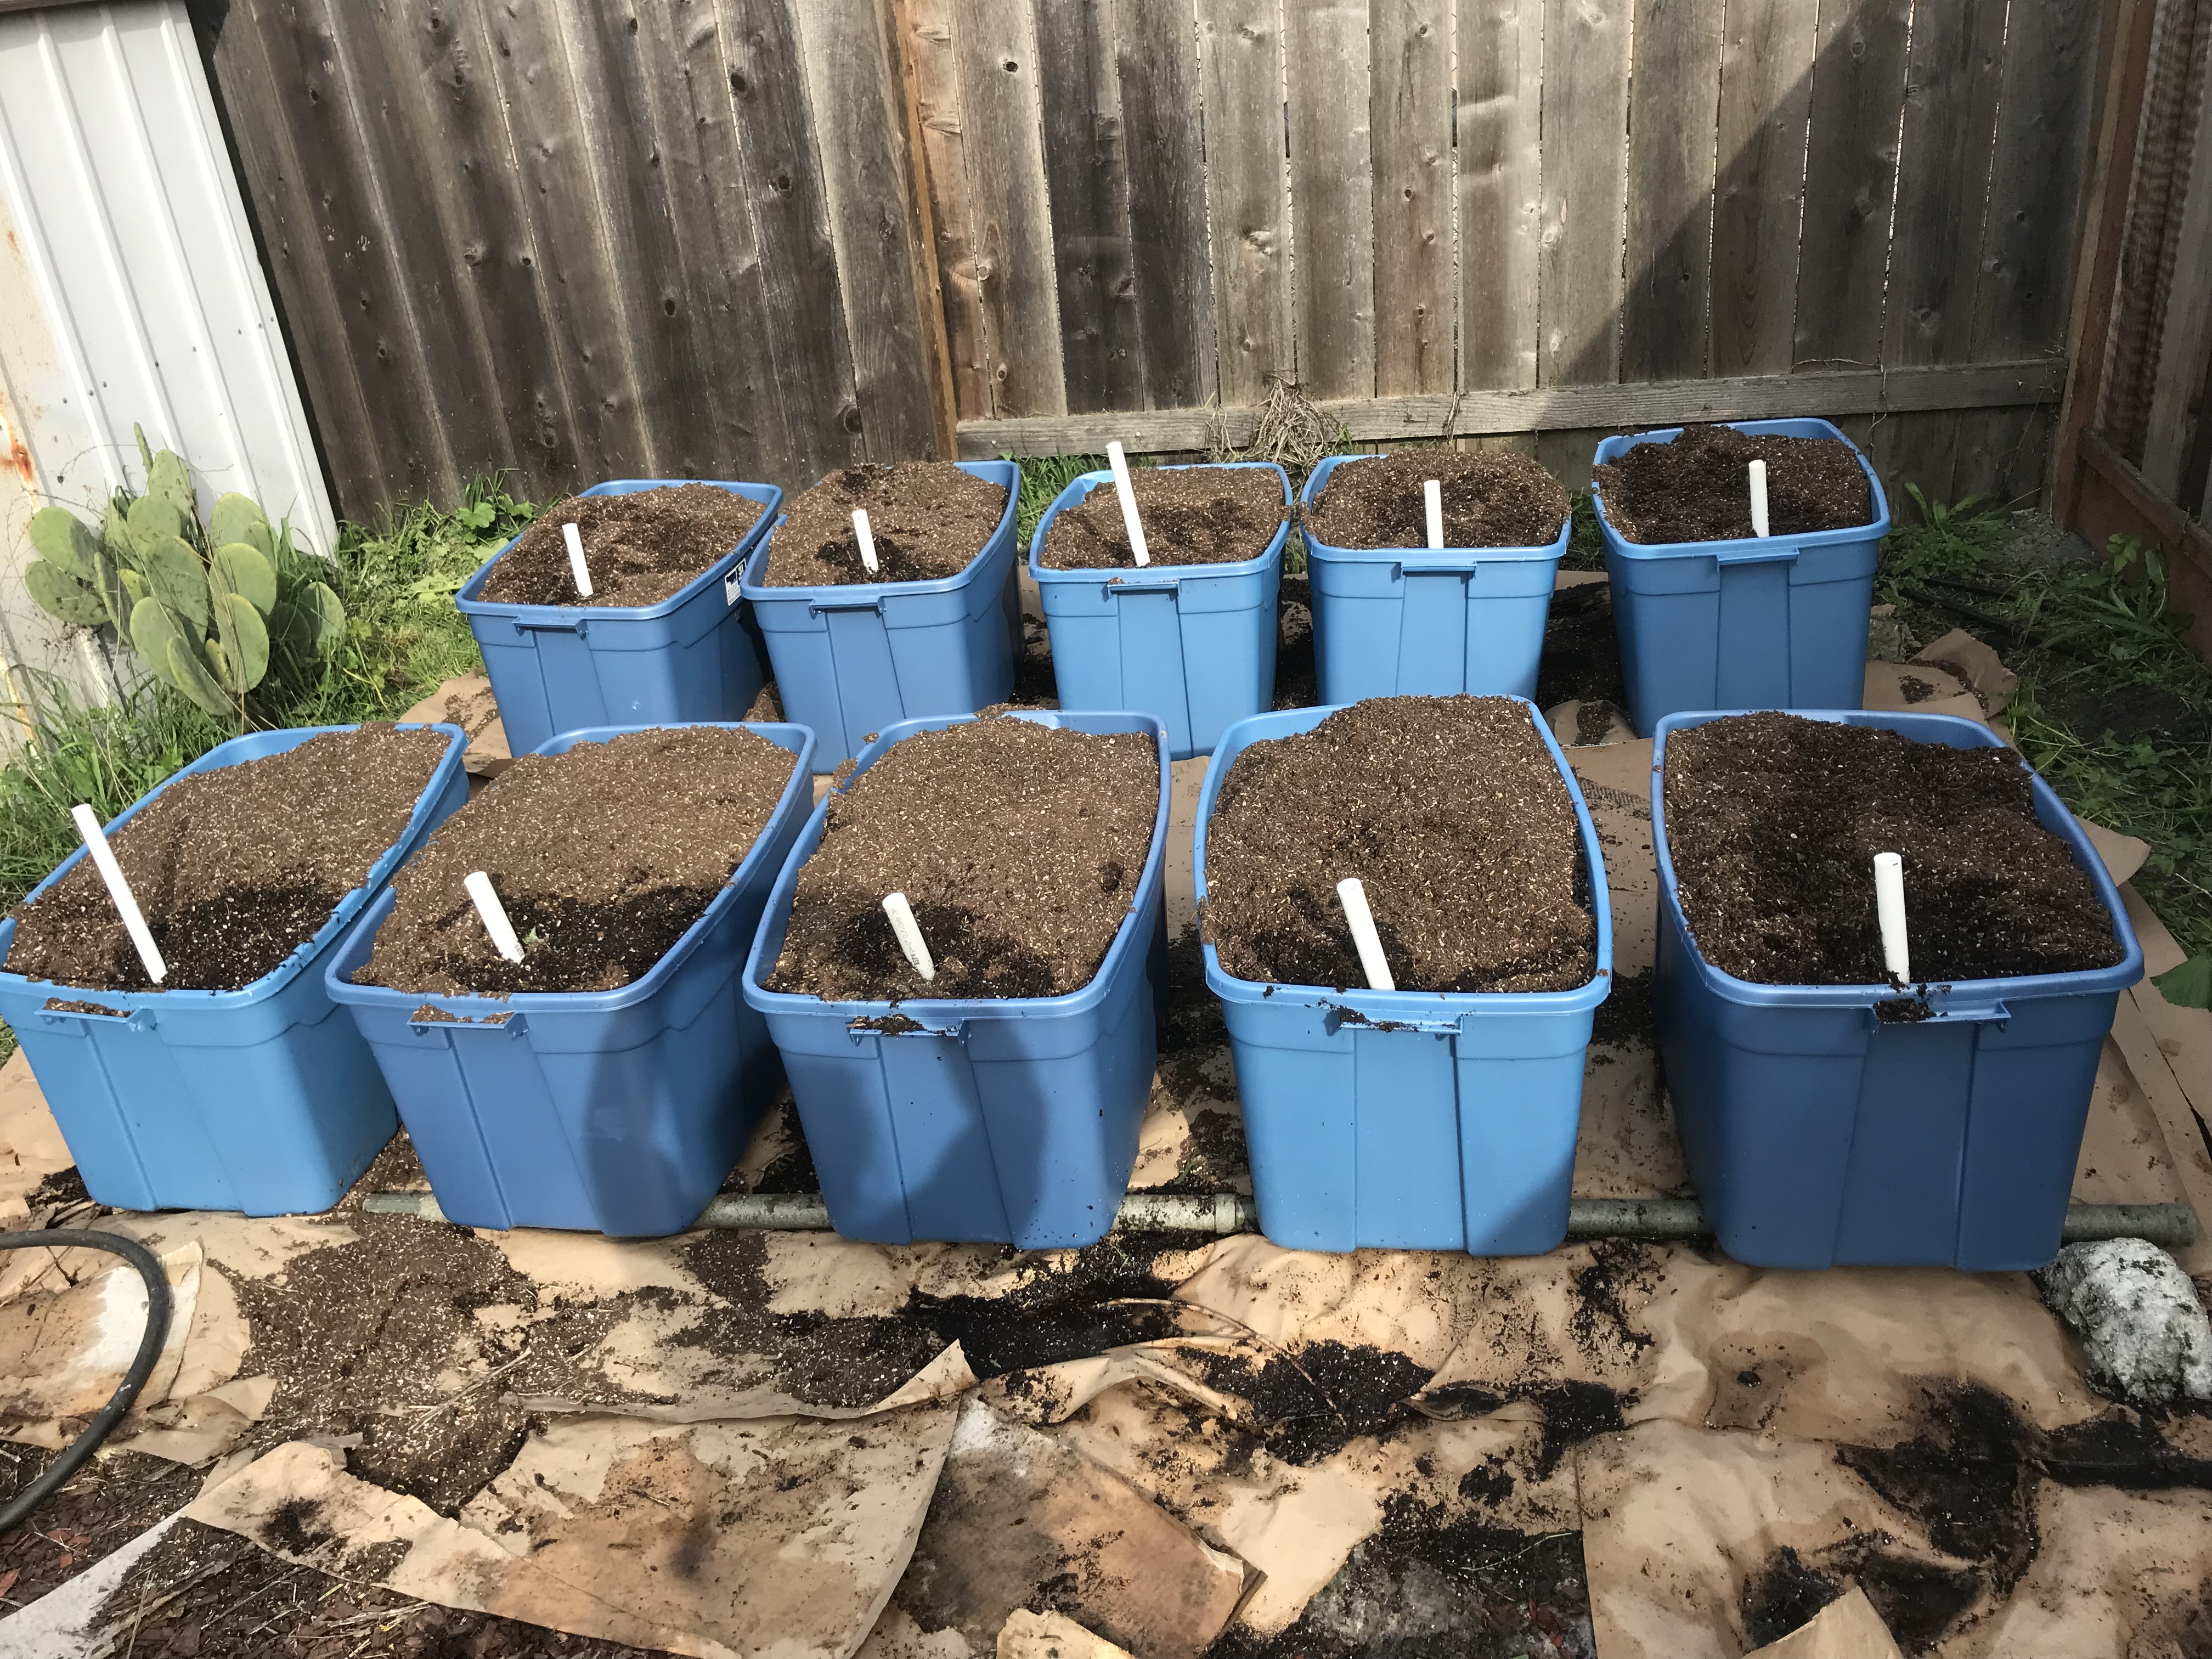
Nonetheless, this tiny pile of potting soil was still enough to fill twenty 31-gallon self-watering totes:

self-watering totes by the garlic
self-watering totes (with a bed of garlic in front)
self-watering totes by the shed

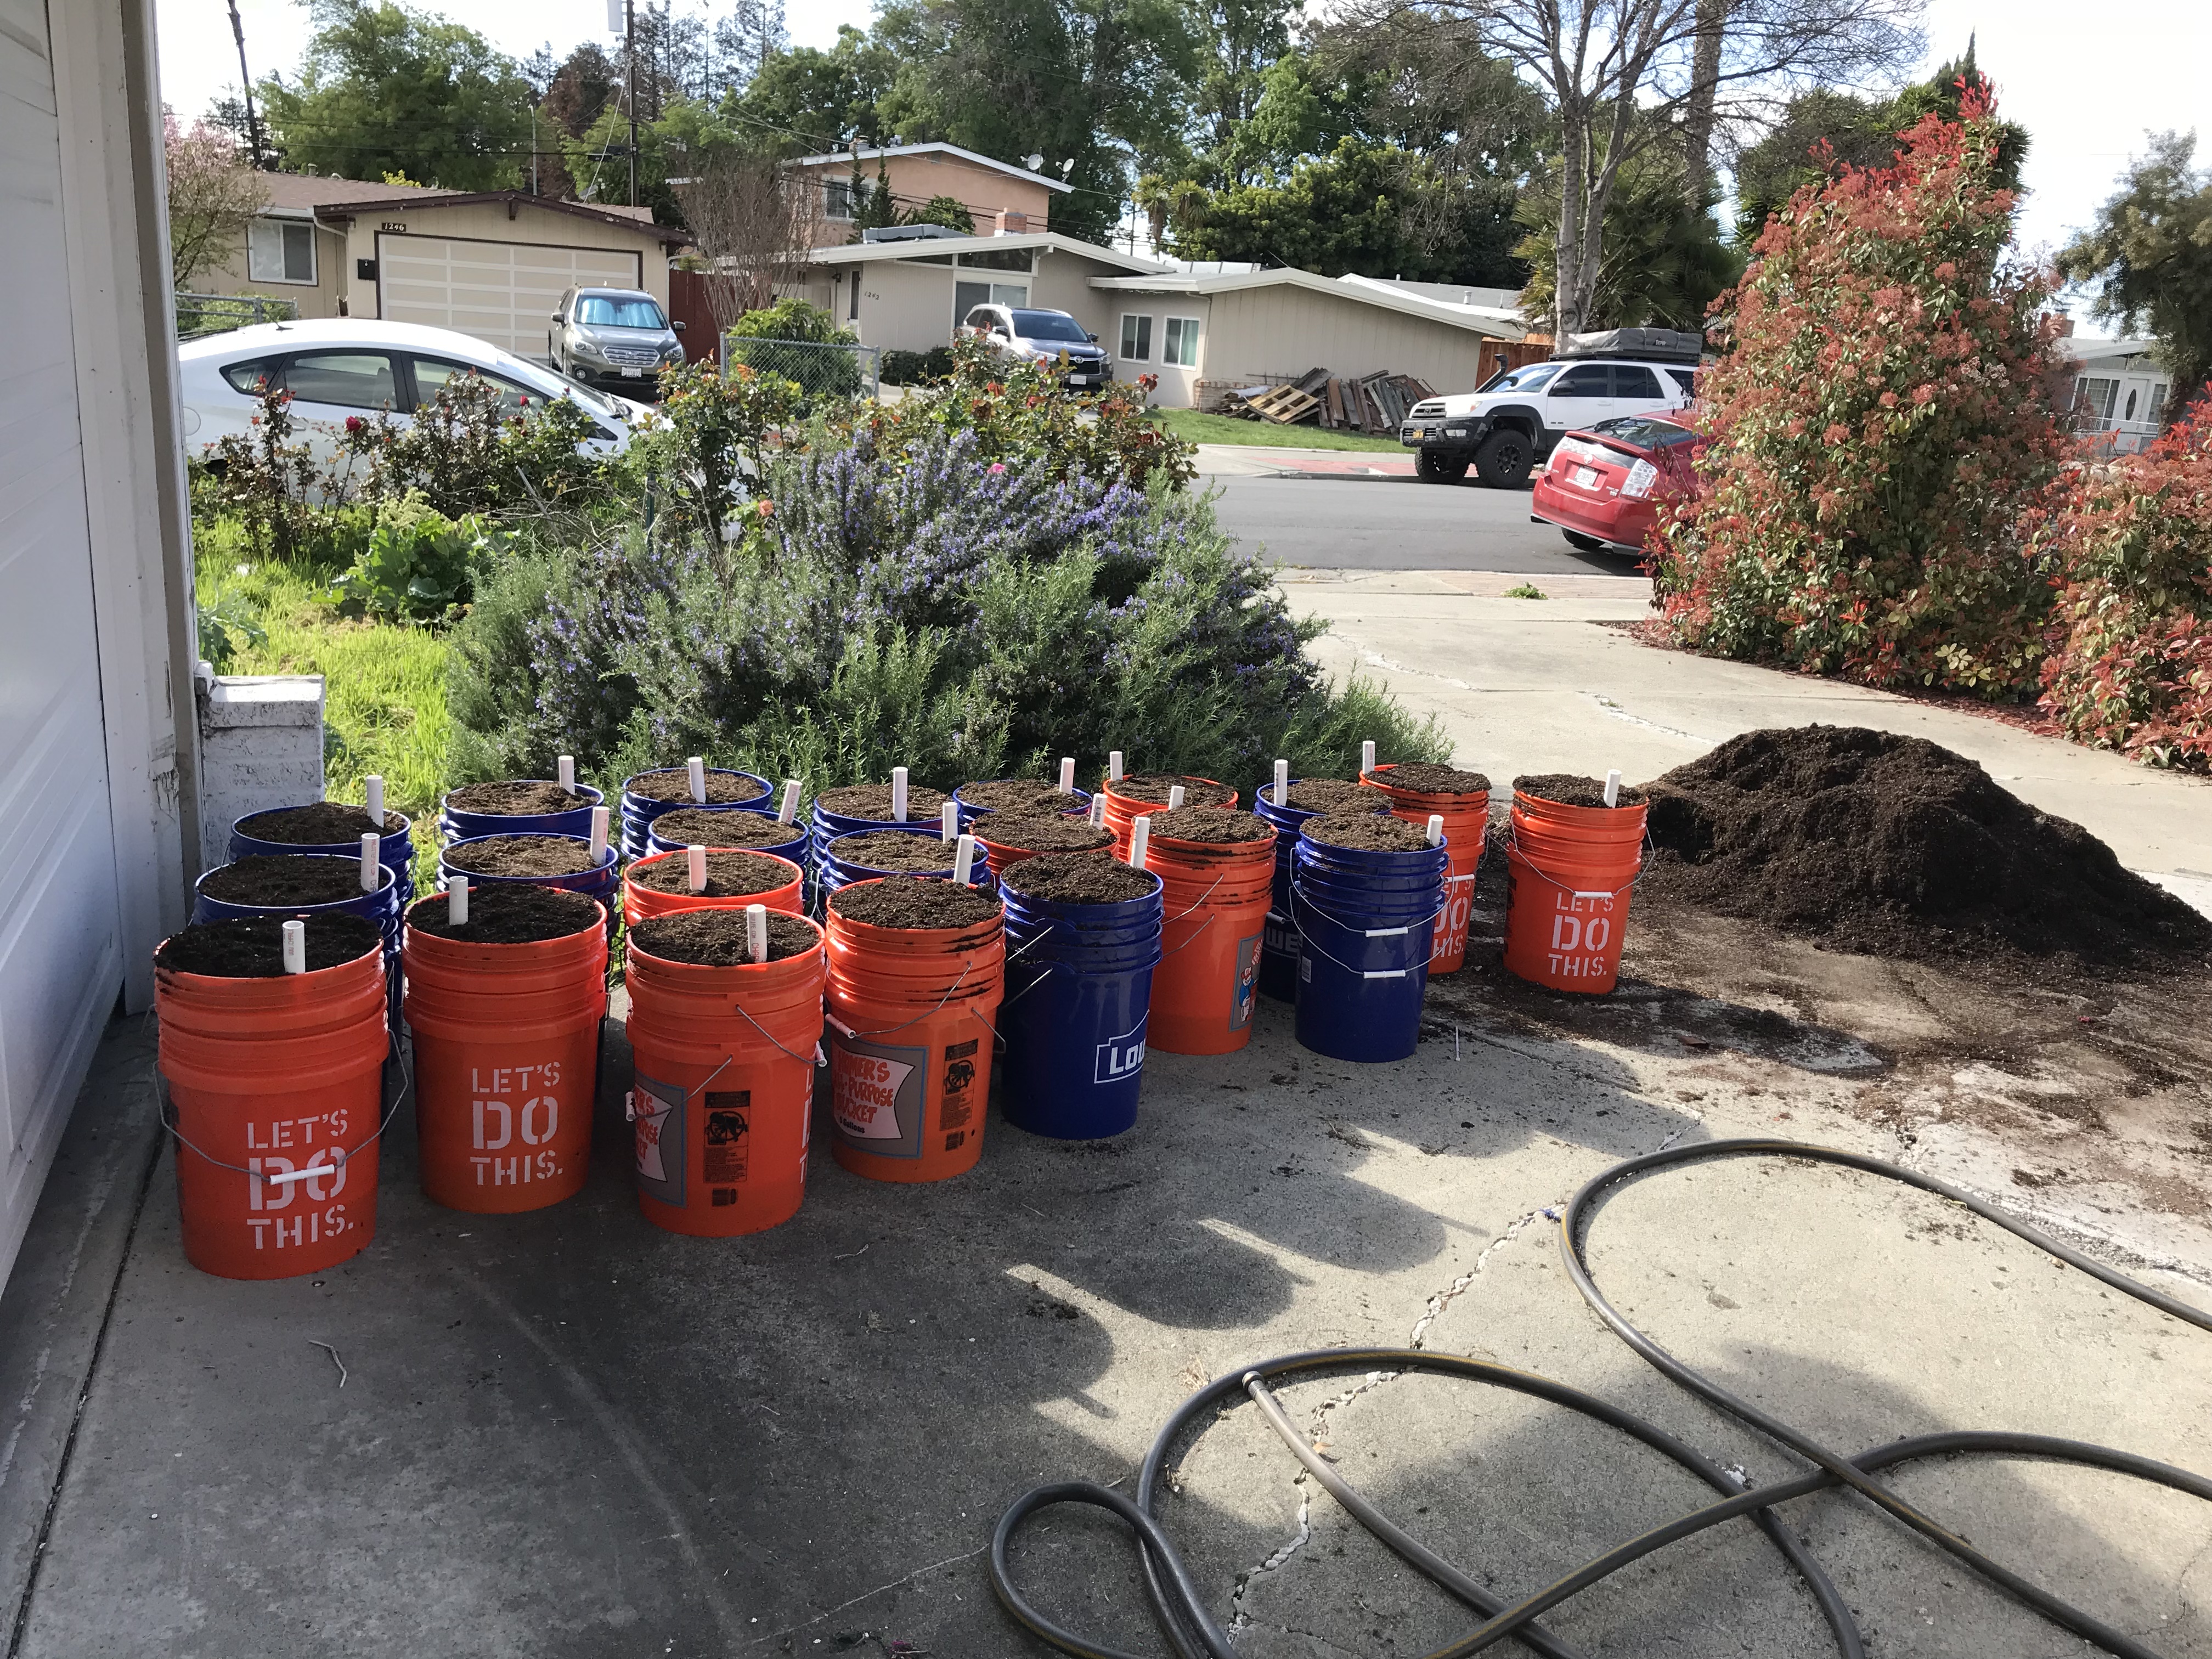
And 21 self-watering 5-gallon pots:

5 gallon self-watering pots (made from 5-gallon buckets)

You’ll notice that there is still some potting soil left! Yay! I’m going to make two more of the big blue totes and fill it with the leftover soil. And plant more tomatoes in it, of course. (Because anything worth doing is worth…oh, you know the drill. 😉 )

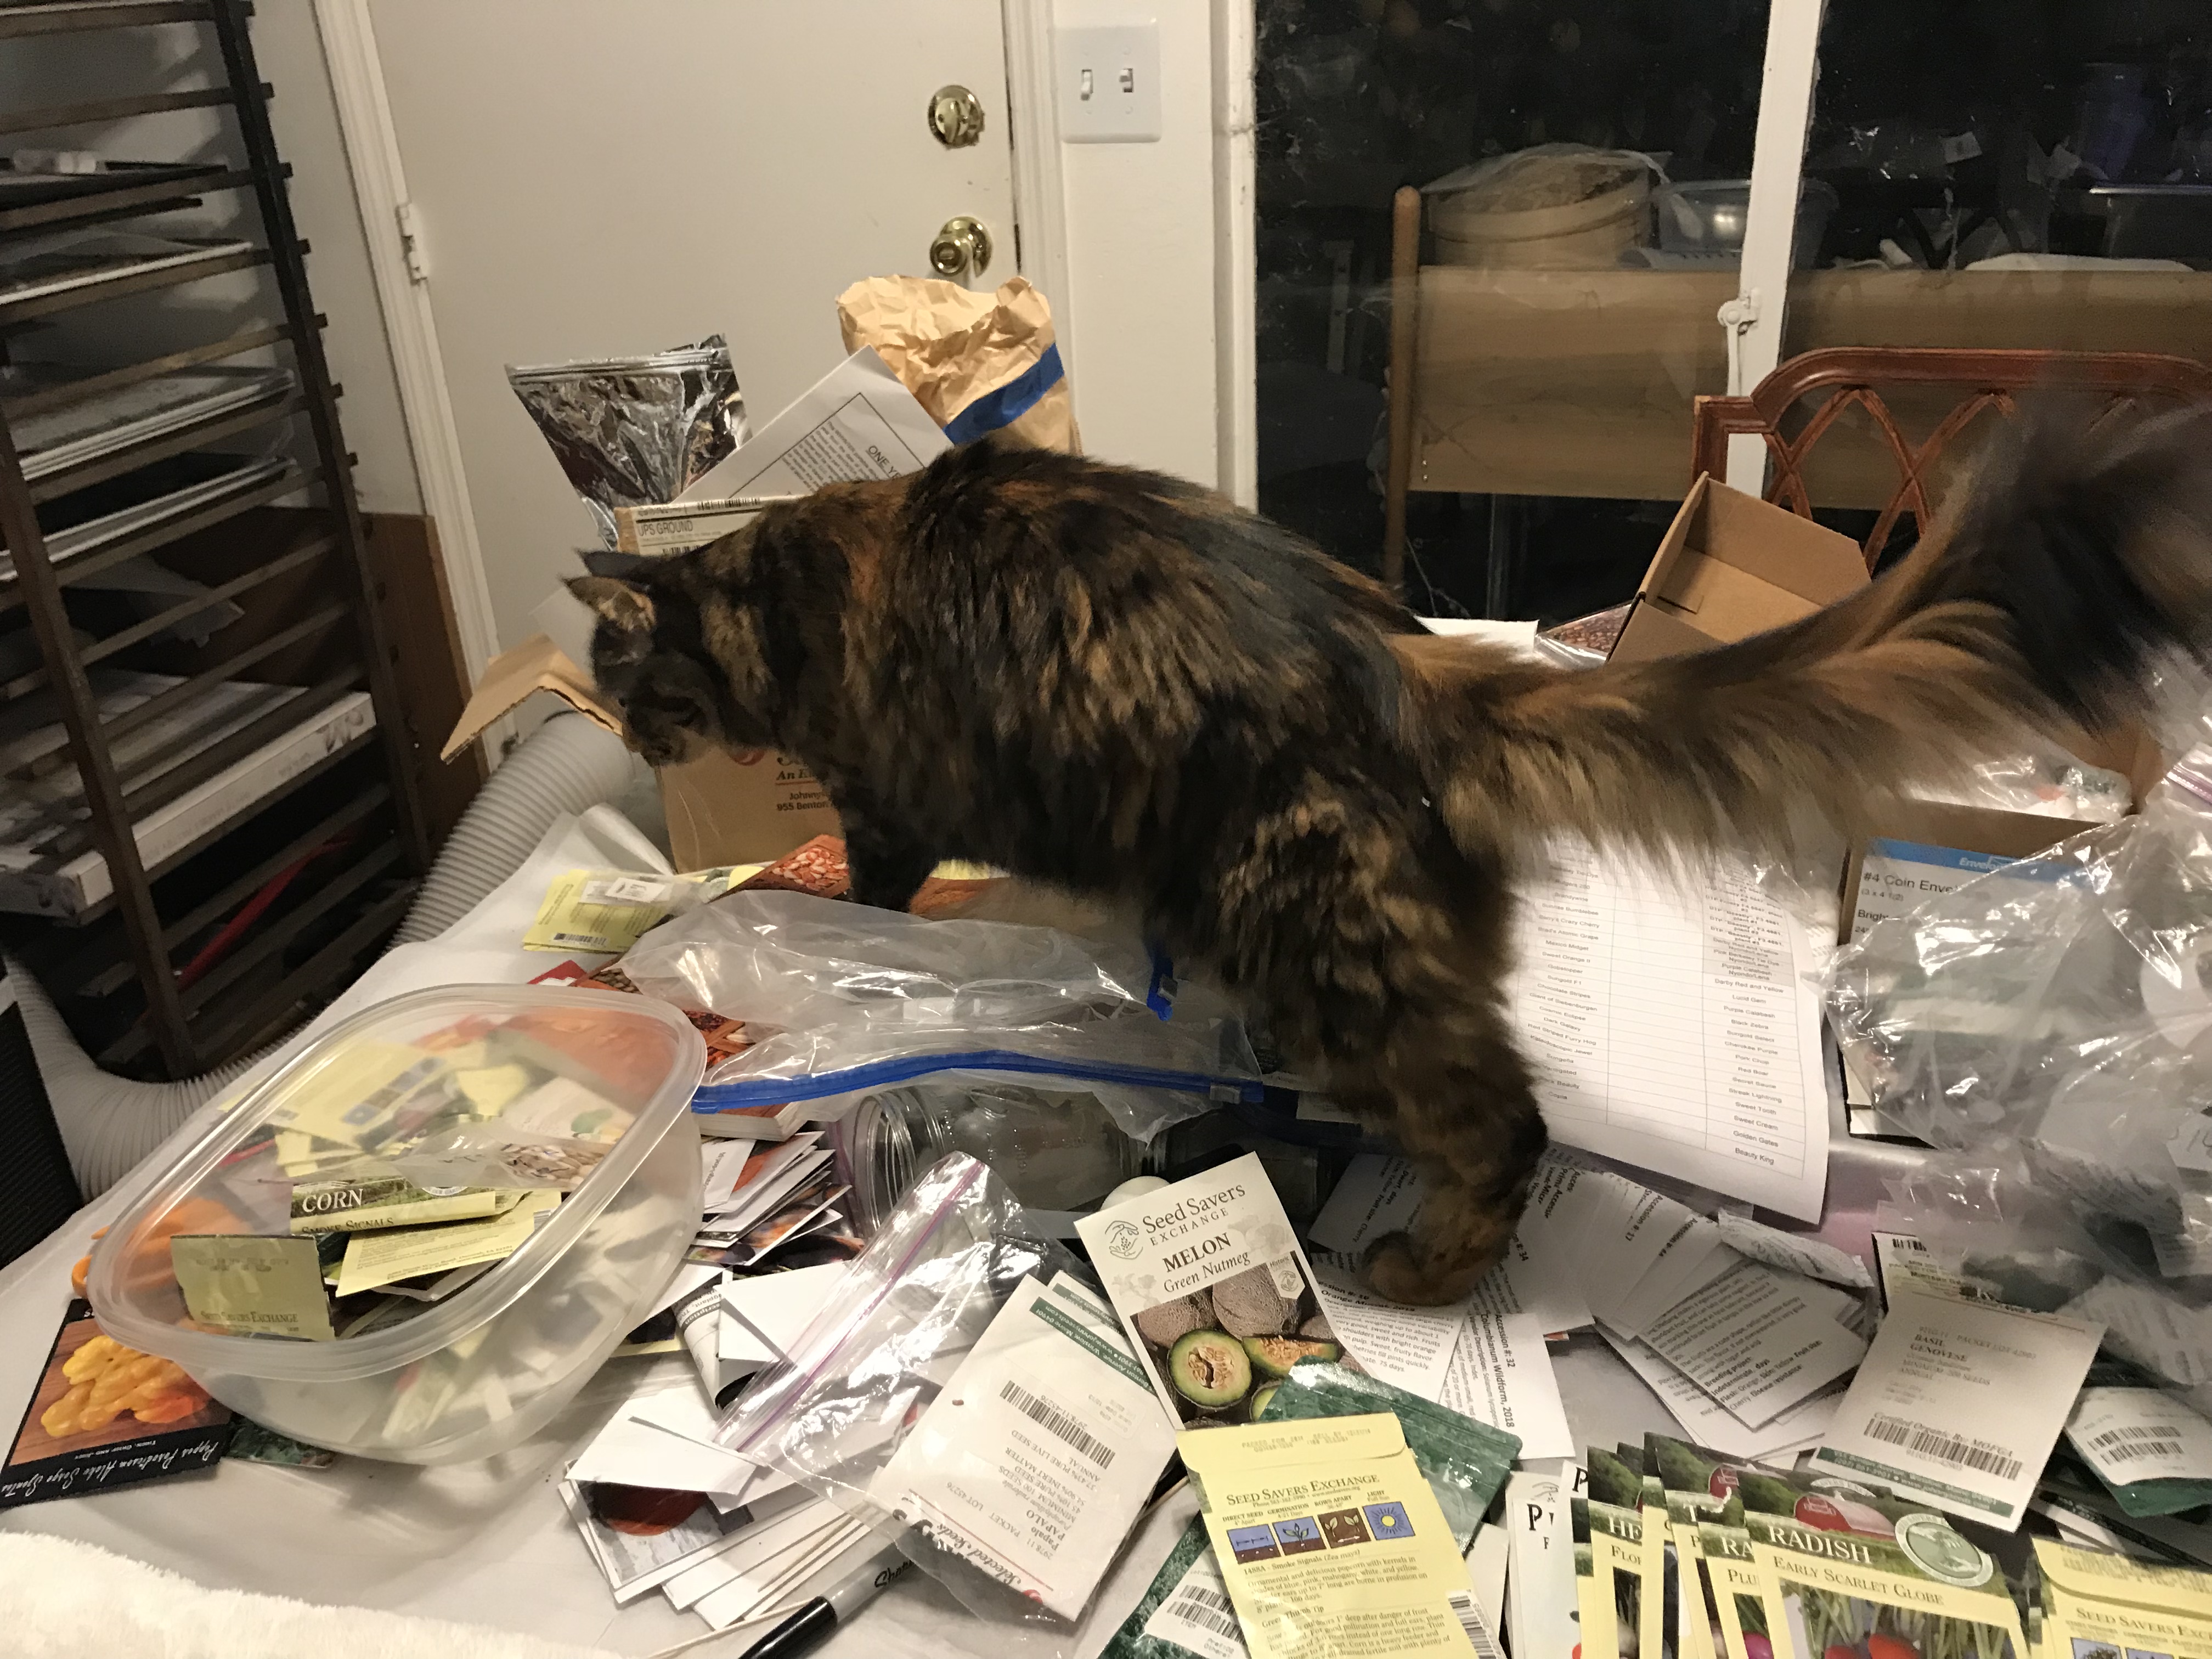
I sorted out my seeds last week – not just the tomato seeds but all the seeds we’ve bought over the last six years. It was a monumental task to get everything straight – so of course I needed help:

Tigress the master botanist

After sorting through all the seeds, I planted all the tomato seeds into soil blocks on Tuesday (the 20th):

March 20 2018 - seeds started
seed starting trays

A few words of explanation:

First, soil blocks are great for growing seedlings because they’re inexpensive and the roots come out healthier than they do in small pots. Roots trapped in small plastic pots rapidly start going around and around the edges of the pot, creating a “root-bound” plant. However, in soil blocks, the roots reach the boundaries and stop naturally because they are exposed to air. Nurseries don’t use them because the soil blocks are too delicate to manage commercially, but I like them better. To make soil blocks, you take your seed starting mix, wet it down thoroughly, and (using your soil block mold) stamp out a bunch of blocks into your seedling tray.

Second, you may have noticed the unusual names on the labels in the foreground. These are the seeds that I’m growing for the Dwarf Tomato Breeding Project. It’s an intriguing project to breed tomato varieties that are well-suited for small-space gardeners. Most tomatoes have one of two growth habits. Indeterminate tomatoes never stop growing, and ripen their fruit gradually over the course of the summer. They’re not well-suited to container growing because they’re huge. 

Determinate tomatoes, on the other hand, stop growing partway through the season, and ripen their fruit all at once. Because their size is self-limiting, they’re often recommended for container gardening. Unfortunately, determinate tomatoes don’t generally taste as good as indeterminate tomatoes. That’s because indeterminate tomatoes have a ton of leaves and a few fruit ripening at any given time, while determinate tomatoes have less leaf surface area and ripen all their fruit at once. Since foliage is where tomato plants get the energy to make sugar and flavor compounds, a lower ratio of foliage to fruit typically produces tomatoes that are not as sweet or flavorful.

From the perspective of the home gardener, the other disadvantage of determinate tomatoes is that you get your entire tomato harvest at once. Determinate tomatoes were mostly developed for industrial tomato farmers to make harvesting more efficient. Commercially grown canning tomatoes are harvested by spraying herbicide to kill the plants once the tomatoes are starting to ripen, then coming back a week or so later with a mechanical harvester that strips the partially-ripe tomatoes off the dried-out vines and takes them off to the factory. Obviously this works much more efficiently if the entire crop ripens at once.

However, most home gardeners would rather have a few tomatoes at a time over a long growing season than a two-week avalanche, then nothing. So determinate tomatoes aren’t great for container gardeners either.

And that’s where dwarf tomatoes come in. Dwarf tomatoes are indeterminate tomatoes with a gene that makes them short. So they are container sized, but they produce their fruits over a long season. They also have a higher ratio of foliage to fruit, so the tomatoes taste better.

However, there weren’t many dwarf varieties ten years ago. So Craig LeHoullier and Patricia Nunske Small started the Dwarf Tomato Breeding Project, enlisting tomato growers from around the world to help develop new varieties. This help basically consists of growing out the children of various crosses, reporting on their growth habits and fruit flavor, appearance, etc., and sending back seeds. This sounded like fun to me! so I signed up and will be growing three plants each of three breeding lines, to see what happens.

If you are looking for container tomatoes, there are already 70 varieties available through the Dwarf Tomato Breeding Project – a list of vendors selling seeds is here.

Filed Under: All blog posts, food Tagged With: garden, tomatoes

March 9, 2018 by Tien Chiu 14 Comments

Uh, Tomato Growers Anonymous? I think I may have a problem…

It’s been three weeks since my last gardening post. I thought it was a lot longer! Rereading it, I see that my past self was lamenting her lack of self-control because she got seeds for ten tomato varieties and a dozen or so varieties of other vegetables.

Past self: You are a total piker.

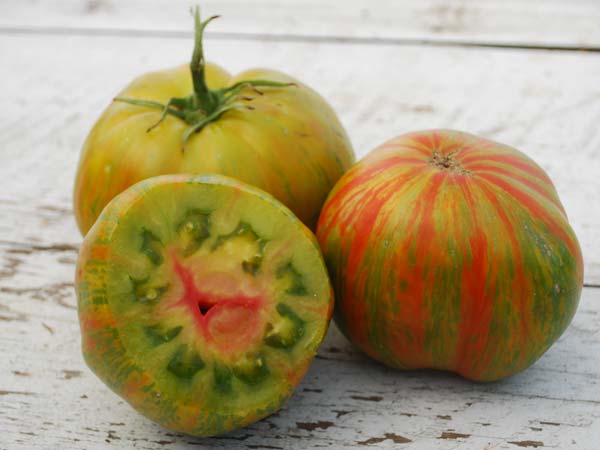
In the three weeks since my previous post, I have purchased seeds for at least fifty-seven varieties of tomatoes. Yes, I’ve bought so many that I’ve lost count! I have seeds for red tomatoes, yellow tomatoes, orange tomatoes, purple tomatoes, “black” tomatoes, green tomatoes, and pink tomatoes. I have seeds for indigo tomatoes (the tomatoes turn indigo blue where light hits them) of various flesh colors. I have striped tomatoes, bicolor tomatoes, and one variety called “Berkeley Tie-Dye” that has three colors in the flesh and multiple stripe colors in the skin. And of course I got “Pink Berkeley Tie-Dye,” which is not quite as colorful but beats some of the top-flavored heirlooms in taste tests.

Here’s a pic of Berkeley Tie-Dye. You can buy seeds from Baker Creek Heirloom Seeds.

Berkeley Tie-Dye tomato

And then I have currant tomatoes (tiny 1/2″ fruits), cherry tomatoes, salad tomatoes (1-3 ounces), slicer/beefsteak tomatoes, and gigantic (2-3 pound) tomatoes. I have round, oblong (paste-type), oblate, ruffled, and oxheart shaped tomatoes. (I don’t have any pear-shaped tomatoes, though – clearly an oversight that needs remedy. 🙂 )

I have tomatoes with normal green foliage, variegated foliage, and gray fuzzy foliage. I have tomatoes with normal leaves, wispy leaves, tiny delicate leaves, crinkled leaves, and potato-like leaves. I have indeterminate tomatoes, determinate tomatoes, and dwarf tomatoes.

I have joined the Dwarf Tomato Breeding Project, become a member of Tomatoville, and searched Tatiana’s Tomatobase and Seed Savers Exchange’s member exchange database for rare varieties I was hunting for. I’ve created a tomato database of my own to track my seed collection and growing notes. And I discovered that the newly founded World Tomato Society is headquartered in Los Gatos – less than fifteen miles from my house. I’m headed down there next week to talk to the founders, and find out more about their plans.

I have no idea why my friends are looking at me funny. Do they think I have a problem? Of course I don’t. I can stop any time. 🙂 

I’ve also read two books about tomato history, a couple books about tomato growing, and a very interesting book about breeding your own plant varieties. I’ve decided that I want to breed the excellent flavor of “Fruity Mix” (my favorite tomato from the year I grew 83 kinds of tomato) into larger-fruited tomatoes. There’s only one small problem: “Fruity Mix” seems to have disappeared. I’ve searched all the tomato databases, Googled high and low, and can’t find it. Even the original breeder doesn’t have seeds. So – assuming my ex manages to locate my original seed packet –  I’ve decided that my main goal, at least for this year, is to do what I can to preserve that strain. It’s a breeding pool, so there is quite a bit of genetic variability – I’m currently researching how to maintain the gene pool. It’s not as trivial as it sounds, because tomatoes are natural inbreeders, so under normal conditions you lose a lot of genetic variation in every generation. Heirloom tomato strains – which have naturally inbred for many generations – are pretty close to genetically identical. So if I want to keep the variation, I’ll probably have to do some crosses. But I don’t know yet how many crosses I need to keep enough variety. (Life is complicated.)

In addition to that, I want to try breeding Fruity Mix into larger-fruited varieties. Fruity Mix is a currant tomato, so while it tastes delicious, the fruits are tiny – maybe half an inch across. Better for grazing than harvesting. If I can breed its flavor into a larger tomato, it would make harvesting and using them much easier.

And, I confess, I also want to breed “art” tomatoes – tomatoes that are as beautiful and distinctive as they are tasty. One of the reasons I collected tomatoes with such varied shapes, colors, etc. was to create a pool of characteristics that I could breed from.

Because I’m a sick and twisted individual, I’ve also thought of some cool “art” you could do with tomato plants. For example, I could plant 5-10 tomatoes in a circle, and weave the vines together as they grow. The tomato equivalent of “lucky bamboo” or braided ficus trees!

And did you know that you can graft tomatoes? If I graft three or four varieties to each of four or five plants, I could grow them espalier-style against the wall of the house. And I could interweave the stems into a lattice, creating a “Tree of Life” look with all kinds of tomato colors, sizes, and shapes growing from the “tree”. (Growing it up against the house might also give enough warmth to allow them to survive the winter.) 

(Once upon a time, my friends once proposed a new unit of excessiveness: the milliTien. I forget what my response was, but I’m pretty sure they thought it was excessive. 🙂 )

Now, I don’t have time for this. I mean, I really don’t have time for this. I would wish that there were three of me so I could actually do it all, except that I know darn well that if there were three of me, they’d just think up even more things to do. And, knowing me, they wouldn’t just think up three times as many things as I could alone, but more like nine times more ideas, because they’d just egg each other on.

No, that way lies madness.

But the good thing about tomato growing is that once you’ve got the plants set up and on drip irrigation, there really isn’t much work to do until the tomatoes start ripening. So I just need to get them set up first.

We do, however, have one small difficulty. Our soil is infected with verticillium wilt, a fungus that kills tomato plants. It can linger in the soil for well over a decade. So if I’m growing tomatoes, I need to grow them in containers.

Did you know that twenty 31-gallon plastic totes fit into a Prius with exactly a quarter inch clearance in most dimensions? Or that filling all those containers requires a dump truck’s worth of potting soil?

But hey, anything worth doing is worth overdoing. And moderation sounds like a dreadfully unhealthy (or at least boring) lifestyle.

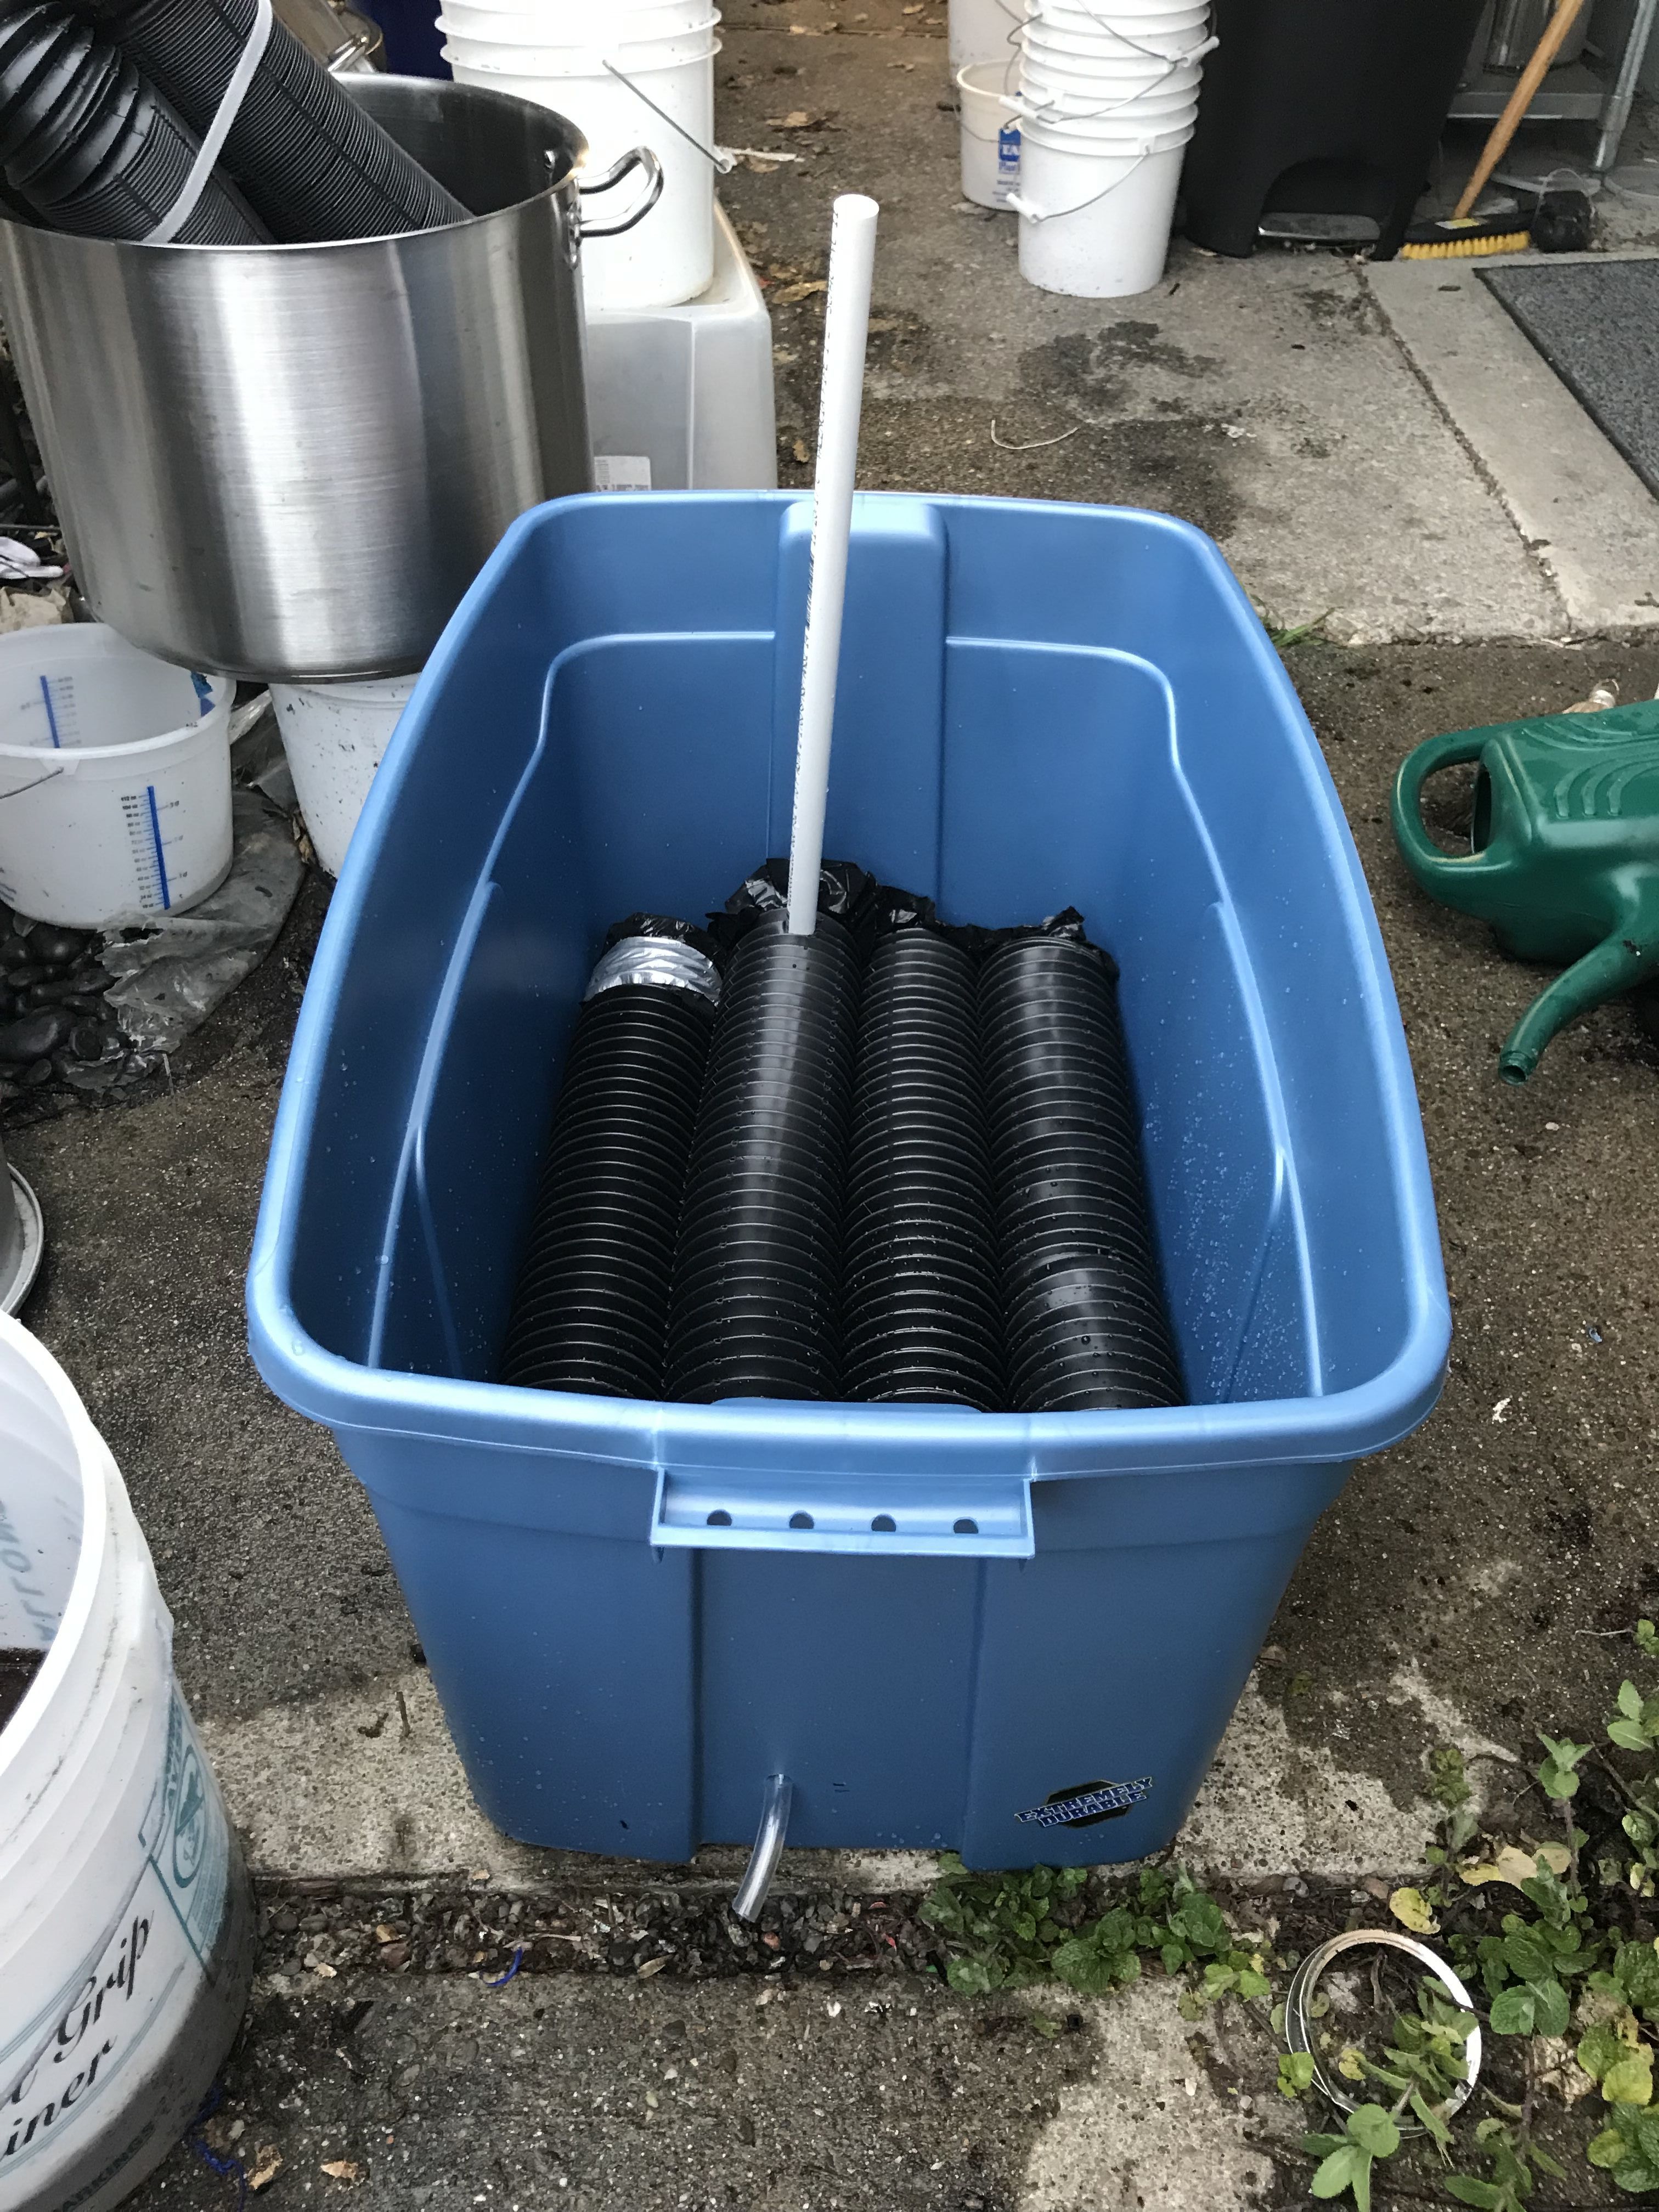
I’m making the 31-gallon totes into self-watering containers using the instructions here. Here’s what the innards look like:

self-watering container innards

A self-watering container has a pool of water in the bottom and soil up top. There’s a screen in between, which keeps most of the soil from contacting the water and allows any excess water to drip out, so the soil stays well-drained. A small amount of soil is allowed to contact the water, which allows water to wick slowly up into the rest of the soil, keeping the moisture even. A drainage hole removes excess water, so there’s always an air gap between the water and most of the soil.

There are various ways to do this. I had originally planned to build my containers using the instructions for building an EarthTainer. This requires two containers for every completed self-watering pot. Basically, you drill a lot of holes into the bottom of one container, and put it into the other container, with a spacer in between. You drill a hole in the outer container a little bit below the level of the inner container, so the water has someplace to drain, and you cut a hole in the bottom of the top container and use that to create the soil “wick” to bring up moisture.

That was my plan, anyway. But somewhere around the 50th variety of tomato, I realized that ten 31-gallon self-watering containers weren’t going to be enough. I’d need at least twenty. So if I were going to use that method, I’d need to go back to the hardware store, explain that yes, I was the crazy lady who bought a Prius-ful of plastic totes a few days ago, and did they by any chance happen to have another Prius-load of totes for me to buy? And then I’d have to stuff another twenty 31-gallon totes into my Prius. Which, let me tell you, was a serious adventure the first time. (Not to mention all the funny looks I got in the parking lot.)

Plus, buying that many would be really expensive. And I’d spend the rest of my life drilling holes in plastic totes. (Did I mention that I don’t have time for any of this?)

And then I discovered this ingenious design by Al Gracian III. As you can see in the photo above, it uses 4-inch perforated drain pipe (capped at both ends) to separate the soil from the water. But there are gaps between the pipes, so a small amount of soil can penetrate into the water reservoir and act as a wick. A plastic tube inserted through the side of the container and into one of the drain pipes removes excess water. The 2′ length of PVC pipe at the far end allows you to refill the reservoir.

I built two containers over the last week – an initial one figuring out how it worked, and a second one to standardize the measurements and process. I’m testing the second one at the moment, verifying that it works properly before launching into mass production.

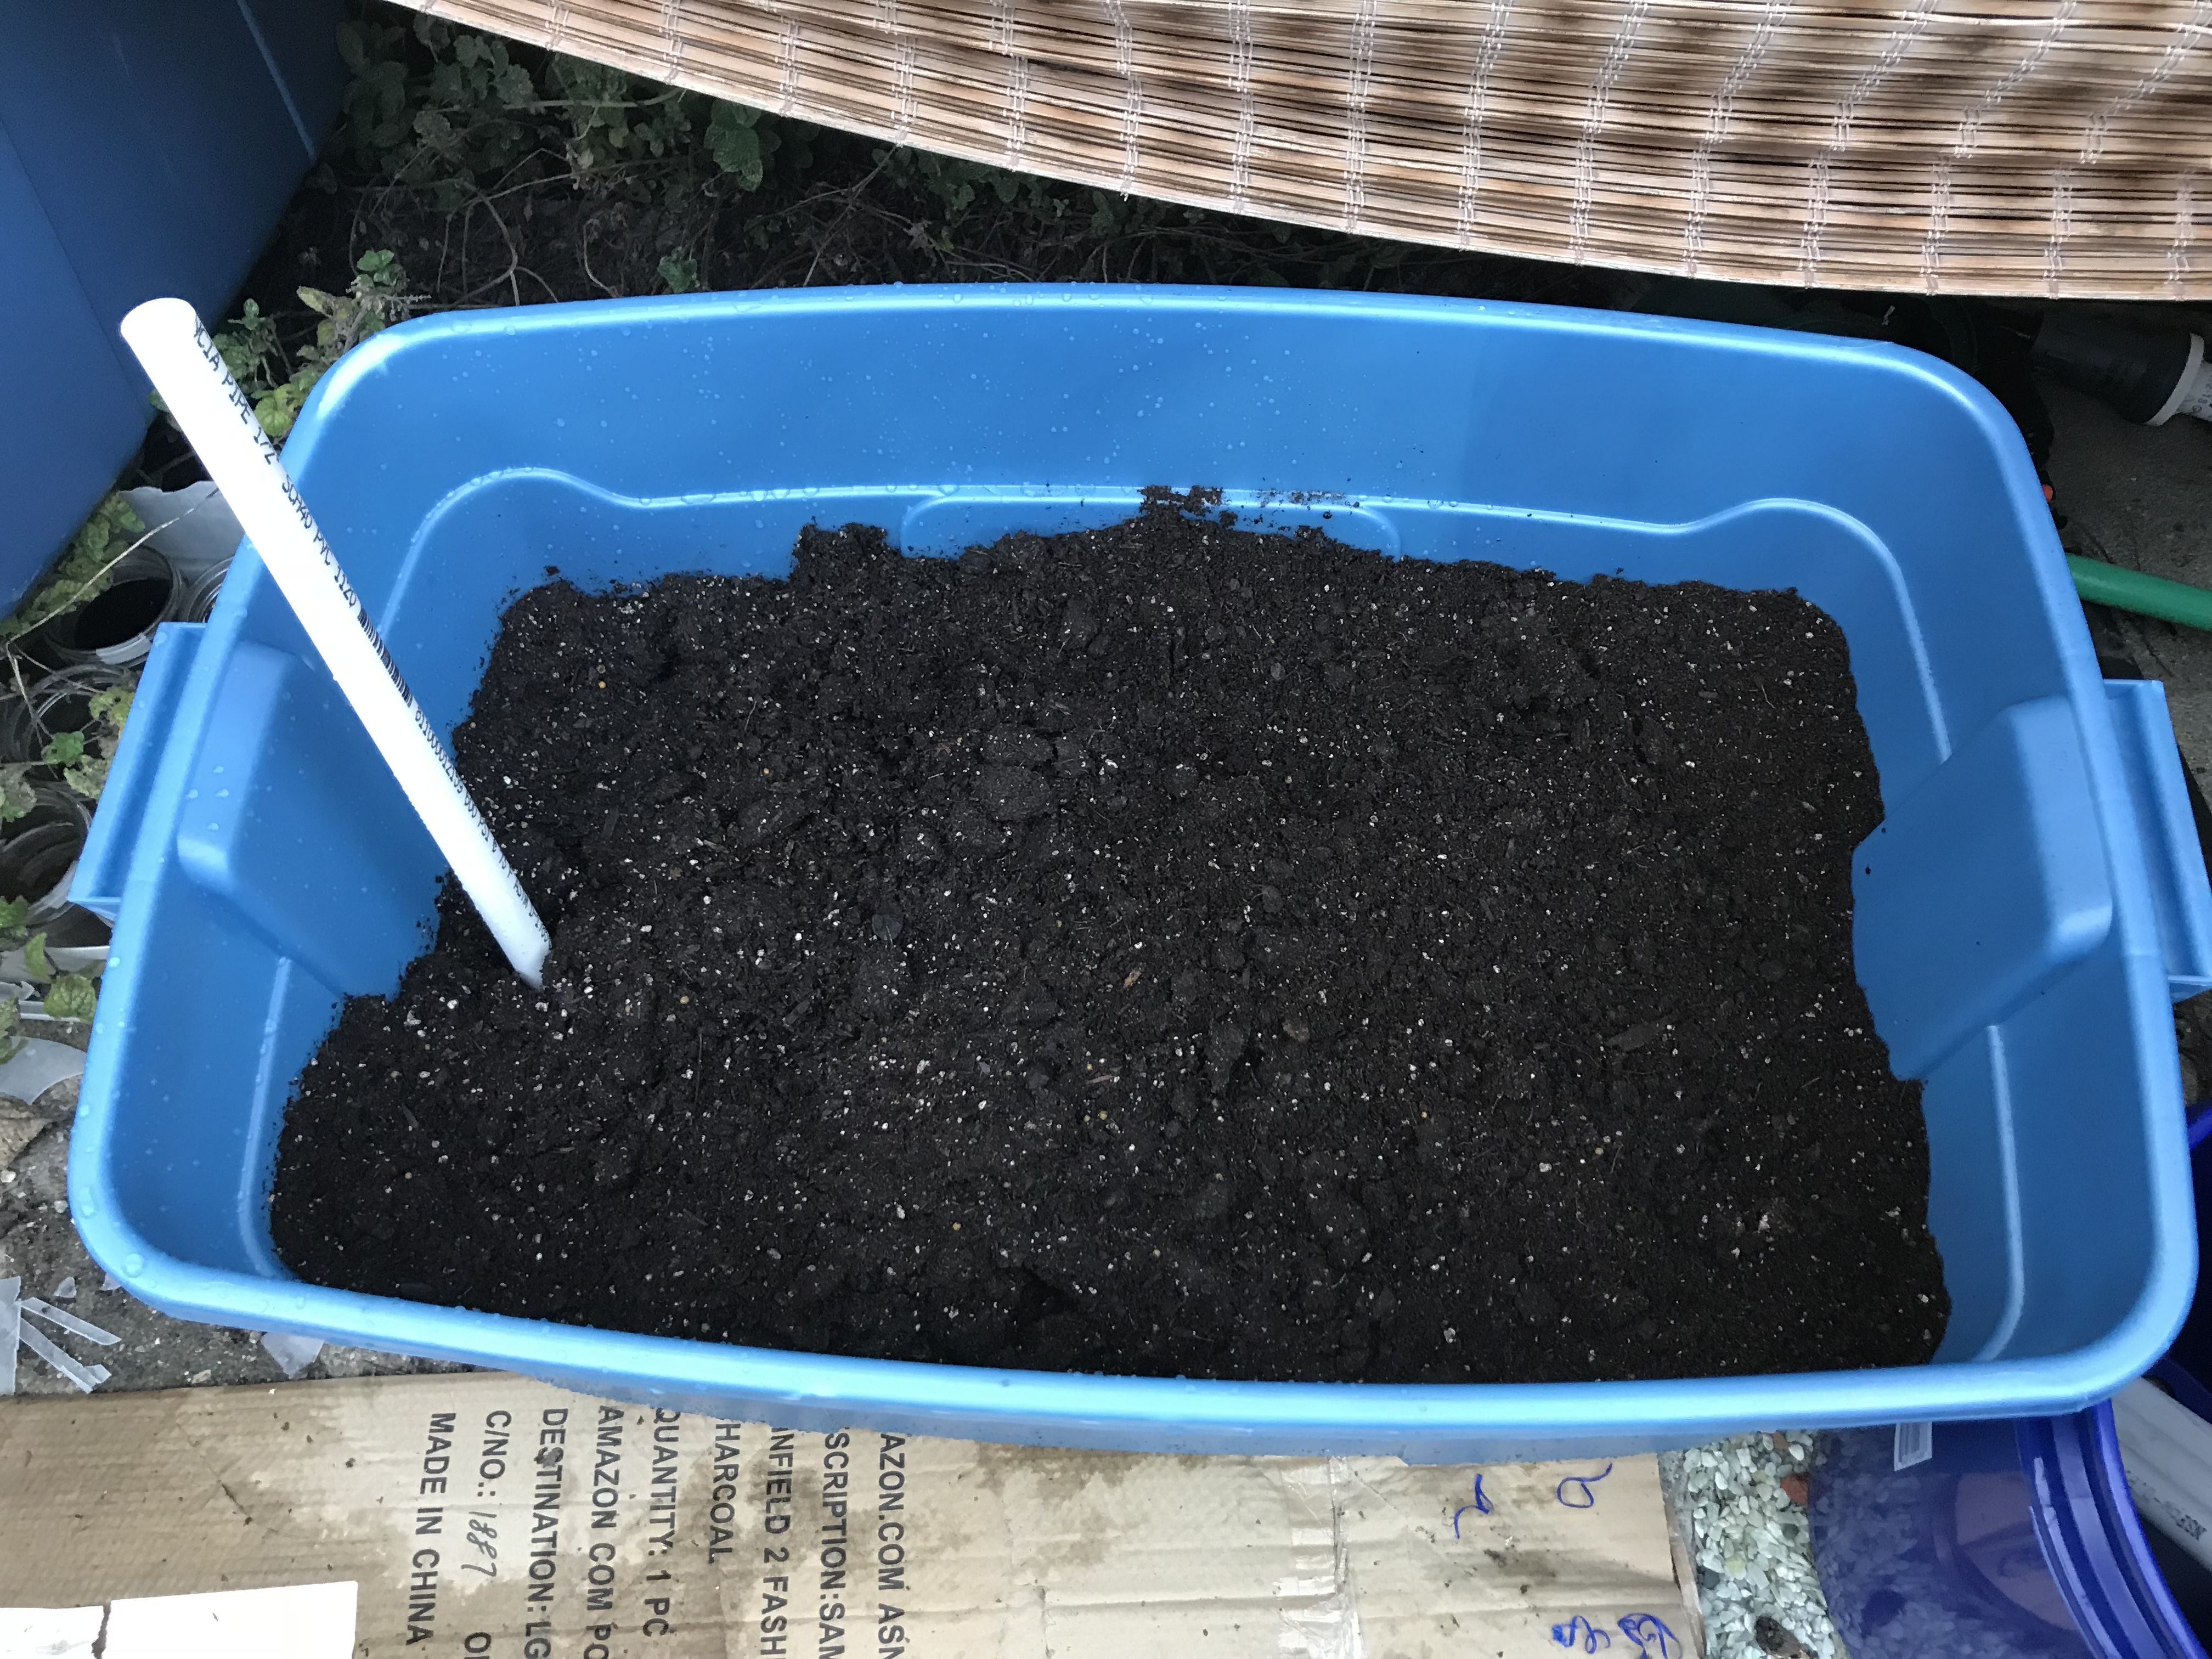
Here’s my test container:

self-watering container test


You’ll notice it’s not full. That’s because I only had one big sack of potting soil available. The biggest bag of potting soil that most nurseries or big hardware stores carry is about 1.5 cubic feet. Anything bigger becomes too heavy and awkward for most people to carry.

According to my calculations, two of those big sacks wouldn’t quite fill this container. To fill it to the brim, you’d need 3.27 cubic feet of soil. (You can and should fill it to the brim, by the way – you’re watering from the bottom, not the top, so you don’t need to worry about runoff or washing away your soil.)

And I’m making twenty of these containers, so I’ll need 3.27 x 20 = 65.4 cubic feet of soil.

Soooo….go down to your local nursery (or hardware store with a nursery section). Look at their biggest bags of potting soil. And then visualize packing 44 of them into the back of your Prius and trying to make it home.

But really, bagged potting soil is only for people who are doing namby-pamby, miniscule scale tomato gardening. (In other words, “people who have some trace of sense”.) Those of us who are truly enthusiastic about our sport understand that the proper way to order potting soil is to go down to your local landscape and construction supplier and order it by the cubic yard. 65.4 cubic feet of soil is only 2.4 cubic yards! Why, that’s practically nothing. Even small dump trucks can deliver that much! And it’s less than half the cost of potting soil at Home Depot! And you don’t even have to put up with the horrified stares of people watching you trying to pack a half-ton of potting soil into your Prius. Win!

(It’s a really good thing that California legalized marijuana farming a few years back. Otherwise, I might find myself explaining my purchasing habits to the police.)

That’s where I am now. In a few days, after I’ve finished testing my prototype, I’ll make the other 18 bins and place the potting soil order. I need to clear my calendar the day it gets delivered, though, because the giant mound of potting soil will get dumped in our driveway, so B. won’t be able to park there (and charge his car) until it gets removed.

Now, of course, I need to face my next problem, which is pretty simple: I have 57+ varieties of tomatoes and the 20 containers will only fit about 40 of them. Plus there are the dwarf tomatoes I’m testing for the Dwarf Tomato Breeding Project, and all the plants of Fruity Mix (if I can get the seeds and they all germinate) that I want to grow out, breed, etc. Fortunately, we also have a front yard…

I don’t have a problem. I can stop any time.

Filed Under: All blog posts, food Tagged With: garden, tomatoes

  • « Previous Page
  • 1
  • 2
  • 3
  • 4
  • …
  • 63
  • Next Page »

Archives

Tags

aids lifecycle outfits autumn splendor book cashmere coat cats celtic braid coat color study cross dyeing design design class devore doubleweave doubleweave shawls drawing dye samples dye study group gradient colors house infinite warp jacquard loom katazome knitted blanks kodachrome jacket ma's memorial mohair coat network drafted jacket/shawl project network drafting painted warp phoenix rising phoenix rising dress phoenix rising kimono phoenix rising reloaded pre-weavolution project sea turtles taquete tie-dye tied weaves tomatoes velvet weaving drafts web design website redesign wedding wedding dress woven shibori

Categories

  • Africa
  • aids lifecycle
  • All blog posts
  • All travel posts
  • Asia
  • Bangkok
  • Belize
  • Cambodia
  • Central America
  • Chai Ya (Wat Suon Mok)
  • Chiang Mai
  • Chiang Rai (Akha)
  • China
  • chocolate
  • computer stuff
  • creating craft
  • Creative works
  • cycling
  • Delhi
  • Dharamsala
  • drawing
  • dyeing
  • Fiber Arts
  • finished
  • food
  • garden
  • Ghana
  • Guatemala
  • Hanoi
  • Ho Chi Minh City
  • Hoi An
  • India
  • Khao Lak
  • Knitting
  • knitting
  • Ko Chang
  • Laos
  • Luang Namtha
  • Luang Prabang
  • markleeville death ride
  • meditations on craft
  • mental illness
  • musings
  • Phnom Penh
  • powerlifting
  • Rewalsar (Tso Pema)
  • sewing
  • Siem Reap (Angkor Wat)
  • Southeast Asia
  • surface design
  • textiles
  • Thailand
  • travel
  • Vangvieng
  • Vientiane
  • Vietnam
  • Warp & Weave
  • weaving
  • Weaving
  • weavolution
  • writing

© Copyright 2025 Tien Chiu · All Rights Reserved ·


Loading Comments...