Tien Chiu

  • Home
  • About Tien
    • Honors, Awards, and Publications
  • Online Teaching
  • Gallery
  • Essays
  • Travels
  • Book
  • Blog
  • Dye samples
You are here: Home / Archives for All blog posts / food

February 16, 2018 by Tien Chiu 7 Comments

I’m doomed.

I made a major tactical error a week ago. A Seed Savers Exchange catalog arrived, addressed to B.. Which was not so bad, until I opened it.

Let’s start with the fact that I am both obsessive and certifiably insane. (Which, by the way, has nothing to do with my having a mental illness – there are plenty of people living with mental illness who are perfectly sane and reasonable folks. I am not one of them, however, which makes me very happy. 🙂 )

I’m also a foodie – the sort who actually notices and treasures the differences between the fifteen kinds of mandarin oranges you can get at the farmer’s market. A week or two I went up to a vendor at the Mountain View farmer’s market and said, “Excuse me, but are those really Satsuma mandarins? They look like Murcotts to me.” The farmer blinked and said, “Yes, you’re right! I lost my sign and haven’t gotten to making a new one. But you know, it’s been two weeks now and you’re the only one who’s noticed.”

Yeah, that kind of foodie.

Put that together with an empty garden and the kind of personality that makes 1500 dye samples just for the fun of it, and you have a recipe for complete and utter mayhem. (Especially if your spouse is the sort to have already planted 21 fruit trees on your property, just for fun.)

Now, this combination has actually happened before, and it wasn’t pretty. (Though it did delight the local food bank.) It started in 1998 or so, when I lamented to a friend that I couldn’t grow tomatoes in my apartment, since my balcony was in deep shade. She said, “Oh, I have some space in my back yard – why not plant some tomatoes there?”

So I planted five tomato plants there, and tended them happily. My friend started making noises halfway through the summer when the tomatoes devoured one entire side of the yard and started going after the house, but hey, they’re tomatoes! These things happen.

And then my friend threw a party, and at the party, I said to one of her friends, “It’s really nice of Carolyn to let me use her back yard, but I keep wanting to try more varieties of tomatoes, and there really isn’t enough space for more than three or four.”

Carla said, “Well, we’ve got a house in Atherton, and we’ve got a half-acre back yard we aren’t using. Would you like to garden there?”

And, next thing you know, I was out there farming an 1800-square foot garden. The soil was solid clay – I actually made a coil pot out of it – so I ordered 5 cubic yards of compost, which arrived in a small dump truck. That wasn’t enough to help much, so I ordered another 5 cubic yards. When that wasn’t enough, I decided to up the ante and order 10 cubic yards. This arrived in a large dump truck, which had trouble with some overhead power lines, so it had to dump 10 cubic yards of compost at the top of their driveway. I spent the rest of the day moving, as they say, “the whole nine yards” – plus one! into the garden.

Then I got a rototiller and turned the compost under. Now I had good soil, and it was time to plant! But what to plant?

Being a foodie, of course, I wanted to grow things for flavor. And obviously the best way to find out what tasted best would be to plant one of everything. Especially tomatoes, because as we all know, “There’s only two things that money can’t buy – and that’s true love and home grown tomatoes!”

(Also covered by John Denver: )

So, in that spirit, I decided to grow a few tomato varieties. Me being me, of course, “a few” translated to “83”. (Because anything worth doing is worth overdoing.)

Sadly, this predated the days of digital cameras, so (unbelievably) I don’t have photos of Tien’s tomato farm. But it was huge, and full not only of tomatoes but other veggies – eight kinds of green beans, three kinds of lima beans, four kinds of potatoes, five kinds of garlic, and, uh, other stuff. I can’t remember all of it…but you get the idea. At the height of tomato season, I was not only canning several gallons of tomatoes every week but bringing them to work AND donating about 100 pounds of tomatoes (and about a 30-gallon bag full of green beans, plus misc. other stuff) to Second Harvest Food Bank every week. (I’m pretty sure they thought I was nuts, but they weren’t complaining!)

Eventually I started training for AIDS Lifecycle, which precluded gardening. But ever since, I’ve been careful to stay away from gardening in much the same way that alcoholics try to avoid alcohol completely – there’s just too much potential for things to get out of hand.

But dang, there I was, opening that seed catalog.

I managed to stay at least reasonably restrained, only ordering five kinds of tomatoes, three kinds of peppers (egged on by B., who likes peppers more than I do), and a beautiful, multicolored dwarf popcorn that we’d grown before and which popped well straight off the cob.

Okay, I lied. I also ordered three kinds of peas, three kinds of lima beans, soybeans, this thing called “strawberry spinach,” a butternut squash, an heirloom parsnip, heirloom carrots, and two kinds of melons. But still, it was more or less under control.

Then I had lunch with my friend Linda, who is married to my ex-husband, Rob. Linda and I were chatting about gardening, and we got on the subject of tomatoes. She said, “Yeah, we’ve got a LOT of tomato varieties – over 100 of them.”

I sat bolt upright and said, “OMG!! Those are MY TOMATO SEEDS!!”

Rob and I are on more or less friendly terms (though we haven’t seen each other in over a decade), and one of his hobbies is botany, so when I went off to Southeast Asia, I gave him my complete seed collection. So he and Linda had seeds to all the tomatoes I’d grown. Including my very favorite tomato, which was called “Fruity Mix” and was developed by legendary plant breeder Tim Peters. Unfortunately, Tim’s company, Peters Seed and Research, had gone out of business, and seeds were no longer available. I had searched for it and turned up nothing.

So I asked Linda if they still had the seeds for “Fruity Mix”. They did! She is bringing me some next week and I am SUPER excited to be getting them. And I will save seed from this plant, for sure!

Unfortunately, that made me wonder whether there were other tomatoes related to “Fruity Mix”, perhaps a descendant with larger fruit. “Fruity Mix” is a currant tomato, producing fruit about half an inch across. They are the most delicious tomatoes I’ve ever tasted, but also quite tedious to pick. So I did a Google search, and found that there is a variety called “Sweet Orange II” that is described as a descendant of “Fruity Mix”.

So of course I had to order that. And then I had to poke around the rest of the site to see what else they had…and I was really restrained, really! I only ordered five more tomato varieties (including one called “Dancing with Smurfs” – how could one resist!).

And the seed catalog season is only just beginning….I think I’m doomed.

I’ll leave you with this ominous harbinger of the garden avalanche to come…yes, the peach trees are already blooming! (And so will most of the other trees, in the next week or two.)
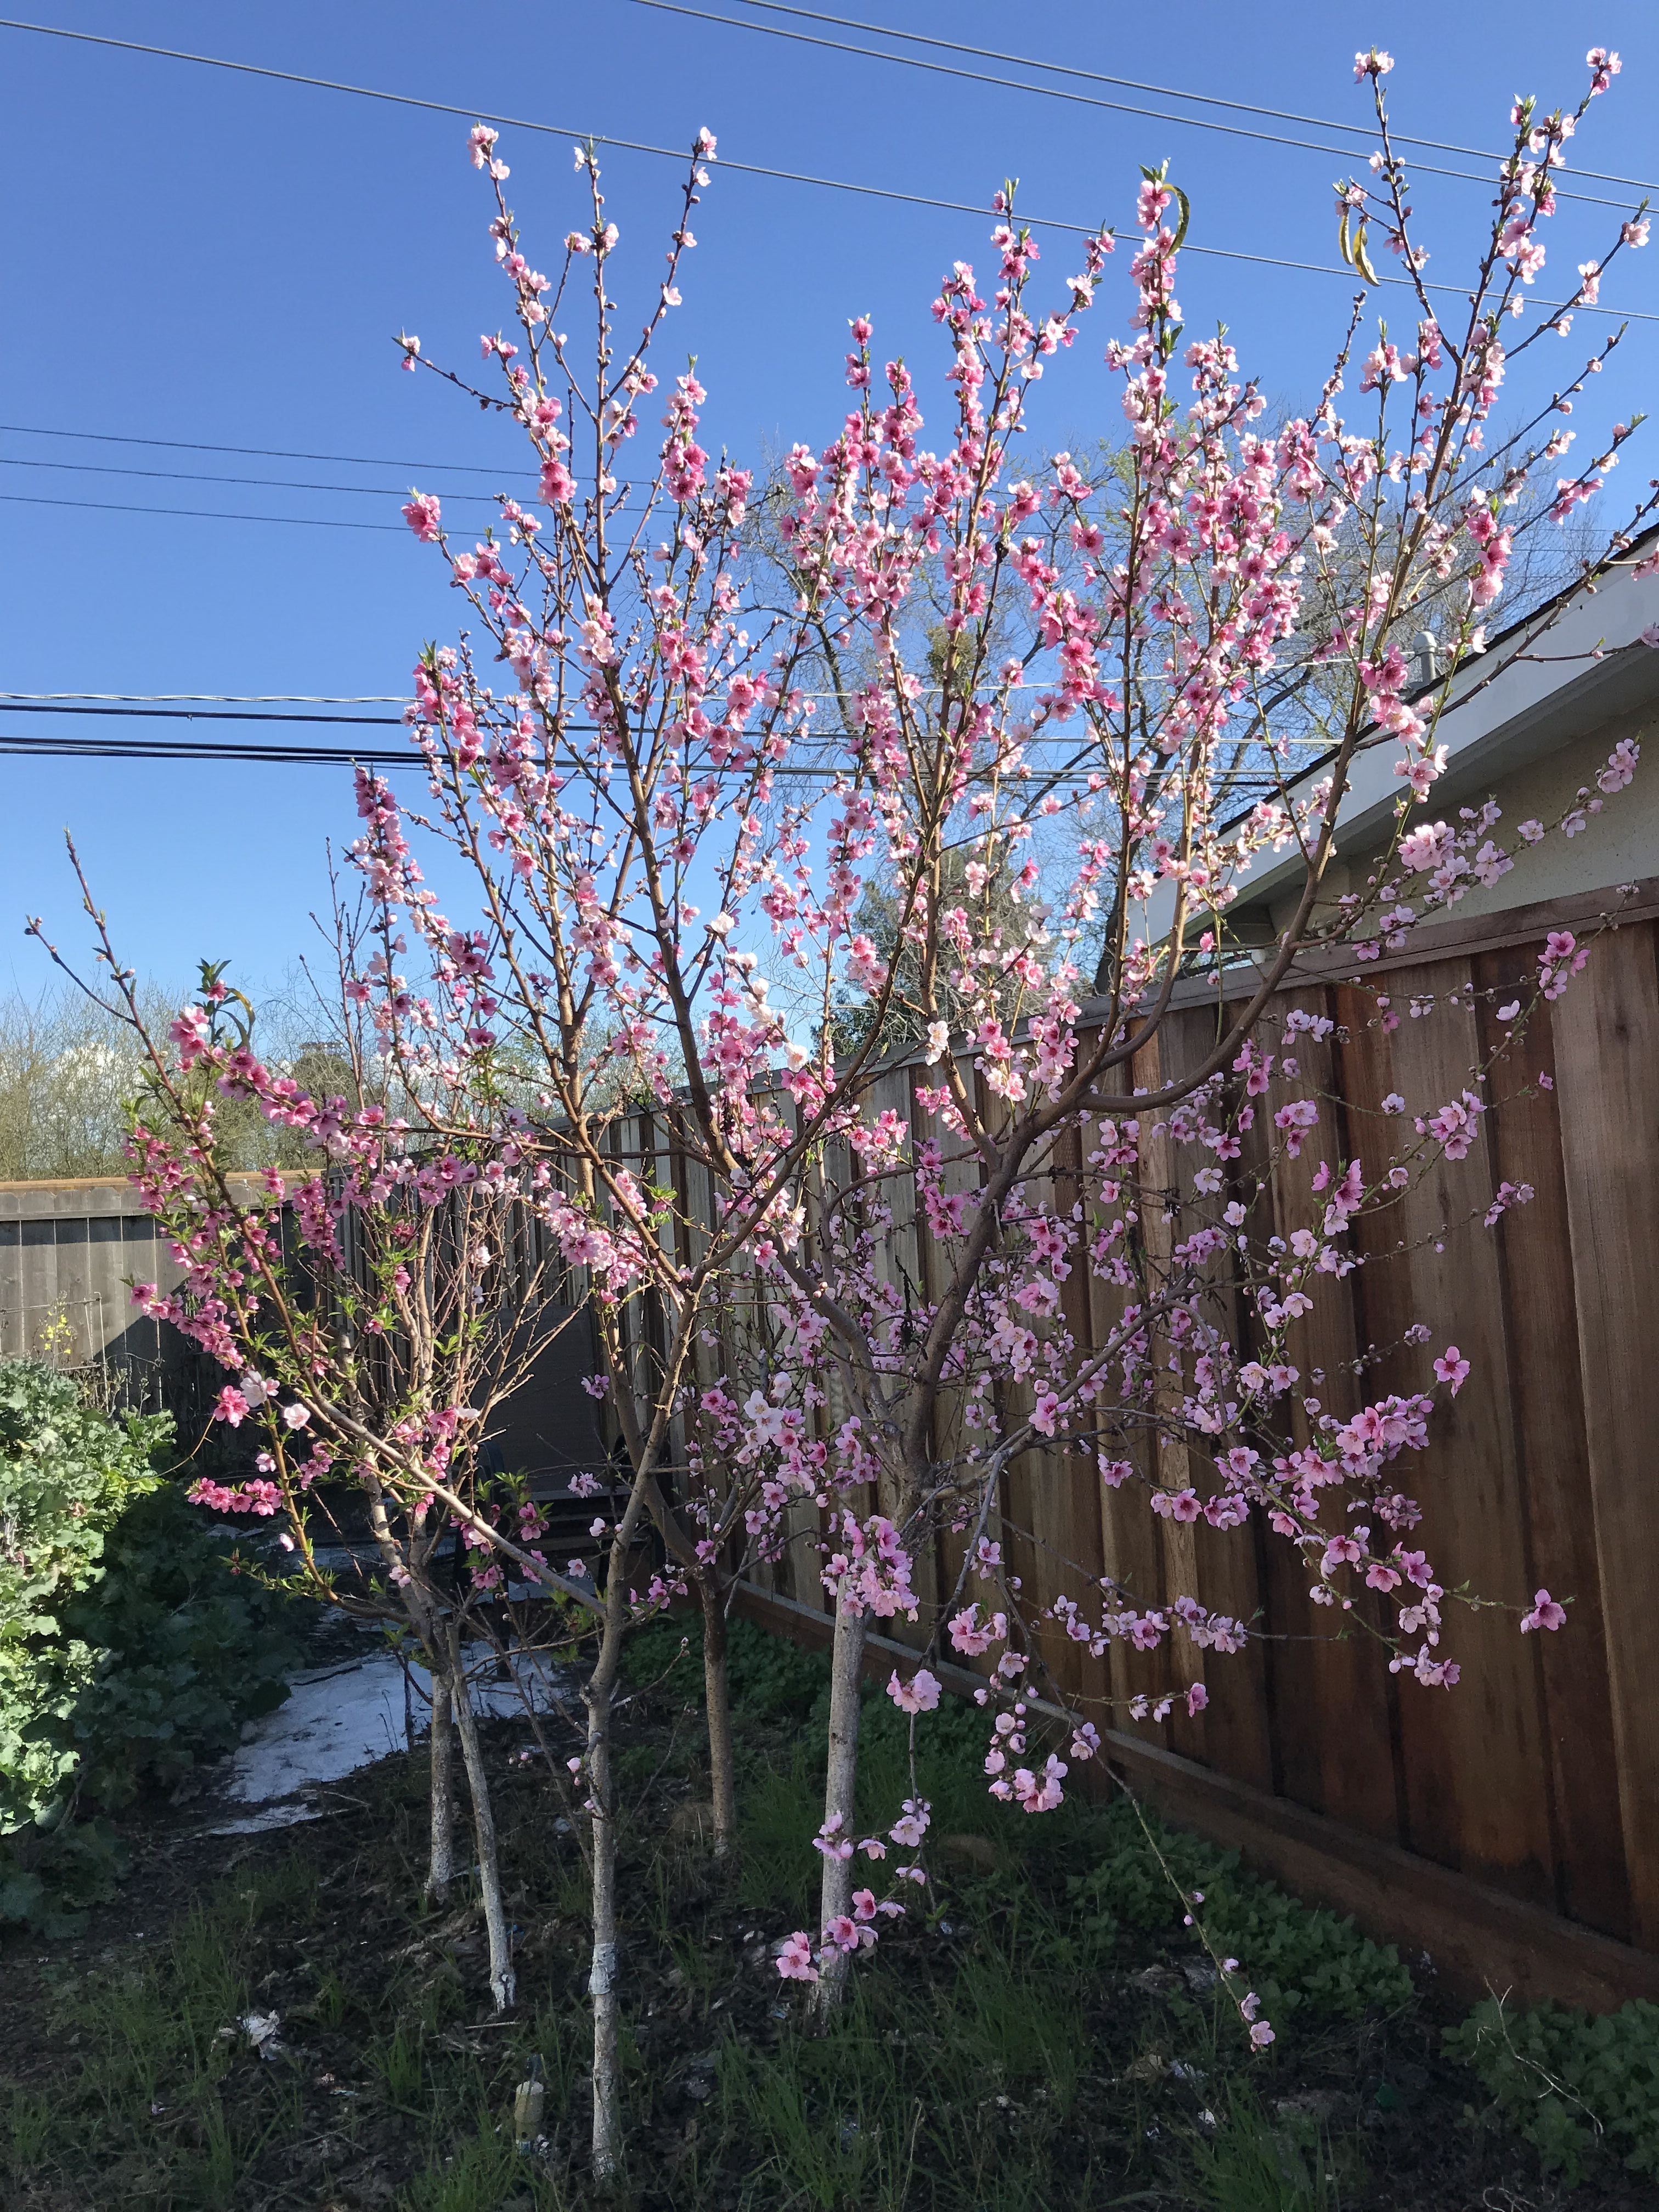
blooming peach trees

P.S. I am THE LUCKIEST KLUTZ EVER! It took ten days for the swelling in my hand to go down enough for further evaluation, but the folks at the orthopedic sports clinic examined it and told me that, astonishingly, there was no damage to bone, muscle, or tendon – it was just a giant bruise. It’s about 95% better now, and I can do most normal activities with it, including typing. Hurray!
Filed Under: All blog posts, food

December 4, 2017 by Tien Chiu 6 Comments

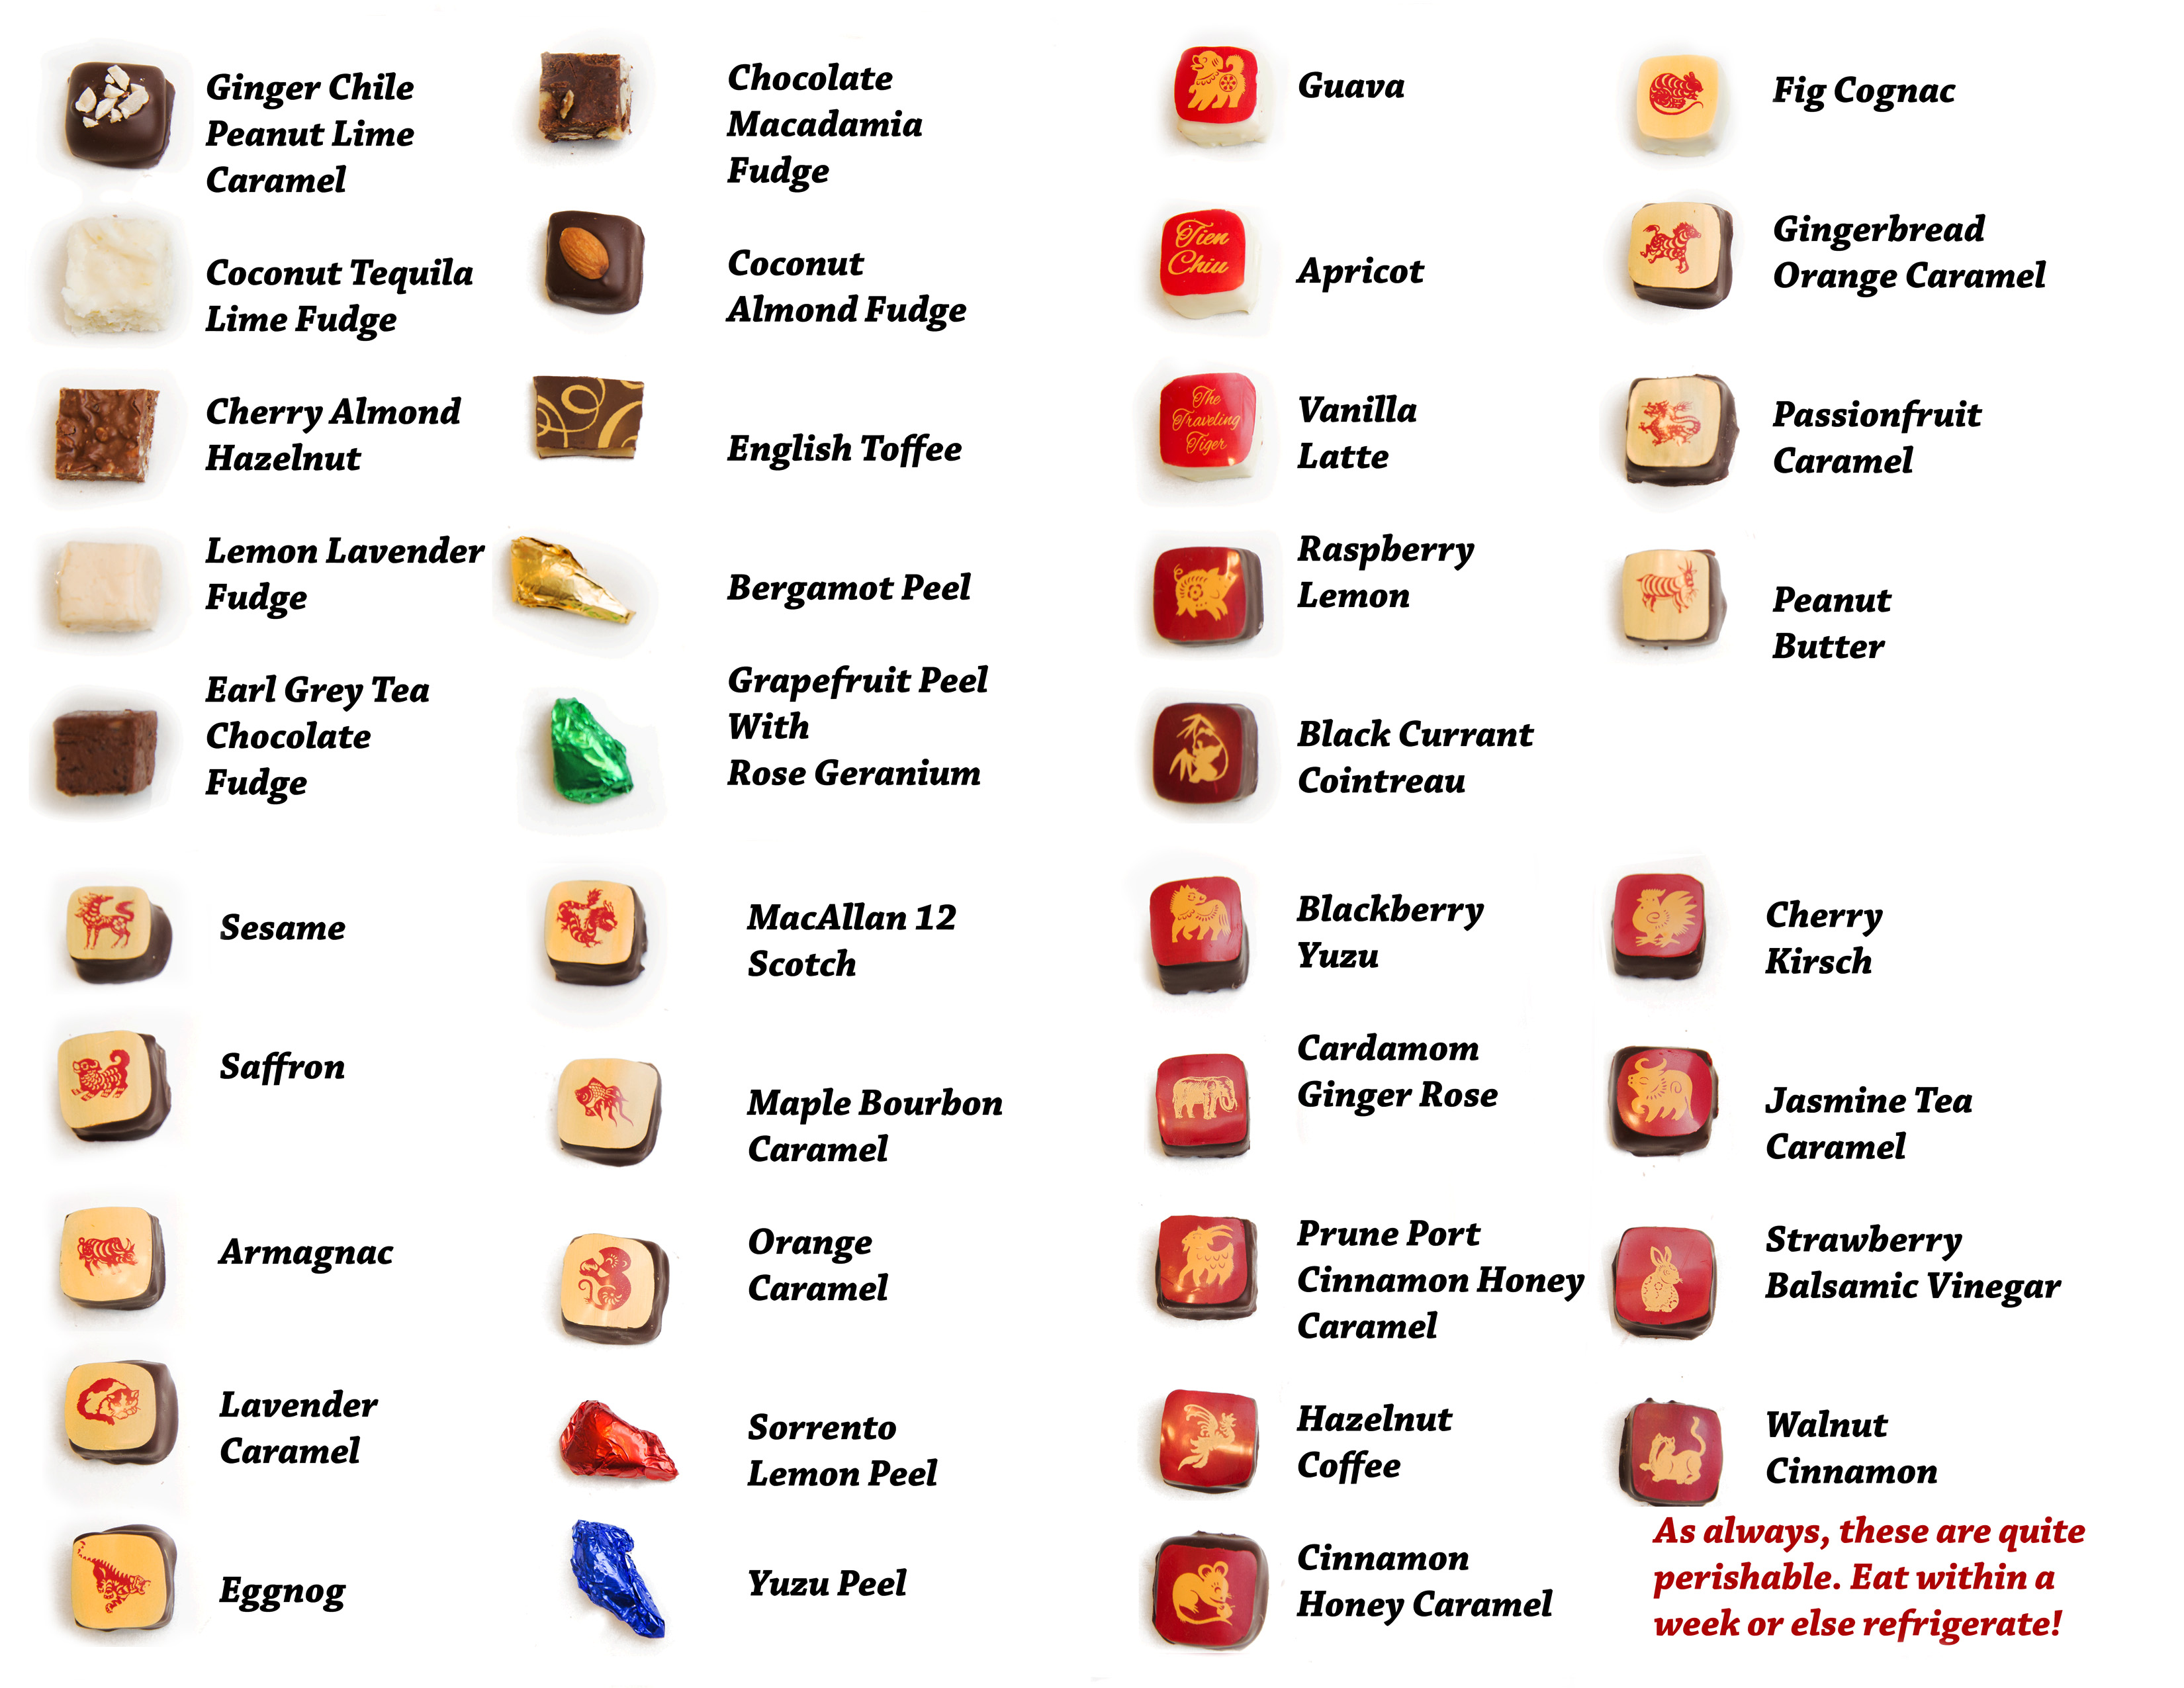
Presenting the 2017 fall collection


2017 fall collection

38 flavors in 2017! The new ones are:

  • Earl Grey tea fudge
  • maple bourbon caramel
  • orange caramel
  • gingerbread orange caramel
  • Prune, port, cinnamon and honey caramel
  • Blackberry yuzu
  • Peanut butter
  • Sorrento lemon peel

Many thanks to Susan, Edie, and Chris, who helped make the chocolates; my friends Carolyn, Brian, Chris, Edie, Jeremy, Pam, Nyondo, and Danika, who helped pack the chocolates; and to my friend Lieven, who did the photography!

Filed Under: All blog posts, chocolate, food

December 4, 2017 by Tien Chiu 5 Comments

118 pounds, 6 ounces

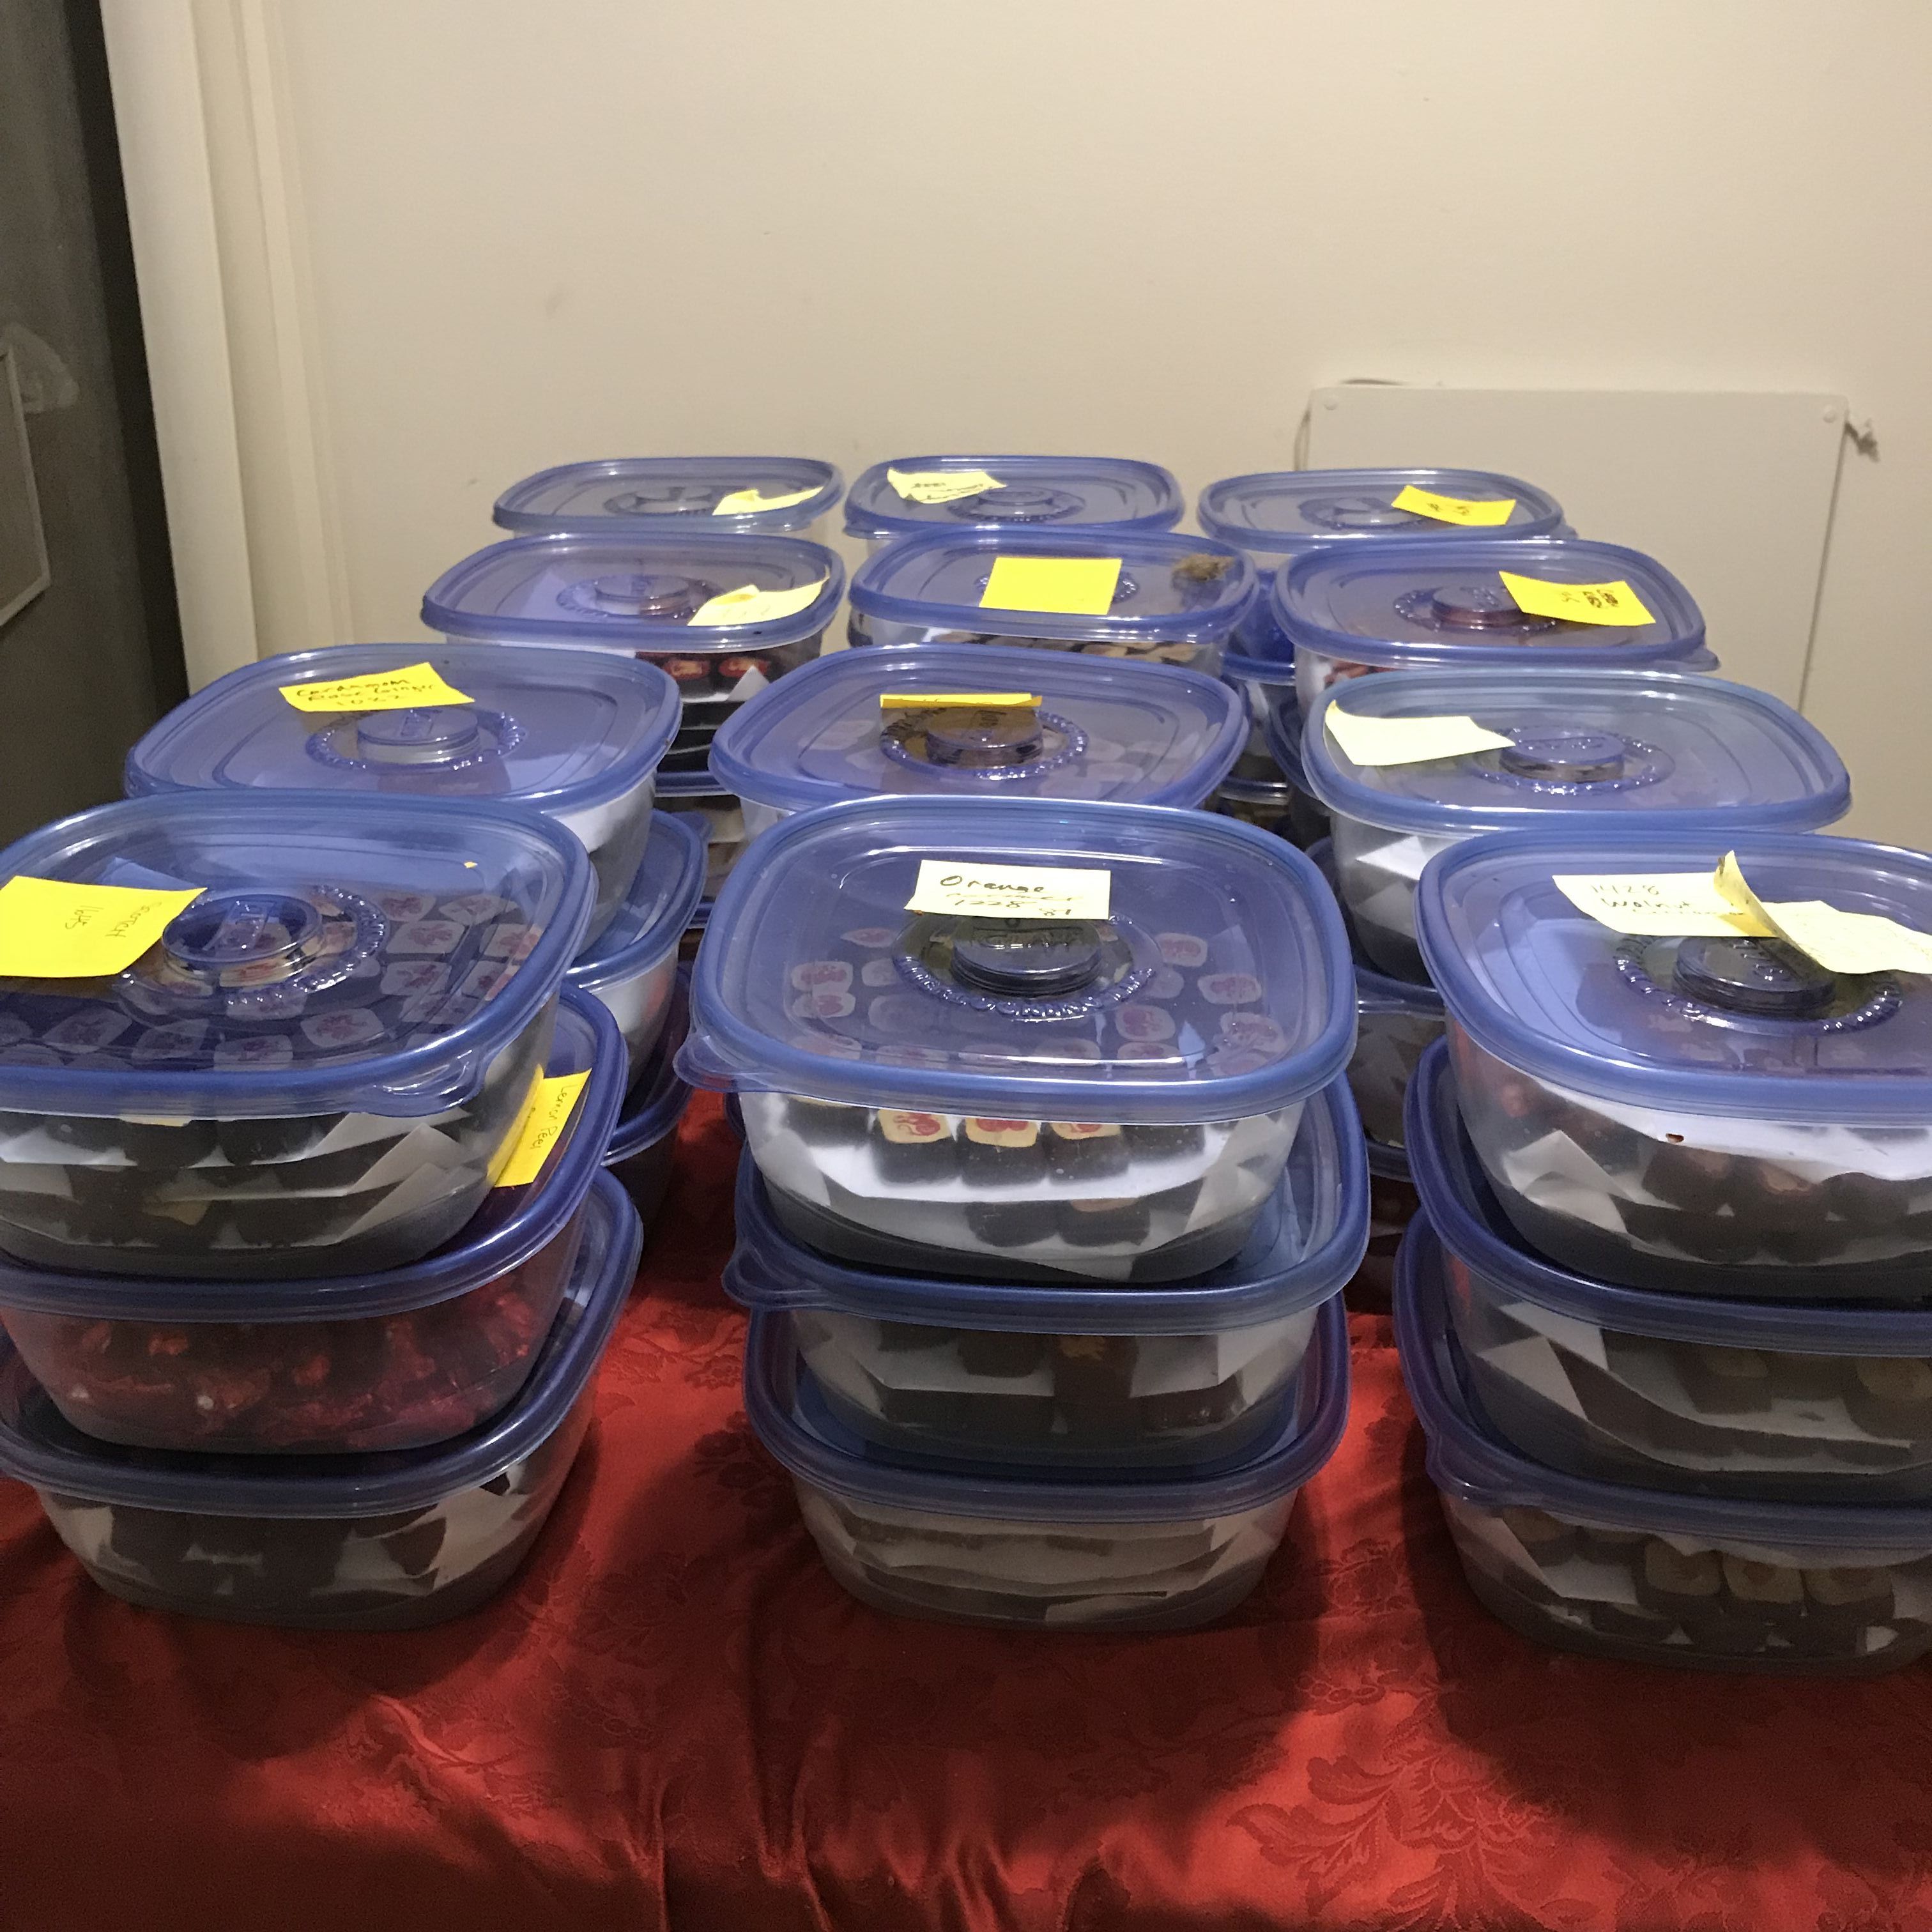
This year’s chocolate harvest was a bumper crop! We made 38 flavors of fudge, caramels, candied citrus peels, and fruit jellies, totaling 118 pounds, 6 ounces. We ran dangerously low on chocolate at the end – was 106 pounds of chocolate going to be enough? – but it turned out fine; in fact, there was a whole 6 pounds left over.

Here are the finished chocolates, neatly boxed up and ready for packing:

118 pounds of chocolates!

And here is a little bit about the process.

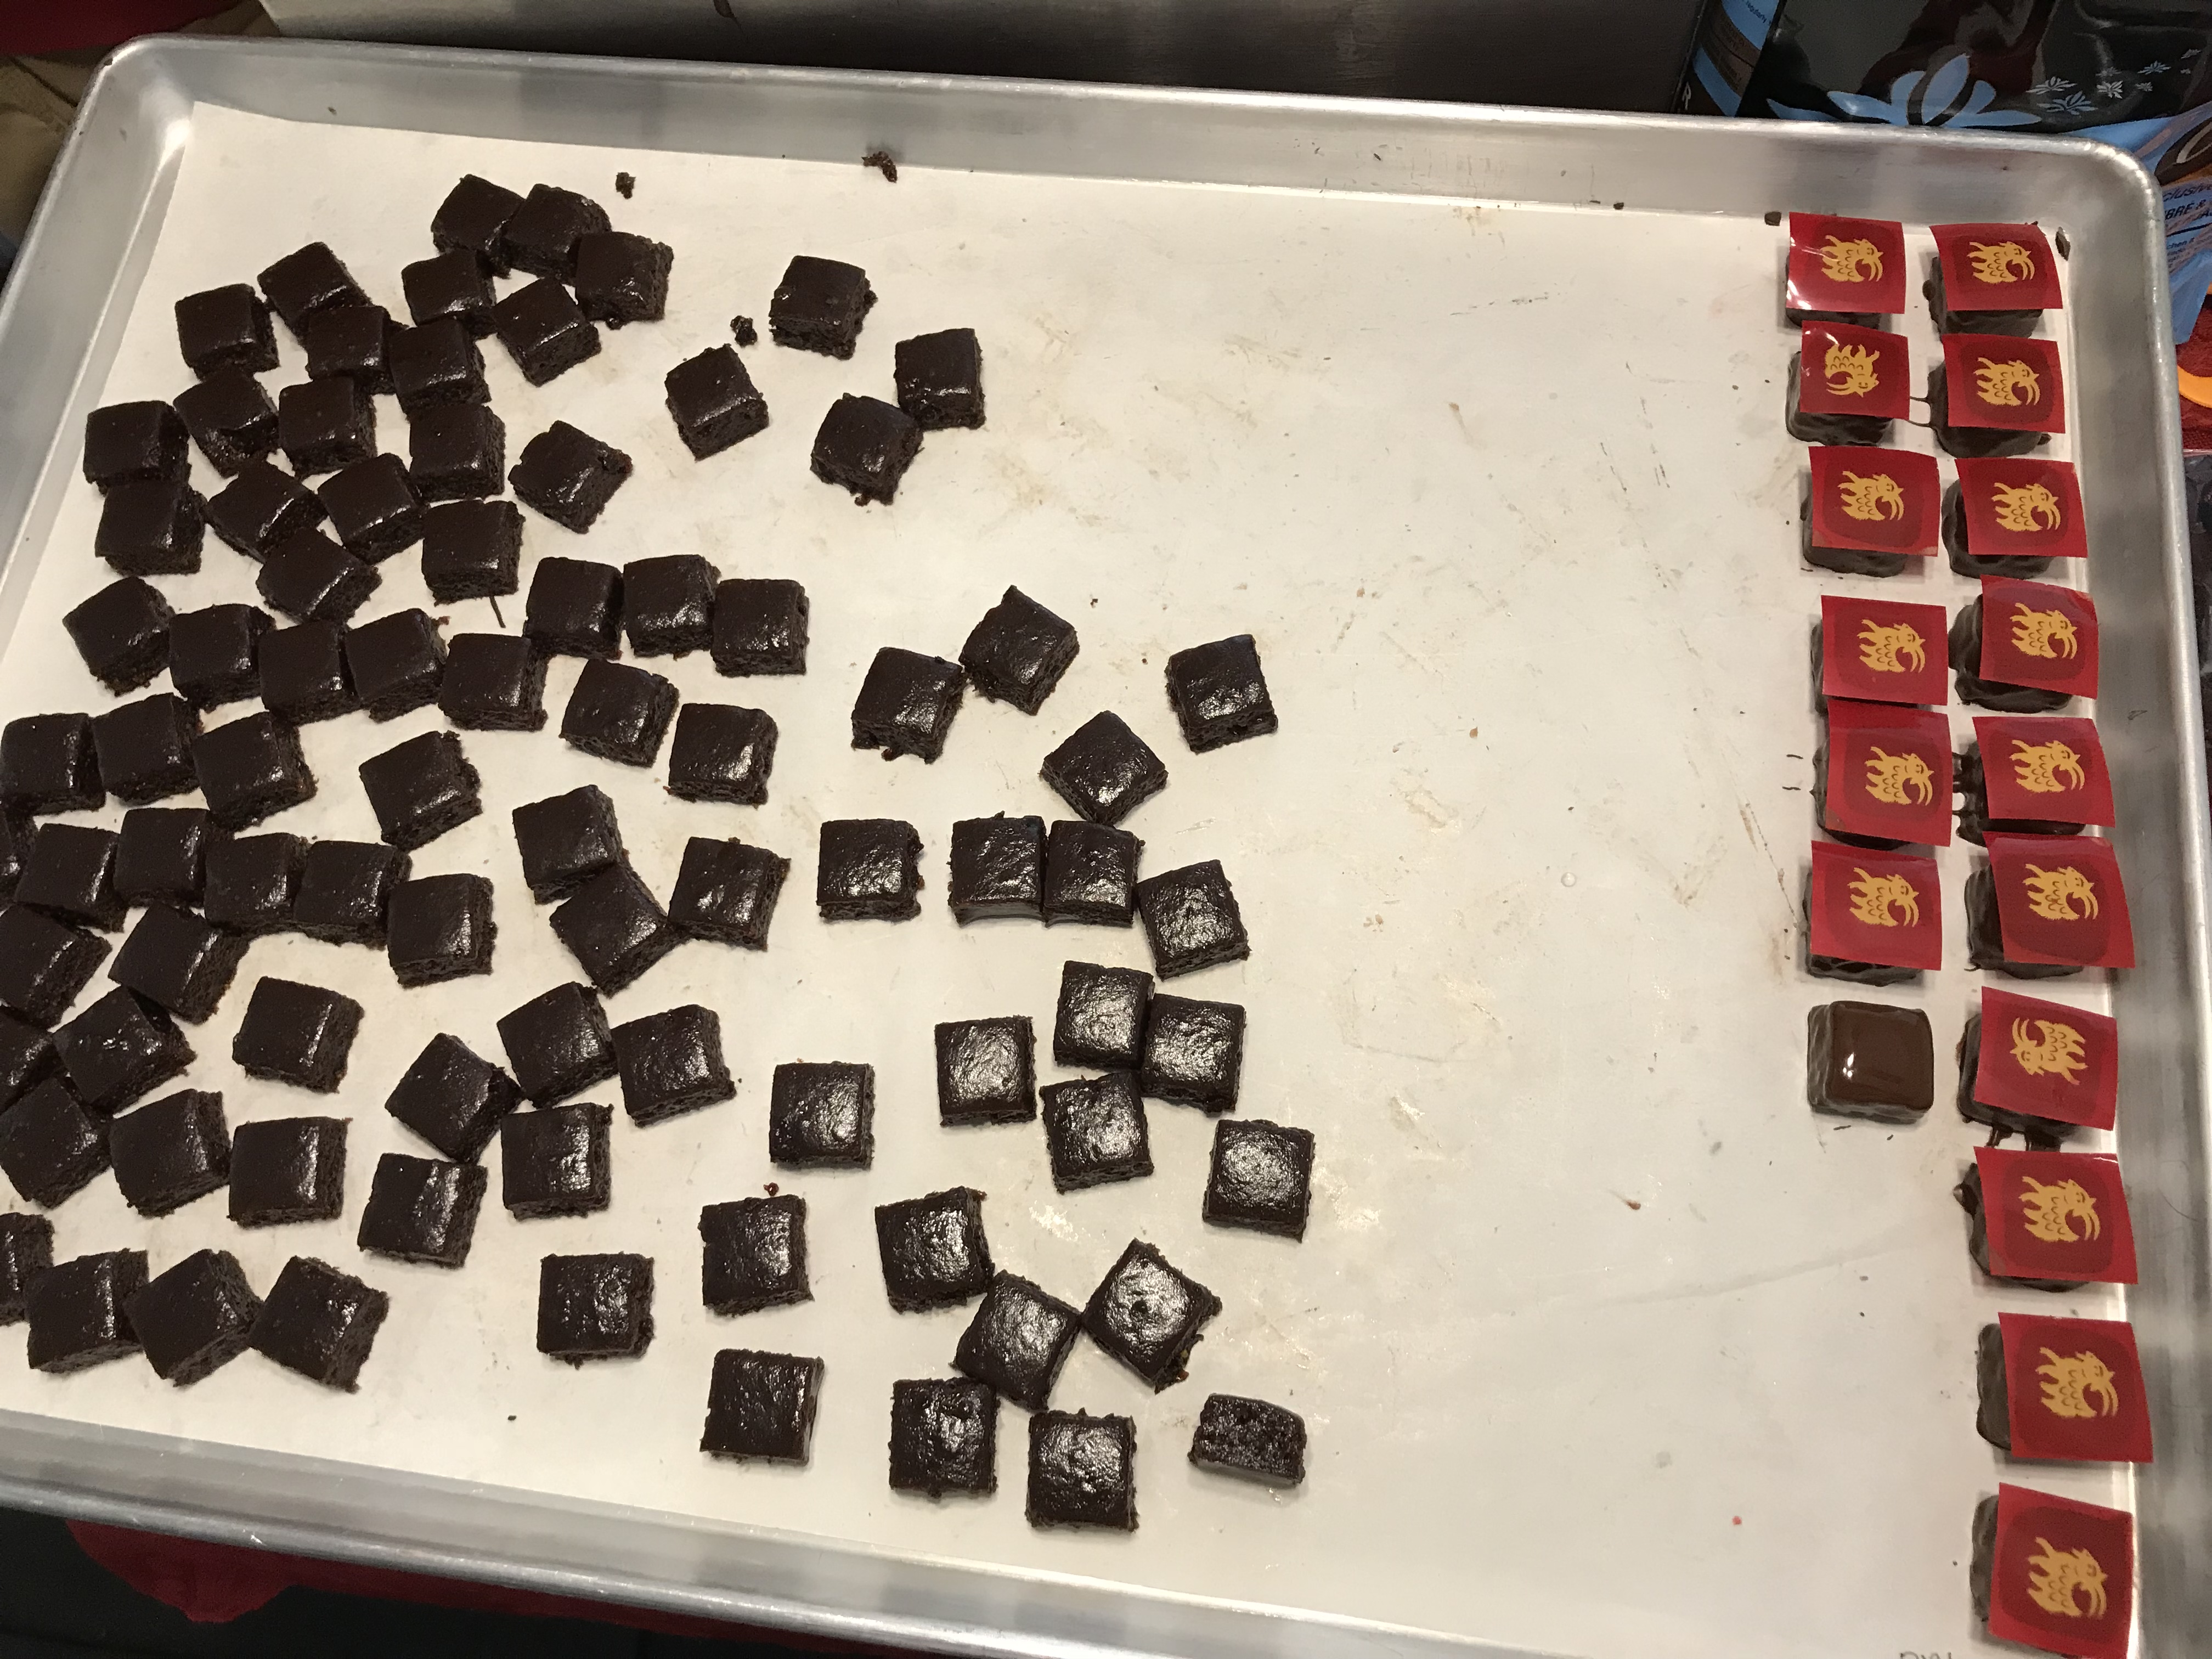
These are the prune, port, cinnamon, and honey caramels (delicious!) midway through the dipping process:

Caramels being dipped

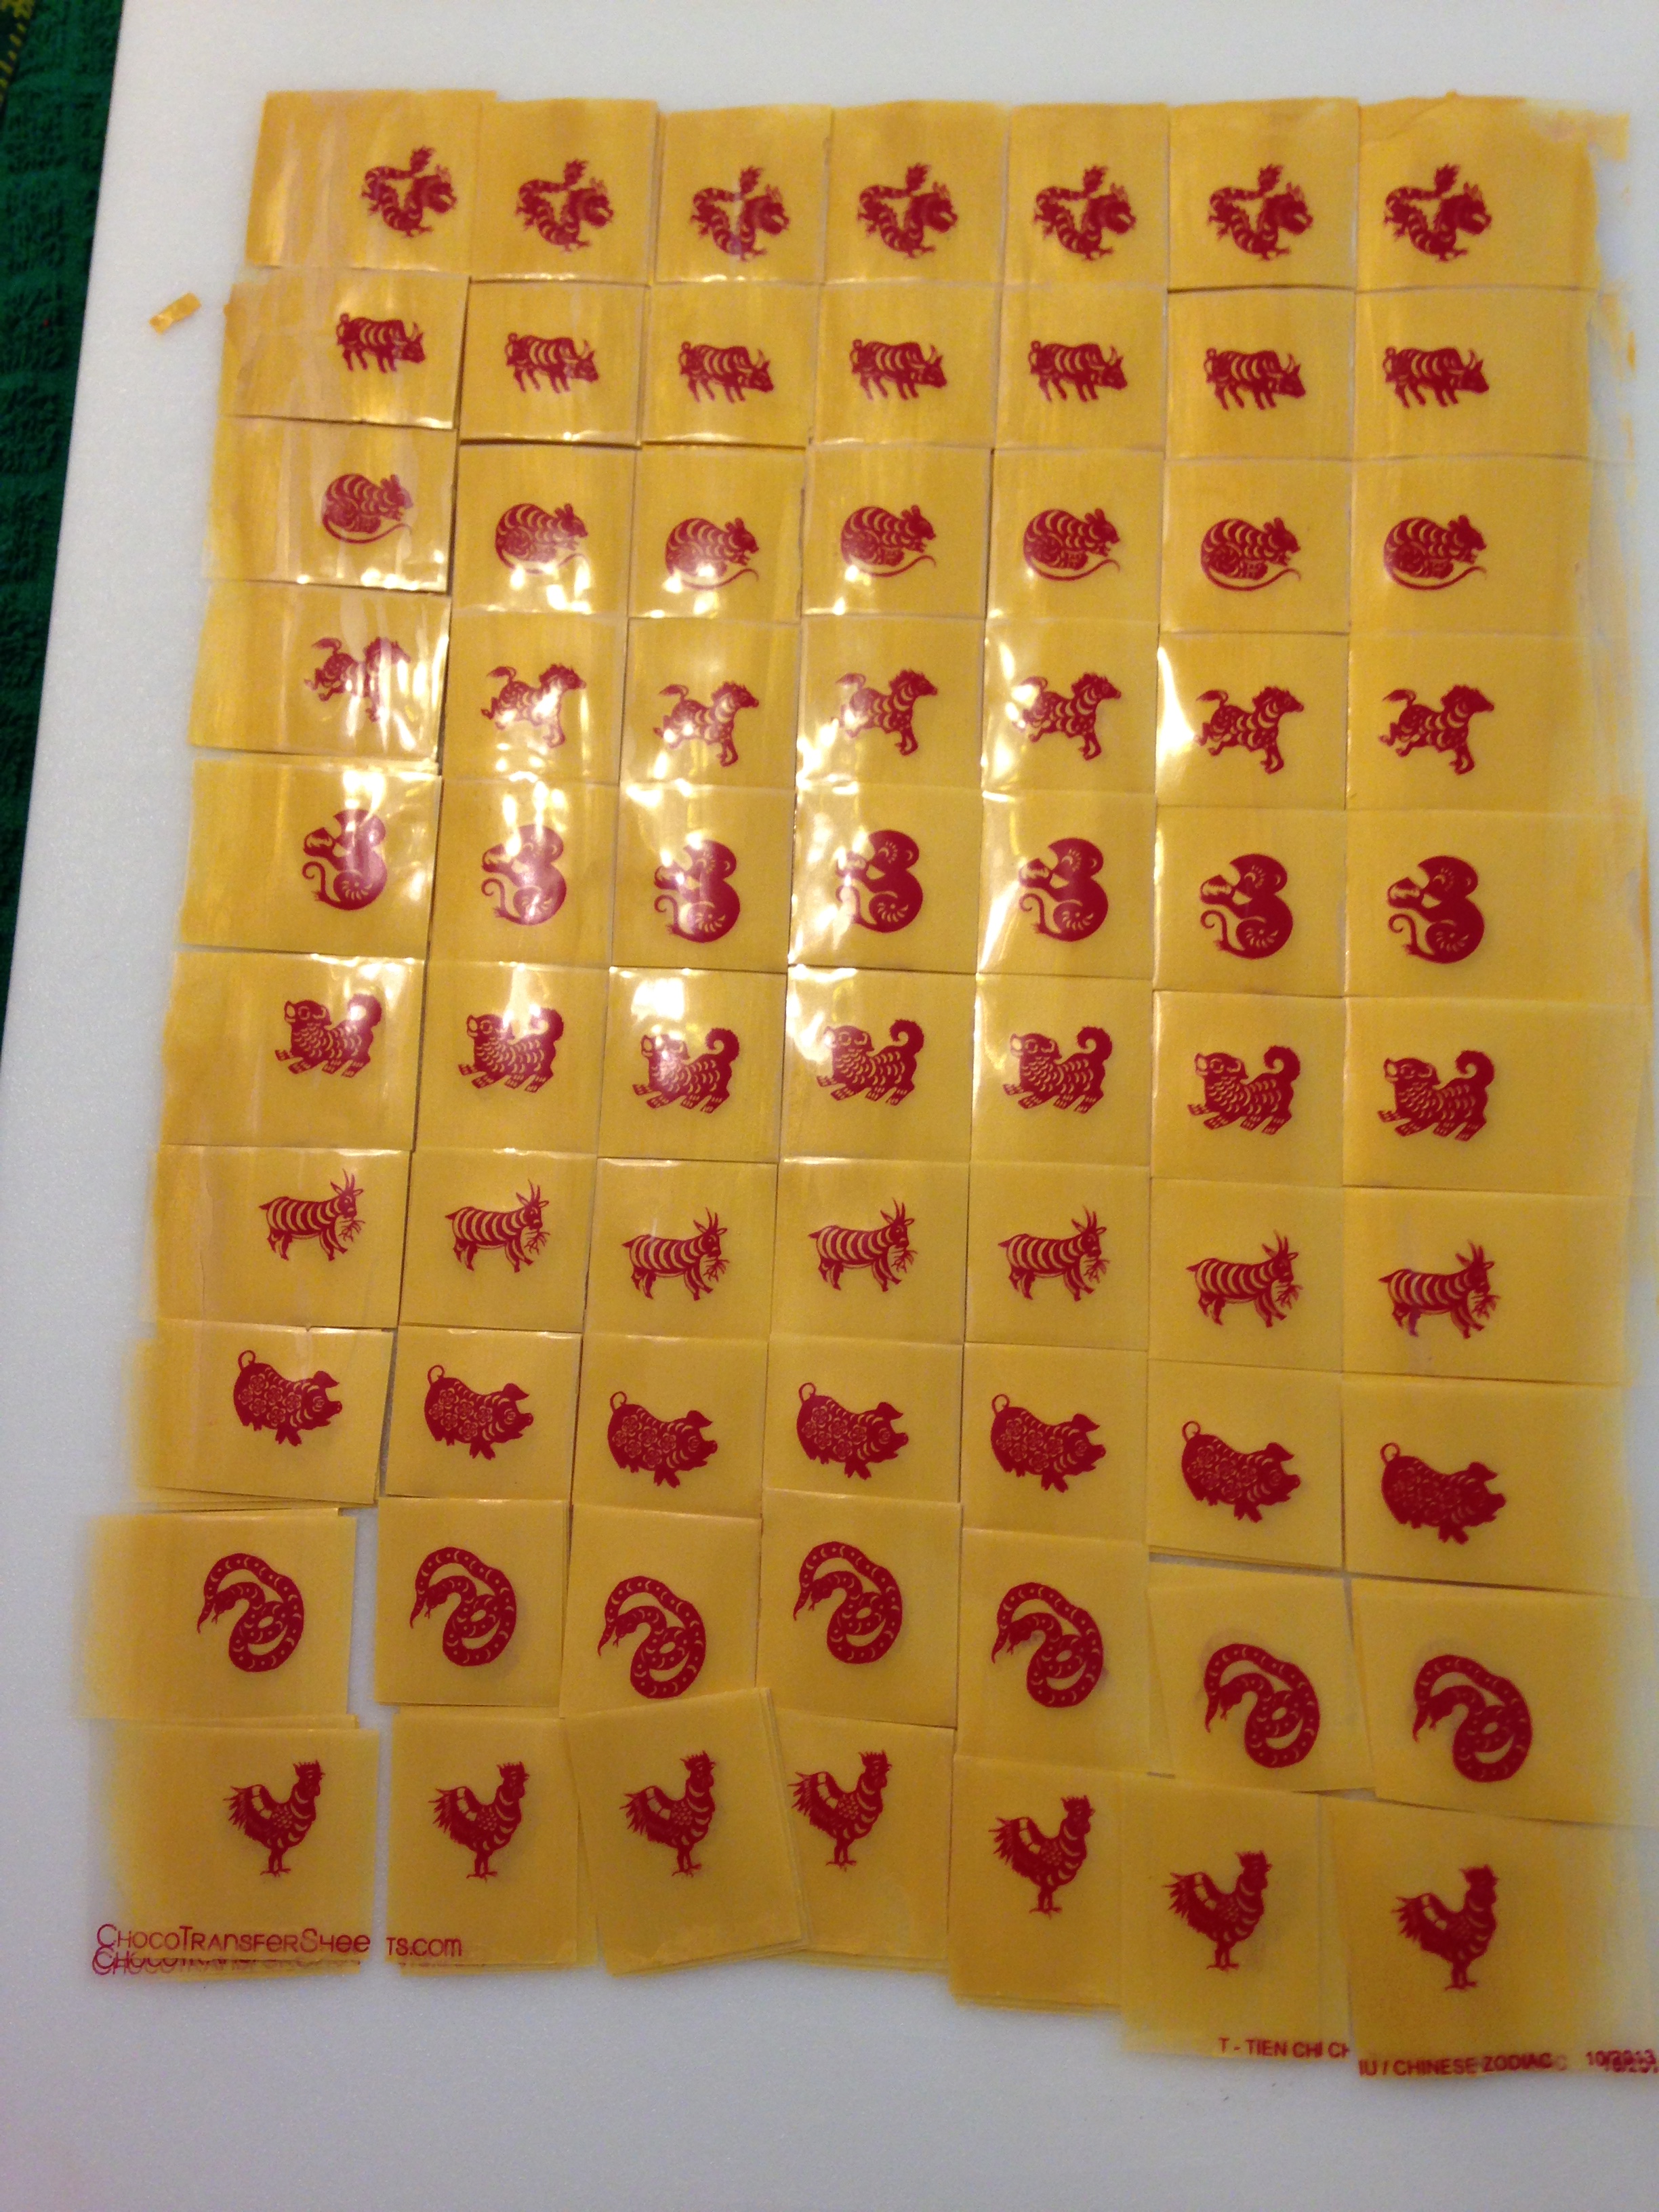
For those not familiar with the chocolatiering process, the chocolates on the right have transfer sheets on top of them (the yellow goat on a red background). Transfer sheets are basically edible decals. A sheet of acetate is printed with an image in colored cocoa butter, then placed on top of a freshly dipped chocolate. The warmth of the chocolate coating melts the cocoa butter, which fuses with the melted chocolate. After the chocolate hardens, you can pull off the transfer sheet, leaving the cocoa butter image behind.

You can buy preprinted chocolate transfer sheets, but because I wanted a distinctive look, I had a set of transfer sheets custom printed with Chinese paper-cut animals. This harkens back to an old family tradition. When I was a kid, every year we would screen print our own Chinese New Year cards, in two colors, using a Chinese paper-cut animal from my parents’ collection as the cover of the card. (The animal, of course, always corresponded to the Chinese Zodiac animal whose year it was: a tiger for the Year of the Tiger, a horse for the Year of the Horse, etc.) The printing process was an all-family job: my mom designed the cards and cut the paper to size, my dad printed the cards, and we kids would tear around all over the house laying the printed cards out to dry on the floor. It was a ton of fun, and I like to think that by sending out holiday chocolates with Chinese paper-cut animals on them, I’m continuing the tradition.

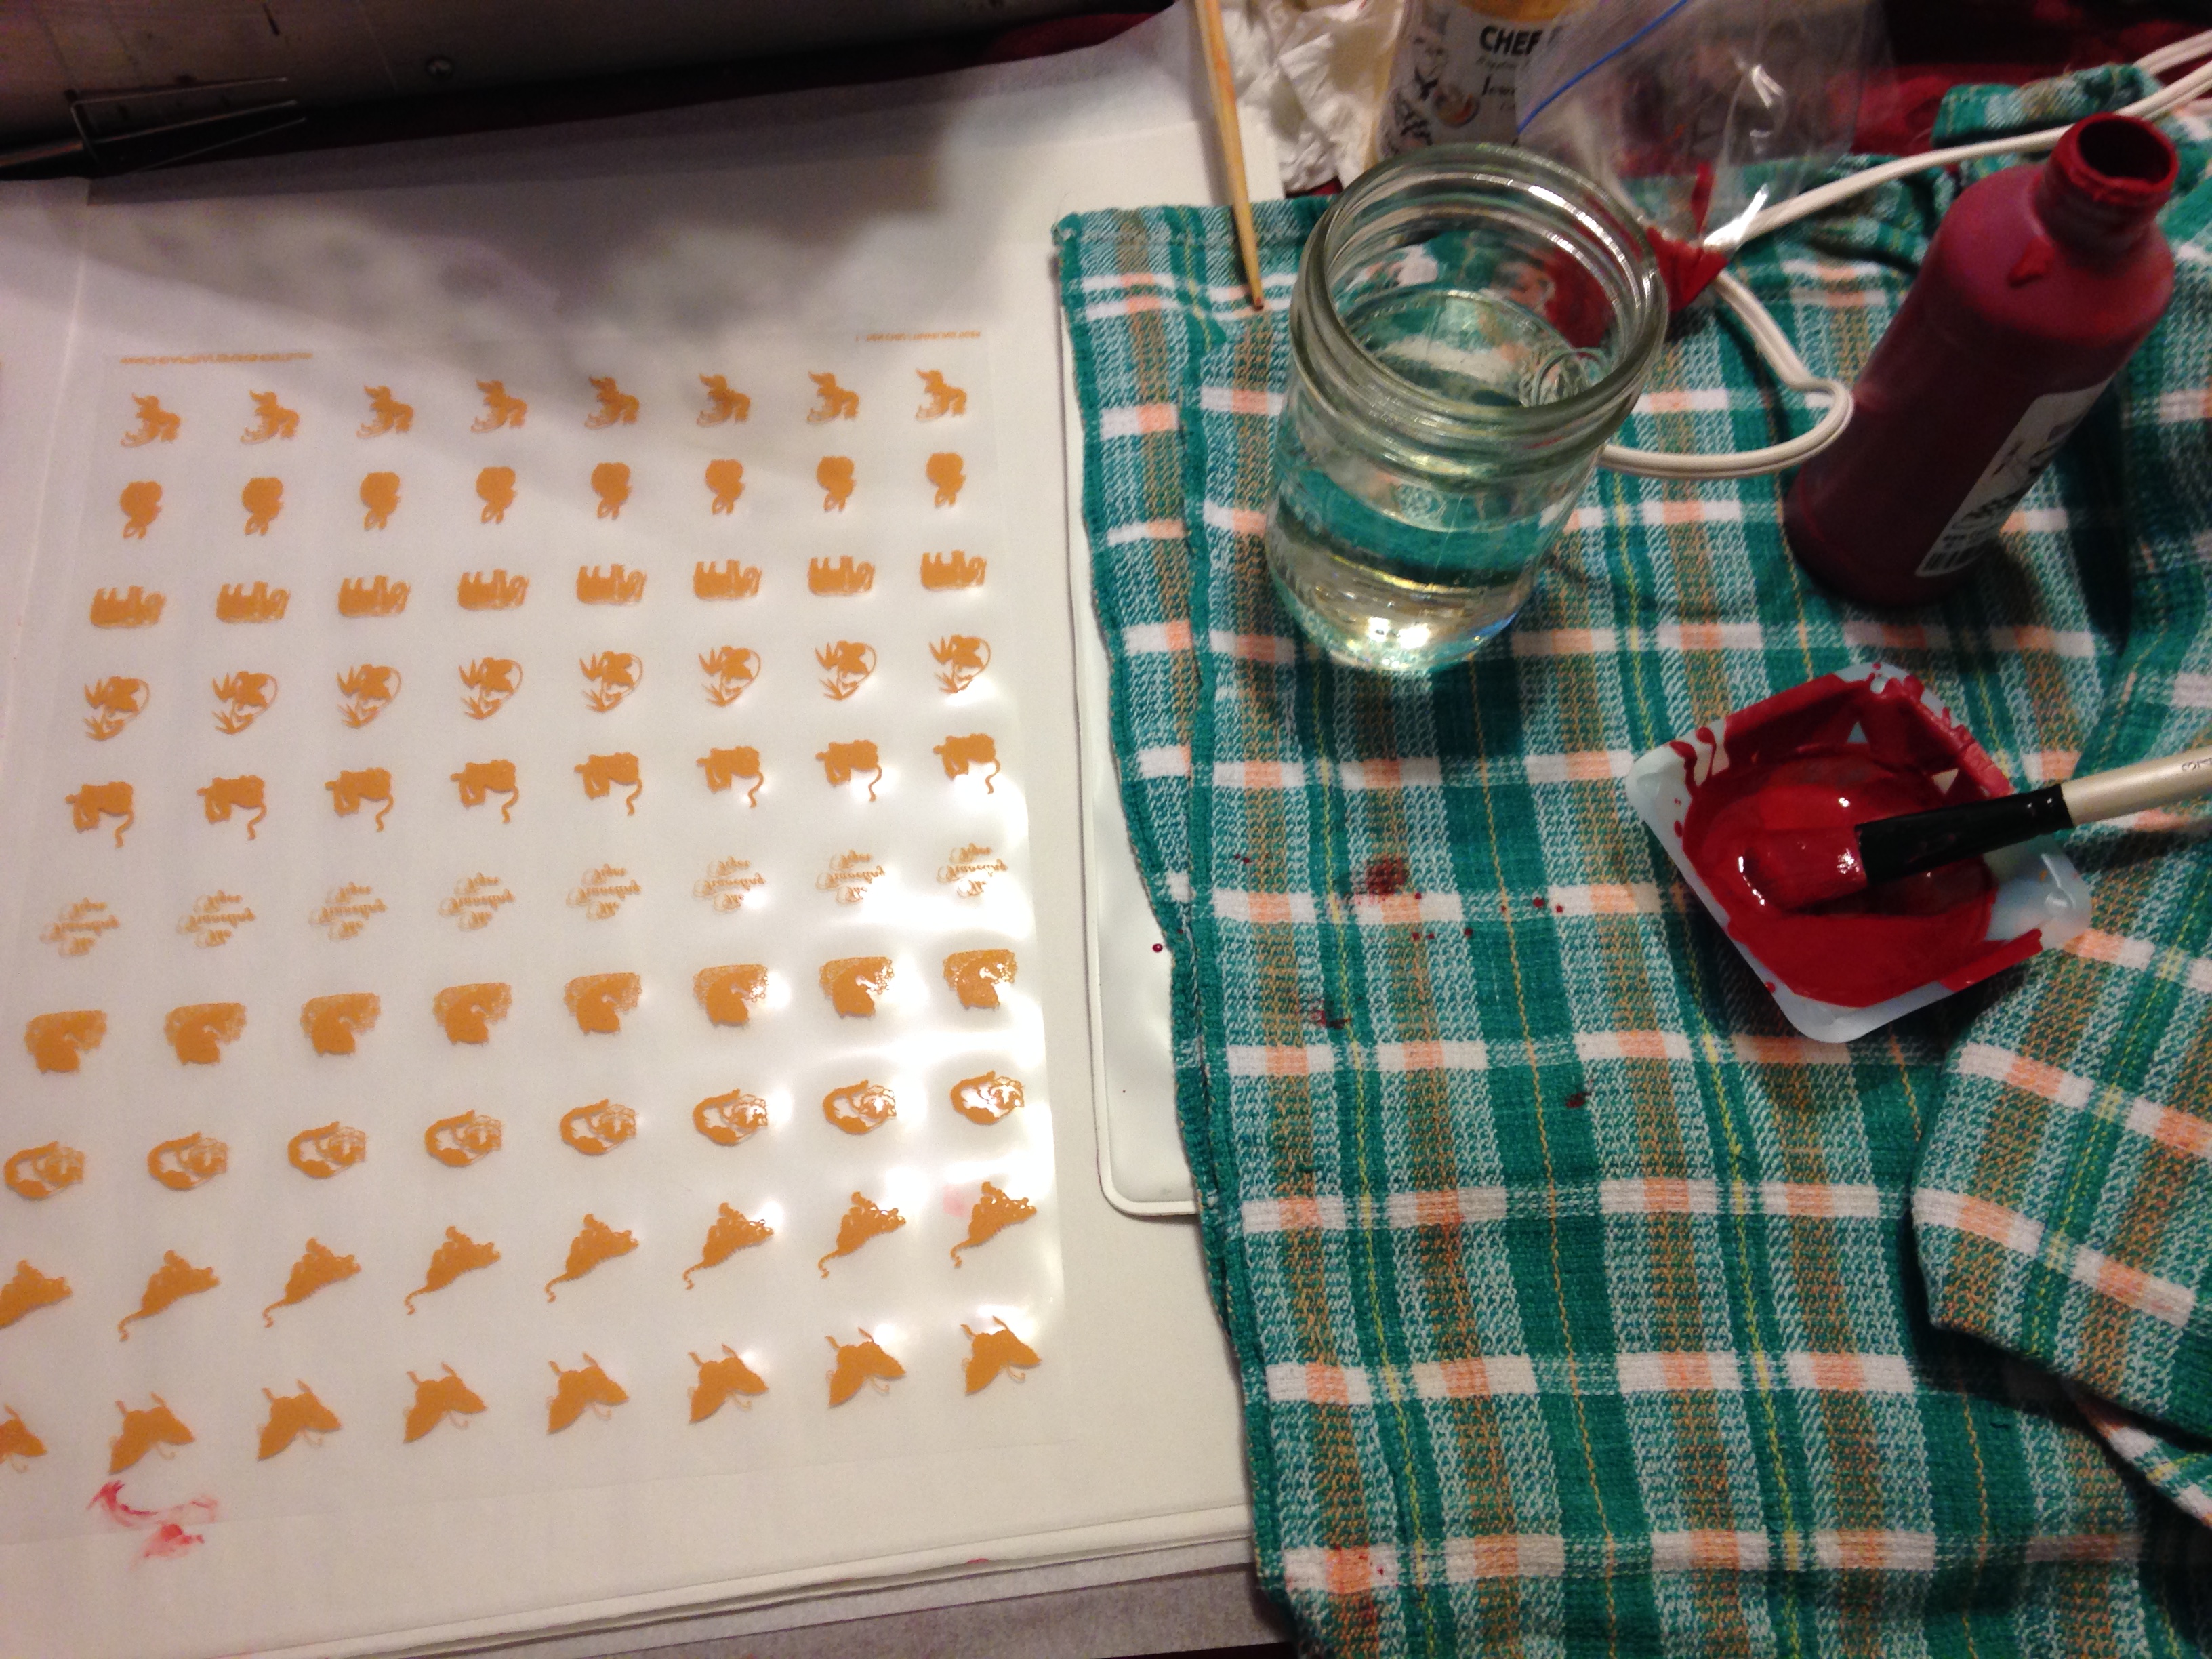
Working with the transfer sheets can be challenging, however. As delivered from the manufacturer, the transfer sheets are just one color:

“bare” chocolate transfer sheets

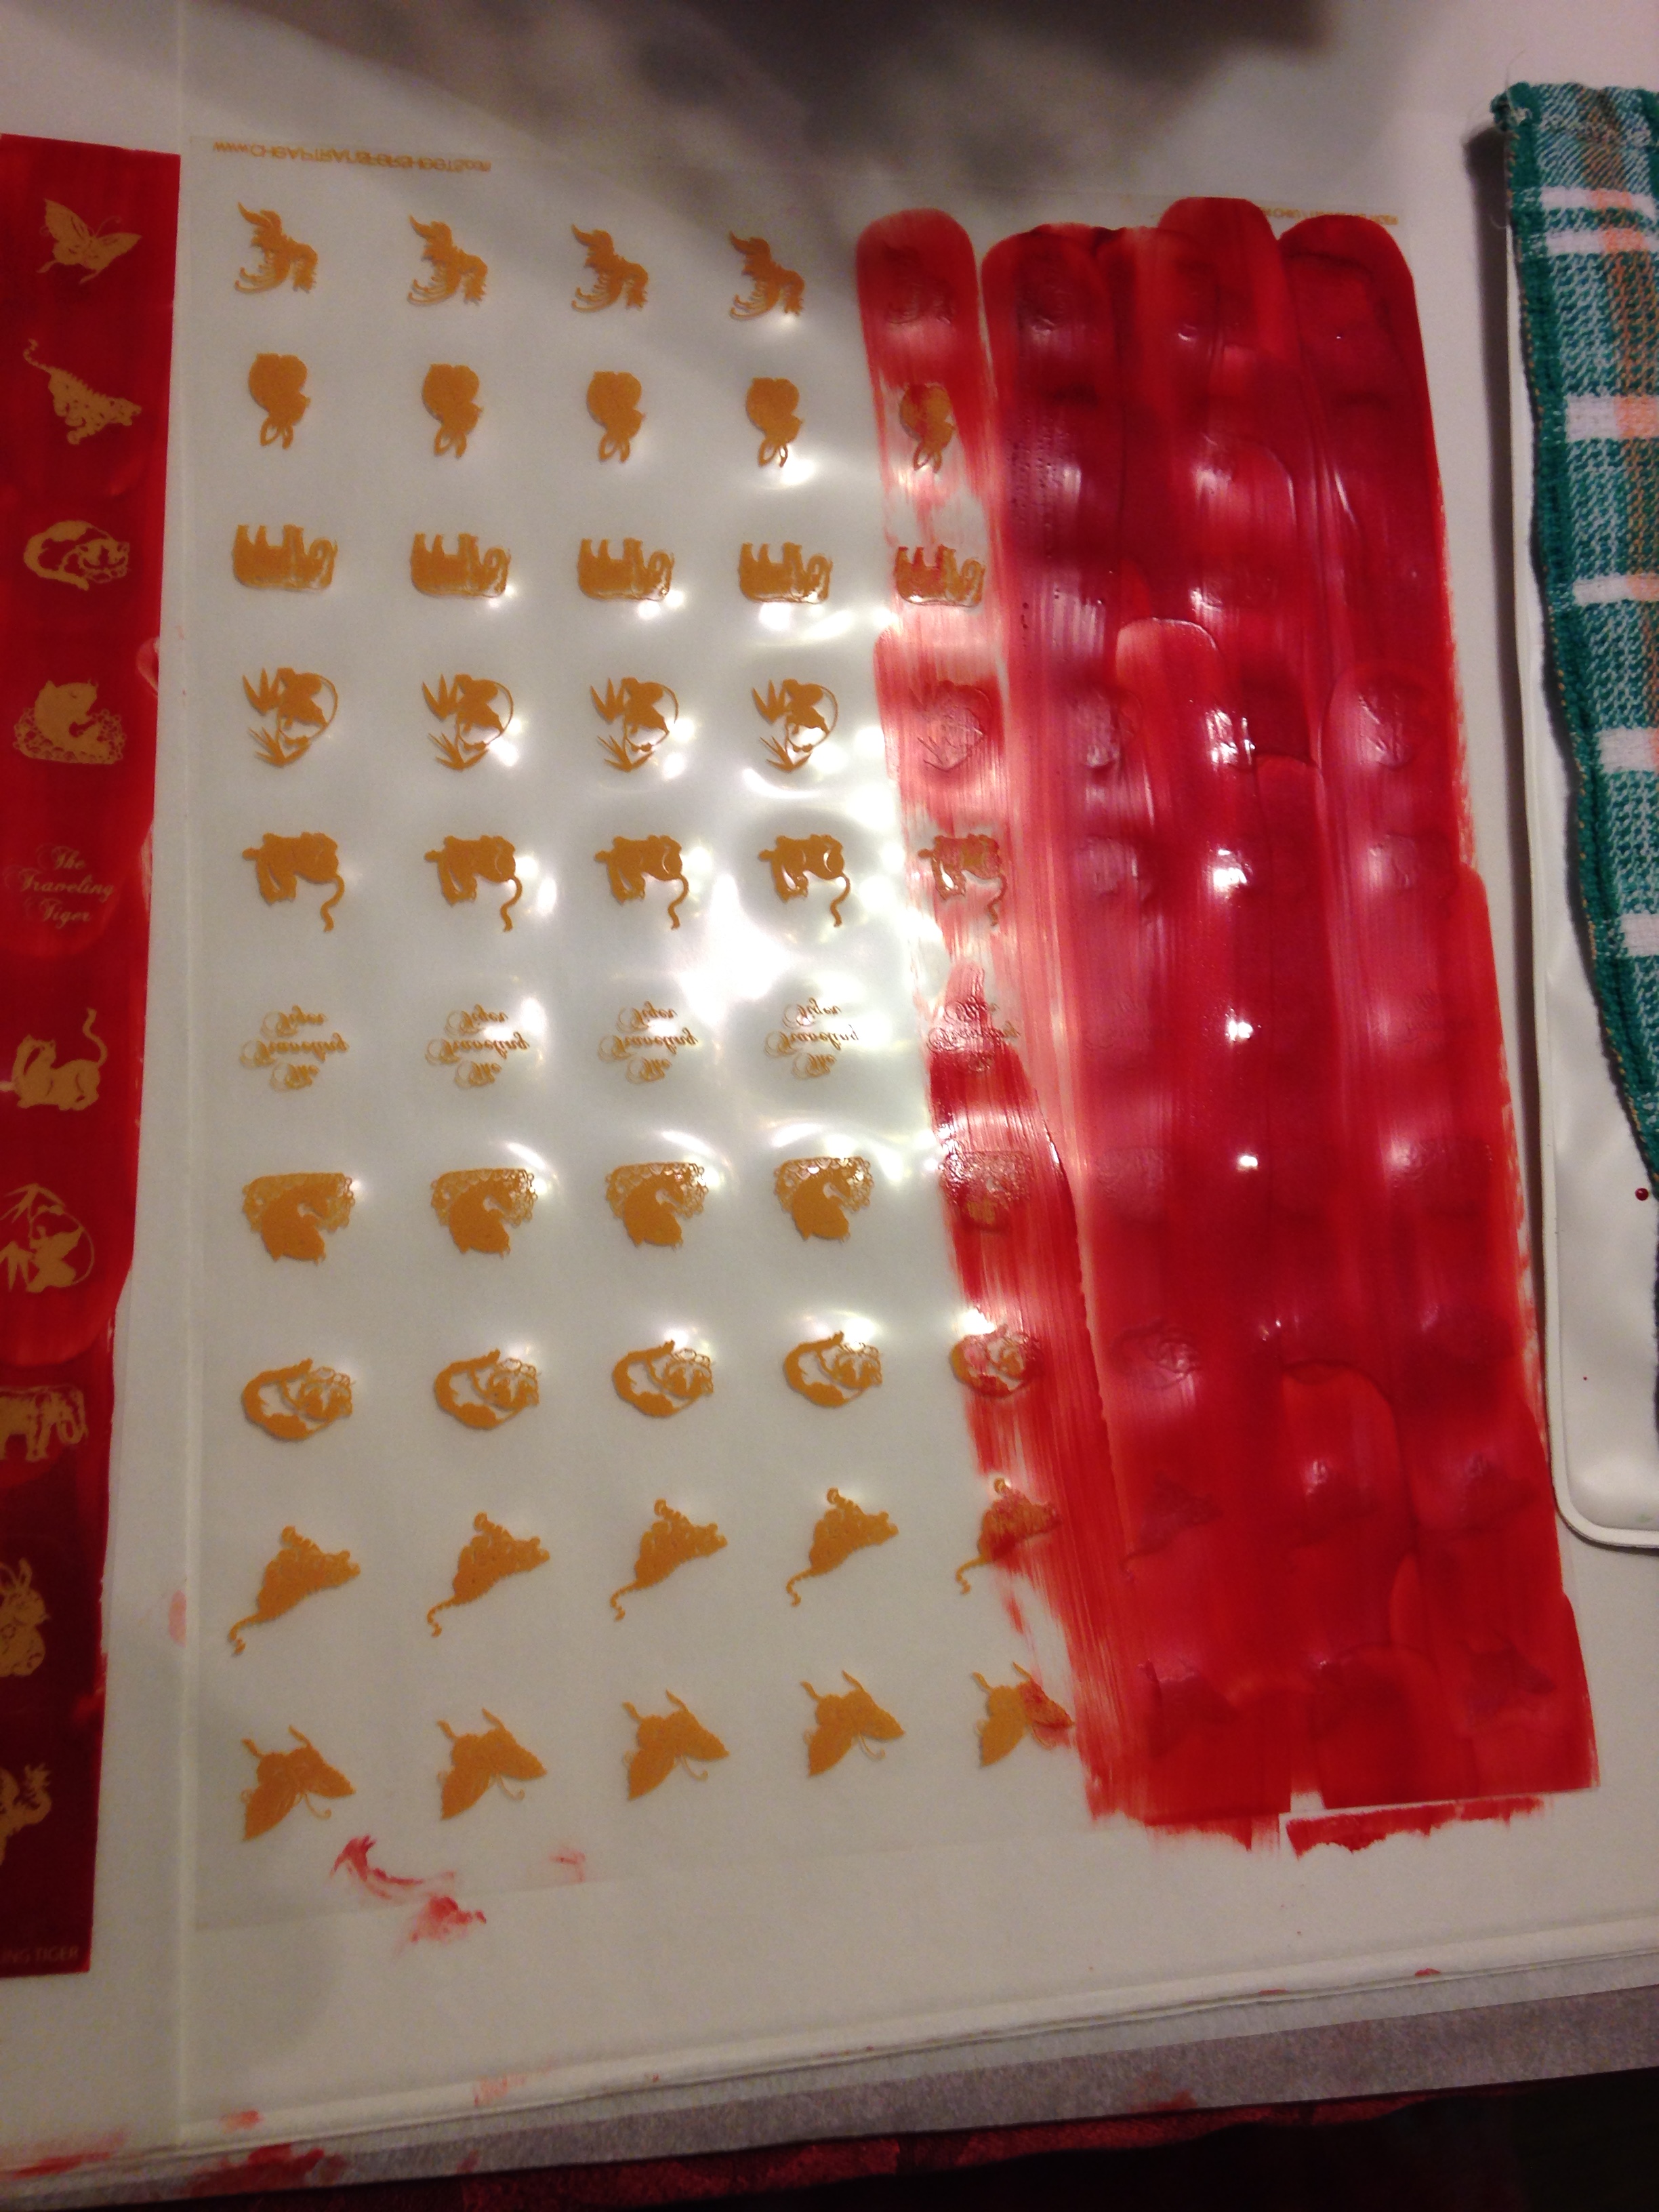
I tried pre-printed two-color transfer sheets in the past, but had trouble getting the image to adhere. So now I hand-paint each transfer sheet with colored cocoa butter:

chocolate transfer sheets partially painted

Cocoa butter contracts as it hardens, so the transfer sheets need to be allowed to harden for a day or two with a weight on top to keep them flat.

After that comes the cutting – one sheet at a time, because the acetate shifts and the cocoa butter backgrounds tend to crack if the sheets get stacked:

chocolate transfer sheets - cut
chocolate transfer sheets – cut

And, finally, the different images need to be separated and stacked, each in its own container, until ready to dip.

This may not sound too awful, but when you consider that I typically use about 120 of any given motif in a batch of chocolates, and that there are 30 different design motifs, that’s a lot of transfer sheets to cut. 3,600 of them, to be exact – each hand-painted and hand-cut, one at a time. (Props to my friend Susan, who does most of the cutting every year.)

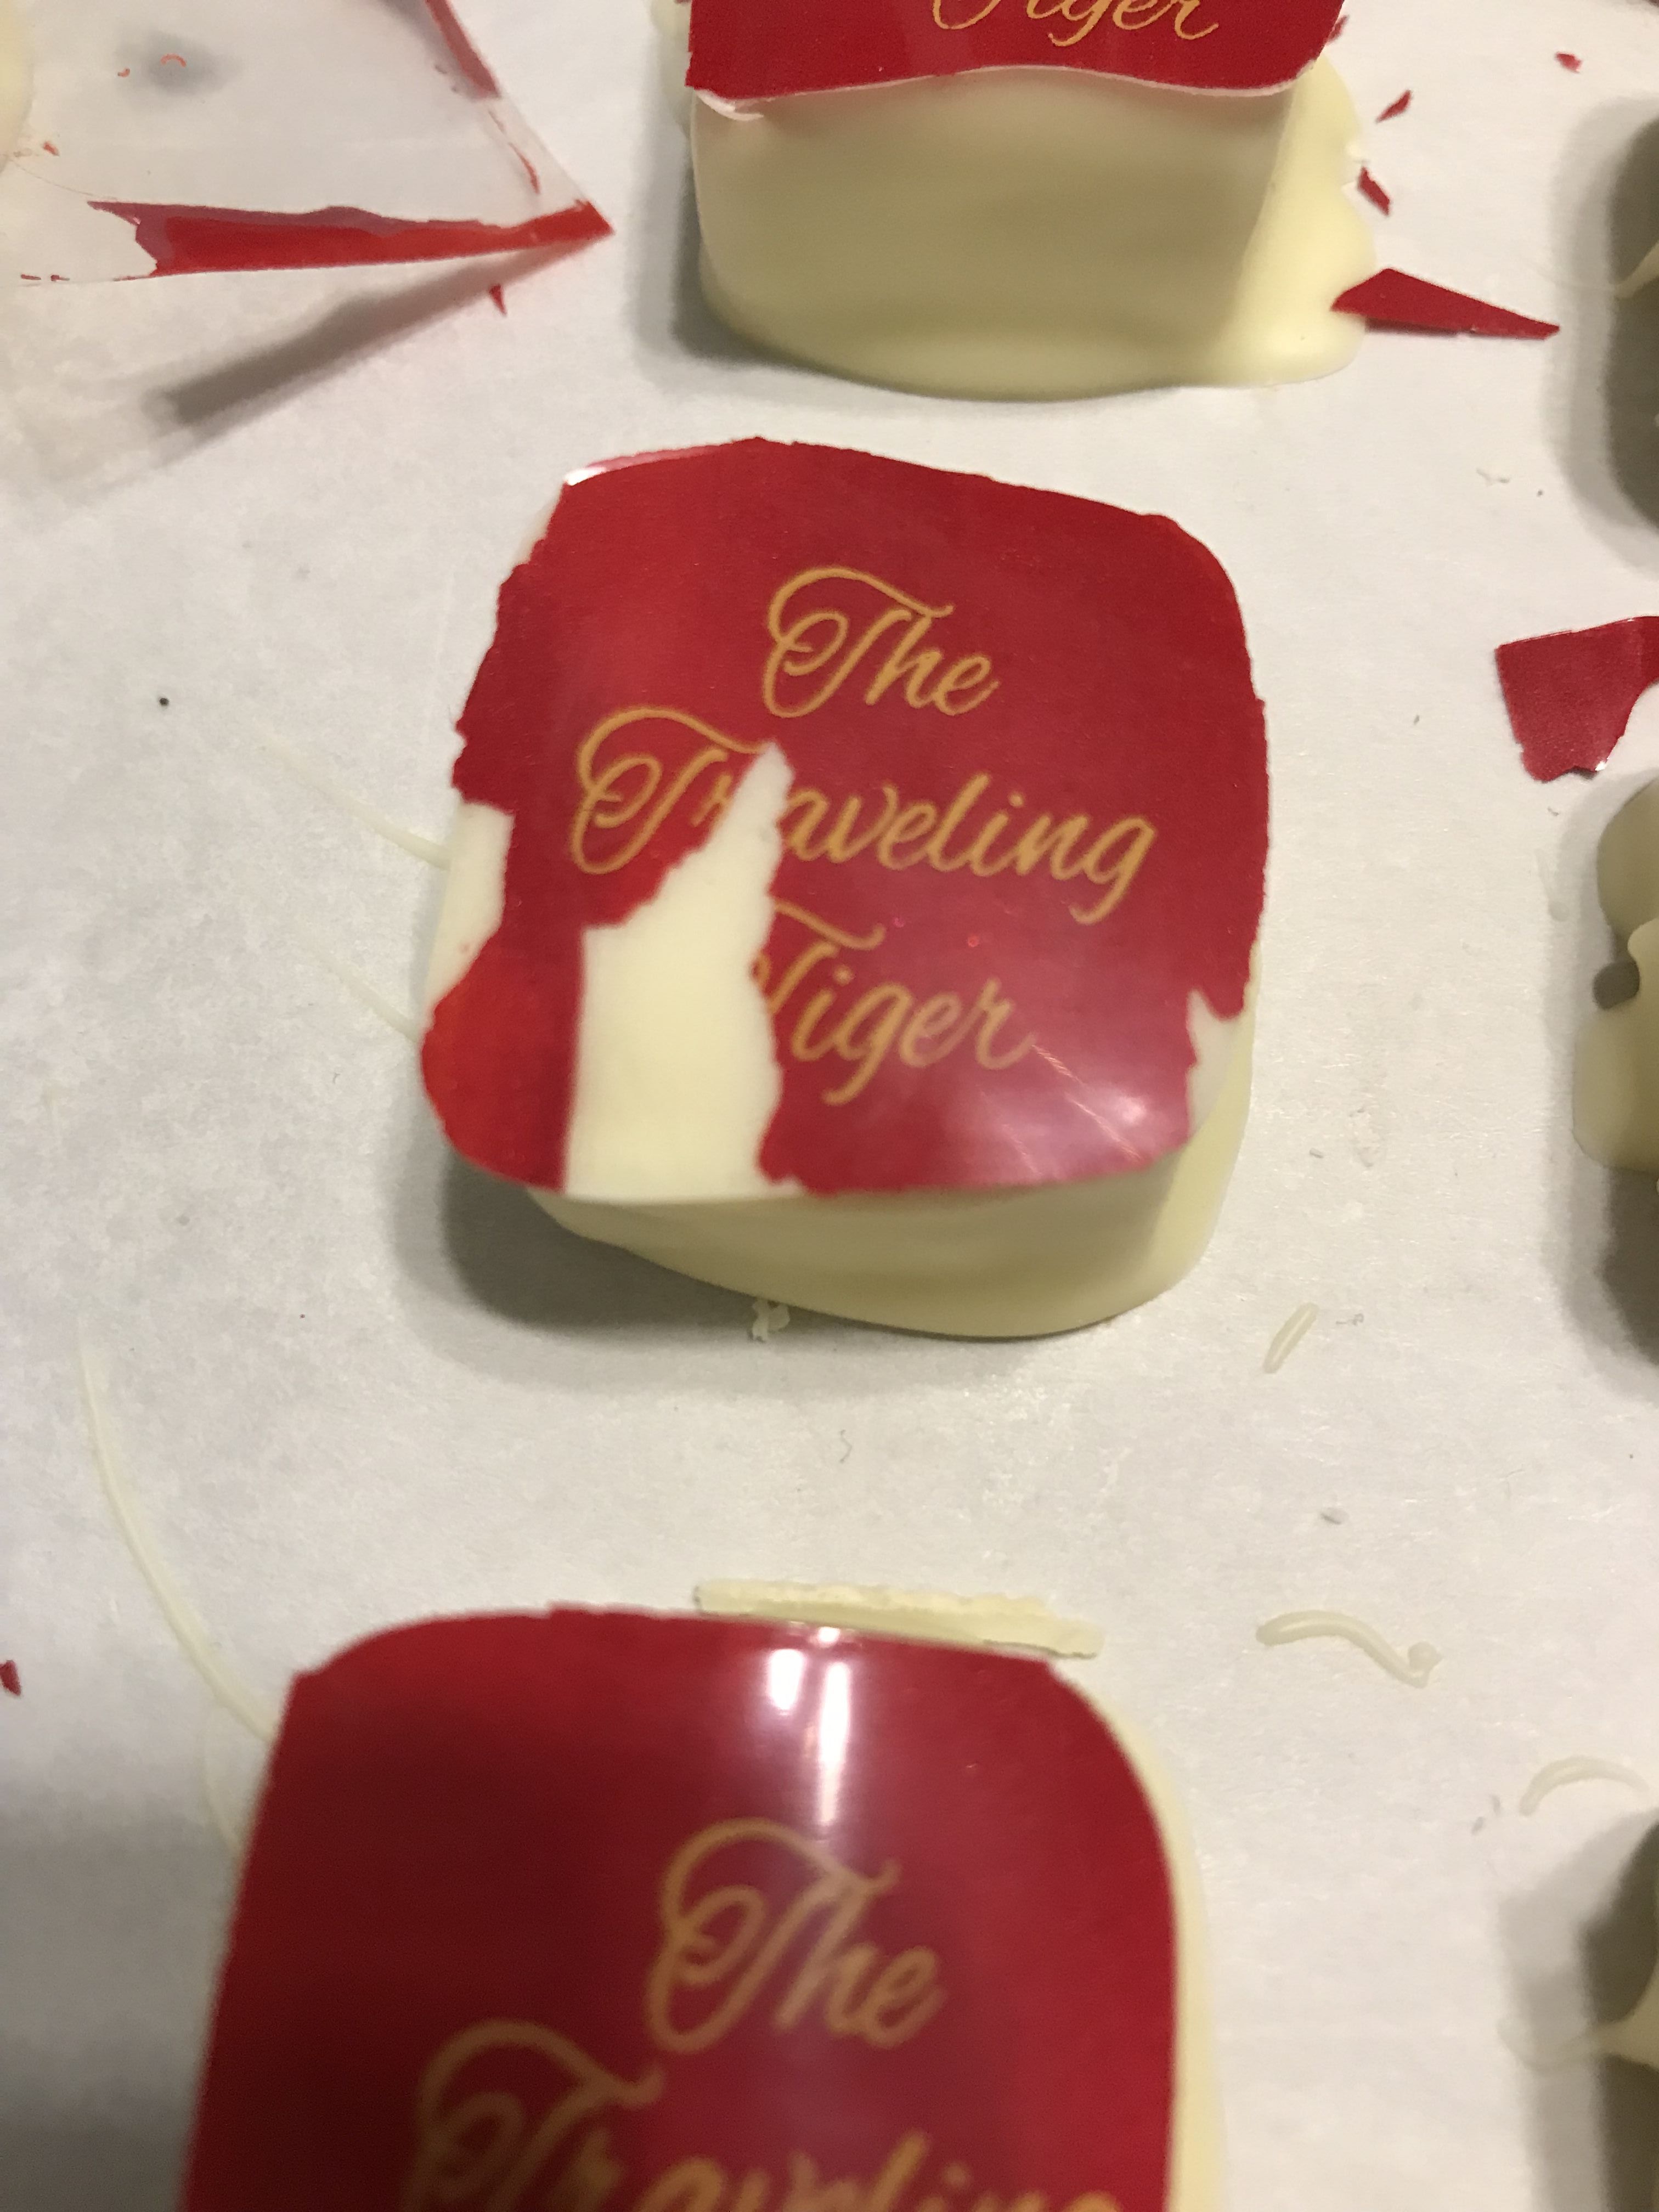
Even after all that work, transfer sheets can be tricky. Chocolate is extremely temperature-sensitive, and if the room is too warm, the transfer sheets won’t adhere properly. And the temperature during this year’s chocolate season was abnormally warm. When we started peeling the transfer sheets off the vanilla latte flavor, the room was too hot – about 75 F. The images started peeling away from the chocolates, like this:

chocolate transfer sheets - room too warm
chocolate transfer sheets – room too warm

Bad, bad. Very bad. But what could we do? We needed to clear some trays so we could make more chocolates, but the room wasn’t going to cool down any time soon.

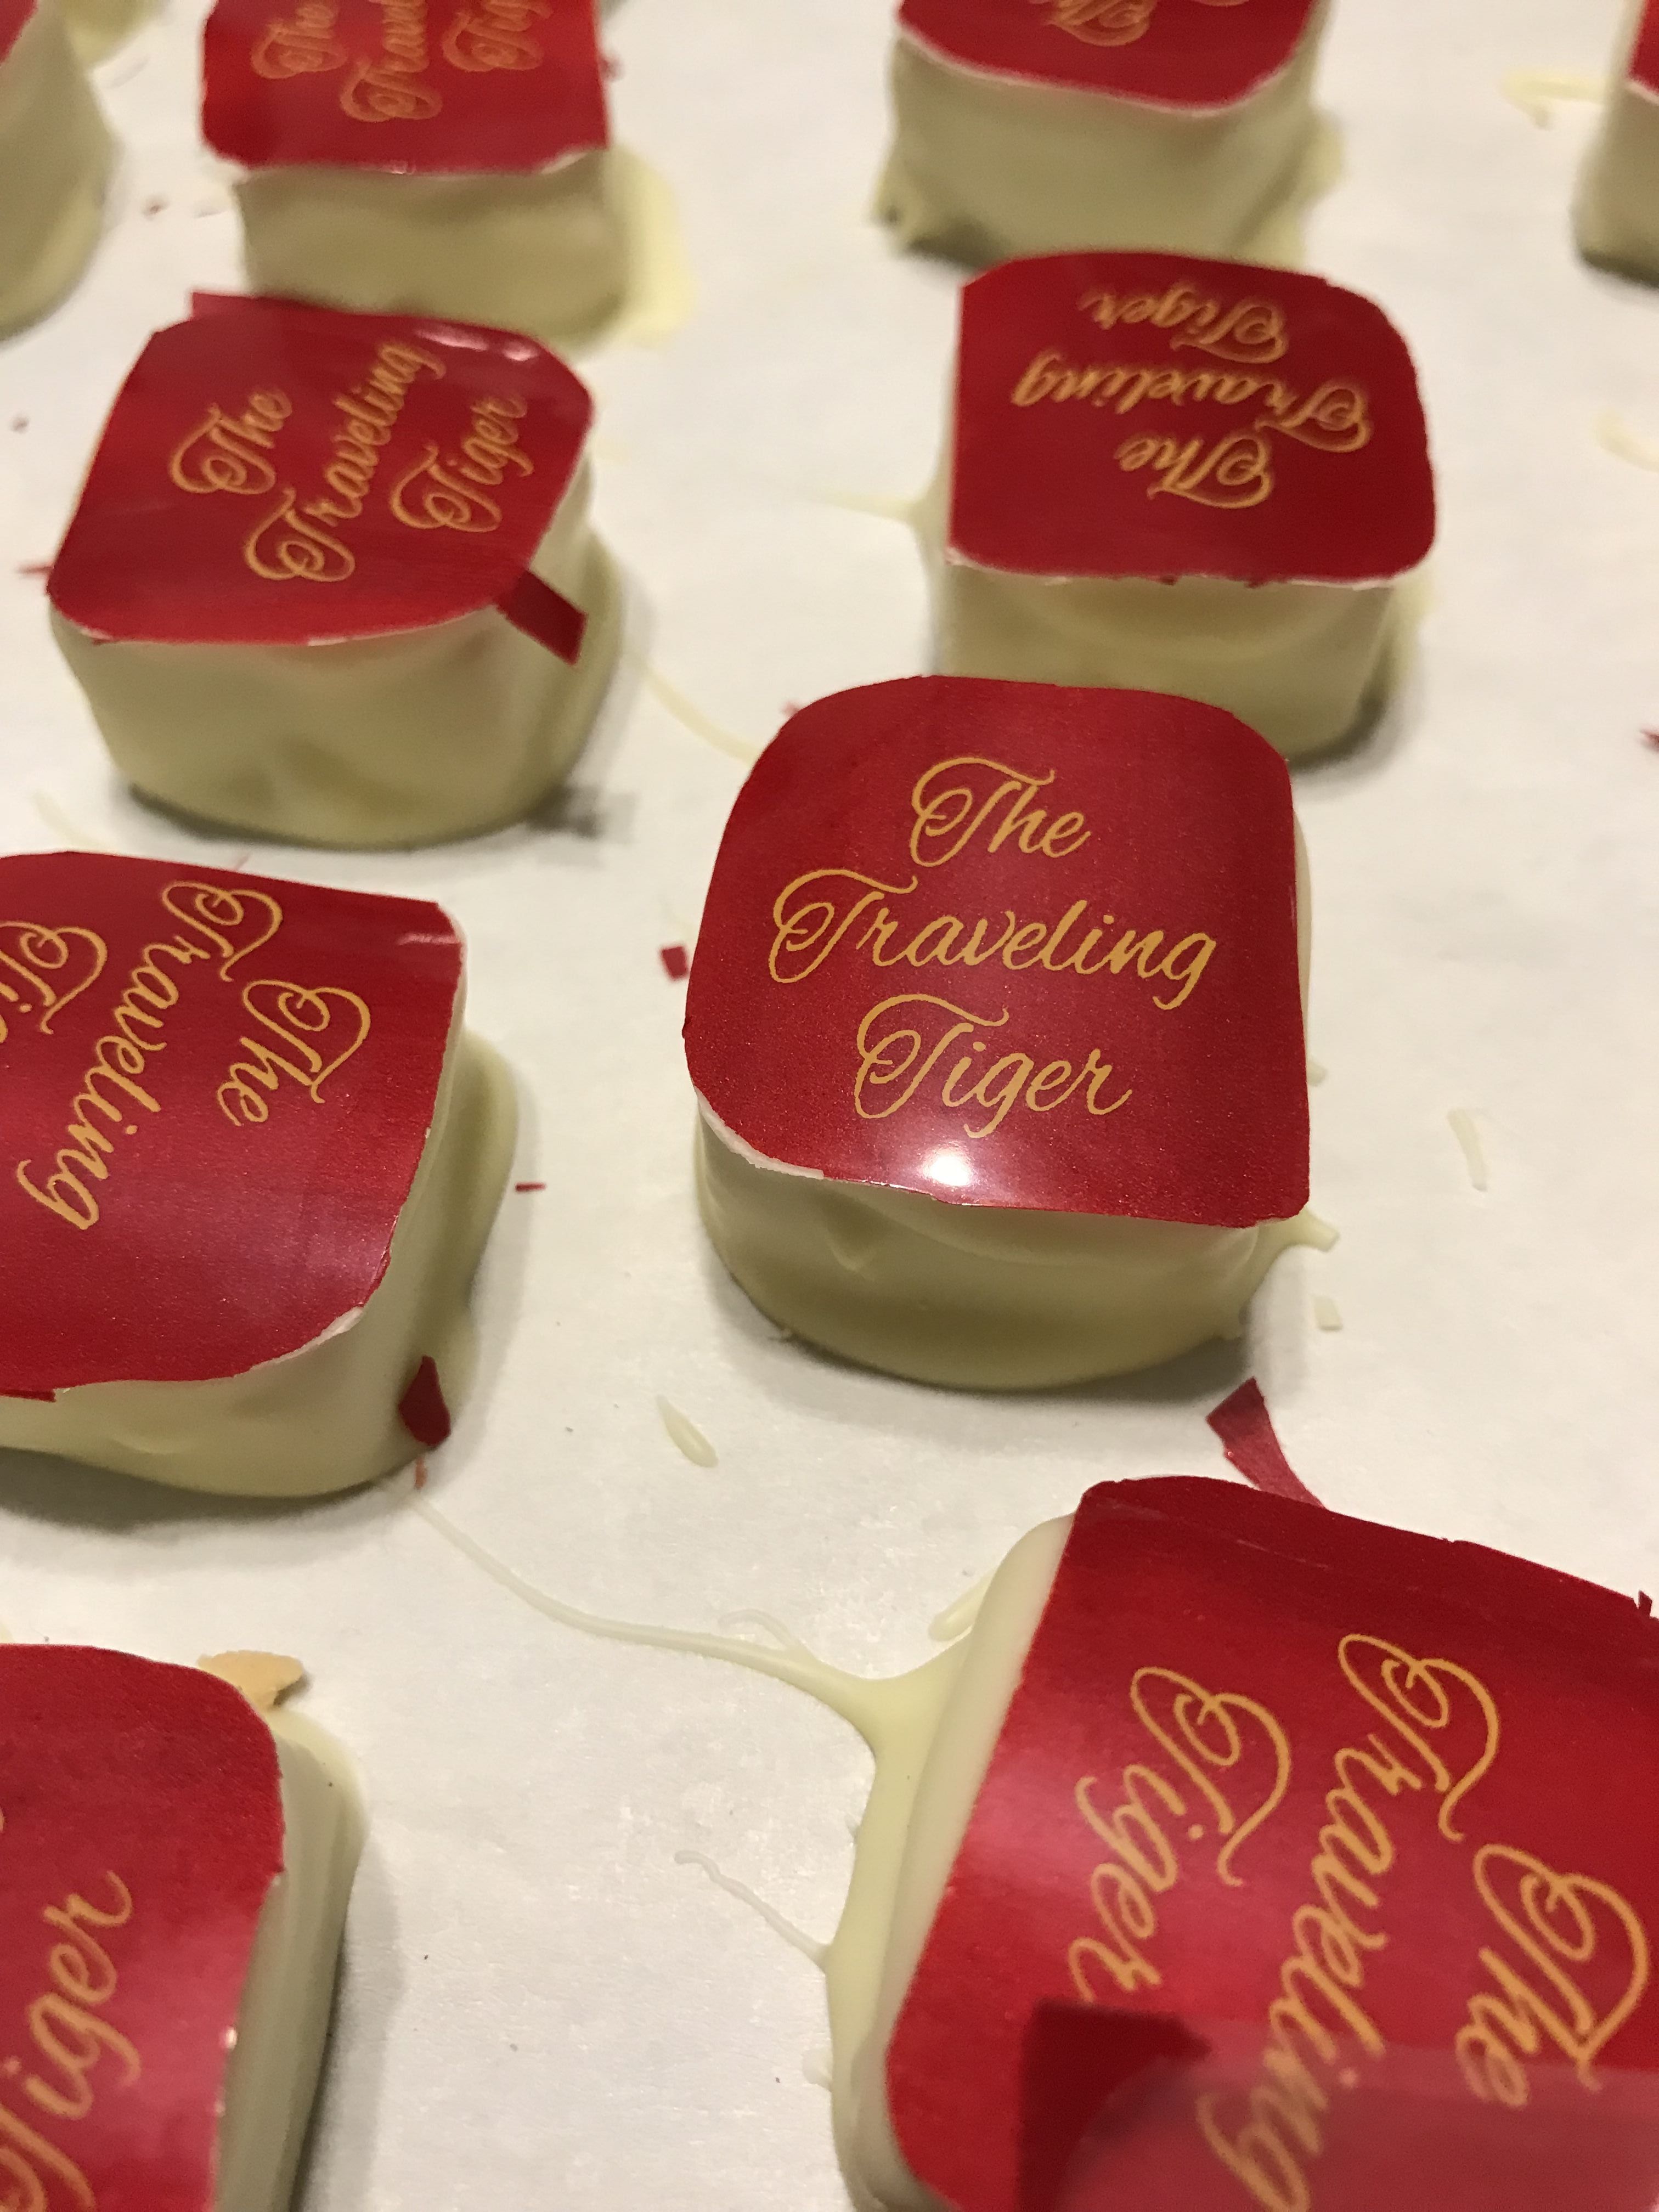
Fortunately, B. and I have a portable air conditioner in the dining room. We hooked up the air conditioner and pointed it at the baker’s cart where the trays of chocolate are stored. That got the temperature down to 65 degrees. After an hour, we tried peeling off the transfer sheets again – and voila!

properly adhered transfer sheets

I’ve often said that the challenging part of chocolatiering isn’t making the chocolates taste good. Armed with a good recipe, even a novice can make wonderfully good chocolates. The hard part is making them look good – and that can be challenging indeed.

I took a break midway through chocolate season, as usual, to celebrate Thanksgiving at my friend Carolyn’s house. Of course I brought a few chocolates with me:

Thanksgiving chocolates

The maple bourbon caramel and orange caramels on bottom left are my favorite new flavors from this year. The maple bourbon caramel has about 3/4 of a bottle of bourbon whiskey in each batch, plus cream and maple sugar, and is delicious. The orange caramel is made with cream, sugar, a ton of mandarin orange zest, mandarin and navel orange juice, and a small shot of lemon juice to give it a bit more acidity. The result is a marvelously buttery, sweet orange flavor with just enough acid “zing” to keep it from being cloyingly sweet. It tastes like the orange curd (similar to lemon curd) that I used to make in college – one of my favorite confections.

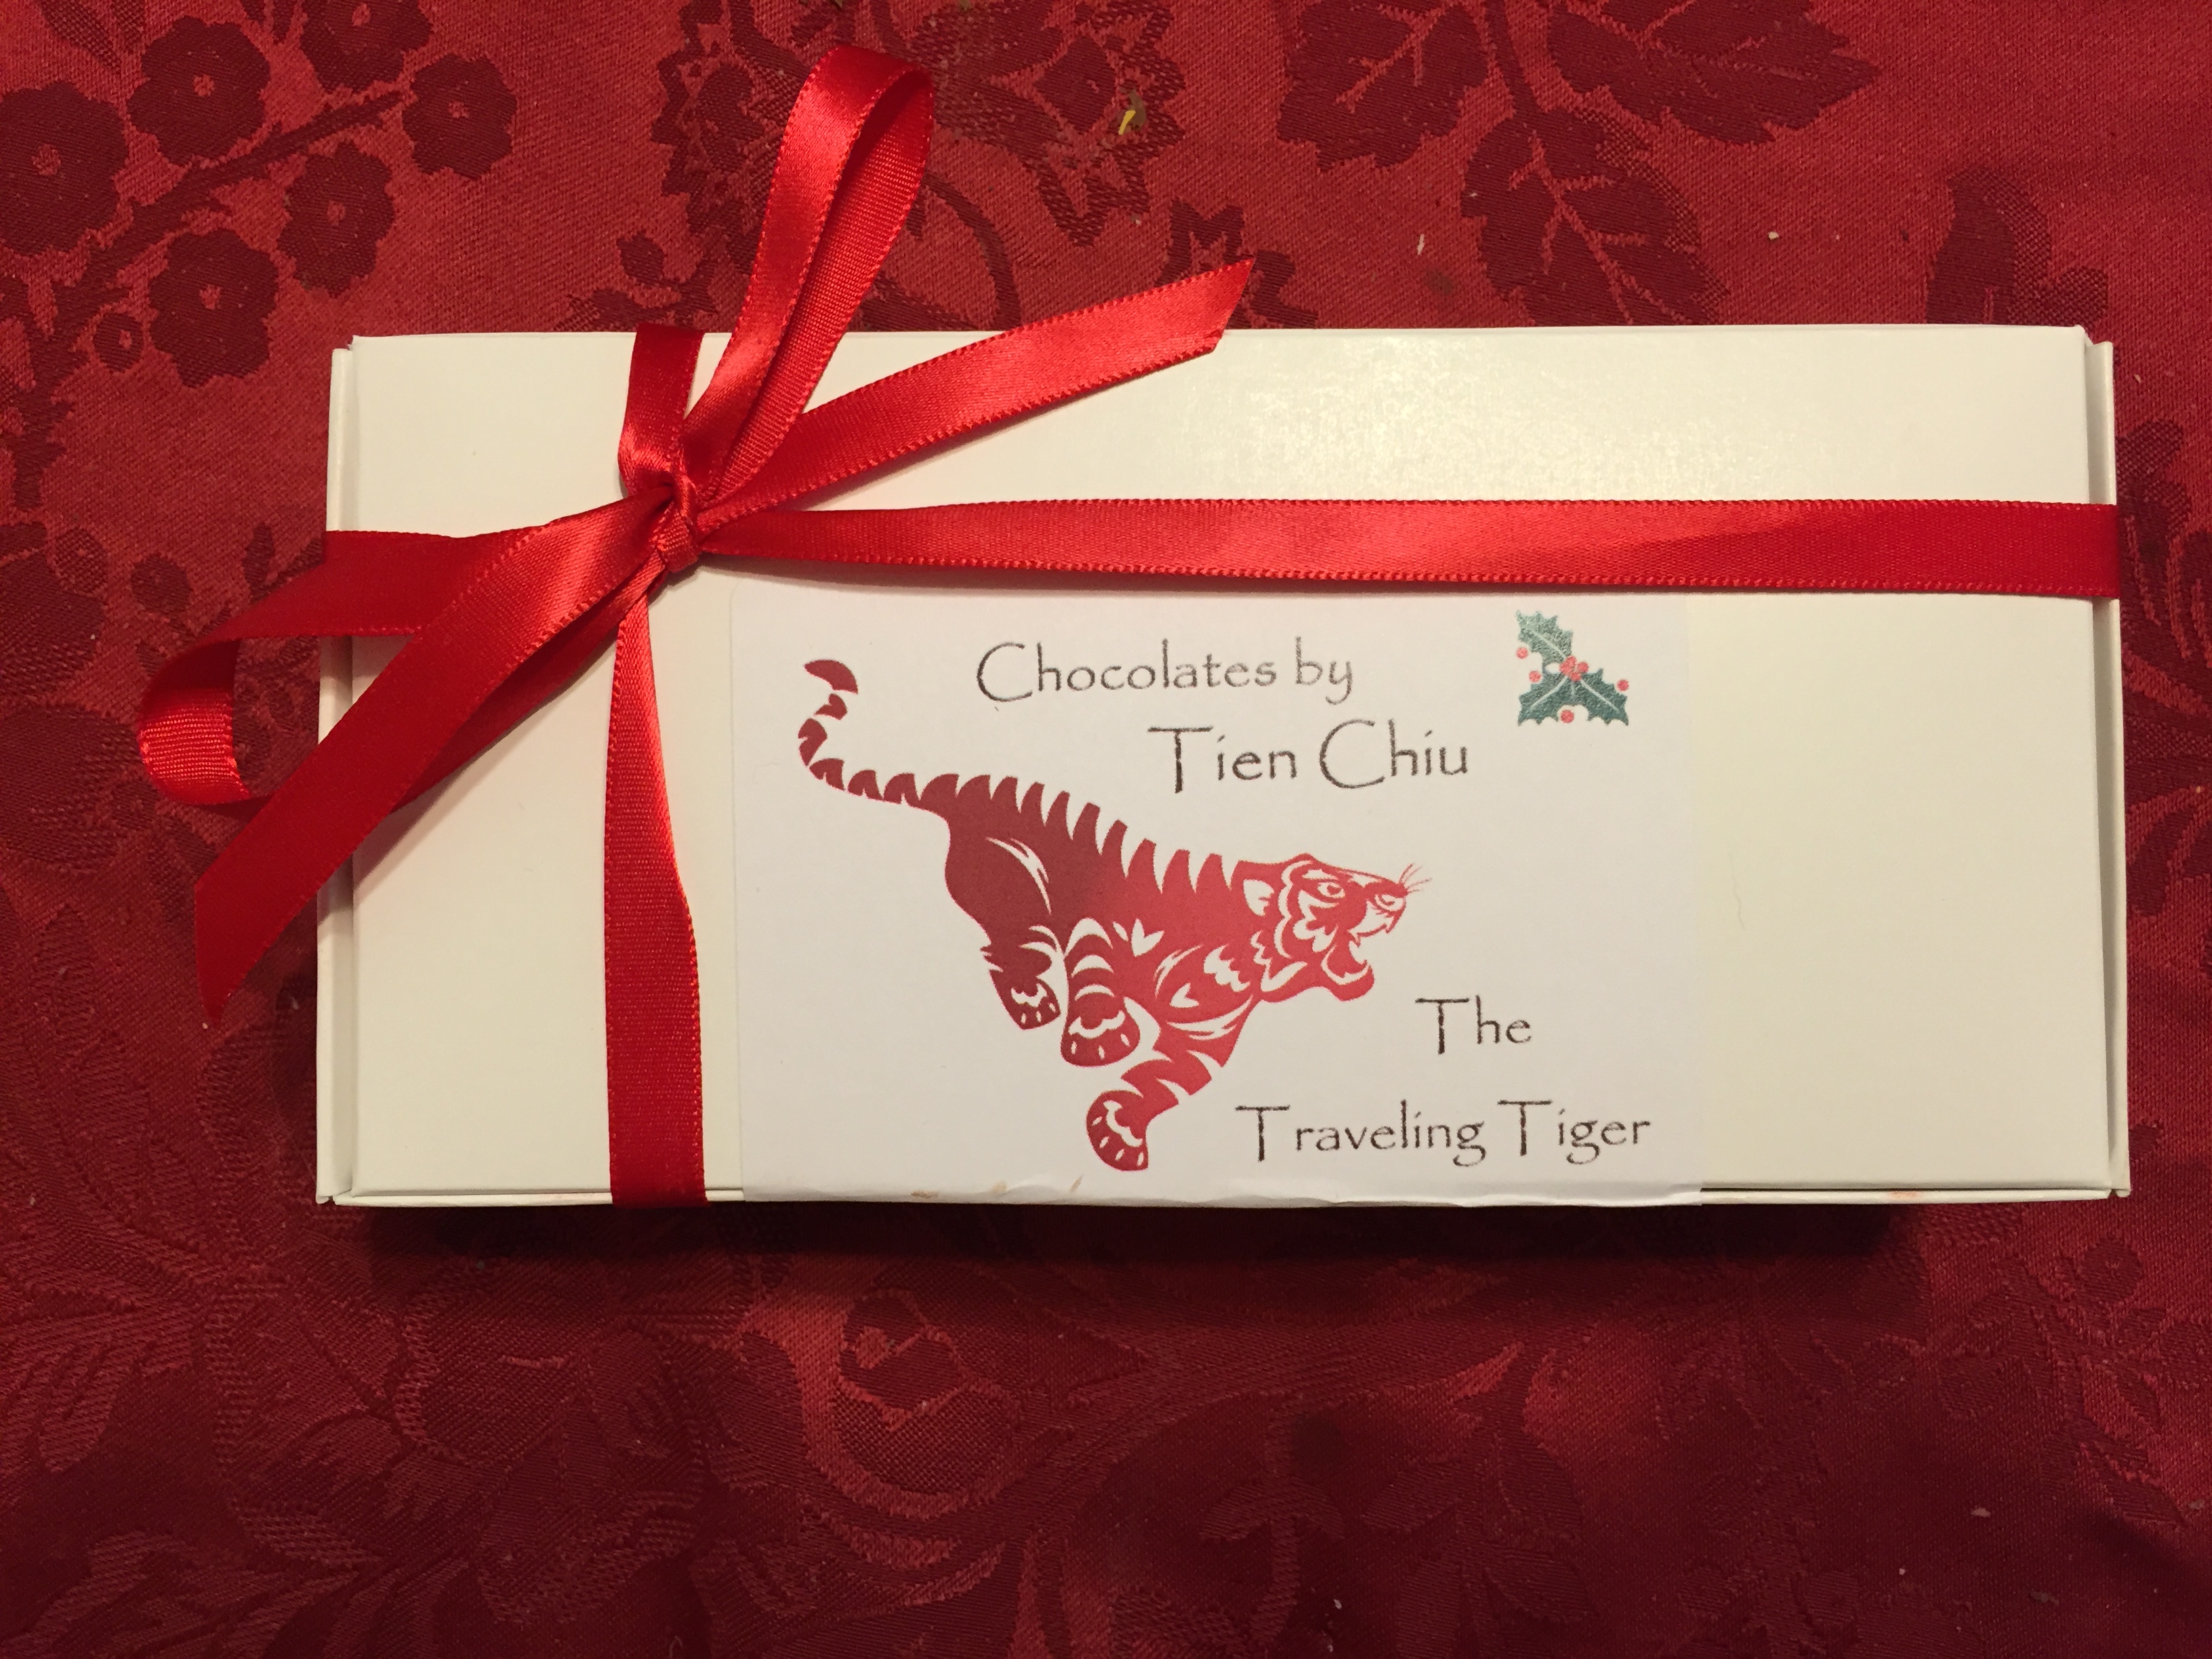
I made 38 flavors this year, expecting to fit in only 37 – but by a miracle of packing and special dispensation from the gods of physics, we managed to fit all 38 flavors into the box. The flavor index will go into a separate blog post, but I’ll leave you with this year’s holiday card. Happy holidays, everyone! May your coming year be beautiful, delicious, and many-flavored.

Tien & B.'s 2017 holiday card
Tien & B.’s 2017 holiday card

Filed Under: All blog posts, chocolate, food

November 17, 2017 by Tien Chiu 16 Comments

Tien 1, common sense 0

Last week I fell prey to the Costco Fallacy.

The Costco Fallacy goes like this. On your shopping list is 10 pounds of apples (because you like apples, and you might make some applesauce). You get to the store, and you discover that apples are $3/pound, but a 35-pound box of apples is only $40. 10 pounds of apples for $30 vs. 35 pounds of apples for $40?? What kind of idiot would pass that up?

And the next thing you know it, you’ve got 35 pounds of apples in your kitchen, and the rest of your day gets spent making 24 pints of applesauce. And now you need to convince all your friends that they really want applesauce, because there’s no way you’re going to eat all that applesauce in the next year. So for just $10 extra, you’ve wasted half a day making applesauce you then have to find recipients for, but hey, at least you got a good deal on apples!

(Go ahead, laugh. And then tell me you’ve never done anything similar.)

So, in that vein, I went to the supermarket last week to buy some chocolate-making stuff. And on the way in to the supermarket, I noticed they were running a Thanksgiving special: Turkeys for $0.49/lb with a $25 purchase!

I quickly totaled up my purchases and realized they were over $25. A 14-pound turkey would cost me less than $7! What a fantastic deal! How could I pass it up?

Somewhere in the back of my head, my common sense was shouting, “Your refrigerator already has an extra 4 gallons of cream and 6 pounds of butter in it! There are 15 pounds of fruit puree in the freezer! You have 50 pounds of sugar, 106 pounds of chocolate, 15 pounds of glucose syrup, 12 pounds of honey, 10 pounds of assorted nuts in the kitchen already. You need to make 130 pounds of chocolates in the next 10 days, and YOU ARE BUYING A TURKEY?!?!?”

Fortunately, my common sense is pretty atrophied (life is so much more fun without it!), and it’s also used to being ignored. So, barely aware of whatever it was saying (it couldn’t be that important anyway), I got into the checkout line and came home with a 14-pound turkey.

As soon as I got home, of course, the enormity of what I’d done hit me. Turkeys take a long time to roast. Like, 3-4 hours. During which the oven heats up the kitchen. And because chocolate doesn’t set properly in a warm kitchen, there was no way to make chocolates while the turkey was roasting. I didn’t have enough freezer space to stash the turkey until chocolate season was over. So what on earth was I going to do with the turkey?

(While my common sense exerts little to no influence over what I do, it is VERY good at saying “I told you so.”)

Finally, I realized that Friday was slated for fudge-making. Fudge is much less temperature-sensitive than chocolate, so I could roast the turkey while making five batches of fudge. It would mean standing in front of a 350-degree oven all day, but heck, that wouldn’t be so bad! And I could roast my $7 turkey! (Take that, common sense!)

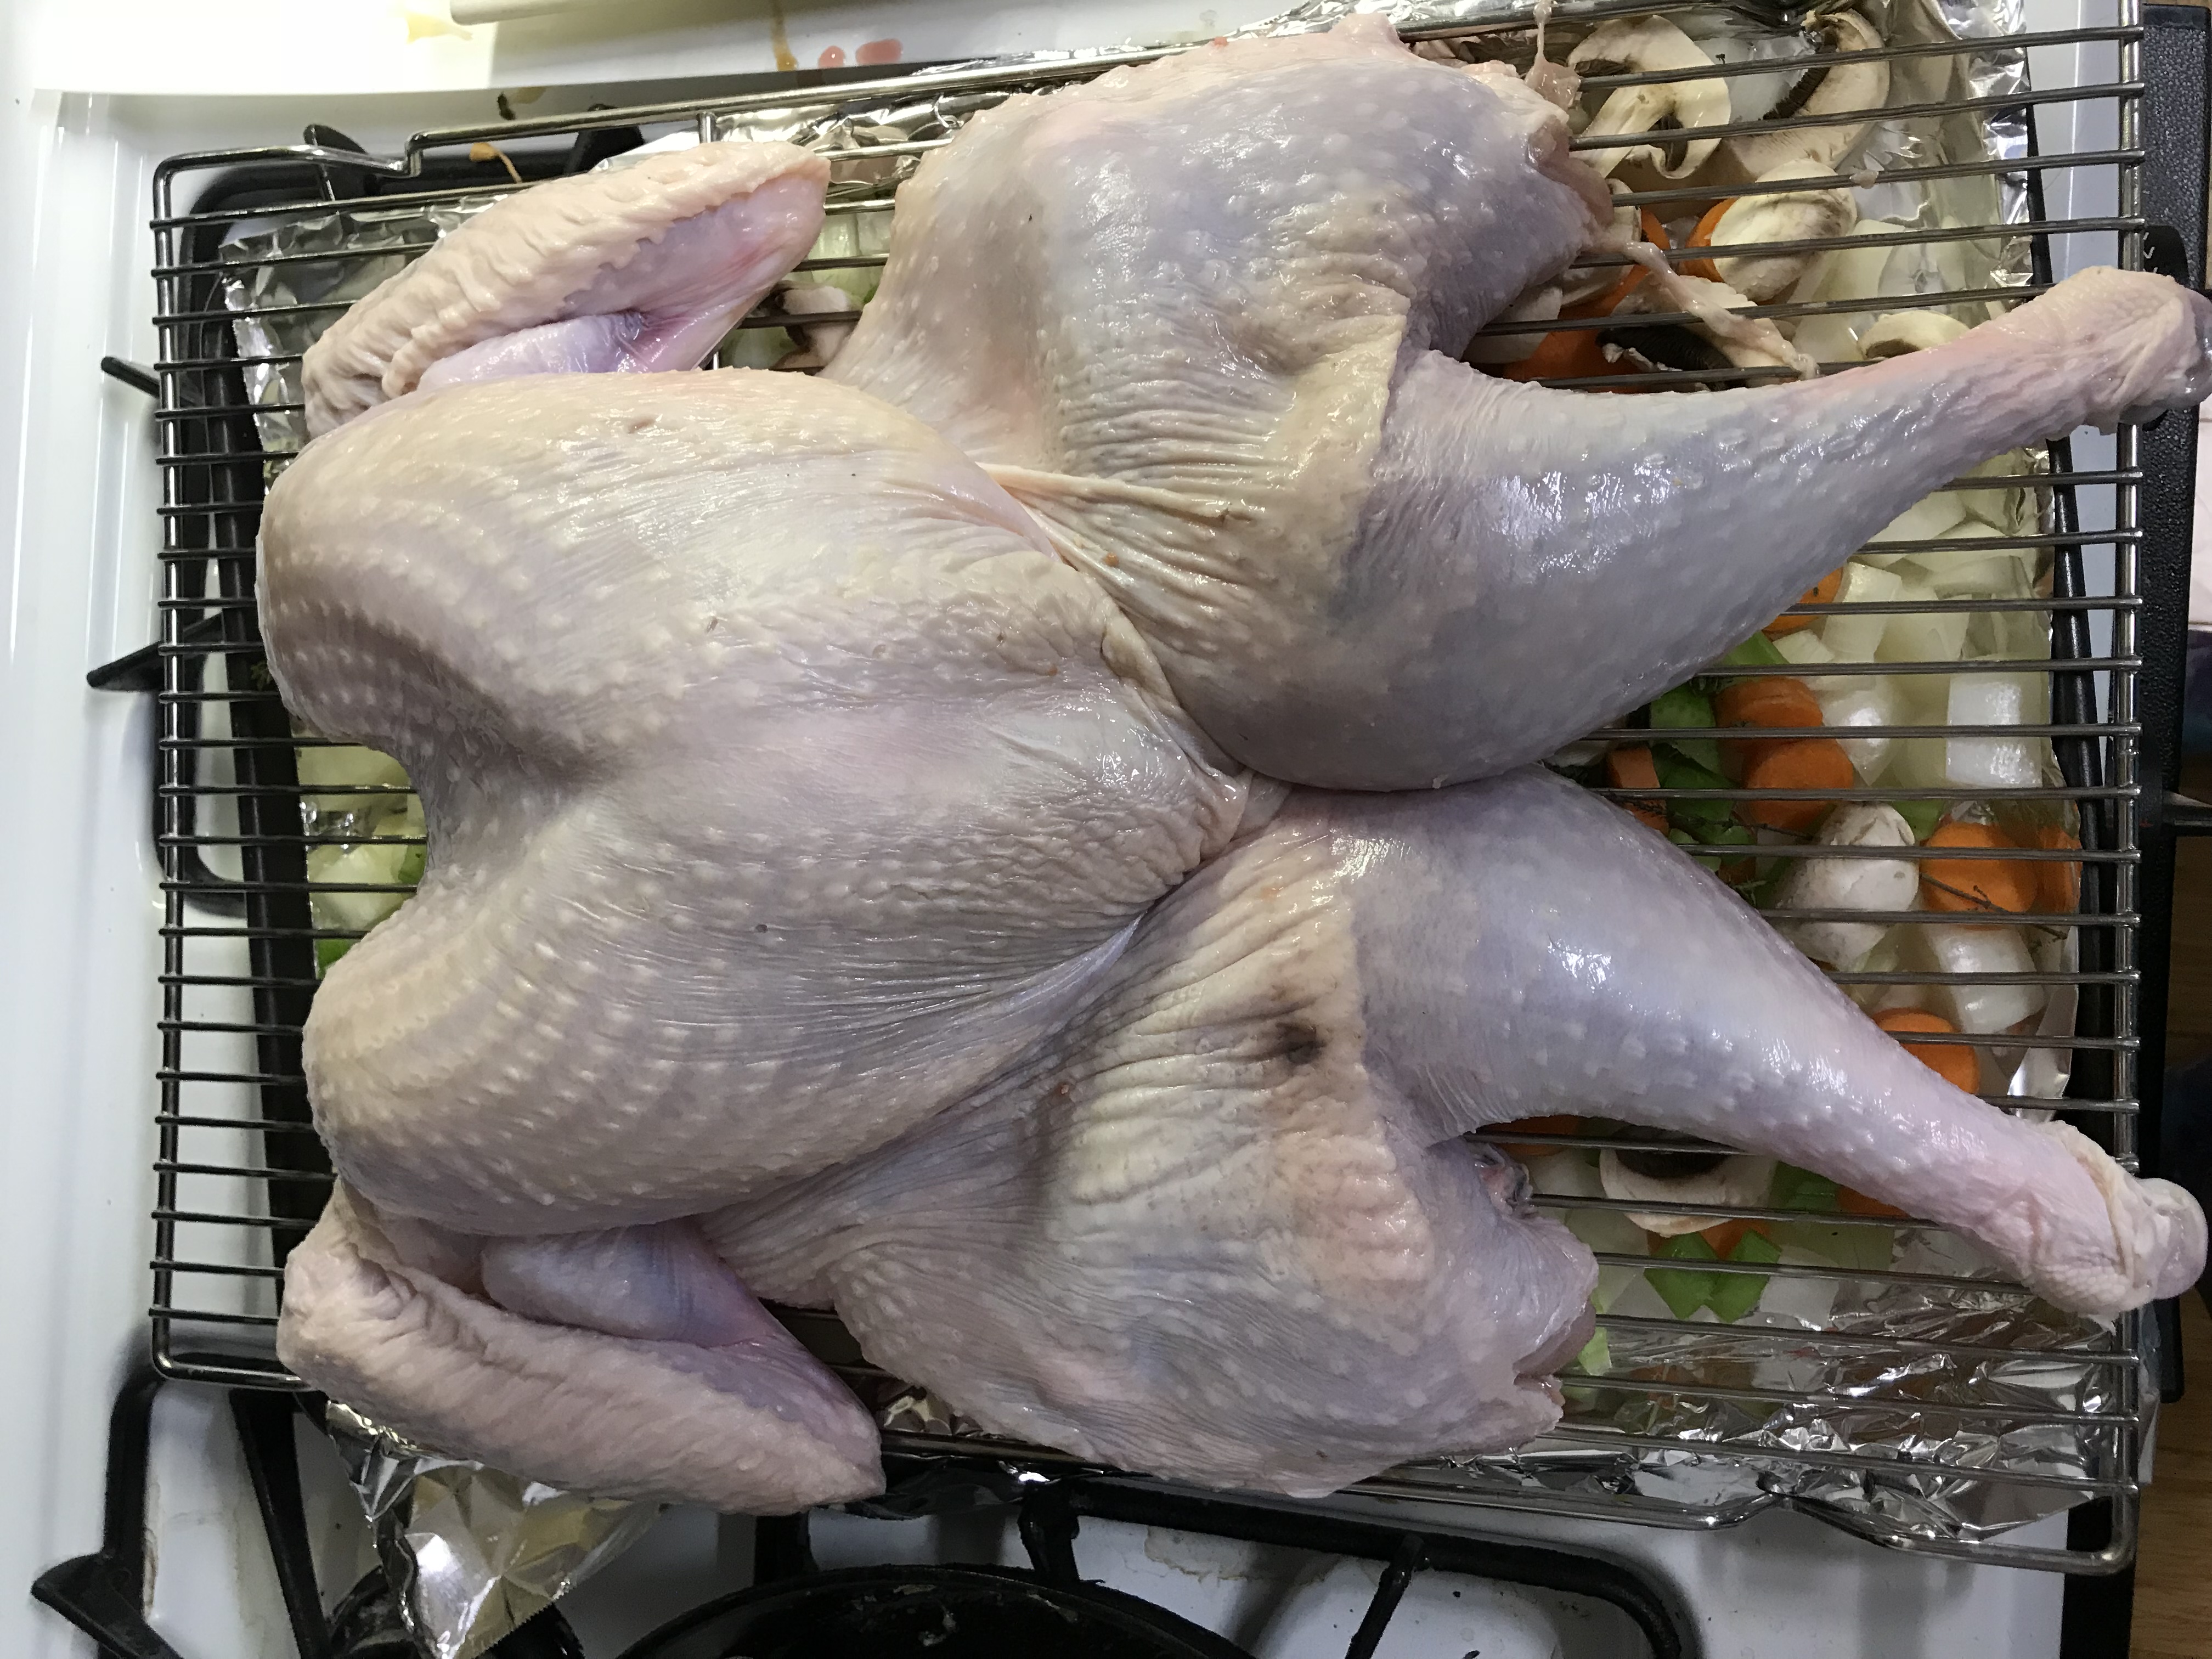
So then I started reading up on turkey-roasting. (Because when you have to make 13 pounds of chocolate per day for the next 10 days, the best way to start is by spending two hours on the Internet learning how to roast a turkey.) And then, while reading all the pros and cons and scientific analyses of ways to brine a turkey, I stumbled upon the solution. The food-scientist cooks at the Serious Eats food blog reported that the best way to get a perfectly cooked turkey was to spatchcock it – cut out the backbone, flatten the turkey, and roast it at a blistering 450 degrees. They said the turkey would cook to perfection in 80 minutes.

I read this at 6pm yesterday night. It sounded interesting, but I didn’t have kitchen shears, which I’d need to cut out the backbone. The obvious course would be to go to the store tomorrow, buy shears, and roast the turkey tomorrow. That would also give me time to think through the rest of the recipe and pick up any missing ingredients.

I, on the other hand, am an instant gratification bunny, and I live 2.5 miles from an Amazon PrimeNow warehouse. Four days previously, I had burned out the motor of a stick blender in the middle of making green tea hazelnut fudge, and Amazon PrimeNow had the replacement on my doorstep in 16 minutes. (Yes, you read that right: sixteen minutes!) Which had gotten me wondering: just how fast could they get it to me? Could they beat their record?

So, in the spirit of intellectual inquiry, I ordered the kitchen shears (and my missing ingredients) PrimeNow.

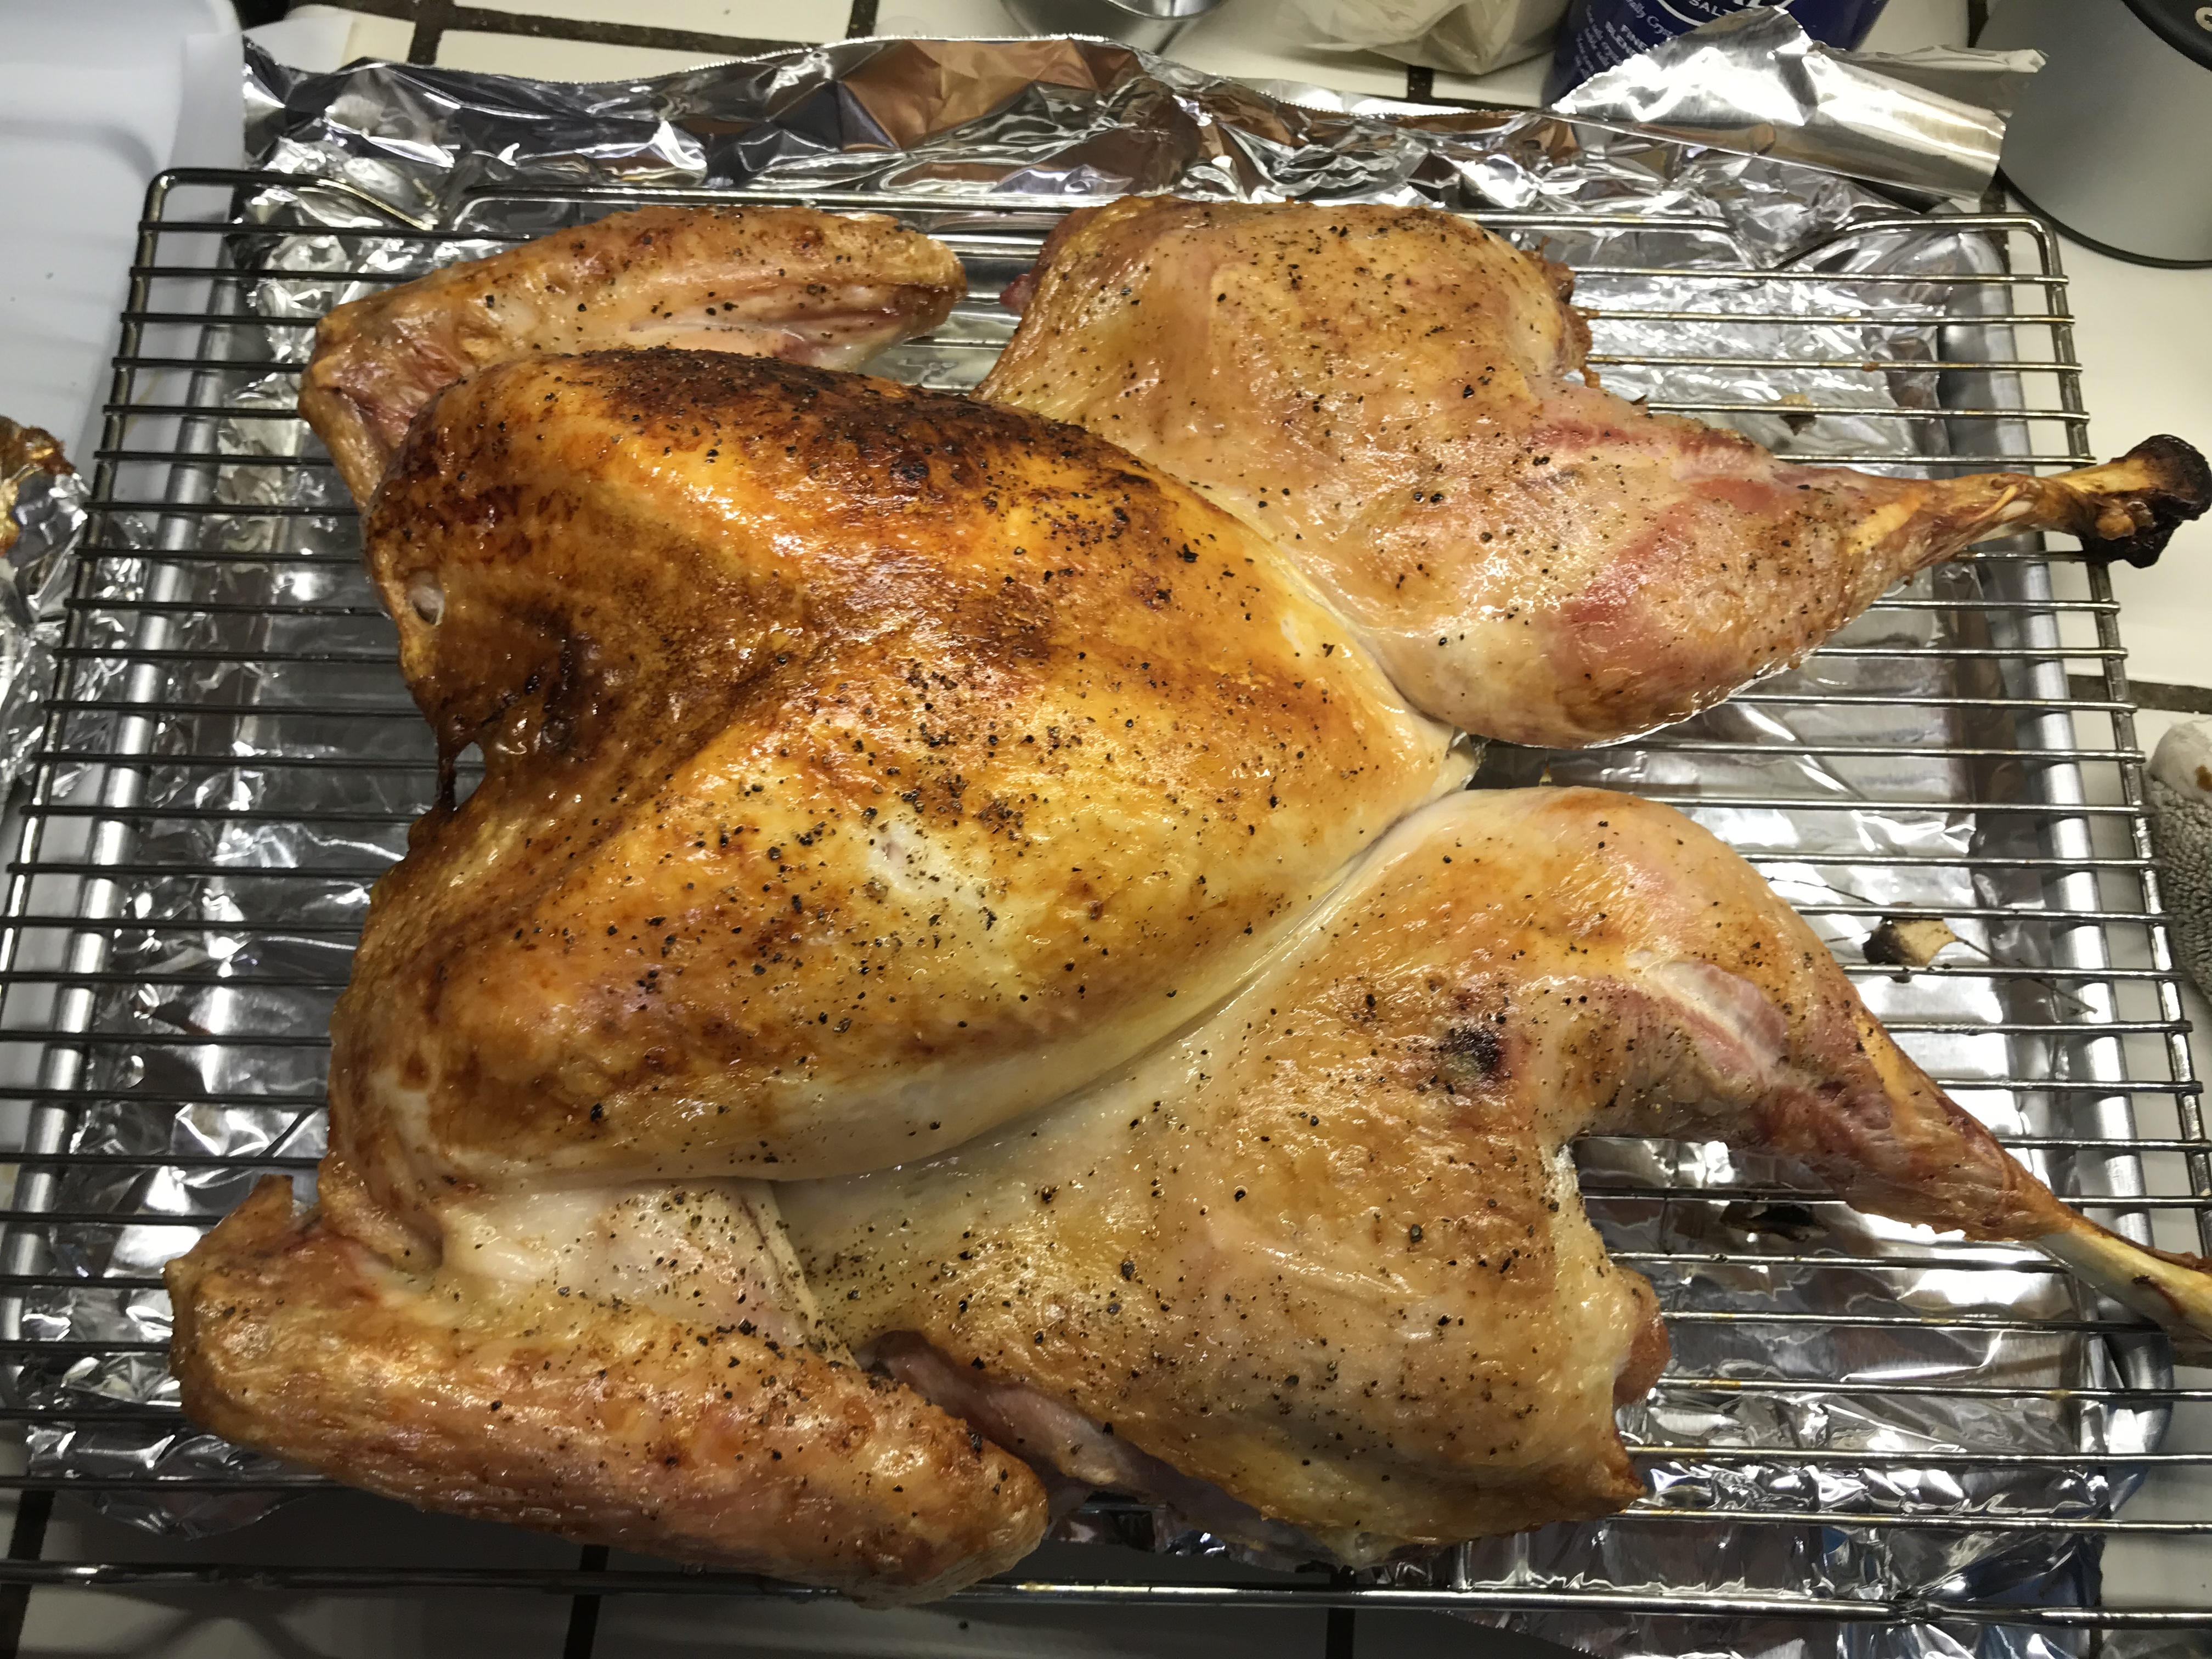
Twenty-one minutes and 32 seconds later (slackers!), I had my shears. I preheated the oven, chopped my vegetables, spatchcocked the turkey (it’s actually a lot easier than it sounds), and put it on a rack. Here’s what it looked like:

spatchcocked turkey going into oven
spatchcocked turkey

I stuck my ChefAlarm temperature probe into it and threw it into my 450-degree oven. (I had actually bought the ChefAlarm for making fudge and caramels – but what’s good for the fudge must be good for the turkey, right?) 

Then I set to making the mandatory turkey fixings: cranberry sauce and gravy. (I don’t like stuffing.) Just as the cranberry sauce finished, and the gravy broth was done simmering, the ChefAlarm went off, and I pulled this beautiful bird out of the oven:

Perfectly roasted spatchcocked turkey!

14 pound turkey, roasted to perfection in 1 hour, 1 minute, and 48 seconds. (Dang!) Tender juicy breast, nicely cooked legs. And wonderfully browned skin!

While the turkey was resting, I thickened the gravy. And, at 8:06pm, I sat down to a lovely turkey dinner, complete with cranberry sauce, gravy, roasted butternut squash, and a medley of the vegetables that had roasted underneath the turkey, absorbing the drippings. (Kinda like stuffing, only much, much better.)

A 14-pound roasted-turkey dinner in two hours and six minutes. (Coulda done it faster if not for those slackers at Amazon. 😉 ) I had no idea it was possible. And, if I’d listened to my common sense, I never would have found out!

So there you have it. Tien 1, common sense 0.

Now, about those 130 pounds of chocolates… 🙂 

Filed Under: All blog posts, food

November 6, 2017 by Tien Chiu 4 Comments

Composing chocolate flavors

I usually spend the first half of chocolate season testing new flavors. Since everyone asks me “How did you come up with that flavor?” I thought I’d share how I do it.

To my mind, a good bonbon has a balanced, complex flavor profile. Perfumers talk about “top notes,” “middle notes,” and “base notes”. I think of confections as having something similar. In my flavor vocabulary, bitter, earthy, and musky overtones are base notes. Most fruits, acids, and spices are middle notes. Flowers, citrus oils, and the sweeter herbs (e.g. basil) are top notes. Unlike perfumes, a good bonbon doesn’t need to have all three notes, but I strive to have at least two. (This is my personal preference, of course; everyone has different ideas of “good”.)

The first key to composing interesting flavors is understanding what chocolate tastes like.

  • Dark chocolate has a strong flavor, characterized by bitterness and what I think of as an “earthy” flavor, mixed with a little acidity, and tempered with moderate sweetness. Different varieties of dark chocolate will have different overtones on top of that, but they all share this basic combination.
  • Milk chocolate gives a milder and sweeter chocolate flavor, mixed with creaminess from the milk.
  • Good white chocolate is flavored with plenty of vanilla. (Poor white chocolate – which is unfortunately most of it – is flavored with artificial vanilla, made with palm oil rather than cocoa butter, and tastes crappy.) Strong floral overtones, sweet taste, creamy and milky.

Dark chocolate’s basic flavor profile is a base note: bitter and a little earthy. (Plus moderate sweetness.) To get a good flavor combination, I generally add either a middle or a top note. So I use dark chocolate with spices, nuts, florals, herbs, and the more acid fruits. I don’t generally use it with other base notes, because I find that the two flavors tend to “battle” each other, and the chocolate usually wins. So truffles (the fungus) don’t work well with dark chocolate, because the flavor of truffles is mostly an earthy fragrance, which disappears under an avalanche of similar flavors from the dark chocolate. Similarly, black tea does not perform well, because it consists mostly of base notes. Green tea, on the other hand, works just fine, because it has strong grassy and sometimes floral notes that sit in a higher range. So even though the chocolate overwhelms the bitter flavors in the green tea, you can taste the other flavors just fine.

Coffee is an interesting case, because it’s a mix of bitter and acid flavors, plus the scent of coffee, which I’d categorize (completely non-scientifically) as a middle to top note. When you mix coffee with dark chocolate, the result is a very bitter flavor with a hint of acidity and the coffee “nose”. (Plus chocolate, of course.) You’re basically doubling down on the bitterness and “depth” of the flavor. Some people like this; some don’t. If I do coffee with dark chocolate, I’ll mix it with a sweet and strongly flavored spice (cardamom leaps to mind), both to add a different note and to cut the perceived bitterness. More often, I’ll pair coffee with white chocolate, where the bitterness and acidity complement the floral “top note” of vanilla. I find that makes it easier to showcase both flavors.

White chocolate’s flavor profile is primarily floral (vanilla) plus a little creaminess. Most people think of vanilla as a subtle flavor, because it interacts only with the nose (only bitter/acid/sweet/salty is perceived by the tongue, the rest is in the nose). But it’s actually a very strong top note. So it tends to interfere with perception of other floral top notes – I don’t generally pair jasmine or rose with white chocolate, for example, because it turns into a war over who gets to dominate. (Lavender is an exception, I think because its pungency and latent bitterness operate in a different range than the vanilla.)

White chocolate is also very sweet, so I generally add something acid or bitter to balance out the flavor profile of a white chocolate center. So I’ll pair white chocolate with green tea, citrus fruits (particularly the tarter ones like lemon or lime), coffee, fruits, and so on. If I don’t, the result is often cloyingly sweet.

Milk chocolate is a midpoint between dark and white chocolate. I’m not a big milk chocolate person, so I don’t use it much.

Now, some flavors don’t mix well with any of the three chocolates. Maple syrup, for example, has a strong flavor. But it is composed of an earthy base note plus a sweet top note (very vanilla-ish in my book). Dark chocolate overwhelms the base note and white chocolate overwhelms the top note. So if you mix maple syrup with either white or dark chocolate to make a bonbon center, the taste doesn’t come through. Does that mean it’s impossible to use maple syrup in bonbons?

No! But it does mean you need to use it differently. You need to concentrate the flavor rather than diluting it. The easiest way to do this is by not using a ganache center (chocolate mixed with cream and butter), but a type of center that concentrates the flavor. Caramels and fruit jellies work very well. These centers concentrate the non-chocolate flavors and enable them to come through. (Blackberry, for example, is much more subtle than raspberry so does better when concentrated in a fruit jelly.) I’ve been experimenting with maple syrup for years, trying to get it to work – one of my test flavors this year is maple bourbon caramels, and it seems to be working out nicely so far. (The bourbon adds a woodiness and a little bitterness to offset the sweetness of the maple syrup. )

After I’ve created and tested the basic flavor profile, I cut up the centers and dip them into the appropriate chocolate. I’m testing two things. First, I want to know whether the taste of the center is still strong enough to come through clearly when mixed with the chocolate coating. Second, I want to see how the flavor develops on the tongue.

Chocolate bonbons do not deliver a single flavor. Instead, it’s parceled out over time, as the various parts of the bonbon break down in your mouth. In particular, the flavor of the center generally “arrives” before the flavor of the chocolate coating, because the center either has water mixed in to soften it (ganaches and fruit jellies) or is composed primarily of sugar (caramels and fruit jellies). The chocolate coating, on the other hand, is an emulsion of cocoa butter, cocoa powder (for dark chocolate), and sugar. You don’t really taste the cocoa powder until the cocoa butter surrounding it melts, whereas a water or sugar-based center releases its flavor a lot faster. (This is one reason why caramels and fruit jellies are so effective for concentrating flavors that don’t stand up to chocolate on their own – they melt faster in your mouth so you get a burst of the “pure” flavor before the chocolate shows up.)

I won’t throw a bonbon out of bed because it doesn’t develop in an intriguing way, but the ones that do tend to win a permanent place in the box. This is pretty rare.

The final step in flavor testing is to wait a few days and then sample the chocolate again. The inside of a chocolate, particularly a ganache, changes over time as the flavors combine and interact with the cream and dark chocolate. The results can be surprising. I had a very strongly flavored three-chile chocolate that looked very promising – but three days later, all you could taste was a hint of chipotle. The other two chiles had vanished completely.

Conversely, flavors can mellow. Last night I made a dark chocolate ganache with grapefruit zest and lavender. I tasted it right after making it, and it was such a disaster I nearly threw it out. I had forgotten that grapefruit zest and lavender buds are both bitter. Combined with the dark chocolate, the result was unpleasantly harsh. This morning I tasted it again, and the taste was quite pleasant – initial chocolate impact, with the lavender coming through in the middle and a hint of grapefruit at the end. I’m still not sure whether it will make it into production (the lavender tends to overwhelm the grapefruit, I think), but I’ll cut it, dip it in chocolate, and give it a chance. If I have time I may do a re-run and add more grapefruit zest.

One of my favorite flavors, by the way, is MacAllan 12 Scotch in a dark chocolate ganache. Not just because it tastes good – though it does – but because the flavors develop intriguingly over a period of about three days. Sadly, you’ll never taste this unless you make them yourself – so what are you waiting for?

Scotch truffles

315 grams heavy cream
90 grams glucose (or light corn syrup, but glucose is better – you can order it on Amazon)
100 grams Scotch whiskey (I use MacAllan 12)
40 grams softened butter
750 grams dark chocolate (I use Valrhona Extra Bitter, which you can get from Chocosphere)

Chop dark chocolate into 1/4 to 1/2″ dice. (If using Valrhona pastilles, you don’t need to chop anything). Put in a bowl.

Mix heavy cream with glucose and bring to a boil. Pour over the dark chocolate and let sit for a few minutes so the chocolate melts. (Push down any lumps of chocolate visible on top so they’re surrounded by the hot liquid.) Using a small whisk, whisk around the center of the bowl to mix the chocolate with the liquid. Try to create a smooth, thick mix in the center first, then slowly stir in widening circles until all the liquid has been incorporated. Add Scotch and repeat the process until you have a smooth mix. Finally, add the softened butter and repeat. Pour into a bowl and let cool to room temperature.

Using a melon baller, scoop bits out of the bowl and roll them between your (very clean, well-powdered with cocoa) hands to create a small sphere of ganache. Toss each sphere into a bowl of cocoa powder to coat them, then put them into a container and store in the fridge.

(The flavors won’t evolve as quickly as if you were storing a chocolate-covered bonbon at room temperature, but they do change – and it’s delicious at any stage.)

If you cannot find glucose (the syrup form, not the powdered kind), in a pinch you can just replace it with cream.

Troubleshooting:

If the mixture winds up curdling when mixed, it’s either too hot or too cold. If you get the temperature between 90 and 94F, it should work fine. (And yes, adjusting the temperature that finely is every bit as irritating as it sounds. But it will work.)

If the mixture is too soft, there isn’t enough cocoa butter in your chocolate. You can either re-melt and add more chocolate (keeping in mind the temperature note above), or – what I usually do – just stick it in the fridge until it’s firm enough to make into balls. (It will also make excellent hot chocolate if you add it to milk and microwave. It’s OK as hot fudge, though it tends to solidify.)

If the mixture is too hard, a little heat (I’m talking 5-10 seconds at a time in the microwave, on low power) will soften it up.

Filed Under: All blog posts, chocolate, food

  • « Previous Page
  • 1
  • 2
  • 3
  • 4
  • 5
  • …
  • 63
  • Next Page »

Archives

Tags

aids lifecycle outfits autumn splendor book cashmere coat cats celtic braid coat color study cross dyeing design design class devore doubleweave doubleweave shawls drawing dye samples dye study group gradient colors house infinite warp jacquard loom katazome knitted blanks kodachrome jacket ma's memorial mohair coat network drafted jacket/shawl project network drafting painted warp phoenix rising phoenix rising dress phoenix rising kimono phoenix rising reloaded pre-weavolution project sea turtles taquete tie-dye tied weaves tomatoes velvet weaving drafts web design website redesign wedding wedding dress woven shibori

Categories

  • Africa
  • aids lifecycle
  • All blog posts
  • All travel posts
  • Asia
  • Bangkok
  • Belize
  • Cambodia
  • Central America
  • Chai Ya (Wat Suon Mok)
  • Chiang Mai
  • Chiang Rai (Akha)
  • China
  • chocolate
  • computer stuff
  • creating craft
  • Creative works
  • cycling
  • Delhi
  • Dharamsala
  • drawing
  • dyeing
  • Fiber Arts
  • finished
  • food
  • garden
  • Ghana
  • Guatemala
  • Hanoi
  • Ho Chi Minh City
  • Hoi An
  • India
  • Khao Lak
  • Knitting
  • knitting
  • Ko Chang
  • Laos
  • Luang Namtha
  • Luang Prabang
  • markleeville death ride
  • meditations on craft
  • mental illness
  • musings
  • Phnom Penh
  • powerlifting
  • Rewalsar (Tso Pema)
  • sewing
  • Siem Reap (Angkor Wat)
  • Southeast Asia
  • surface design
  • textiles
  • Thailand
  • travel
  • Vangvieng
  • Vientiane
  • Vietnam
  • Warp & Weave
  • weaving
  • Weaving
  • weavolution
  • writing

© Copyright 2025 Tien Chiu · All Rights Reserved ·


Loading Comments...