I have an AVL Warping Wheel and love it. Here are a few of the things I do that make it a little faster and easier to use:
1. Wind from multiple cones at once.
I weave with fine threads and generally wind with three or four cones at once. It speeds the winding process immensely.
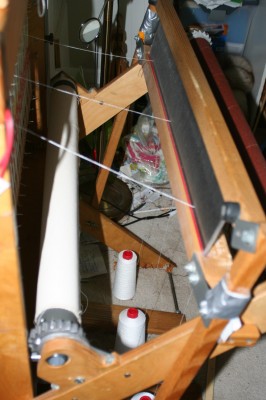
To make sure the yarn feeds smoothly off the cones, I set the cones directly under the beater of my loom, and run the yarn up through the reed directly over the cone, so it winds off smoothly.
(Apologies for the mess in the photo!)
2. Use a tension box to even out tension as the yarn winds onto the warping wheel.
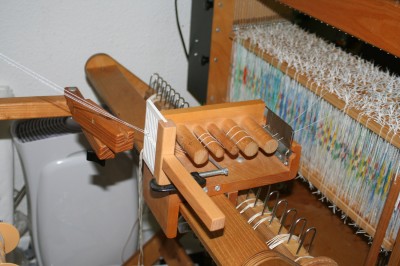
Sandra Rude suggested this to me when I was having trouble with tension on a fine silk warp. I set a tension box on the back beam and run the yarns through the comb (to keep them separated) and then through the pegs. I’m not trying for tight tension, just even tension as the yarn winds onto the warping wheel.
3. Mount a paddle to the tension box to maintain the cross.
Because I work with fine threads, which tangle easily, I prefer to use a cross instead of securing the sections with masking tape. Here is a photo of the paddle (white thing) mounted to the tension box. It serves two purposes: first, it lets me create the cross when winding from multiple cones, and second, it keeps the threads neatly together for winding on.
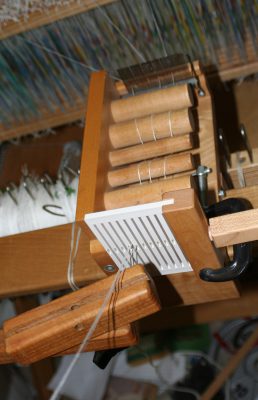
To use the paddle, I gently pull down on the threads as they come out of the paddle, and put a finger between the ends. I then pull back slightly with my finger, separating the top ends from the bottom ends, until I get to the crossmaker. I put the top ends over the first peg of the crossmaker, and the bottom ends under. Then I go back to the paddle and pull the threads up, putting a finger between the ends. Then I separate top ends from bottom ends and transfer the arrangement to the second peg of the crossmaker. Then I wind onto the wheel.
(If you are winding with an even number of threads, you can keep the same down-then-up pattern and still get a 1×1 cross. If you are winding with an odd number of threads, you have to change from down/up to up/down each time, which is why I strive to keep an even number of threads in the paddle. Of course, it won’t tangle anything to have a 2×1 cross (which is what you wind up with if you don’t alternate), but I find it’s easier to catch errors if I use a 1×1 cross.)
4. Wind multiple sections at once.
I wind 2-3 one-inch sections at once, which speeds up warping considerably since I only have to wind on once for each batch of sections. (I have tried warping four 1″ sections at once, and while it does work, it’s definitely at the far end of what the wheel will do, so I mostly stick to two or three sections.)
Here’s how I do it:
First, I wind all the sections onto the warping wheel as usual. I have marked my comb every 5 dents to make it easier to figure out where to start and stop winding:
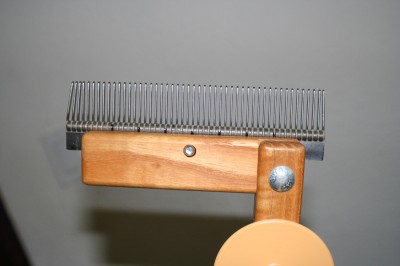
I use a convenient number of dents per inch – usually 10 because in my experience that is the minimum width you can use and still have the section wind across the full width of the one-inch section. But I’ll use more if I need to, to get the correct number of ends in each section.
If I am winding two inches at once, which is what I usually do, I arrange them symmetrically and push in the pin that holds the comb in place all the way, so it forms a natural divider between the two bouts, like so:
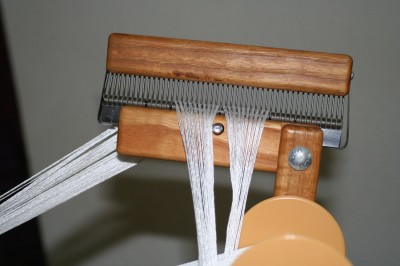
(If your loom has wooden pegs dividing the sections, you may need to skip a dent or two to prevent the thread from hanging up on the dividers. I have metal hoops and find it is not necessary to skip dents; the thread naturally slips to one side or another of the hoop, and builds up in nice even sections. It does not matter if a thread goes to one side of the hoop in one rotation and a different side in the other; it will weave off just fine.)
Once I am done winding, I tie off the cross, and tie a temporary knot in each section to keep them distinct and also to prevent them from accidentally slipping back through the comb. Then I put the top on and transfer the comb to the position for beaming.
Next I attach the sections to the back beam. To do this, I tie a knot in the nearest section, and loop a larks-head knot around the section behind the knot, as usual. I then loop a larks-head knot around the second section, and pull the larks-head knot tight around the grouped threads, but do not tie a knot in the end of the second section. In fact I untie the temporary knot so there is no knot at all.
It looks like this:
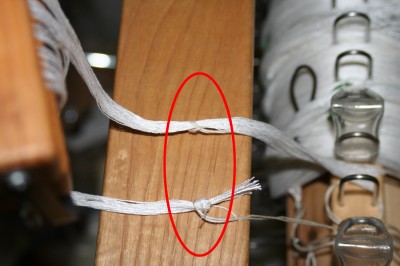
Now I turn the warp beam just enough to put a little tension on the knotted end. Because the larks-head knot is pulled tightly around the threads in the second section, it should not slip with light tension.
I then gently tug the threads from the second section through the larks-head knot until the tension is even on both bouts. Like so:
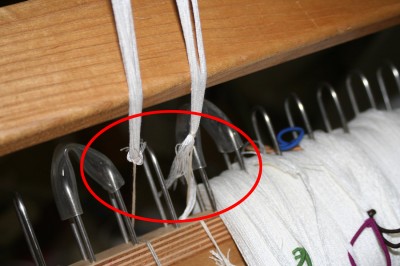
Then I back up the warp beam to release the tension, and tie a knot just barely above the larks-head knot on the second section. Because the larks-head knot is pulled tight, it does not slip and it is easy to adjust the knot.
Now I start winding on, taking care to angle the comb to get a nice flat distribution across the width of the section. I also retract the pin that holds the comb so it is not sticking out and disturbing the arrangement of threads:
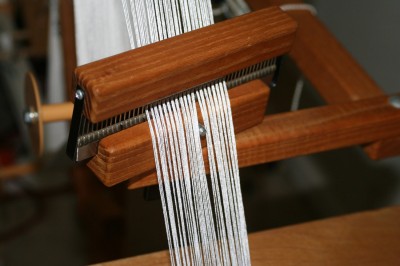
This can occasionally cause problems, so I usually pull it back, like this:
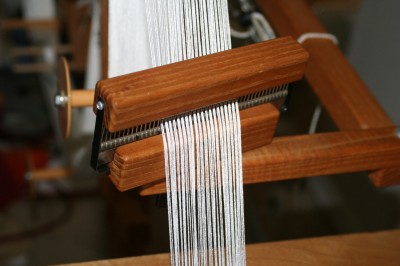
Then I wind on the sections. If I have adjusted the tension correctly and spread the warp correctly in the comb, I get a nice flat section across both sections:
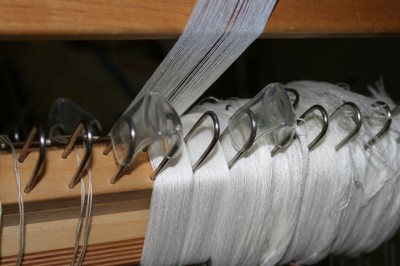
If I find that the thread is building up on one edge (making that edge tighter), it means the warping wheel is too close to that edge. If the thread is building up on both edges (tight edges and slack in the middle), then the comb needs to be angled more sharply – the section is too wide and so is building up on the ends. If it’s tight in the middle and loose on both ends, it means the comb is angled too sharply; the section is too narrow, and isn’t building up enough on the ends.
Finally, I find that it is much easier to wind on if I put plastic tubing across the two adjacent hoops ( as shown in the photo above) – they gently guide the warp threads into place, so they don’t “go visiting” in adjacent sections. (I heard this first from Sandra Rude, but the idea originated with Marg Coe. Ruth Blau also added that bicycle inner tubing works just as well, and being more flexible, can fit on more looms than plastic tubing.)
That’s it! I hope this has been useful to you – if you still have questions, feel free to leave a comment, and I’ll answer if I can.
