I spent virtually the entire weekend working with Cibacron F fiber-reactive dyes on silk, dyeing all the “pure” colors at four intensities. Since it takes 2-2.5 hours to do a single dyebath, and I could only do three colors at a time, this meant a LONG time over the dyepots. But I am nearly done! Only one color left, and I am waiting for instructions on it, so it will probably be another day or two before I dye it.
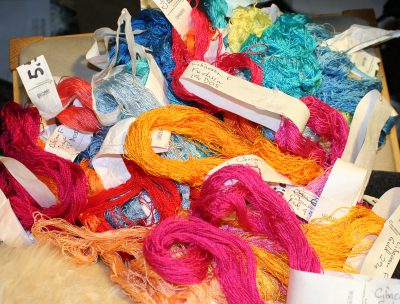
Here is a photo of the (very meager-looking) fruits of my labors:

Doesn’t look like much, does it? But it will be positively invaluable when it comes time to mix the colors.
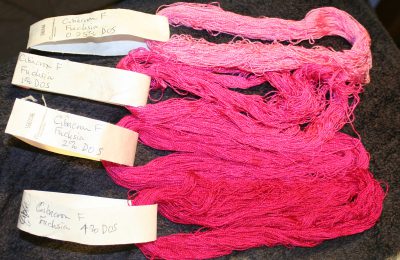
Here is a photo of a single set for one color:

These are dyed (on Karren’s recommendation) at 4%, 2%, 1%, and 0.25% DOS (depth of shade), meaning the amount of dye is 4%, 2%, etc. the weight of the fiber. As you can see, 4% produces an intensely saturated color, while 0.25% produces pastels.
A word about the handles. They are the temporary wristbands that you see at athletic events, made of Tyvek and hence resistant to both heat and dye. (Google “Tyvek event wristband” and you’ll find them.) They’re cheap, make a convenient handle, and you can write on them! So I weigh the skeins, put a Tyvek “handle” on them, write the weight of the skein on the handle, and then scour/soak them. Later, once the skein comes out of the dyebath, I write the name of the dye and the DOS on the handle with a ball-point pen. (I could write it before dyeing it – which would be better for obvious reasons – but I would need to use a permanent marker. However, it’s usually not that hard to tell the different intensities and colors apart. When I start doing samples for color-matching, I will probably write the information on the handles before dyeing.)
The Tyvek bands will stand up to about 180 Fahrenheit before the glue melts, so you can easily do a dyebath with them. Don’t boil it, though!
I’ve been discovering some interesting things about Cibacron F (fiber-reactive) vs. Lanaset (acid dye) along the way. Cibacron F has remarkably high-chroma (“bright”) colors compared to Lanaset – some of the Cibacron F colors are practically “dayglo” bright. Lanaset is more muted by comparison.
Cibacron F (and fiber-reactives generally, I think) is also more of a pain to dye. From my point of view, this is because the dye, salt, and soda ash all need to be added separately. So the Cibacron F process looks like this:
- 0 minutes: add dye, water, and skeins to dyebath. Keep dyebath at 60C throughout.
- 15 minutes: add salt, circulate skeins around for more even dyeing
- 30 minutes: circulate skeins
- 45 minutes: add soda ash, circulate skeins
- 60 minutes: circulate skeins
- 75 minutes: circulate skeins
- 90 minutes: remove skeins from dyebath, rinse/soak for 10 minutes in very hot tap water
- 100 minutes: neutralize skeins in very hot tap water + a little vinegar for 5-10 minutes
- 110 minutes: simmer skeins at 80-85C in hot soapy water
- 120 minutes: rinse skeins with a final vinegar dyebath (because this is silk and you want the pH at the end to be slightly acidic)
- 125 minutes: rinse skeins in a final hot water rinse
(These are an adaptation of the Ciba instructions on how to do the dyebath, incidentally, courtesy of Karren Brito (our study group leader) who was kind enough to share them with us.)
This doesn’t actually sound too awful until you realize that I’m dyeing twelve skeins at once, and that each item added needs to be carefully measured down to the 1/10 of a milliliter (which is about two or three drops). Because Cibacron F is a fiber-reactive dye and hence reacts with water, the amount of water in the dyebath is an important factor. So I have tables and tables (spreadsheet-generated) of how many milliliters of water, salt solution, and soda ash solution to use for which weight of skein. This makes the entire process very fussy, and the only reason I’m putting up with it is the beautiful clear colors.
By way of contrast, here is the Lanaset dye process:
- 0 minutes: add skeins to dyebath (carefully pH balanced to 5.0 using acetic acid (vinegar) and sodium acetate, plus 2 g/L of Glauber’s salt as a leveling agent). Temperature 40 C.
- 10 minutes: remove skeins, add dye to dyebath, put skeins back in dyebath and circulate skeins for more even dyeing. Maintain temperature at 40 C.
- 20 minutes: circulate skeins, increase temperature to 50 C.
- 30 minutes: circulate skeins, increase temperature to 60 C.
- 40 minutes: circulate skeins, increase temperature to 85 C.
- 50 minutes: circulate skeins.
- 60 minutes: remove from dyepot and rinse once or twice with warm tap water.
As you can see, it’s a much shorter process! (I should add that I have modified it somewhat from the recommended process, which has a “hold” time of 45 minutes at 85C instead of 20 minutes. This is the result of some experimentation – I won’t bore you with the details, but basically I leave out one leveling agent because it doesn’t seem to work with my water, and that means the dye strikes faster.)
Anyway, that is probably far more information than you wanted to know about acid and fiber-reactive dyeing, but it is only the tip of the iceberg when it comes to everything I have learned in this study group! I hope Karren decides to offer it as a regular class, because it has been incredibly educational for me. I had worked a lot with both fiber-reactive and acid dyes before this study group, but never had access to the detailed information that Karren has been giving us, or tried the kind of rigorous measurement that Karren has us doing. It’s a wonderful study group.
If you are interested in more detailed information on my dye process, drop me a line (my email is in the “About Me” section of my website) or leave me a comment, and I’ll be happy to share. The only reason I’m not including it here is that it is really too long to detail entirely in a blog post!