Tien Chiu

  • Home
  • About
    • Honors, Awards, and Publications
  • Online Teaching
  • Gallery
  • Essays
  • Book
  • Blog
  • Dye samples
You are here: Home / Archives for gradient colors

July 14, 2010 by Tien Chiu

Back in action

After several more unfruitful repair attempts, I called AVL yesterday.  I talked to one of their technicians and within fifteen seconds he told me the cause and the solution.  I moved out the end caps on shafts 22-24 a little bit and voila! problem fixed.  Like magic.

So I have been merrily weaving away, and am now at the 19″ mark, about 1/4 of the way through.  I’m weaving at about 3.6 picks per second (including advancing the warp, checking the underside for errors, etc.), which means that it will (in theory anyway) take me about 6 hours to weave the rest of the shawl.  Add another two hours for unpicking errors, floats, etc. and that comes out to about 8 hours.  This is reassuring since it means I can most likely get the shawl woven in time for Complex Weavers.  I will likely be finishing it on the plane and wet-finishing it in the hotel, but hey, a girl’s gotta do what a girl’s gotta do, right?  And it means I will have something new to show at Complex Weavers/Convergence.

I took a couple photos of the work-in-progress, but I couldn’t get enough of it in the shot to show off the color progression.  So instead I will give you a photo of the first 36 pirns, which do show a clear color progression, and are quite pretty, arranged on the windowsill:

wound pirns for handwoven doubleweave shawl, showing the color gradient

And now, back to weaving.  I gots a shawl to finish, after all!

Filed Under: All blog posts, textiles, weaving Tagged With: doubleweave, doubleweave shawls, gradient colors

July 13, 2010 by Tien Chiu

The real thing

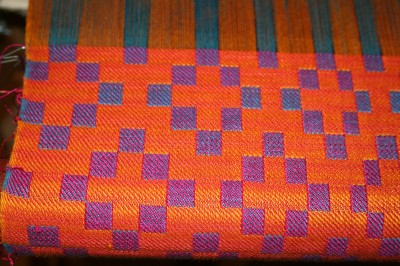
I wove up a few more samples, and wet-finished the first one.  Here is the front of the first sample, wet-finished:

Wet-finished handwoven doubleweave sample, solid color warp and weft, front

And here is the back:

Wet-finished handwoven doubleweave sample, solid color warp and weft, back view

You can see the long floats where I had problems with shaft #24.  But more on that later…

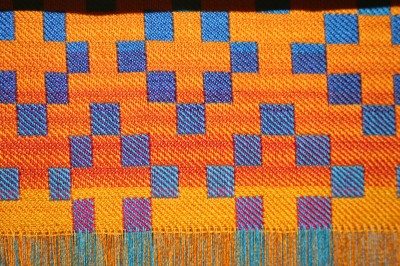
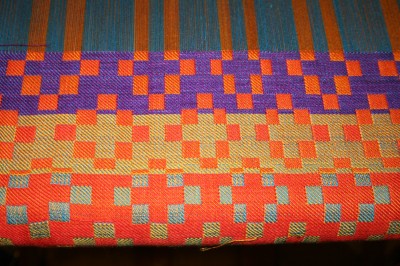
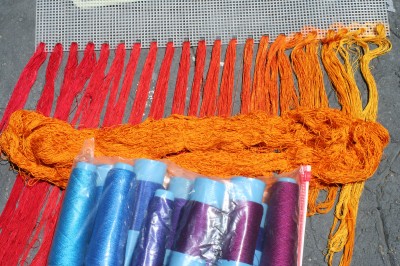
I then decided to see what the color progression would look like when woven.  Here is a portion of that sample (the rest is wound onto the cloth beam, and I don’t want to disturb the weaving-in-progress by unrolling it):

handwoven doubleweave sample, showing the color gradients

Here you can see a progression from gold/turquoise weft down to fuchsia/red – the final set of squares does not belong to the color gradient but is an experiment to see whether I liked starting the yellow against the fuchsia warp (instead of red against fuchsia).  Preliminarily, I don’t like the combination, but it is intriguing enough that I may weave it up to see.  For this warp I am worried that the turquoise weft combined with the gold weft will produce large areas of low contrast between warp and weft, resulting in “plain blue” and “plain yellow” squares.  I am not sure whether that will work in this shawl or not.

At this point I had reached the limit of what could be simulated with samples, and I was eager to get on to the “real thing”, so I started weaving the “real” shawl:

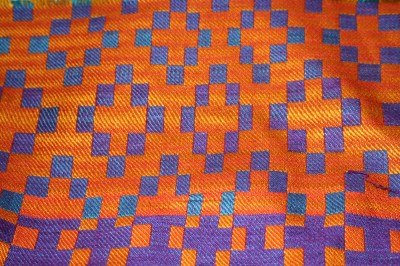
handwoven doubleweave shawl, first seven inches
handwoven doubleweave shawl, first seven inches, second view

The  color gradients are not really visible yet, but I expect them to get considerably more visible in the next six inches, in the fuchsia warp anyway: that weft is headed rapidly into purples.  The red is tinged with orange, but the real progression to orange occurs in pirns #12-18, so not as much change there.

All this is beyond my ability to simulate using Photoshop, so I’m “weaving blind” – it’s too complex for me to visualize in my head, so the only thing to do is weave it up!

Which brings us to the weaving part.  Shaft #22 and 24 are giving me conniptions.  Shaft #22 now rises all the time unless I shove the compudobby box as close as it will go against the loom.  Fine.  I can do that.  However, now shaft #24 refuses to lift, because the solenoid cap (the little U-shaped thing) is rotating until it no longer “cups” the wire when retracted, but presses up against it instead.  The end result is the same as if it refused to retract – the shaft stays down all the time.  I managed to weave about eight inches before it started its antisocial behavior, but since then it’s mostly been weaving and unweaving.  Unweaving is an incredibly slow and tedious process because there are two layers that need to be unwoven, so it takes double the time.  I have now made some adjustments to the loom, and we’ll have to see whether that improves matters.  As soon as Mike gets up I’ll take it for a test run.

Dye-wise, I am still doing samples and experimenting with my process.  For some reason, at pH 5.0 the red dye simply will not exhaust.  I am going to drop the pH down to 4.5, take out the leveling agent, and see whether that works any better.

Between the weaving and the dyeing, I’m starting to get frustrated.  I have the patience of Job (or can at least fake it when necessary), but to have major setbacks on two projects at once is incredibly frustrating.  I sure hope the last round of loom changes fixes the problem and I can get back to weaving!

Off to the dyepots!

Filed Under: All blog posts, dyeing, textiles, weaving Tagged With: doubleweave, doubleweave shawls, gradient colors

July 7, 2010 by Tien Chiu

Doubleweave samples

It was an exhausting long weekend – the first two days were spent setting up the BBQ, having the party, and cleaning up.  By the time Saturday and Sunday were over, I was feeling reclusive and fiber-deprived, so I spent all day Monday working obsessively in the dyepots and over the loom.

And here is what I have!

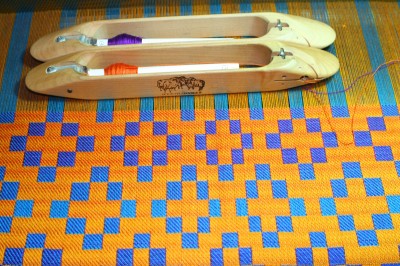
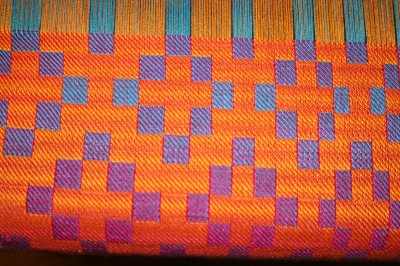
block doubleweave samples, top side

Much to my surprise, my best-guess sett turns out to be correct, and the results, on the top at least, are lovely.

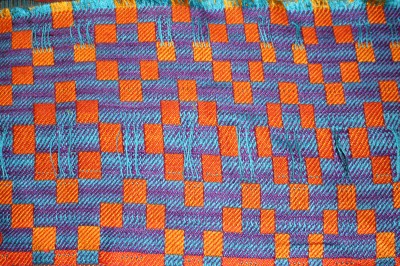
Alas, the results on the bottom are not so lovely:

Back side of block doubleweave samples

Kind of hard to make out, but you can clearly see the skips in the orange/yellow layer, where blue is peeking through.

I think I understand what the problem is, but not (yet) how to fix it.  I’m weaving with 1/3 twill background on the top and 1/3 twill background showing on the bottom, which of course means that I’m actually weaving a 3/1 twill on the bottom.  This means that I’m weaving with nearly all threads lifted, which is (generally) an invitation to skipped threads.  I have a mirror adjusted so I can see the bottom of the cloth, but the lighting on the bottom is  poor and it’s difficult to see skips as they happen.  I tried lighting the bottom layer to make things more obvious, but to no avail.  I may re-adjust the mirror to show me the shed instead of the bottom layer – not the best of solutions since it means turning my head to check every single pick, but better than lots of skips.  If anyone has a better suggestion, I’m all ears.

That said, I am ECSTATIC at the appearance of the doubleweave blocks.  On the topside, it’s just beautiful.  And the two-shuttle weave is going nicely, too.  I had worried that switching shuttles constantly would be frustrating, breaking the natural rhythm.  But it turns out to be just a different rhythm – slower, sure, but not much slower than what I’ve been weaving lately!  And the results are worth the additional effort.

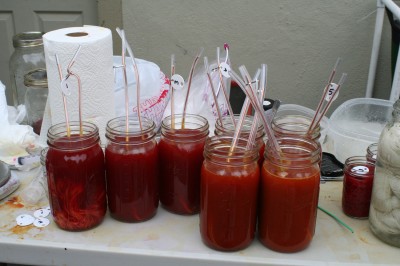
I have also made progress on dyeing the weft skeins.  Here is my dyeing setup:

dyeing setup for multiple=
dyeing setup for multiple small skeins

I’m using Sandra Rude’s system, with loops of heavy copper wire in vinyl tubing holding each skein.  This makes it easy to lift the skein out of the dyebath without tangling the skein or burning your hands, and is a handy place to hang a tag, too.  Once the skein is out of the dyebath, it gets labeled and hung to dry.

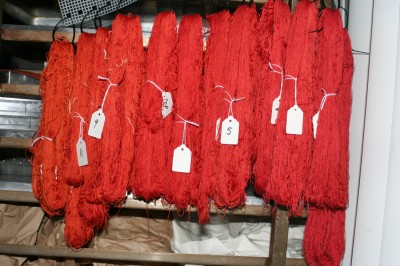
Here are about half the skeins, almost dry:

1st set of skeins, dyed in gradient colors

Not a huge difference in color, but it goes from a bluer red at right to a distinctly orangey red at left.  I’m using price tags to label each skein, and will label each cone as it’s wound on.

I now have a lot of meticulous work to do.  The pattern did not come out quite as I wanted, so I’m going to have to rework the pattern in Photoshop to make sure that it comes out right.  This entails quite a bit of tedious point-and-clicking, which I am not looking forward to, but hey, a girl’s gotta do what a girl’s gotta do, right?  So tonight I will continue weaving samples to see if I can get both layers perfect (or near perfect), and tomorrow morning I will rework my patterns in Photoshop.  I may  also play around with color gradients in the weaving, which means winding a bunch more pirns.  Fortunately I have figured out how to wind a small piece of watercolor paper (rough on one side) into a pirn of sorts, or I would be buying 56 pirns just for this one project!

Filed Under: All blog posts, dyeing, textiles, weaving Tagged With: doubleweave, doubleweave shawls, gradient colors

July 3, 2010 by Tien Chiu

Ready to dye the real thing

I tried four formulas for red and finally came up with a bright cherry red by using Polar Red, a dye that I don’t like as much as the others because it is considerably less wash/lightfast.  But it appears the only way to get a true cherry/fire-engine red.

I then dyed a set of samples:

samples for second weft

What is interesting is the incredible nonlinearity of the colors.  Here is a listing of the proportions involved (skein #1 is gold, far right; skein #22 is red, far left):

Amt Mustard Amt Polar Red Diifference from previous skein:
1 100.00% 0.00%
2 99.73% 0.28% 0.28%
3 99.45% 0.55% 0.28%
4 98.90% 1.10% 0.55%
5 98.08% 1.93% 0.83%
6 97.25% 2.75% 0.83%
7 95.88% 4.13% 1.38%
8 94.50% 5.50% 1.38%
9 91.75% 8.25% 2.75%
10 89.00% 11.00% 2.75%
11 86.25% 13.75% 2.75%
12 83.50% 16.50% 2.75%
13 80.75% 19.25% 2.75%
14 78.00% 22.00% 2.75%
15 75.25% 24.75% 2.75%
16 72.50% 27.50% 2.75%
17 69.75% 30.25% 2.75%
18 67.00% 33.00% 2.75%
19 64.25% 35.75% 2.75%
20 61.50% 38.50% 2.75%
21 58.75% 41.25% 2.75%
22 56.00% 44.00% 2.75%

Notice that the first 9 (!) samples – in other words, all the golds and oranges – are 90+% mustard yellow.  That’s how powerful Polar Red is, and how weak yellow is.

Neat, huh?

I’m now ready to dye the actual skeins.  I’ve swapped around the dye proportions a bit because I needed to add a few skeins to the color sequence, particularly in the yellows.  It’s hard to believe that adding 0.28% Polar Red at the beginning should produce a noticeable jump in color, but it does; and there are a few other places in the golds where there are visible differences, too.  That brings me up to 25-26 skeins, with the three extra added in the yellows – that will produce a better visual balance, as the first set of samples is rather heavy in the reds.

All this, however, will have to wait a day or two.  Mike and I are throwing a party tomorrow, and in addition to cleaning up the house (which is an incredible mess), I need to make 10 lbs of apricot jam today to clear out the refrigerator. (The apricots are macerating in sugar and honey to draw out the juices, and are thus in the fridge.)  I also need to reboil the syrup for my candied cherries, which will need about another week’s worth of candying before they’re ready to be put into jars.

Goals for this holiday weekend:

  • Clean house for party, have party
  • Dye the first two batches of skeins in the color sequence (1 batch = 8 skeins)
  • Finish warping the loom (700 threads left to thread, 1200 to sley)
  • Make 2nd batch of apricot jam, continue working on cherries

That is aggressive, but I think it is probably do-able.  My goal is to have one of the shawls done in time to wear it to the Complex Weavers Fashion Show.  (But if I can’t do it, I’m not gonna stress!)

Filed Under: All blog posts, dyeing, textiles Tagged With: doubleweave shawls, gradient colors

June 29, 2010 by Tien Chiu

Unstuck

Lots of good things happened yesterday!

First, the new fans arrived for my AVL compudobby.  They are twice as powerful as the previous fans, so that should be an end to my Compudobby woes.  Mike and I will be swapping them out tomorrow night, so I’ll be able to resume threading on Thursday.  Hooray!

Second, the New Munsell Student Color Set that I’d ordered arrived.  This means I can progress on my dye study group.  I’ll get to work on that this morning.

Third, I got confirmation that my custom order of 30/2 silk is being manufactured and should arrive in three weeks, max.  I need that silk to continue progressing on my dye study group, so I’m glad to have that confirmed.  (I ordered a total of 25 kg, for myself and friends, so this is a pretty big deal.)

Fourth, the wedding photographer told me that she’d mailed the disk with our wedding photos on it, so it should arrive today or tomorrow.  This means I can start putting up wedding photos!

And, finally, my temperature controller for dyeing samples, which I thought had died, turned out to be just the push of a button away from resurrection: the GFCI had triggered and needed re-setting.  So I got the first dye samples for the doubleweave shawl weft done yesterday night and am finishing up the second batch this morning:

red to gold color gradient samples

These are a combination of Lanaset/Sabraset mustard yellow  and a stock solution of 80% Scarlet and 20% mustard yellow, which was the closest to cherry red in my dye sampling.

This is the first set of samples…there is a second set brewing, mostly progressing from orange to red, but with one additional sample from the gold range.  I thought I detected a slight jump from skein #4 to skein #5 (counting from the left), so I dyed one more in-between skein to see if that helped even things out a bit.

If the skeins look a little uneven, that’s my fault…I forgot to put in the Albegal SET, a leveling agent, and then didn’t stir the skeins enough, so got somewhat spotty results.  Lesson learned for the future!

And, finally, my plan for tonight: go out to celebrate my 40TH BIRTHDAY!!

Filed Under: All blog posts, dyeing, textiles, weaving Tagged With: doubleweave shawls, gradient colors

« Previous Page
Next Page »

Subscribe to Blog via Email

Information resources

  • Dye samples
    • Procion MX fiber-reactive dye samples on cotton
    • How to "read" the dye sample sets
    • Dye sample strategy - the "Cube" method
  • How-Tos
    • Dyeing and surface design
    • Weaving
    • Designing handwoven cloth
    • Sewing

Blog posts

  • All blog posts
    • food
      • chocolate
    • musings
    • textiles
      • dyeing
      • knitting
      • sewing
      • surface design
      • weaving
    • writing

Archives

Photos from my travels

  • Dye samples
    • Procion MX fiber-reactive dye samples on cotton
    • How to "read" the dye sample sets
    • Dye sample strategy - the "Cube" method
  • Travels
    • Thailand
    • Cambodia
    • Vietnam
    • Laos
    • India
    • Ghana
    • China

Travel Blog

Entertaining miscellanies

© Copyright 2016 Tien Chiu · All Rights Reserved ·


Loading Comments...