Tien Chiu

  • Home
  • About
    • Honors, Awards, and Publications
  • Online Teaching
  • Gallery
  • Essays
  • Book
  • Blog
  • Dye samples
You are here: Home / Archives for mohair coat

April 10, 2009 by Tien Chiu

Progress and poppies

I am working on the collar now, and have painstakingly catch-stitched the interfacing down to the undercollar.  I have basted the roll line, and steamed it:
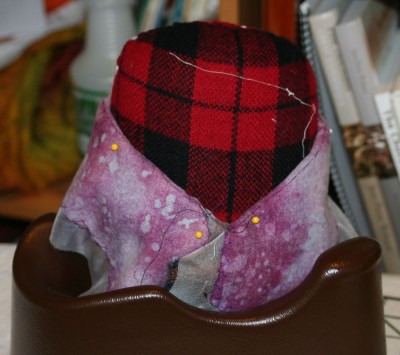
Collar, wrapped around a tailor's ham along the roll line and steamed into shape

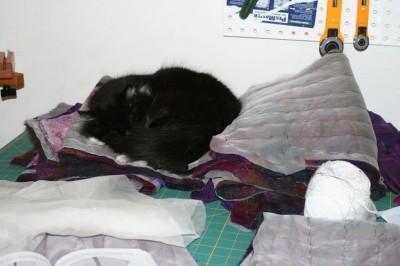
I have also finished padstitching both front lapels (and finished off the fronts generally), but since someone discovered them before I could get out the camera, this is the only photo I can offer:

Sweetheart, enjoying my mohair proto-coat

This weekend Mike and I are driving down to the Antelope Valley Poppy Reserve to see the poppies and other wildflowers.  In a good year, the Poppy Reserve is literally paved in wildflowers, and truly is the sight you see in all those photos of fields of poppies and lupines.  I’ve been to see it once before, and always wanted to go back, but as the Poppy Reserve typically blooms at the height of cycling training season, I’ve not been able to go.   This year, since I  am (unusually) taking a year off, I can go.  (It looks like we missed the peak of poppy season, but it should be fun regardless.)

We’re also visiting an old friend of mine – in fact, my oldest friend.  In middle school we were inseparable best buddies, but we went to different high schools, fell out of touch, and, well, you know how that goes.  A few years after we graduated college, he dropped me a line asking if I were “the same Tien-Yee Chiu who went to Wilde Lake Middle School”, and we corresponded for awhile.  Then I went off to Southeast Asia, and came back to discover his email address disconnected and no trace of where he’d gone.  I tried looking him up, but do you have any idea how many Rob Callahans there are in the U.S.?  I finally gave up.

Fast forward seven years.  I got an email from him, again out of the blue.  Hopefully we won’t lose track of each other again; we’re connected on Facebook and I have a permanent email address  for him now, so that should help.

Anyway, we’re going to stay with him, and I look forward to catching up on the last seven years.

I’m taking the collar along with me, I’m planning to padstitch it if I have free time.  Unfortunately I can’t do that during the 6-hour drive  to/from LA, unless I want to prick myself!  Instead I am bringing an off-the-loom but unfinished shawl, and will probably twist the fringe  on the way  down and back.  Or I might just relax.  (I’ve been known to do that on occasion.)
Filed Under: All blog posts, textiles, sewing Tagged With: mohair coat

April 3, 2009 by Tien Chiu

Buttonholes complete!

Last night I thread-traced all the markings for the buttonholes (truthfully, there’s no other way to mark the mohair!).  This morning I got up early and put in all five buttonholes, with very little effort (except on the first one where I accidentally sewed the buttonhole on the wrong side of the fabric!).

I don’t know why bound buttonholes are supposed to be difficult.  It’s admittedly a little more complicated  than simply zigzagging around the edges and cutting a slit open for a machine buttonhole, but as long as you remember the steps it’s not hard.  I’m amused by a Threads article in my “Jackets, Coats, and Suits” book that recommends having a professional tailor put in your bound buttonholes.  It’s not that hard!

(Sometimes I think 90% of being able to do the unusual is simply not realizing (or refusing to believe) that it’s difficult.  I remember that as a 13-year-old I started up an underground newsletter for a summer program I had been to…I had 68 subscribers to the magazine, which was printed on pink ditto-masters and titled “The Scarlet Newsletter” or some such.  I had friends writing articles for it, even a little fundraising drive – and I managed to do all that because my parents never told me this was difficult.  They helped me find pink ditto-masters and figure out one or two problems along the way, but other than that they acted like it was a perfectly normal thing for a 13-year-old to do.  And because they didn’t say anything, I never realized how unusual it was to be doing that!  My parents had their foibles, but they were dead right on how to encourage me  in my little adventures.)

The buttonholes aren’t perfect – there’s a tiny bit of gapping in the middle, maybe 1/16 of an inch in some places, but they look pretty good.  More to the point, from the first one to the fifth one there’s a noticeable improvement in quality, which makes me pretty happy.  I could conceivably have gotten better results by basting the lips together before sewing down the triangles on the end, but since I’m working with suede, basting would have been quite difficult, and would have left marks.  Suede is more forgiving than smooth leather, but not by much.

I think my next set of buttonholes will be better, so it’s good that I’m doing the practice coat.

Filed Under: All blog posts, textiles, sewing Tagged With: cashmere coat, mohair coat

April 2, 2009 by Tien Chiu

Bound buttonholes

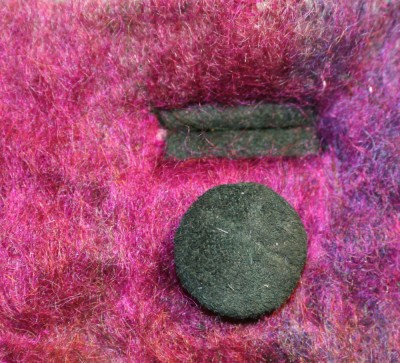
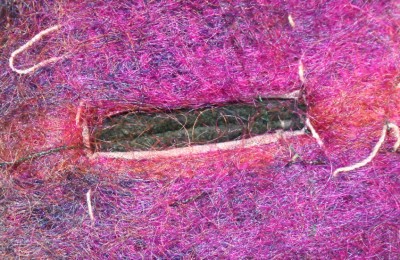
Despite 11 hour days at work, I have been working on bound buttonholes, practicing and trying several different methods.  Here are two of them, along with a button:

Bound buttonhole using the 2nd method in Palmer & Pletsch's "Easy, Easier, Easiest" tailoring book
Bound buttonhole using the 2nd method in Palmer & Pletsch's "Easy, Easier, Easiest" tailoring book, with piping in the "lips" to puff them out
A half-finished bound buttonhold using the organza patch method in Palmer & Pletsch's "Easy, Easier, Easiest" tailoring book

I gave up on the second one halfway through as I didn’t like the look of it at all.  The organza patch was supposed to press invisibly away, but obviously didn’t.  I also couldn’t see how to get piped buttonhole lips into the window gracefully (and didn’t think that flat lips would look good with the fluffy coat fabric).  Finally, pressing from the front as instructed crushed the fluffy “pile” of the mohair.  The first method worked perfectly and is the method I will use in the coat.

I think the second method would work  better with a fabric that is not as lofty and not as hard to press.  (I’m still trying to figure out how to press the seams without squishing  the  fabric, but perhaps I can either (1) brush it afterwards to bring up the nap again, or (2) look up how one presses velvet.  This is obviously a  problem that other people have dealt with, so I just have to find out how.)

At any rate, I like my bound buttonholes, so my next step will be putting them into the coat.  That will be fun!  I really enjoyed making the first bound buttonhole and am looking eagerly forward to doing more.  Funny since I hate doing machine-worked buttonholes.  I don’t know why bound buttonholes are so much fun to me, but they are.

Filed Under: All blog posts, textiles, sewing Tagged With: cashmere coat, mohair coat

March 30, 2009 by Tien Chiu

Buttons and buttonholes

Things have been moving a bit slower than I would have liked, but I am making some progress.  On Daryl’s advice, and after testing several options, I bought a yard and a half of tightly woven plum-colored flannel to use for interfacing.  I drafted the interfacing patterns, cut out the interfacing, and marked it with roll lines, buttonholes, darts, and center front.  I am just about ready to start tailor-basting the interfacing to the coat, and padstitching the lapels.

This is where things get a bit confusing.  Claire Shaeffer’s book, while it covers the main points, doesn’t provide a complete blow-by-blow description of the process.  For example, she doesn’t specify when to add the buttonholes or when to add welt pockets (though she does give instructions elsewhere in the book for creating both).  She does say that couturiers add the buttonholes near the end, not during the initial construction.  But since my last experience in making buttonholes was at least ten years ago (and I have never made a bound buttonhole), I’m not sure I want to wrestle with buttonholes in a nearly-finished jacket.  Doing them earlier just seems smarter considering my experience level.  So I think that, for this first coat anyway, I will do the buttonholes first.

Of course, doing the buttonholes early means that you have the buttons ready.  Since I had planned to make the coat with suede buttons (using the same suede as for the collar/lapel), this meant making the buttons myself.  So I spent some time this evening experimenting with make-your-own-button kits, and discovered that they just aren’t designed for material as heavy as suede.

So instead I took a slightly rounded button with a long shank and covered it with suede, the old-fashioned way.  I cut a circle from the suede, about twice the diameter of the button.  Then I sewed a gathering stitch around the edges, put the button in the center, and pulled both ends of the thread until I had a nice tight gather right around the shank, and the button was smoothly covered in suede.  Looks really nice (except on the back side, which nobody is going to see) and the results are quite durable, I’d expect.  I used heavy-duty thread to reduce stretch and to make sure it held.

That part was easy.

Now I am reading through books to make sure I understand the assembly process.  It is a slow process, because I have three good books on sewing jackets and they sometimes contradict each other.  So I am reading all three, trying to understand the motivations of the author in making that recommendation.  Sometimes it’s speed, sometimes it’s simplifying for the  inexperienced, sometimes it just seems arbitrary.  It’s a little overwhelming, but I’m letting myself puzzle it out because the important part is not actually getting the coat done; it’s learning how to think about fabric, how it behaves and how to work with it.  And the way you learn how to do that is not by blindly following instructions, but by reading and thinking closely about what you are doing and why.  This takes longer, but I’ve got patience.

So I am back to my high-school and college days: reading texts, taking notes, and writing in my notebook my understanding of what they are recommending and why, and also my plans for moving forward.  Because it’s easy to get bored, confused, or just plain overwhelmed with this much information, I plan to do this in tandem with a couple of fairly straightforward things: padstitching the lapels and collar, making the buttons, and practicing bound buttonholes.  All  of these are relatively simple and relatively time-consuming, giving me plenty of time to think while still making progress.

So stay tuned…in a day, a week, a month I’ll start to understand this…and then, by all the myriad gods, THERE WILL BE FIREWORKS!!

Filed Under: All blog posts, textiles, sewing Tagged With: cashmere coat, mohair coat

March 27, 2009 by Tien Chiu

Basting the backing

Daryl Lancaster and I swapped a couple of emails today – she was kind enough to offer some thoughts on the interfacing and backing.  As I had half suspected, the mohair is too loosely-woven to work well with a sewn-in organza backing.  (There are 1/16″ gaps between the threads!)  If I simply tack it to the organza at the seamlines, over time it will stretch and “bag” at the bottom.  And because of the looseness of the weave, it definitely needs support.

At the same time, the mohair is nubbly enough that a fusible would be problematic – twice over.  First, I don’t want to flatten the “pile” of the brushed mohair by fusing an interfacing on top.  Second, the rough surface would make it hard for the fusible to adhere.

So what to do?  Well, obviously the only thing left was to sew the backing to the fabric, tacking it down across the entire piece of fabric.  And that’s exactly what Daryl recommended.

So that’s what I’ve been doing:

Tailor-basting the backing to the mohair

I have been going through each piece, pinning the backing and the fabric together, then tailor-basting the backing to the fabric.  The stitches are about 1″ in length, and the columns are spaced 1.5-2″ apart.  I’m hoping that will be sufficient.

This is both quick and slow.  The stitches go very quickly, but of course there are a lot of them to do.  I spent about an hour working on it tonight, and have done one back piece, one side panel, and just under half of one sleeve.  I expect I’ll spend a good chunk of time on it tomorrow, and that it will take me two or three hours to get  it done.

This is  not bothering me.  The rest of this whole cashmere-coat voyage has been fairly slow, and this falls right in line with the rest.  Moreover, it’s contemplative, and quiet, both things that I need really badly right now.  And it’s hand-stitching, which I enjoy.

I have never really liked the sewing machine.  It is undoubtedly faster, and in some cases better, than hand sewing.  But it never feels “alive” to me, in the way that a loom does, or that a needle and thread do.  I use it like I would use a computer – something that you work with, but which has no relationship to you – no “soul”.  To me, a sewing machine is something standing between me and the fabric.  I like hand sewing a lot better, and am seriously considering hand sewing this coat.  To me, it is not just a garment, but also a meditation of sorts, and I feel like a machine gets in the way.  The sewing machine, to me, is focused on efficiency, and that is not what this coat is about.

So I am really enjoying this basting work.  It is giving me time to explore the silent, empty spaces, a wordless meditation.

Filed Under: All blog posts, musings, textiles, sewing Tagged With: cashmere coat, mohair coat

« Previous Page
Next Page »

Subscribe to Blog via Email

Information resources

  • Dye samples
    • Procion MX fiber-reactive dye samples on cotton
    • How to "read" the dye sample sets
    • Dye sample strategy - the "Cube" method
  • How-Tos
    • Dyeing and surface design
    • Weaving
    • Designing handwoven cloth
    • Sewing

Blog posts

  • All blog posts
    • food
      • chocolate
    • musings
    • textiles
      • dyeing
      • knitting
      • sewing
      • surface design
      • weaving
    • writing

Archives

Photos from my travels

  • Dye samples
    • Procion MX fiber-reactive dye samples on cotton
    • How to "read" the dye sample sets
    • Dye sample strategy - the "Cube" method
  • Travels
    • Thailand
    • Cambodia
    • Vietnam
    • Laos
    • India
    • Ghana
    • China

Travel Blog

Entertaining miscellanies

© Copyright 2016 Tien Chiu · All Rights Reserved ·


Loading Comments...