Tien Chiu

  • Home
  • About Tien
    • Honors, Awards, and Publications
  • Online Teaching
  • Gallery
  • Essays
  • Travels
  • Book
  • Blog
  • Dye samples
You are here: Home / Archives for phoenix rising kimono

November 13, 2013 by Tien Chiu

Warp stenciling experiment

The last two days have been quite busy, but I carved out some time to experiment with stenciling on an unwoven warp. I started by weaving a “fabric” using an extremely fine weft yarn that John Marshall had given me – far thinner than a human hair, and so delicate it was difficult to wind onto a pirn. It’s meant for use as a sacrificial weft when printing on warps, and that’s exactly what I used it for.

I wove a very loose fabric using 60/2 silk warp, sett for plain weave at 40 ends per inch, throwing one pick of the superfine yarn every 1/8 inch (in plain weave) to hold the warp in place. I started with a stick header and a couple of inches of weaving that happened to be on the loom anyway, and wove about a yard of very loose “fabric”. Then I wove a half-inch of more normal fabric, inserted a stick, and threw a few more picks to hold the stick in place.

Here’s what it looked like, stretched out on a table and ready for stenciling:

woven header with stick inserted
woven "footer"
woven “footer” (still attached to loom)

To keep the warp taut during printing, I attached two weights to the header and dropped them off the side of the table:

two five-pound weights for applying tension to the warp as it was stretched out on the table
two five-pound weights for applying tension to the warp


Weights, hanging off the table.
Weights, hanging off the table. (Because the table wasn’t quite wide enough to support the full warp, I changed the configuration later to keep the stick on the table rather than leave it dangling just below the edge.)

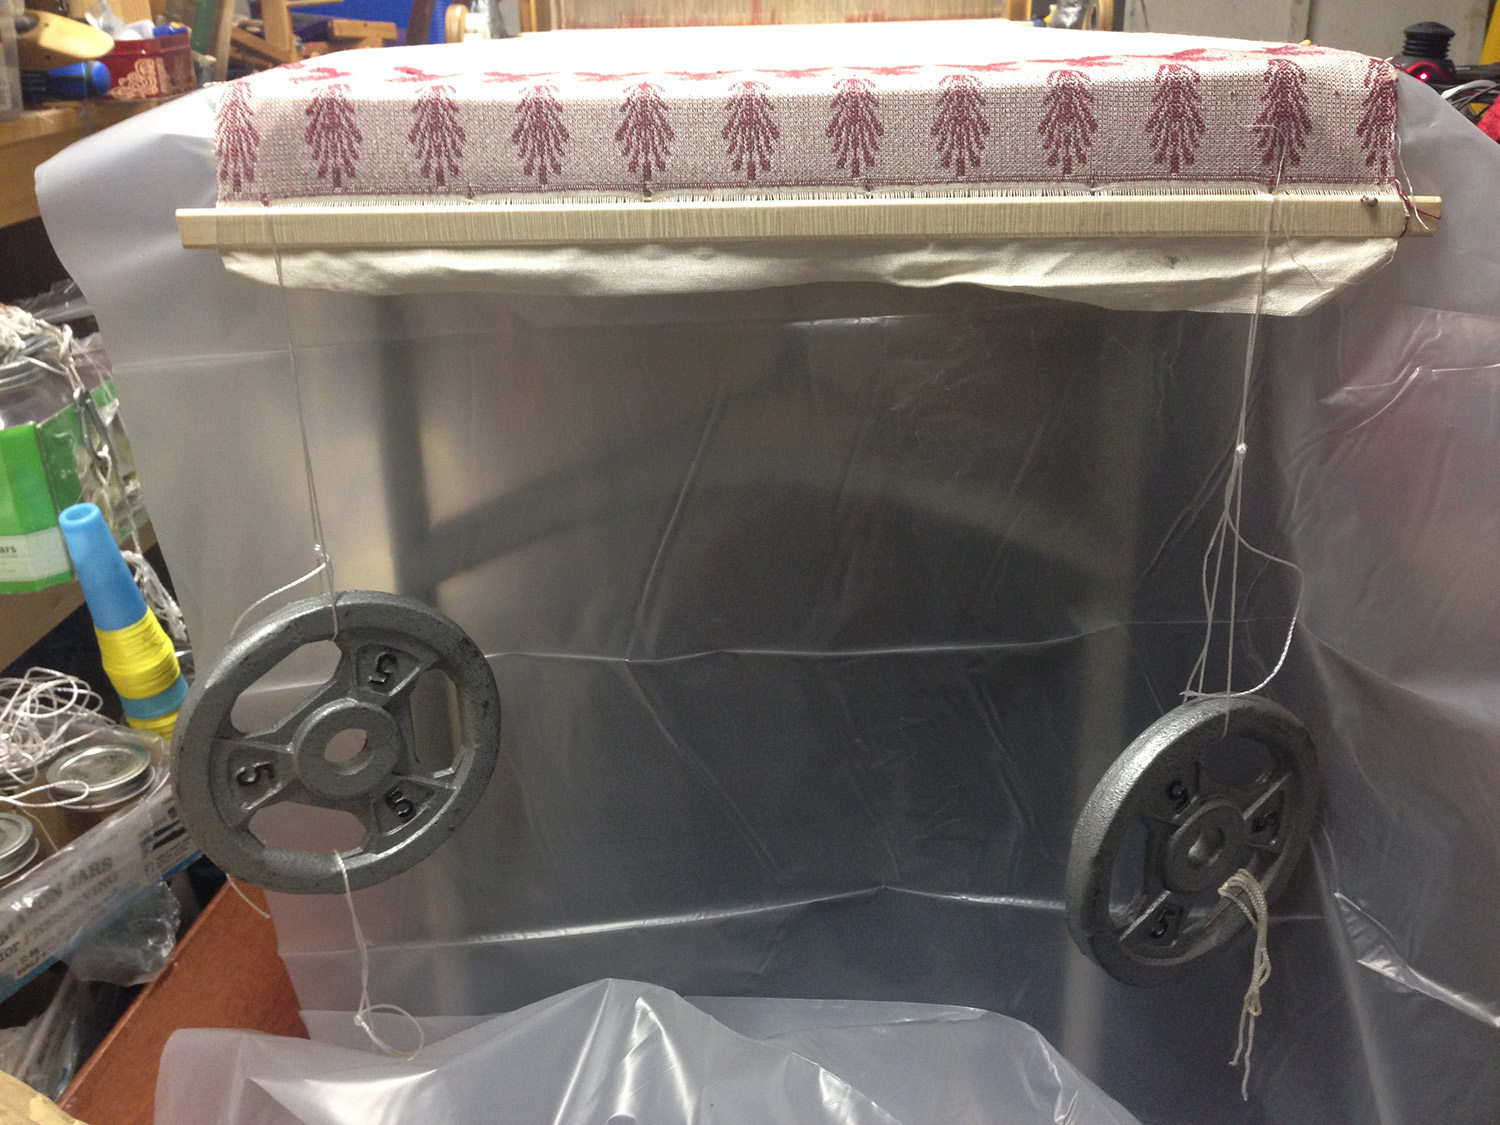
Since the back side of the warp was still attached to the loom, I only needed to weight the end away from the loom to keep the warp taut.

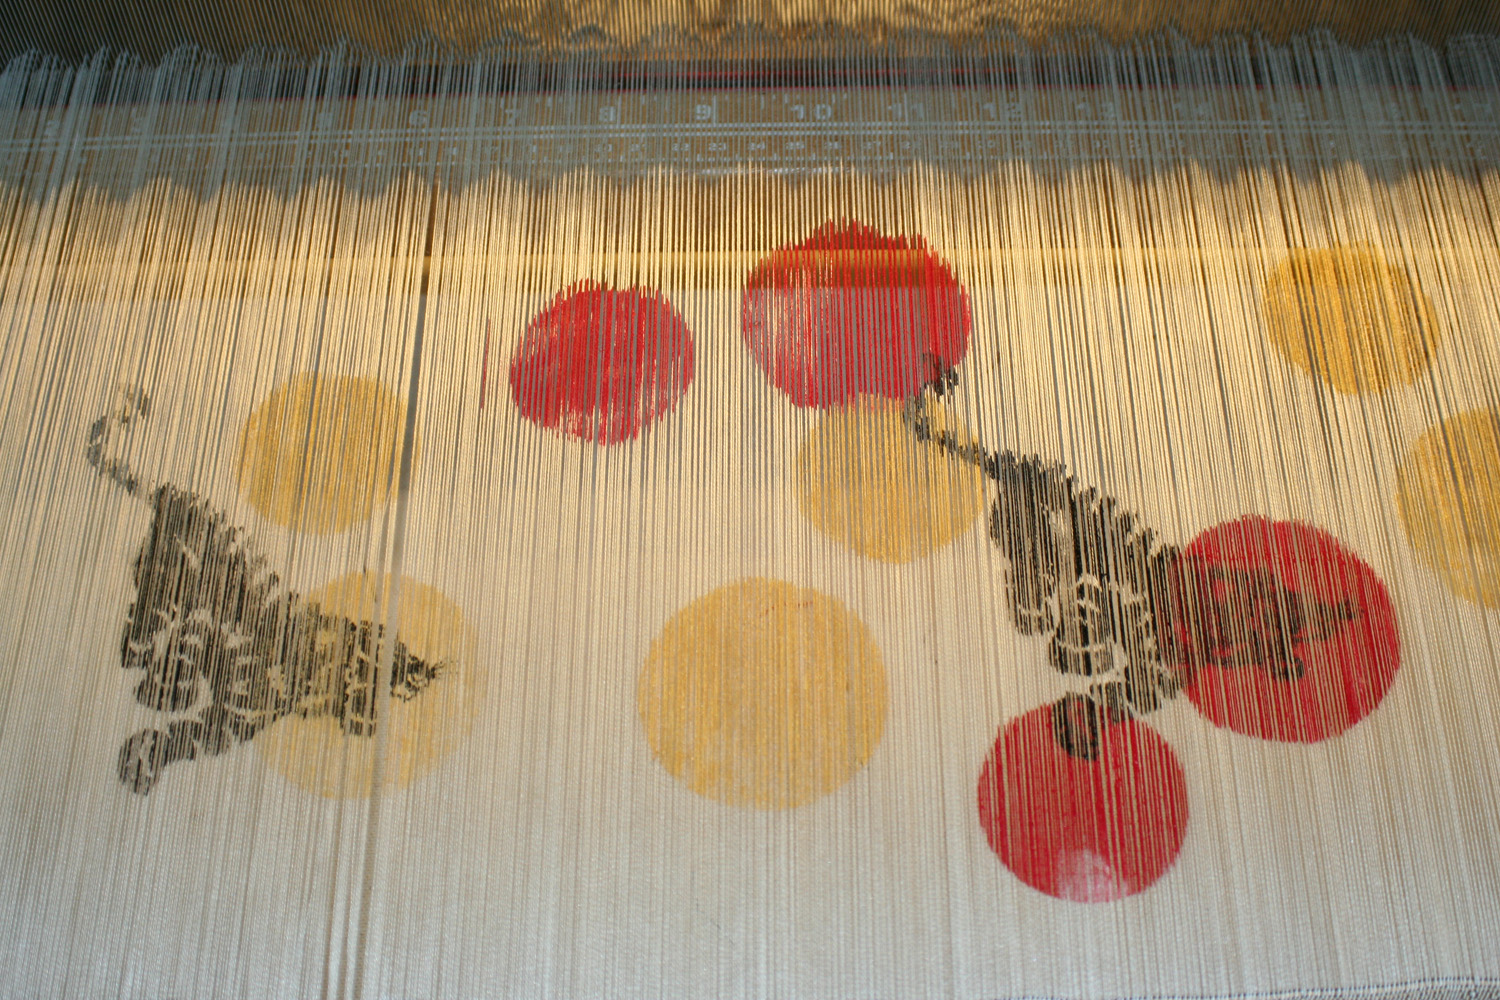
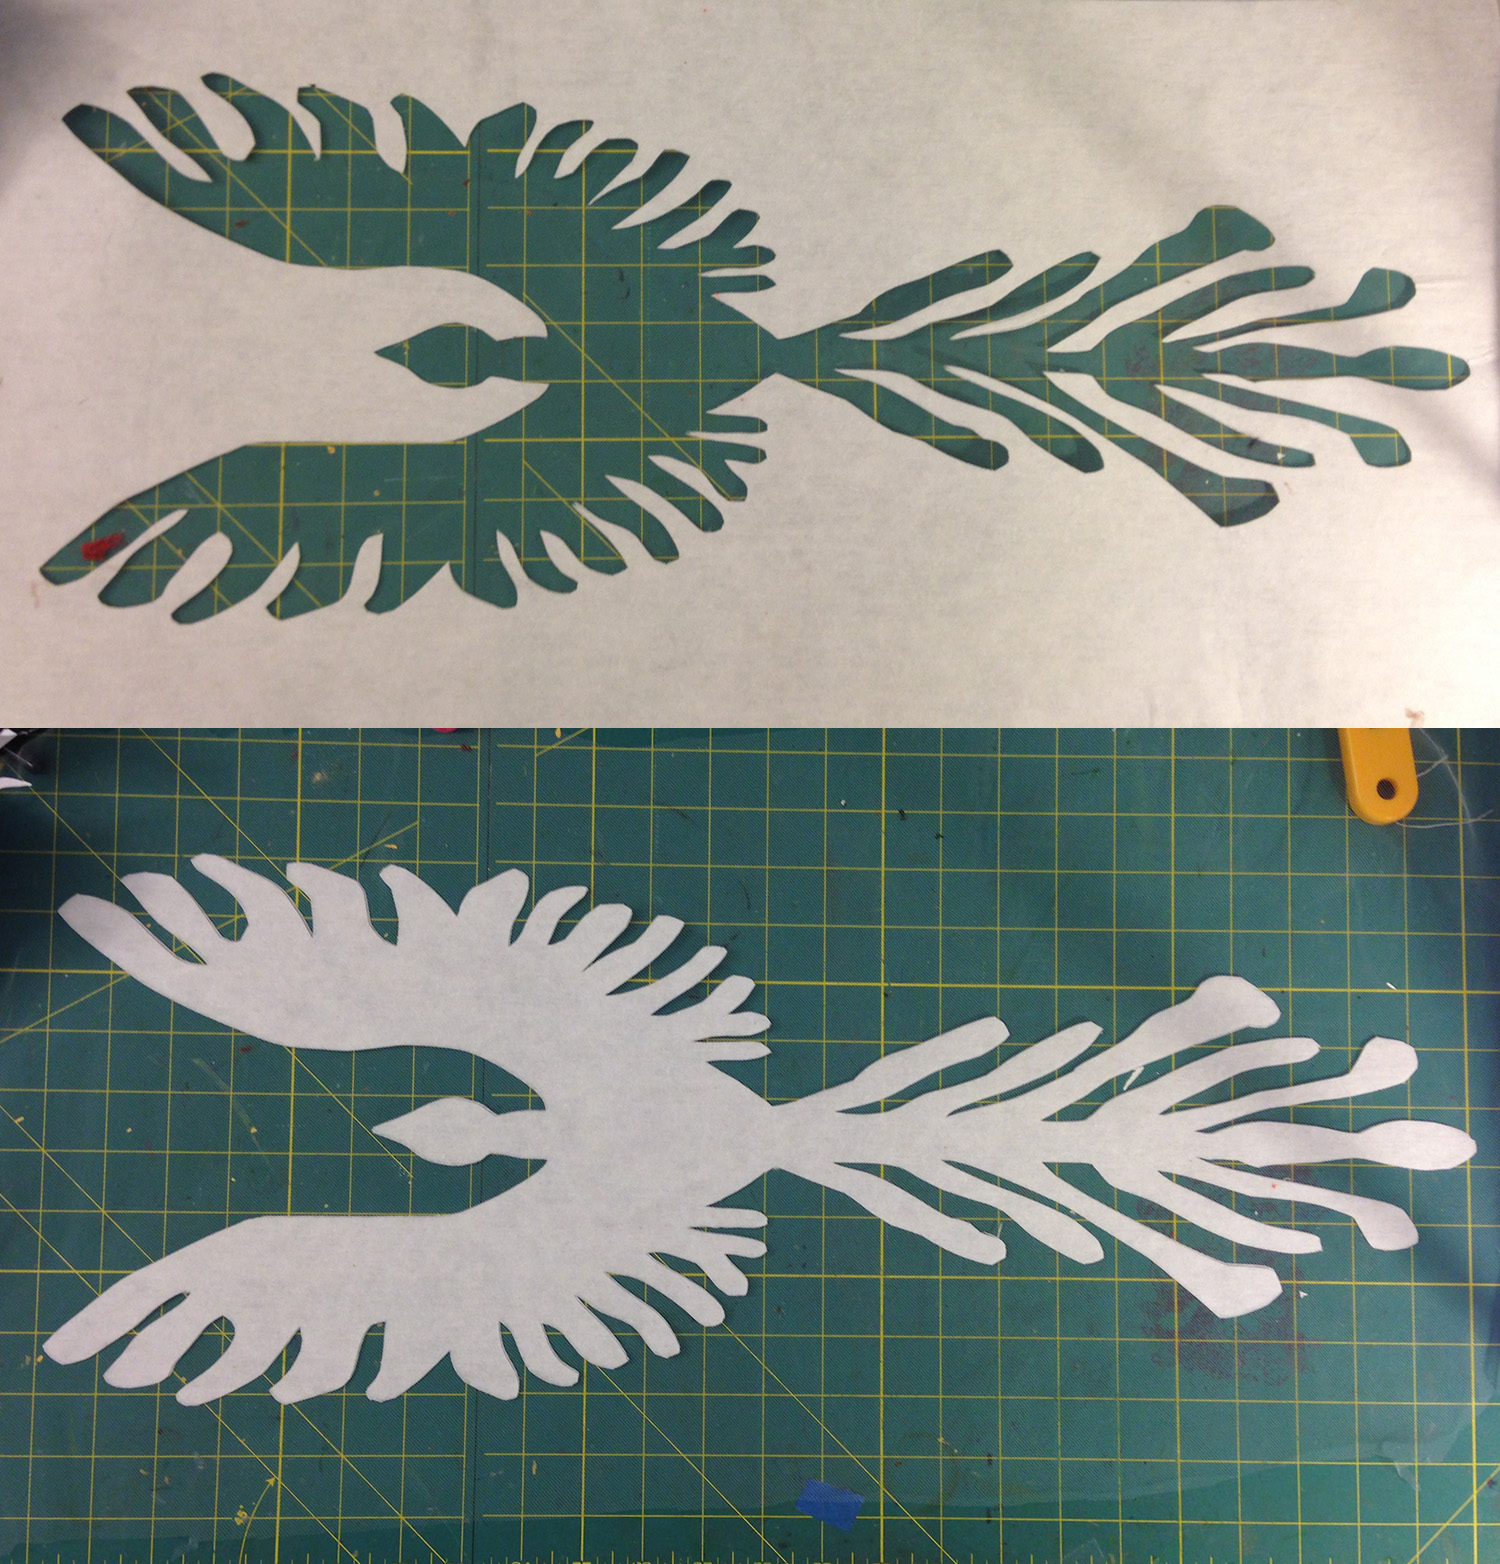
Next, I laid out the stencils on the warp:

Two stencils, laid out on the warp

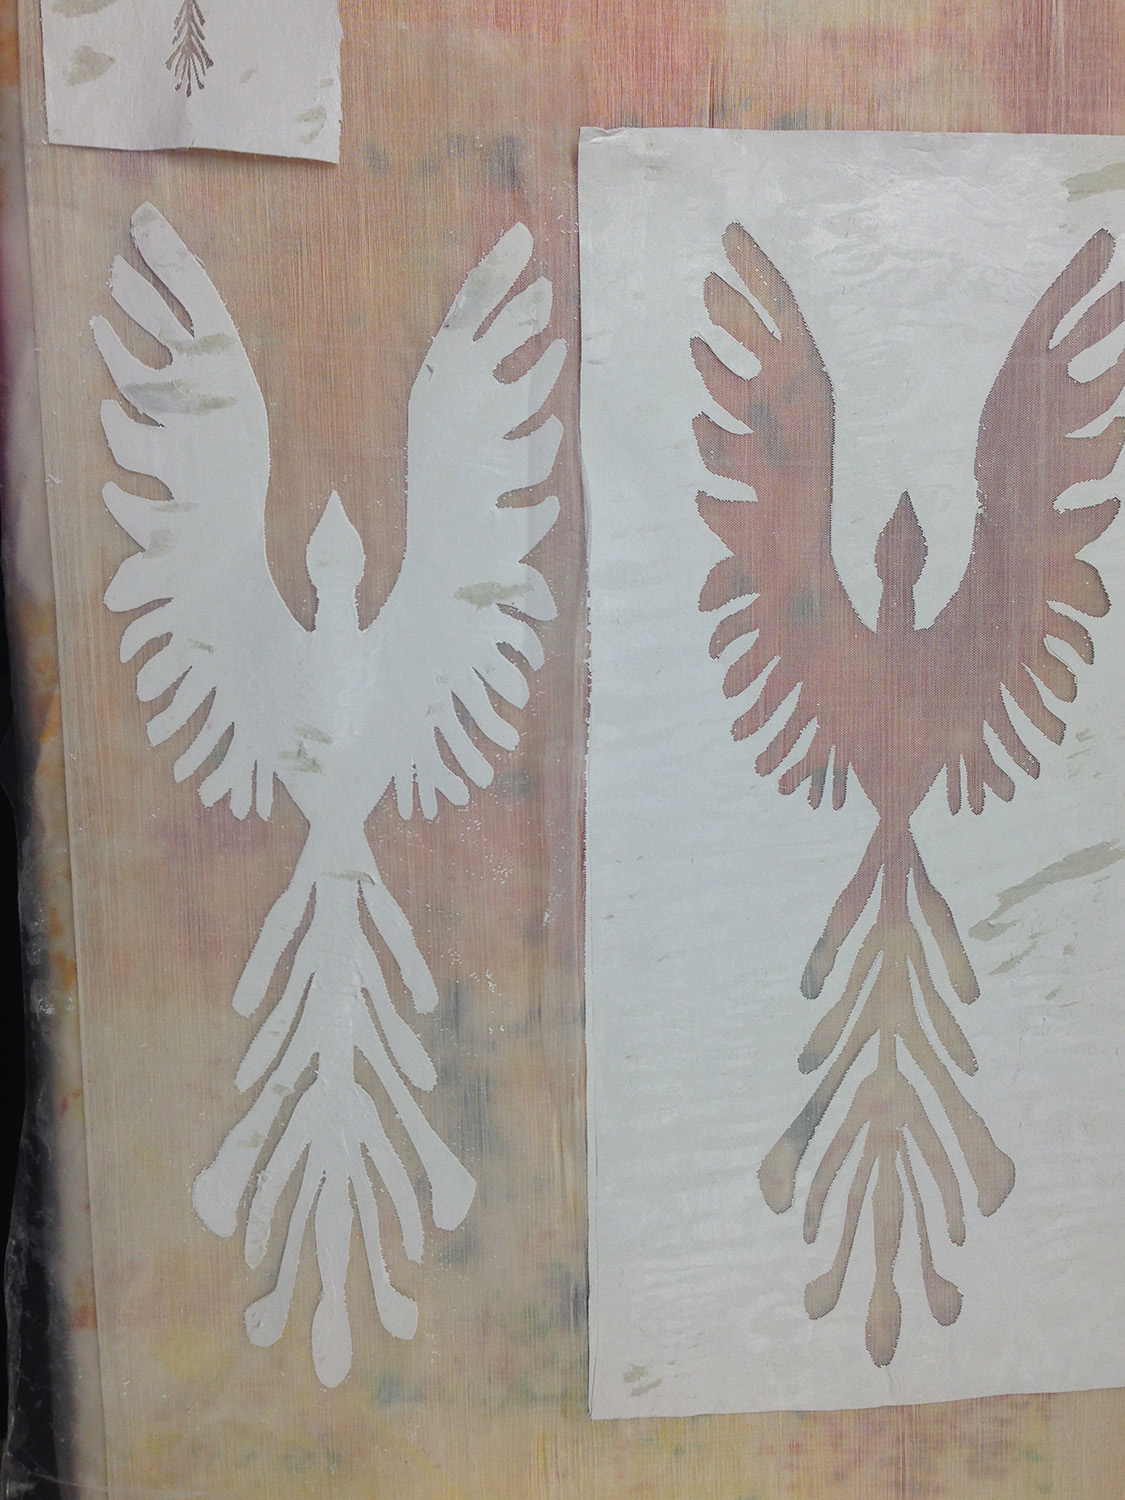
I decided not to use the tiny stencil, because the detail was obviously too fine to work. So I laid out the big ones and got to work. I diluted some screen printing paint to the consistency of cream, and applied gold, scarlet, and black paint to the warp, like this:

Warp, stenciled in black, red, and gold

About two seconds after I dabbed the first paint on, it dawned on me that this wasn’t going to work, because the paint would make the threads stick together permanently, and I’d wind up with a glued-together mess. Oops!

However, I’d already started, so I kept on with it, just on the off chance I could make it work. After finishing the stenciling, I took some paper towels and blotted the excess paint off the warp. I didn’t expect it would work, but it might improve the odds somewhat. Then I ran off to work.

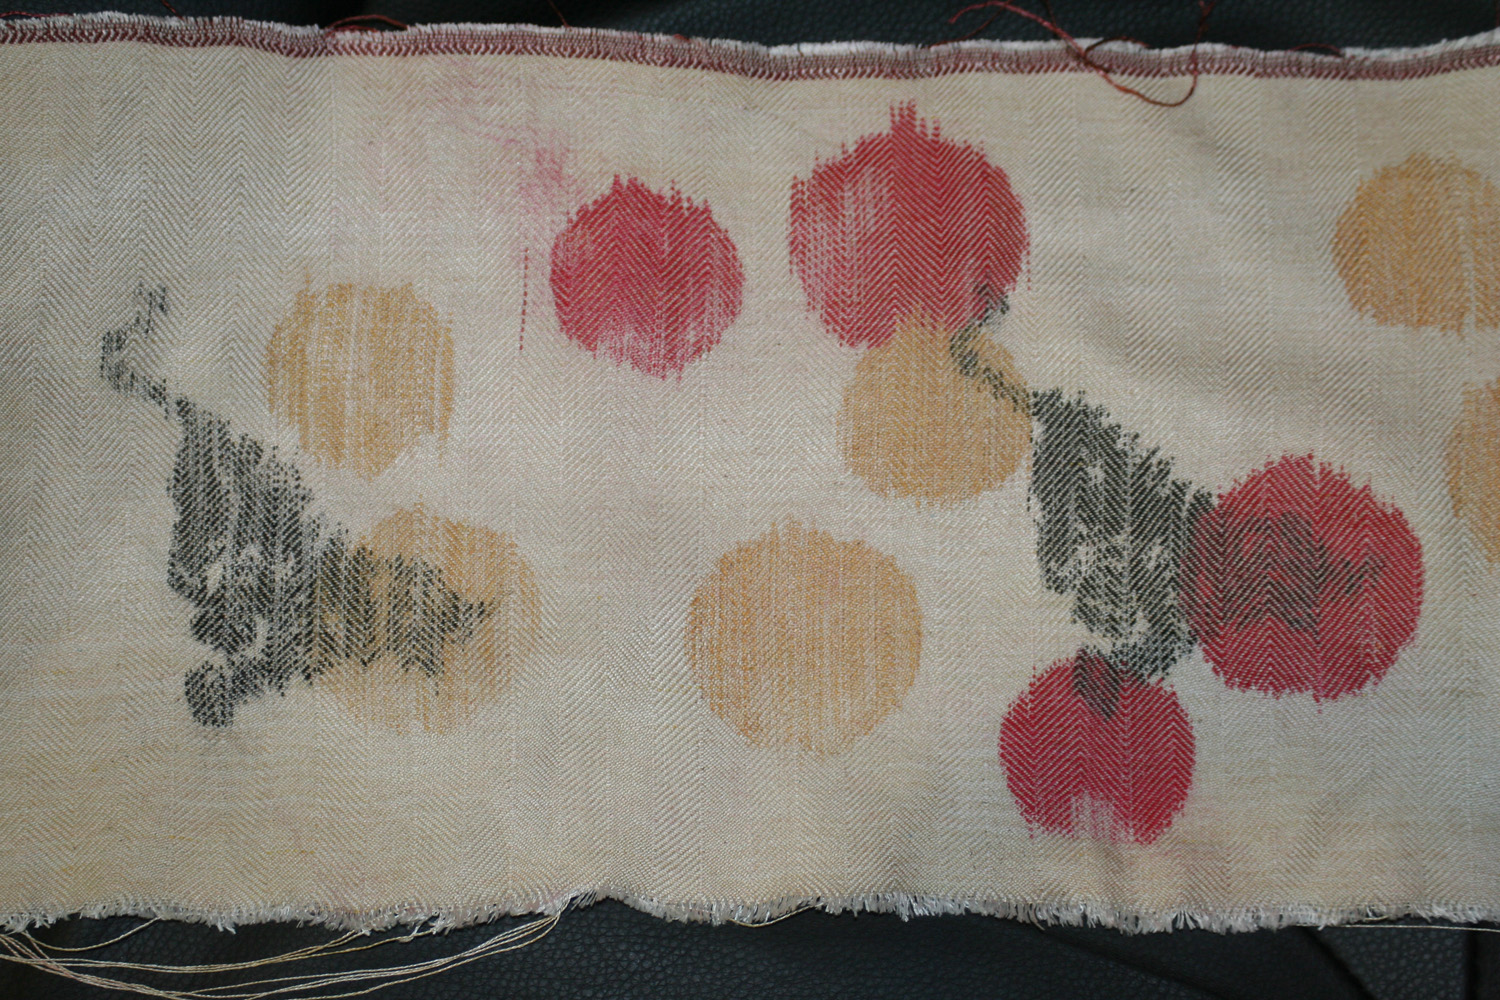
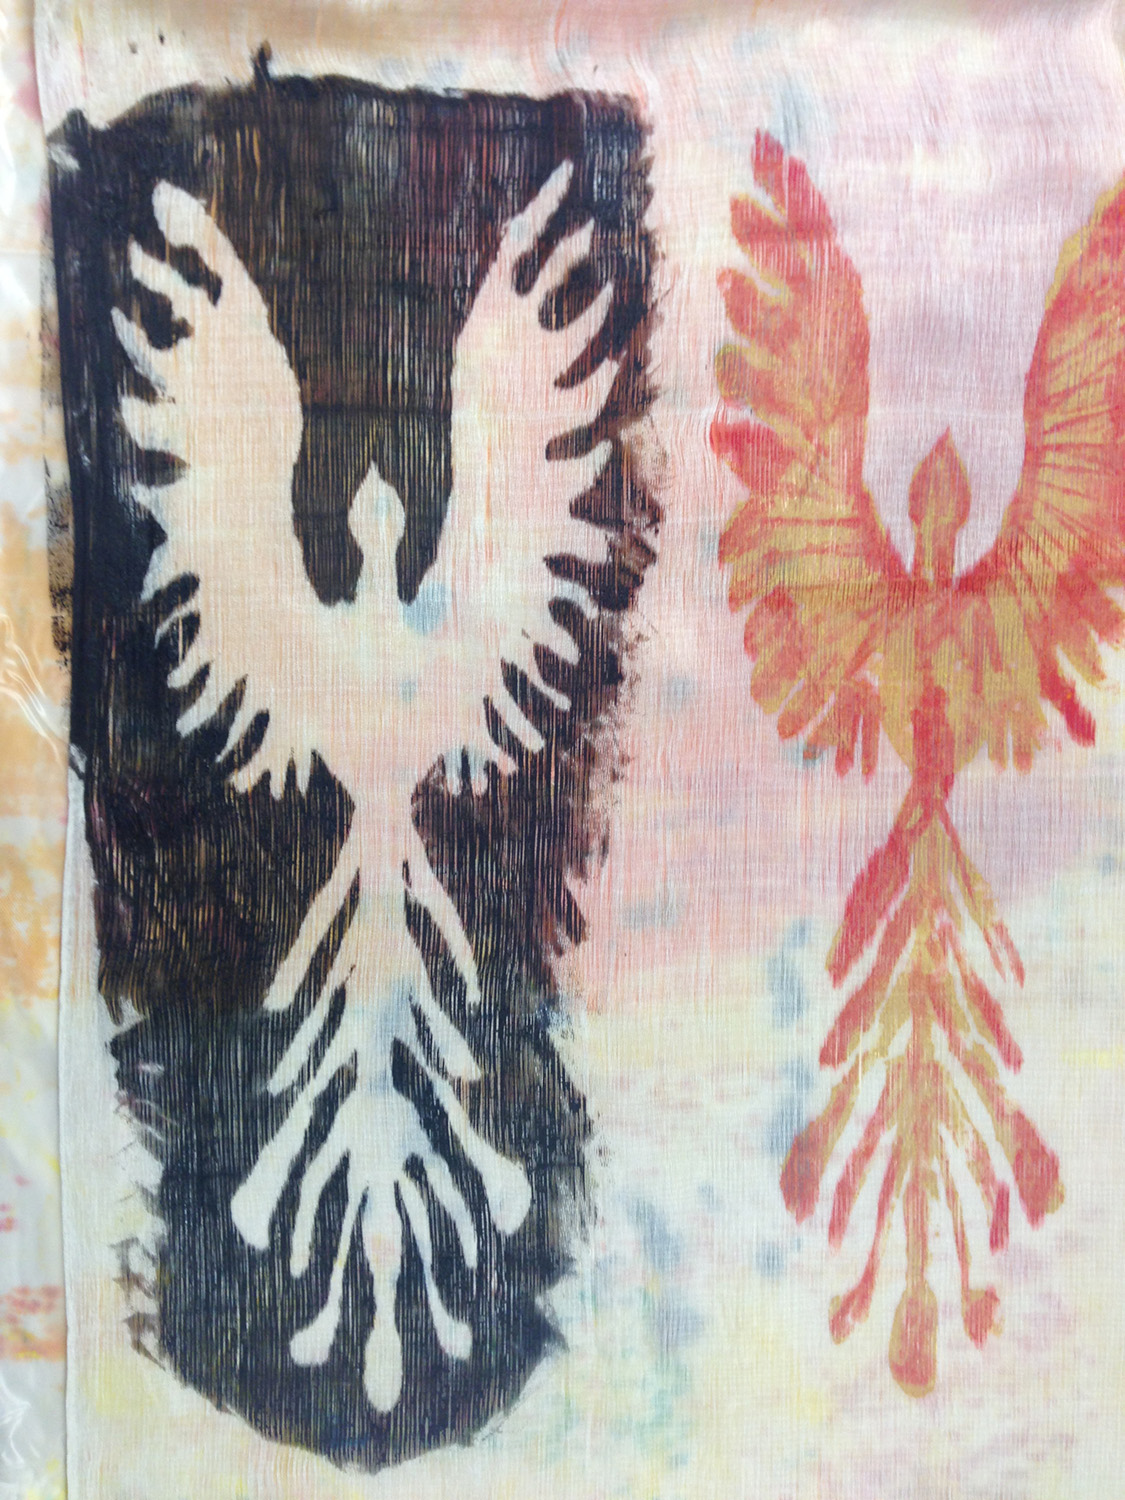
At lunchtime, I got home and discovered that the paint wasn’t quite dry yet. More precisely, it was dry enough not to smear, but still pliable. A possibility! I tried pulling out some sacrificial weft yarn, which (to my great surprise) came out easily. Hot dog! I quickly pulled out the rest, resulting in this:

stenciled warp with weft removed

I was quite pleased to see that the paint had coated each strand evenly – there were no white spots. (Using a fine yarn probably helped, as did the blotting with paper towels earlier in the day.)

Next, I wound it back onto the loom. I unfortunately did not wind on with even tension, so I had to weight quite a few threads. But I did get the warp on the loom, and started weaving it up in plain weave:

stenciled warp, being woven

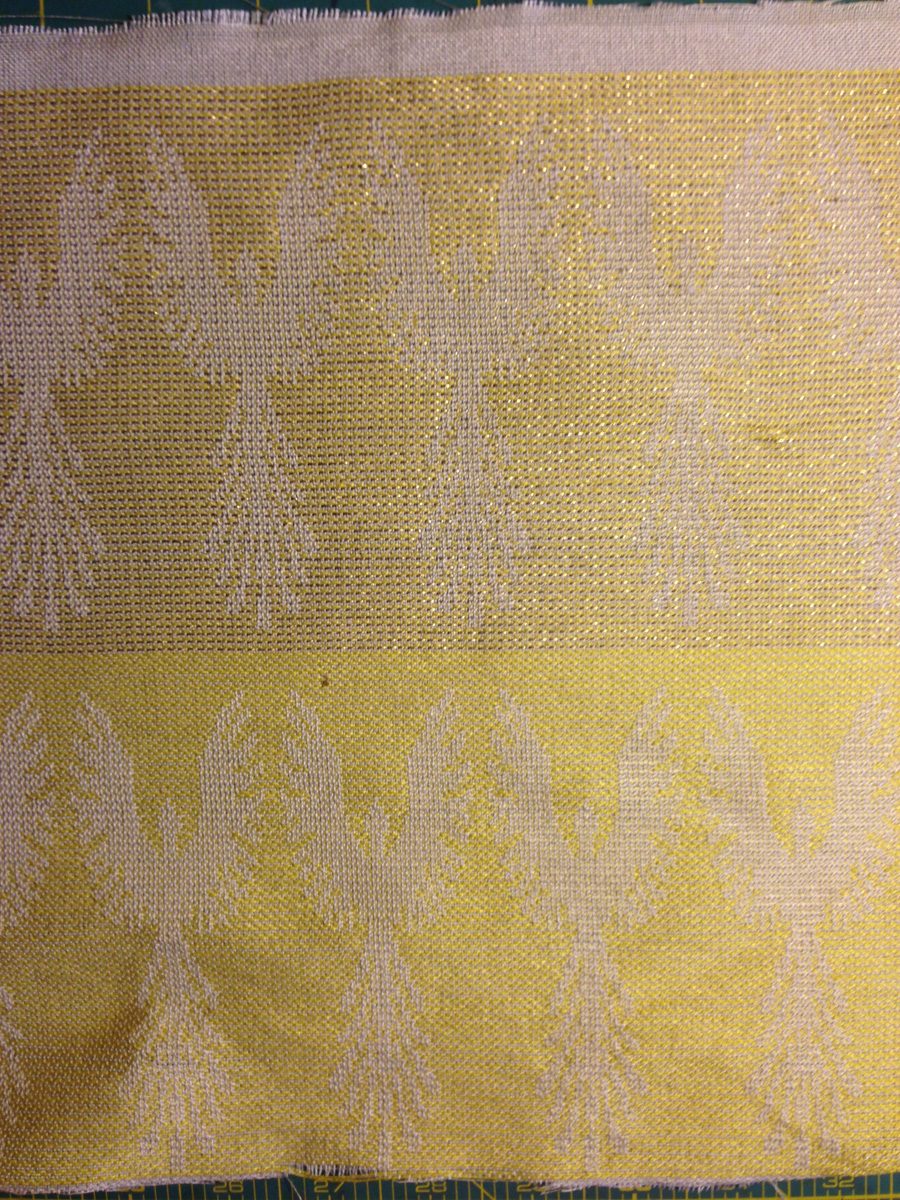
…and finished weaving it yesterday evening, by staying up way past my bedtime:

Cloth, woven but not yet dyed

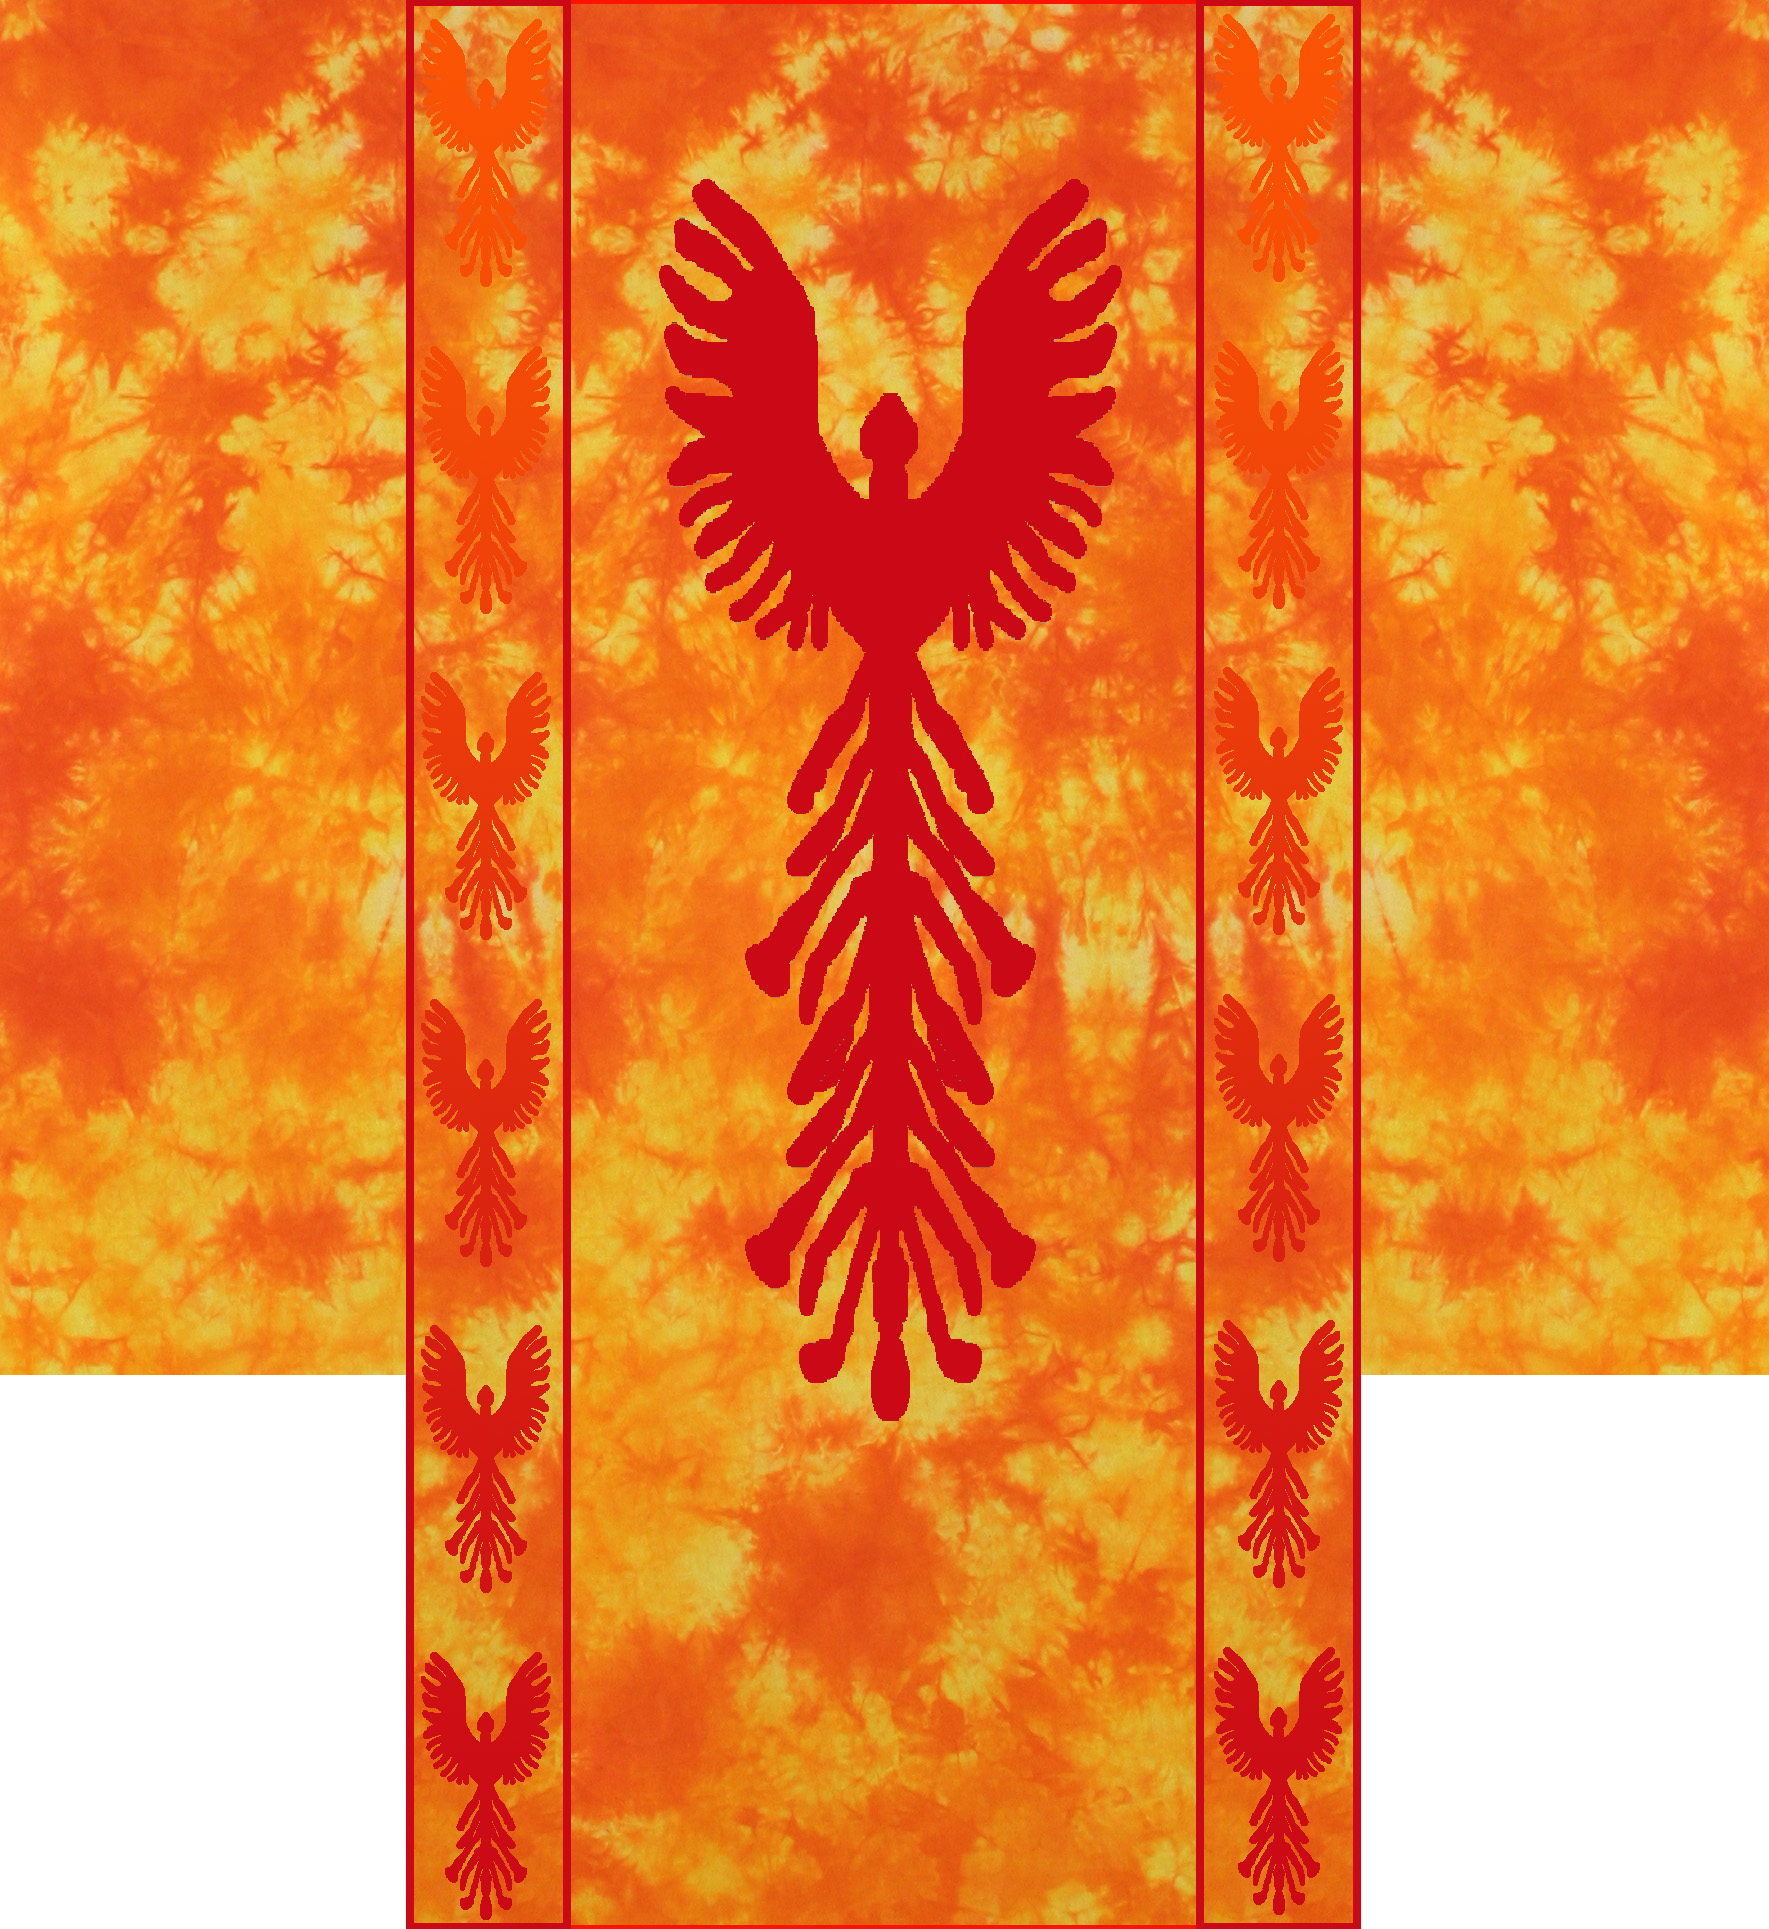
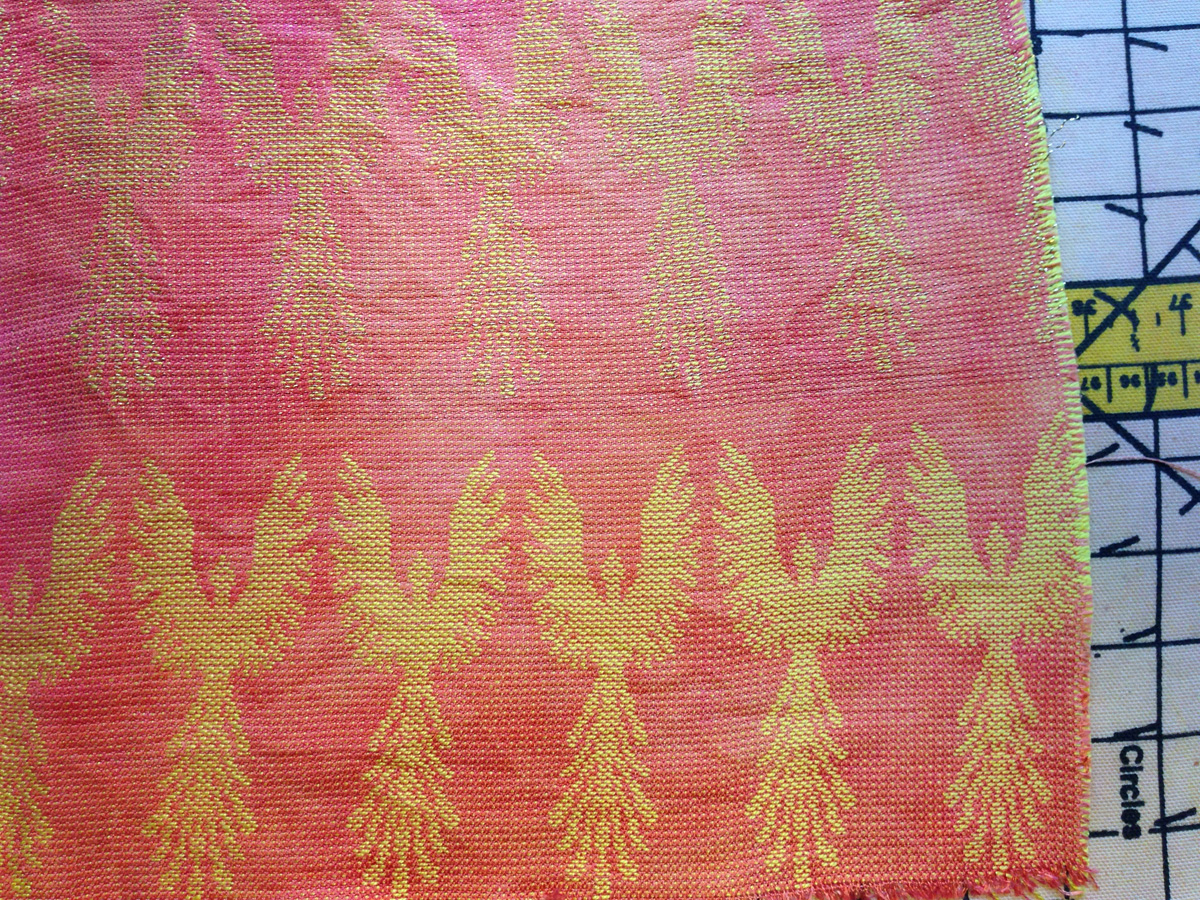
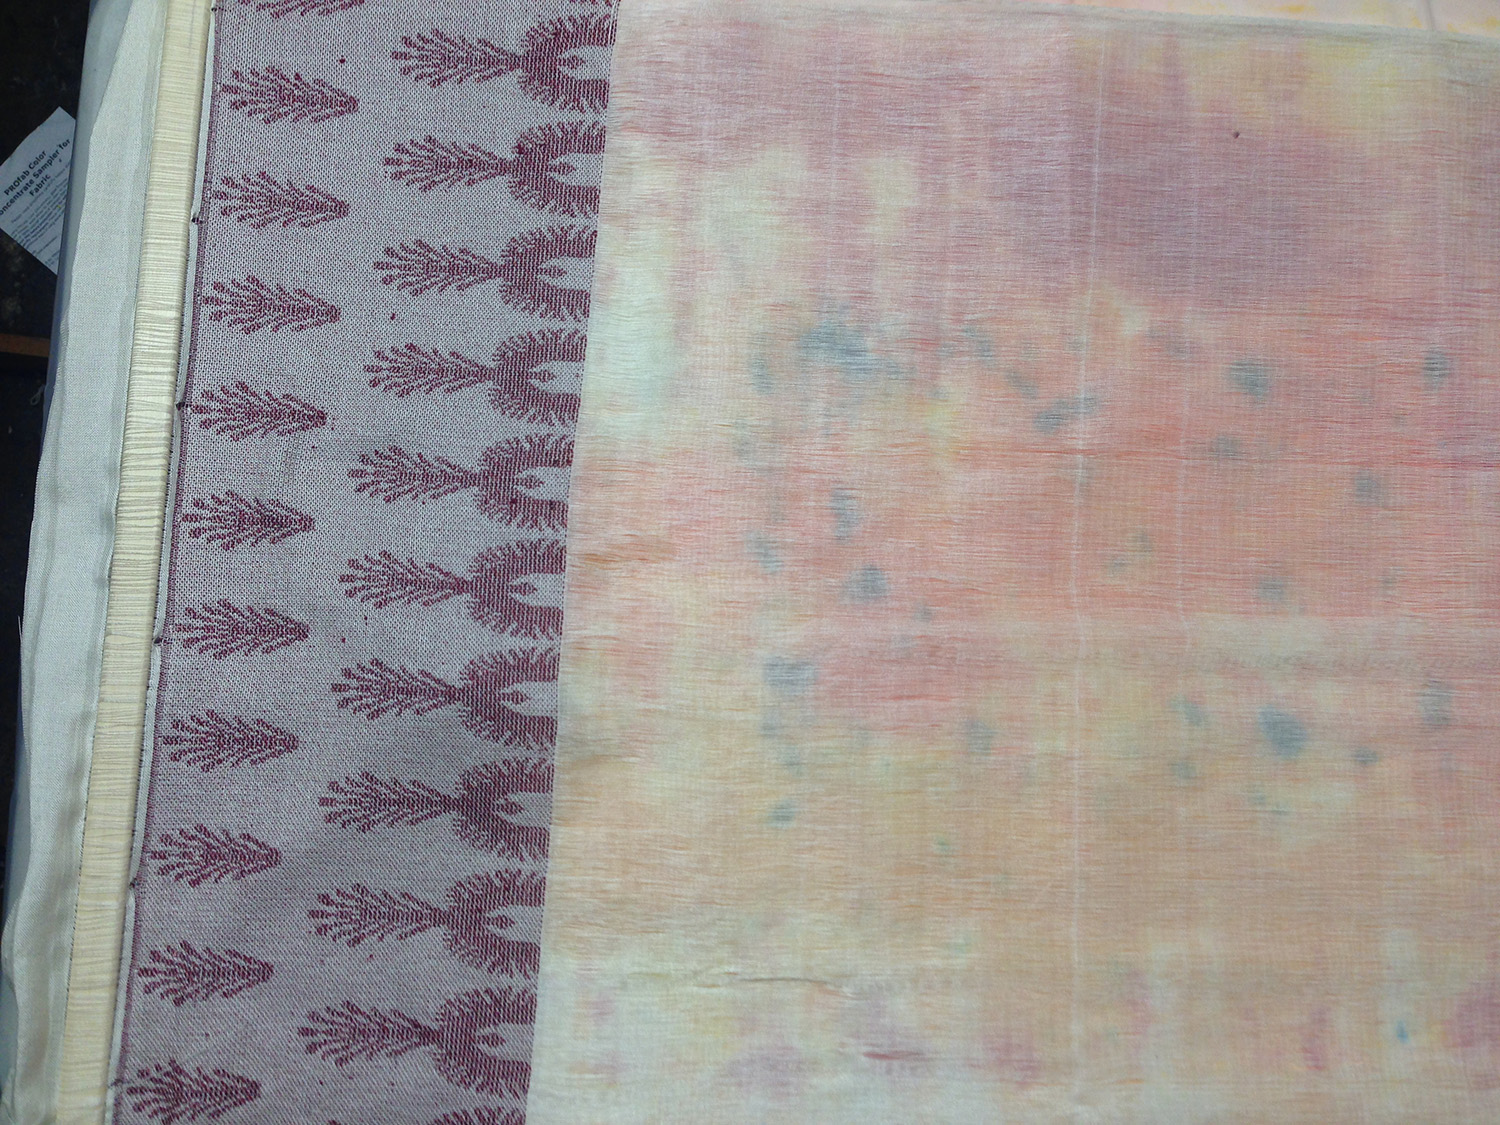
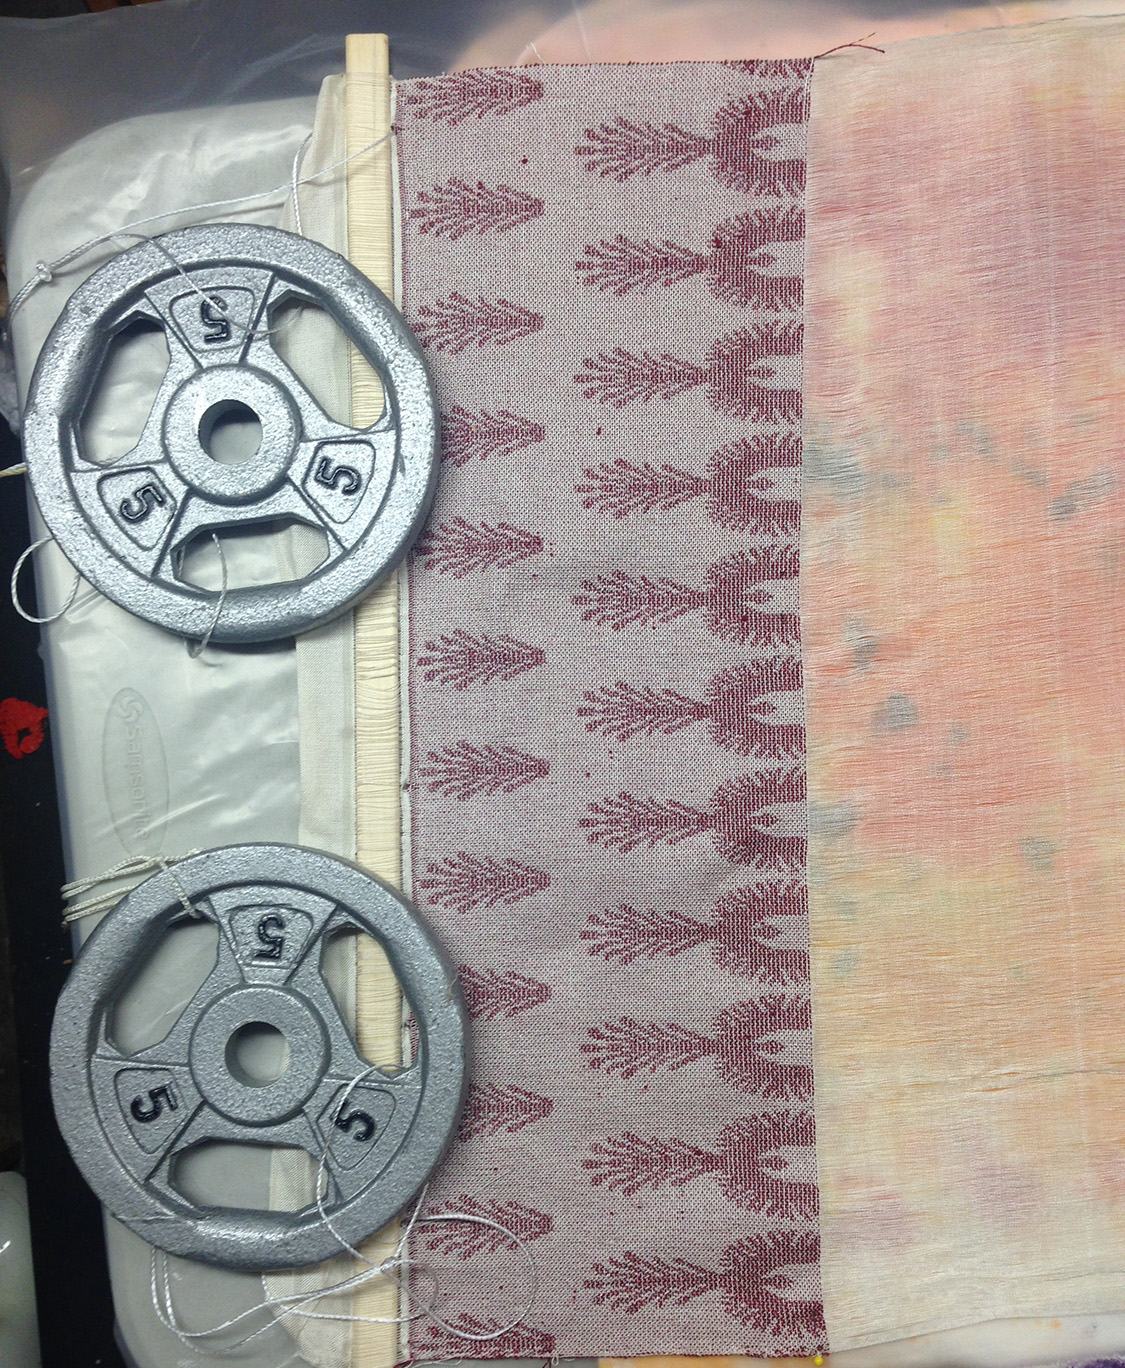
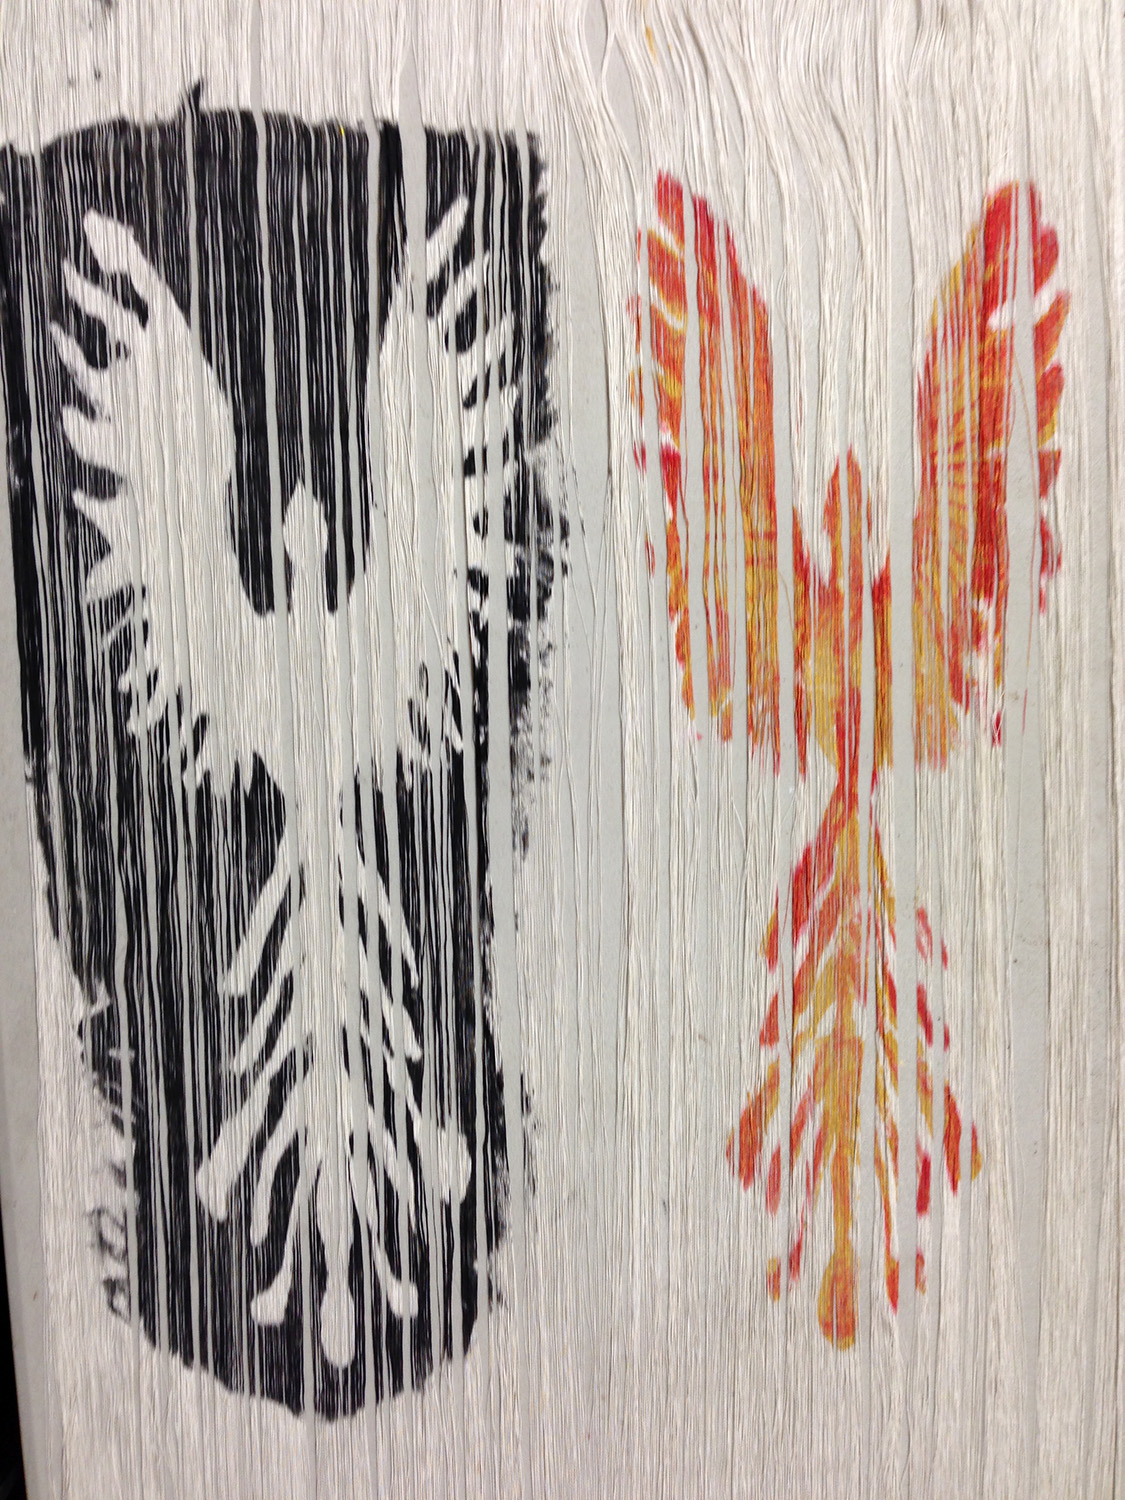
Finally, I cut it into two pieces, and dyed the gold/red phoenix cloth with a yellow-orange background, and the black cloth with scarlet and orange:

finished black phoenix fabric
finished light phoenix fabric

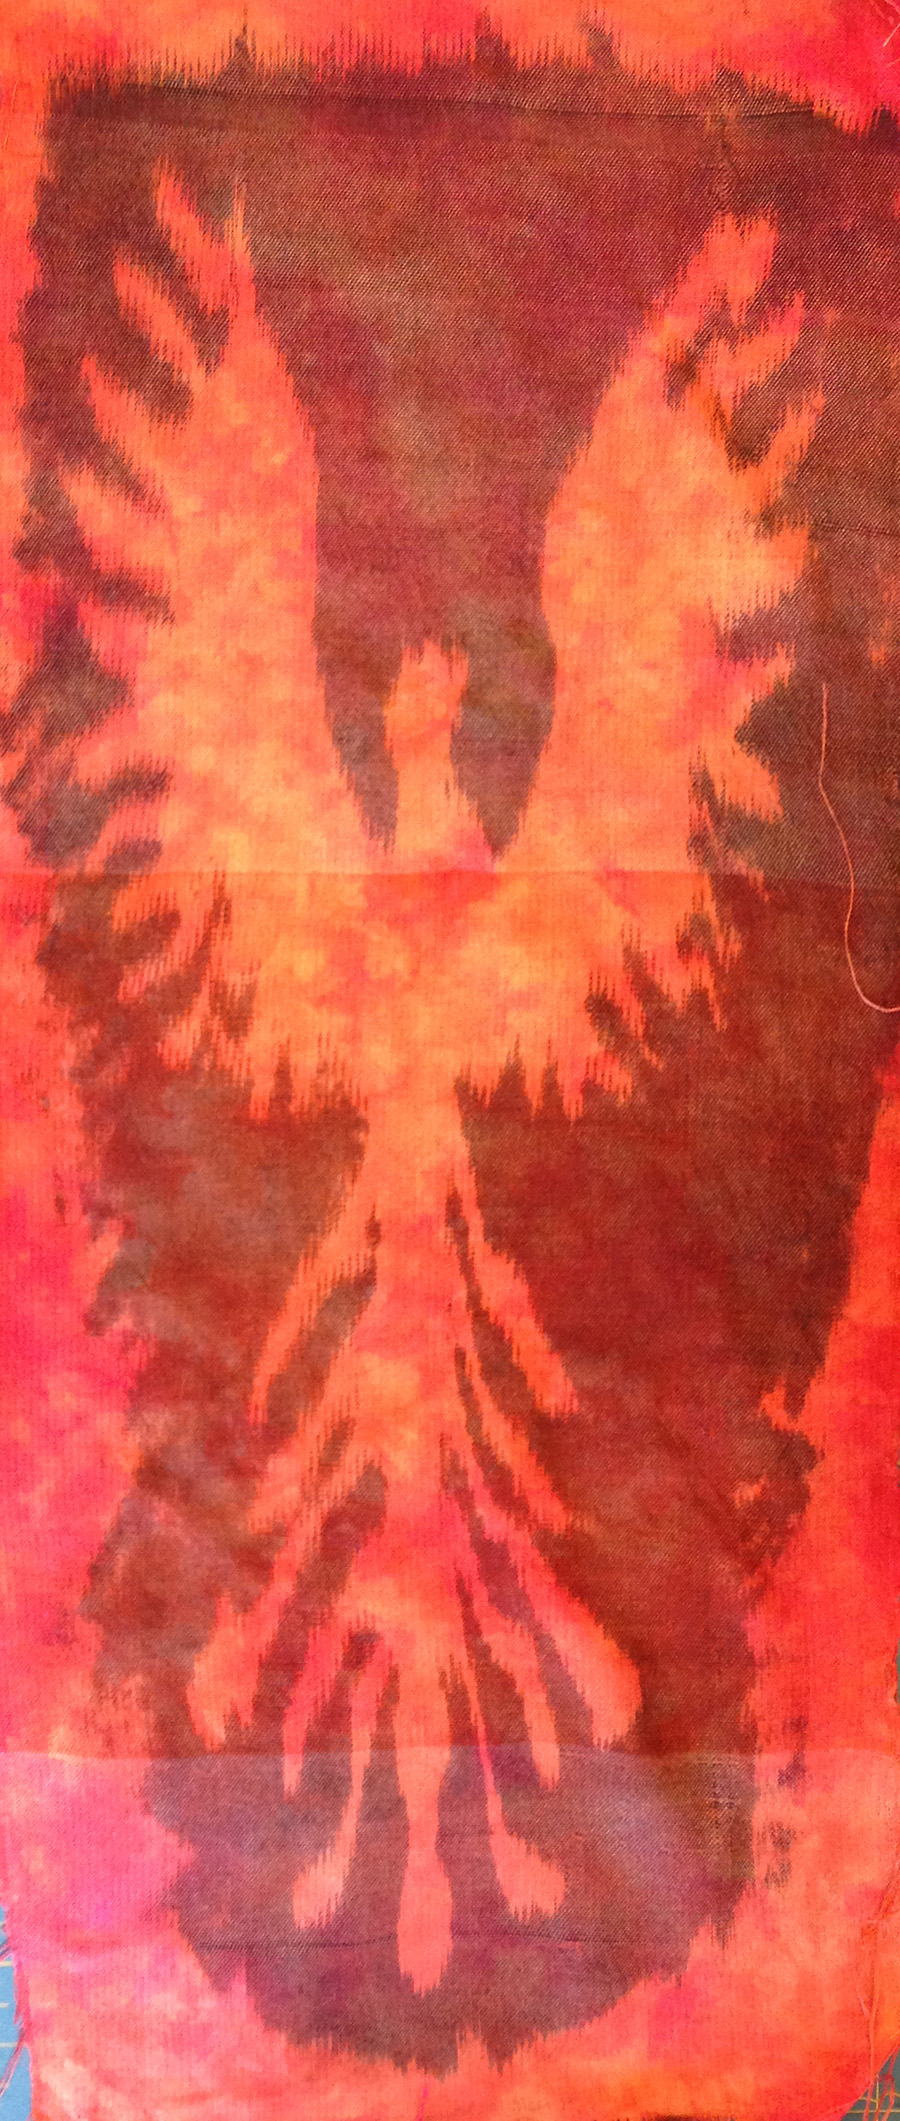
While both samples have huge technical flaws, the overall idea appears sound. I’m particularly fond of the phoenix on black background – the black “pops” the red and orange of the phoenix, the feathering around the edges suggests flickering fire, and there is enough red and orange in the black background to suggest smoke and ash. I really, really like this.

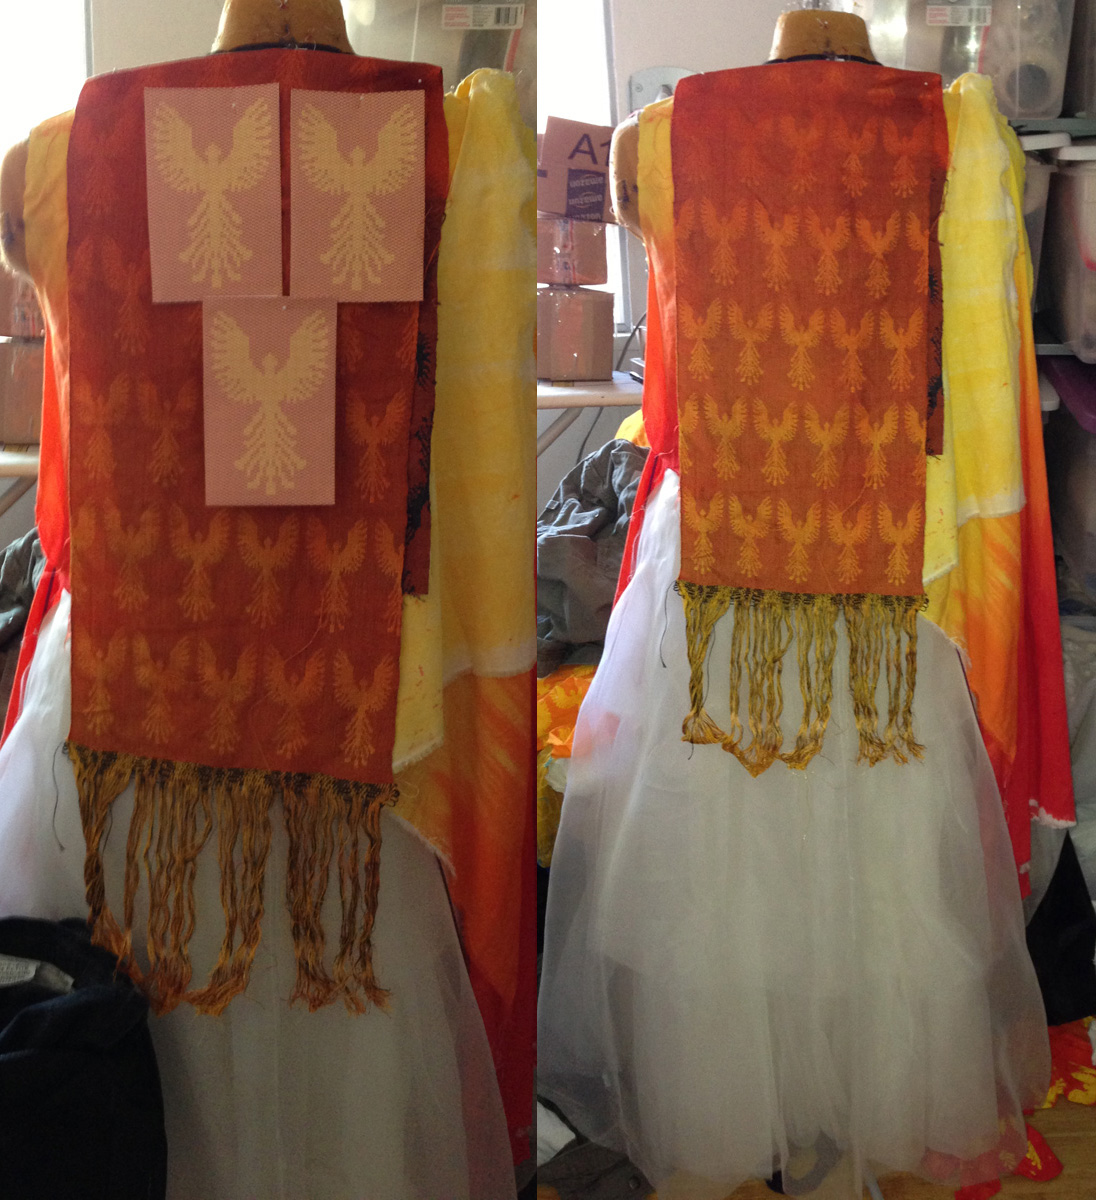
However, I think some embellishment might add interest to the woven cloth. I have a ton of beads, and went out and bought these delectable embroidery threads today:

threads, for embellishing yardage

I’m going to experiment on the samples over the next few days, in between preparing and printing a larger phoenix stencil – this one will be eighteen inches wide and nearly sixty inches long. I may have to prepare a bigger printing table!

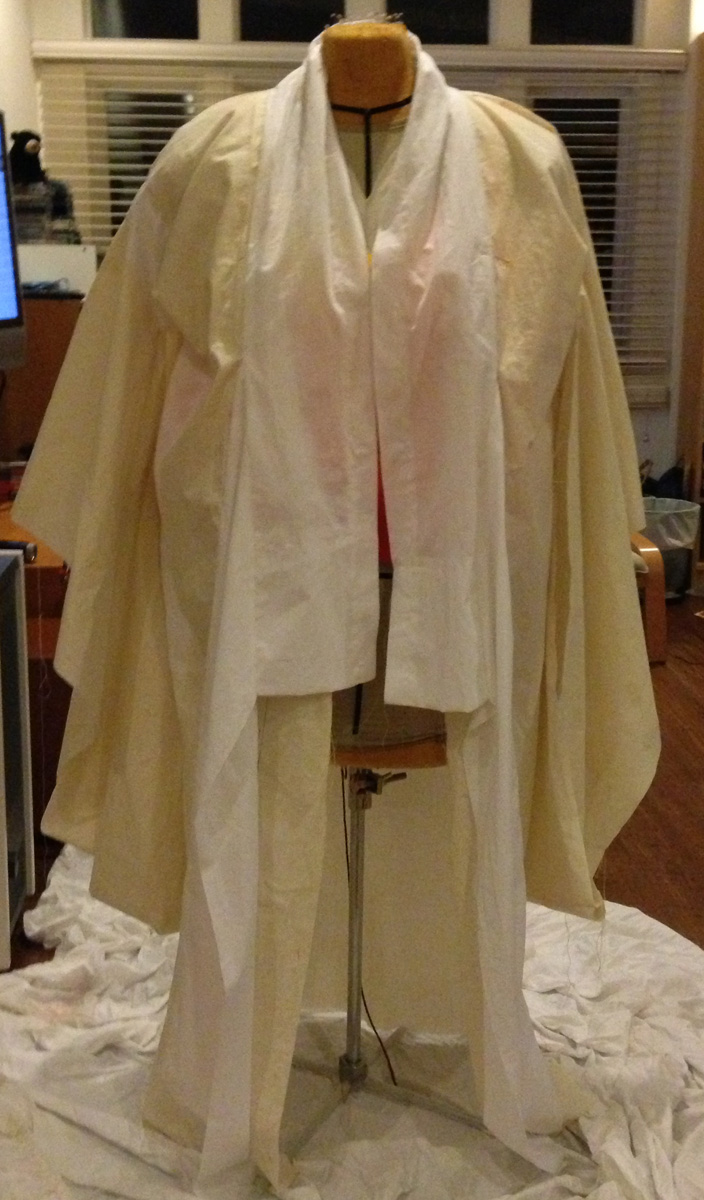
I am thinking of weaving a panel or two for the Convergence yardage exhibit. I don’t have time to make a kimono, but I can probably get the yardage done in time. More to ponder.

And, to round out this post, I finally realized why I’ve been getting so little ironing done:

Ironing board, or kitten bed? You decide!
Ironing board, or kitten bed?

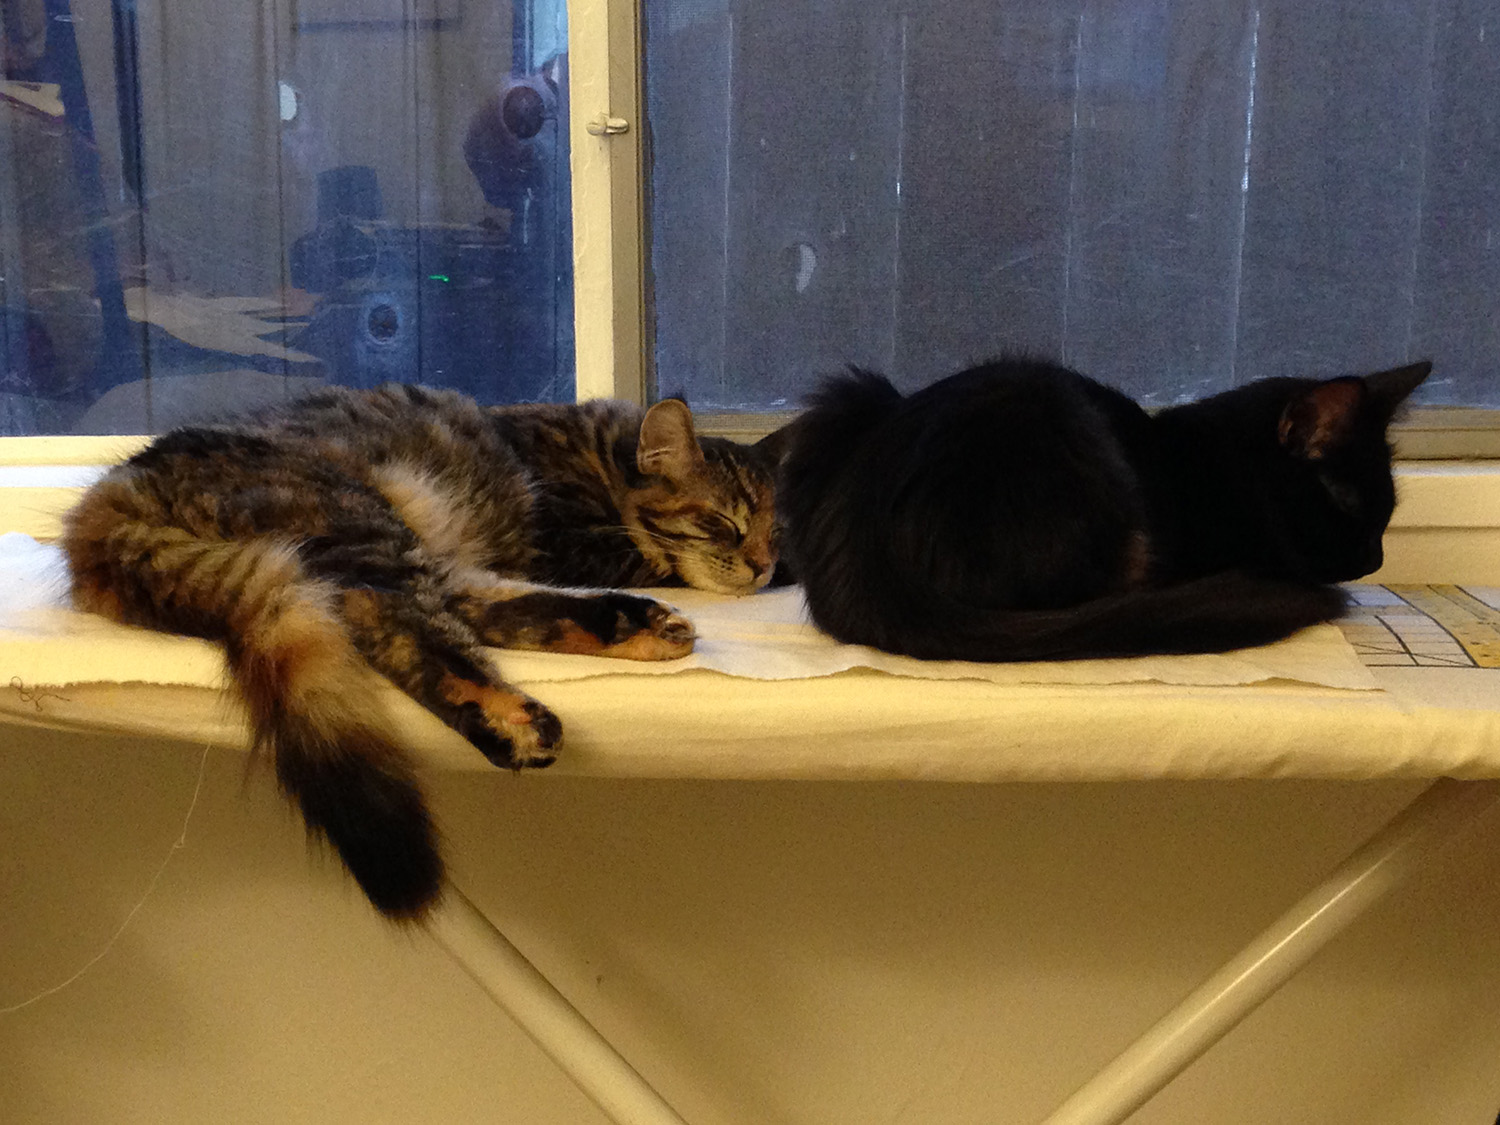
They do look blissful, though!

Filed Under: All blog posts, dyeing, surface design, textiles, weaving Tagged With: phoenix rising, phoenix rising kimono

November 10, 2013 by Tien Chiu

Carving stencils

I’m preparing to play with surface design on warps. The basic idea is pretty simple: stretch a warp out on a long table, then apply paint and/or dyes to the warp. Reel the warp back onto the loom, and weave it with whatever structure you choose. Easy, right?

Well, yes and no. Surface design on warps is a bit like playing a violin. Any fool can pick up a bow and make noise, but making music with a violin requires considerable technical mastery. And getting controlled effects on unwoven warps can be, well, complicated.

For example, here’s an experiment I did last year, using screen printing on warps:

two tigers screen-printed onto an unwoven warp
twin tigers, woven
twin tigers, woven

As you can see, even though the images are printed cleanly onto a perfectly tensioned warp, there is considerable distortion when woven. The circles flatten into ovals, and the edges distort and blur. Also, the diagonal lines of the weave structure (a reversing twill) further obscure the image.

This example was made using the simplest approach: screen printing onto a warp that is already on the loom, printing in the small gap between the reed and the fell of the cloth. This method produces the cleanest picture, but is limited to printing that can fit between the reed and the fell. (On my loom, that’s about eight inches.) And distortion still appears at the edges.

For the kimono, I need a panel about five and a half feet long, so this approach won’t work. So I’ve decided to use the other commonly used method – stretch the warp out on a long table and do the printing on the table. To minimize distortion, I’m weaving the warp into very loose “cloth” using a superfine weft, with about an eighth of an inch between picks. I wove a stick in at the beginning and end of the section to be printed, and will use those to stretch out the section evenly on the table for printing.

But before I can print on the warp, I need something to print with. So I spent a good chunk of time this afternoon making these stencils:

two large stencils
two large stencils
one large and one small stencil

The big stencils are about nine by thirty inches; the small one is about two by four inches.

I plan to use these stencils to test a couple of things:

  • lengthwise distortion due to take-up: the image will shorten as the fabric is woven, but how much?
  • clarity of woven image with a very simple weave structure (plain weave)
  • distortion of edge details

In particular, I am using the small phoenixes to test the amount of detail possible in an image, and the large phoenixes to test what happens to a larger design. I’ve prepared 36 inches of warp, which is enough to print two large and many small phoenixes. Now I just need to finish the stencils, which will take another day or two, and I’ll be ready to experiment.

(The stencils, by the way, are carved from fusible interfacing – the heavy “craft” type. Two layers of interfacing, fused together with a layer of nylon tulle in between. The tulle stabilizes the tiny details and the interfacing makes the stencil. I need to coat them with two layers of latex house paint and iron the paint to heat-set it; after that they’ll be ready to use. This technique is covered in detail in Jane Dunnewold’s excellent book Complex Cloth.)

I do plan to experiment with katazome (Japanese paste-resist dyeing) later, but for the first trial or two, I’m going to keep it simple and stencil rather than play with resists.

Finally, I went to a friend’s help-out-with-gardening party today, and when I came home, a certain black kitten was fascinated by my shoes. Here is Fritz, with his head stuffed eagerly into my left shoe:

Fritz in my shoe
Fritz investigating my shoe

Apparently the kittens have not yet discovered feline dignity. 🙂

Filed Under: All blog posts, dyeing, surface design, textiles, weaving Tagged With: cats, phoenix rising, phoenix rising kimono

November 8, 2013 by Tien Chiu

What next?

Chocopalooza is over, except  for some cleaning that I’ll be doing this weekend. Which means it’s back to work. 🙂

I’m at a crossroads. While the Phoenix Rising kimono is definitely at the top of my list, I also want to get back to the book. (No, I have not forgotten about it!) At the same time, I’m unpleasantly aware that the Convergence Fashion Show deadline is just three months away – which is practically tomorrow, at least for me. If I work obsessively on the phoenix kimono and don’t make radical changes to the design, I might be able to get it photographable in time. However, there is a huge flaw in the design, which I mocked up today:

simulation of large phoenix pattern

The design looks good at a small scale, because the eye interpolates the blocks into a smooth curve. However, at a larger scale, it looks distinctly pixelated. Unattractive at best. (The image on the blog is a small version that actually looks smoother than the real thing would; if you click on the image to get the full size version, and view it at 100%, you’ll see that each block is huge.)

So, to get an attractive phoenix at large scale, I need to turn to other methods. I’m thinking surface design on the warp – either stenciling directly on the warp or stenciling on a resist (katazome) and then applying dyes/paints. This would give me the beautiful phoenix pattern I’m after. However, I’m not familiar with this technique and I certainly won’t have time to figure it out and still make the Convergence entry deadline. So I can either go with what I know, and have a less-than-perfect piece to enter into the Fashion Show, or I can skip Convergence 2014 and continue to refine my design.

Well, that’s a pretty obvious choice, at least for me. I’d rather have a knock-your-socks-off piece for the next Convergence than a mediocre piece for this one. So I think I’m going to sit this Convergence out. That also means I can skip going to Convergence, which will be useful since there are several other expensive, vacation-consuming things I’d like to do next year. (Two weaving conferences, a three-day chocolate class, and a one-week katazome class with John Marshall.) I’m a bit disappointed to be missing Convergence, but I think it’s better than working in a panic for three months to turn out something that doesn’t meet my standards for a show piece. There will be other shows.

So the next few steps will involve experimenting with stenciling on warps – katazome and “regular” stenciling, I think. I can use the warp I currently have on the loom – which is threaded up for summer and winter, but which can be used just as effectively (I think) for plain weave. I’ll have to do more stenciling experiments later using whatever structure I settle on, but this will work to get an initial “bead” on the techniques and processes involved.

And, for the kitten-watchers, here is what happened shortly after I sat down in front of the computer this morning:

Fritz, "helping"
Fritz, “helping”

And, of course, that shortly led to this:


Fritz AND Tigress "helping"
Fritz AND Tigress “helping”

So what could I do? I got up to take a break. Which, of course, resulted in this:


Fritz and Tigress engaged in territorial combat over who gets to sit in my (warm) chair
Fritz and Tigress arguing over who gets to sit in the (warm) chair

Tigress eventually won, and I had to (gasp!) evict her after I came back from getting a cup of tea.


Filed Under: All blog posts, textiles, weaving Tagged With: cats, phoenix rising, phoenix rising kimono

September 18, 2013 by Tien Chiu

Design progress

Sorry for the radio silence, but once again, so much has been happening that I haven’t had time to write about it all!

First, I finished the first muslin for the Phoenix Rising uchikake. The body came out way too wide, but by chopping two inches off either side, I got it down to a reasonable width. There is still one glaring problem – the extensions on the front panel need to be moved up by 5-6 inches. And the bottom needs to be extended by about 8-12 inches. But otherwise, it seems reasonably plausible.

Here are pics of the muslin:

The first muslin for Phoenix Rising kimono, with its arms down
Finished muslin for Phoenix Rising, back view, with its arms down
The finished muslin for Phoenix Rising kimono, front view, arms extended
The finished muslin for Phoenix Rising, back view, with its arms extended
The finished muslin for the Phoenix Rising kimono, back view, with its arms extended

This shows rather clearly some of the design challenges. The kimono/uchikake will likely be displayed on a broomstick, with its arms out to show the pattern. At the same time, however, it needs to look good when worn, and the pattern will look quite different when on the body.

For example, this beautiful design, which I spent several hours concocting before finishing the muslin, simply won’t work:

first draft design for Phoenix Rising kimono

It looks great hanging from a broomstick, but the two side panels will be largely invisible when the kimono is worn. (For evidence of this, look at the back of the muslin – the two stripes of white muslin appear clearly when the arms are extended, but are nearly invisible when the arms are down.)

My conclusion from this is that I really need to design directly on the muslin, so I can see what is working and what is not. This fortunately shouldn’t be too hard – I can design in Photoshop and then print onto long sheets of fabric, ironing the fabric to freezer paper to stabilize it and using a printer that can print 12″ wide and arbitrarily long. By taking this approach,  I can easily play with the design, while using a flexible material that won’t affect the drape of the garment. (Paper is too stiff to play well, I think.)

My next steps? Redo the muslin, this time in a heavier fabric that more closely resembles my handwoven fabric sample, and fixing the mistakes I made in the first one. Then design various phoenix motifs, print them on fabric, and test different arrangements on the broomstick and the dress form. I think I can finalize the design quite quickly using this approach – at least, enough to let me weave more samples.

And then? Well, chocolate season is approaching way too quickly. I’m making chocolates a month early, Oct 30 – Nov 2, because of my work schedule. This means I need to start making chocolates around Oct 19, which means finishing my planning by Oct 12 at latest. That means I need to know what flavors I’ll be using by then, which in turn means I need to start the flavor trials Sept 21-28 or so. Whoops! That’s coming up way too fast. So I am poring over chocolate books and starting a list of flavors to try for this year. Test kitchen commences on Sunday.

Filed Under: All blog posts, chocolate, food, sewing, textiles Tagged With: phoenix rising, phoenix rising kimono

September 14, 2013 by Tien Chiu

Phoenix samples

So much has gotten done in the last two days that I’m feeling quite bewildered at the prospect of telling you about it all. I finished threading, sleying, and tying on the loom yesterday and today. And then a miracle occurred…I made NO mistakes in threading or sleying! 960 threads and not a single one out of order. And perfect tension. I owe a fistful of incense to the weaving gods! I’m quite confident that someone was watching over me, as that’s the first time I’ve ever put on a warp and just been able to start weaving. (Whoever you are, please keep on doing it!)

Anyway, one of the things I considered as I started threading was motif size. I had planned to thread a double two-tie point threading, which would have made each repeat 84 threads – a bit over two inches wide. But did I want to keep the motif size the same? Threading for summer and winter would have doubled the size of the motif. So I printed out a few motifs and hung them on the dress form, like this:

phoenix rising kimono - choosing motif sizes
phoenix rising kimono – choosing motif sizes

After thinking it over, and discussing with my critique partner, I decided that the smaller motif was better-sized for the garment. As my critique partner pointed out, the larger motifs had the feel of an emblem or logo, which is definitely not the effect I wanted. They were also overwhelmingly large for the garment, I felt.

So I threaded up a double two-tie rather than a summer and winter threading, and upon discovering (thank you weaving gods!) that the warp was perfect and no corrections were necessary, I dove into weaving. I wove four samples, with the following weft combinations:

  • yellow 10/2 cotton pattern weft
  • yellow 10/2 cotton pattern weft alternating with a heavy-ish metallic gold pattern weft
  • scarlet 10/2 cotton pattern weft
  • scarlet 10/2 cotton pattern weft alternating with a very thin metallic gold pattern weft

And those four samples looked like this (front and back):

phoenix fabric - undyed - yellow weft
phoenix fabric – undyed – yellow weft
phoenix fabric - undyed - red weft
phoenix fabric – undyed – red weft, front side of fabric
phoenix fabric - undyed - red weft - reverse side
phoenix fabric – undyed – red weft – reverse side

Then I tried dyeing them. I started by trying to scrunch-dye the yellow-weft sample in shades of orange and red, using Lanaset Mustard and Polar Red, both of which were removable from cotton yarn during my experiments.

Unfortunately, I botched the dyeing and the result came out way too even, an ok but not impressive tomato red. Then I tried to remove the dyes from the yellow cotton, but unfortunately, when I simmered it in soapy water, the dyes mostly came out of the silk as well as the cotton, leaving this unfortunate result:

phoenix fabric - yellow weft - after dyeing and simmering in soapy water
phoenix fabric – yellow weft – after dyeing and simmering in soapy water

It’s not as pretty as it is in the photo – the colors look faded and tired. Definitely not what I wanted!

So next I dyed the scarlet sample. Because yellow and orange won’t change the color of a scarlet yarn much, I could simply overdye the entire piece. So I did, scrunch-dyeing it in yellows and oranges. The result? Stunning!

dyed phoenix fabric - red weft - front
dyed phoenix fabric – red weft – front


dyed phoenix fabric - red weft - back
dyed phoenix fabric – red weft – back

The top phoenix is woven with the scarlet 10/2 cotton pattern weft alternating with a metallic gold pattern weft. This diluted the color. The bottom phoenix was woven with just the scarlet pattern weft, and has much stronger color and contrast. I like the bottom one a lot better.

I am very pleased with the results from the scarlet sample. So pleased, in fact, that I wove up another twenty-two inches of fabric with a scarlet pattern weft. Then I ran out of pattern weft and had to stop, but I had enough to drape over the dress form:

scarlet-weft sample on dress form

I think the aspect ratio is a little off (I would like to make the phoenixes about 10-15% shorter), but that is easy to adjust. Other than that I think the phoenixes are the right size.

Next steps? I need to figure out how to dye the sample. I think I will scrunch-dye this one with orange and yellow as well, but after that I may experiment with overdyeing certain portions black. It would be interesting to see if I could get dark red phoenixes on black in part of the fabric while keeping the fiery colors in another part of the fabric. There are all sorts of interesting dye techniques I could use to get more pattern into the fabric – I am contemplating both shibori and katazome as possibilities. I am guessing that most of these techniques will not work, design-wise. But I don’t plan to let that stop me; even if the end result doesn’t work, I will learn a lot from doing the experiment.

The catch, of course, is that I’m out of weft yarn, so this sample is all I have until my order arrives late next week. (It’s 10/2 cotton, “10 Red”, from Lunatic Fringe Yarns. Yes, occasionally I get lazy and order pre-dyed yarn!) So I am not sure I want to get too experimental with this sample yet. I may be conservative and simply flame-dye it and leave it at that (for now). I am running up to see Sharon, my sewing mentor, tomorrow, and I’d like to show her a largish sample of the flame-dyed scarlet fabric, to get her thoughts on the design.

Plans for tomorrow: dye the 22-inch sample, finish and put away the candied sour cherries and candied bergamot peel, visit with Sharon, clean the patio, and finish the kimono muslin. Oh, and make tomato soup, do laundry, and the usual chores. If I have time, I’ll cook some pig’s tails: I bought six of them at the farmer’s market last week, out of curiosity, and have an excellent-sounding recipe from a book The Whole Beast: Nose to Tail Eating.

So much to play with, so little time…!

Filed Under: All blog posts, dyeing, textiles, weaving Tagged With: phoenix rising, phoenix rising kimono

Next Page »

Subscribe to Blog via Email

Archives

Tags

aids lifecycle outfits autumn splendor book cashmere coat cats celtic braid coat color study cross dyeing design design class devore doubleweave doubleweave shawls drawing dye samples dye study group gradient colors house infinite warp jacquard loom katazome knitted blanks kodachrome jacket ma's memorial mohair coat network drafted jacket/shawl project network drafting painted warp phoenix rising phoenix rising dress phoenix rising kimono phoenix rising reloaded pre-weavolution project sea turtles taquete tie-dye tied weaves tomatoes velvet weaving drafts web design website redesign wedding wedding dress woven shibori

Categories

  • Africa
  • aids lifecycle
  • All blog posts
  • All travel posts
  • Asia
  • Bangkok
  • Belize
  • Cambodia
  • Central America
  • Chai Ya (Wat Suon Mok)
  • Chiang Mai
  • Chiang Rai (Akha)
  • China
  • chocolate
  • computer stuff
  • creating craft
  • Creative works
  • cycling
  • Delhi
  • Dharamsala
  • drawing
  • dyeing
  • Fiber Arts
  • finished
  • food
  • garden
  • Ghana
  • Guatemala
  • Hanoi
  • Ho Chi Minh City
  • Hoi An
  • India
  • Khao Lak
  • Knitting
  • knitting
  • Ko Chang
  • Laos
  • Luang Namtha
  • Luang Prabang
  • markleeville death ride
  • meditations on craft
  • mental illness
  • musings
  • Phnom Penh
  • powerlifting
  • Rewalsar (Tso Pema)
  • sewing
  • Siem Reap (Angkor Wat)
  • Southeast Asia
  • surface design
  • textiles
  • Thailand
  • travel
  • Vangvieng
  • Vientiane
  • Vietnam
  • Warp & Weave
  • Weaving
  • weaving
  • weavolution
  • writing

© Copyright 2025 Tien Chiu · All Rights Reserved ·


Loading Comments...