Tien Chiu

  • Home
  • About
    • Honors, Awards, and Publications
  • Online Teaching
  • Gallery
  • Essays
  • Book
  • Blog
  • Dye samples
You are here: Home / Archives for woven shibori

February 8, 2013 by Tien Chiu

Crimped phoenix sample

The last few days have been spent experimenting with airbrushing and stenciling on the warp, and making a crimped sample of the phoenix fabric. The airbrushing and stenciling weren’t successful – there simply isn’t enough background warp showing to get a visible design – but the crimped cloth turned out interesting. Here is the cloth before crimping:

Tied sample for woven shibori to make crimp cloth
Tied sample for woven shibori using synthetic yarns to make crimp cloth
finished crimp sample, woven shibori with polyester weft

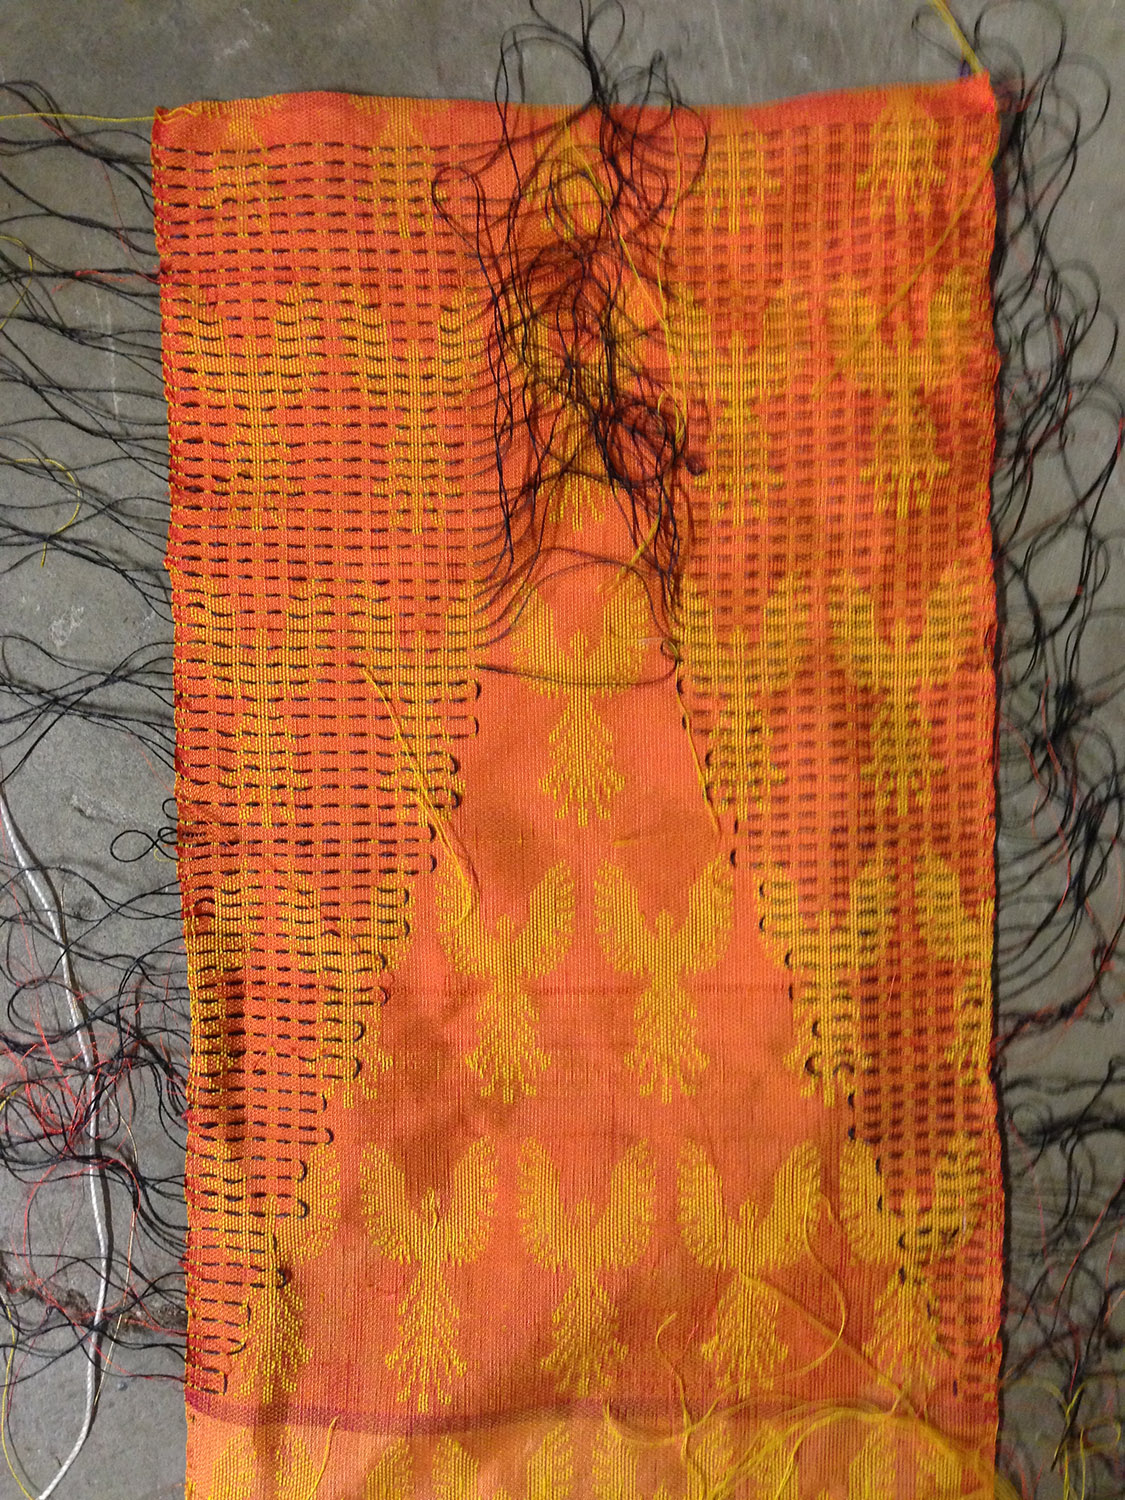
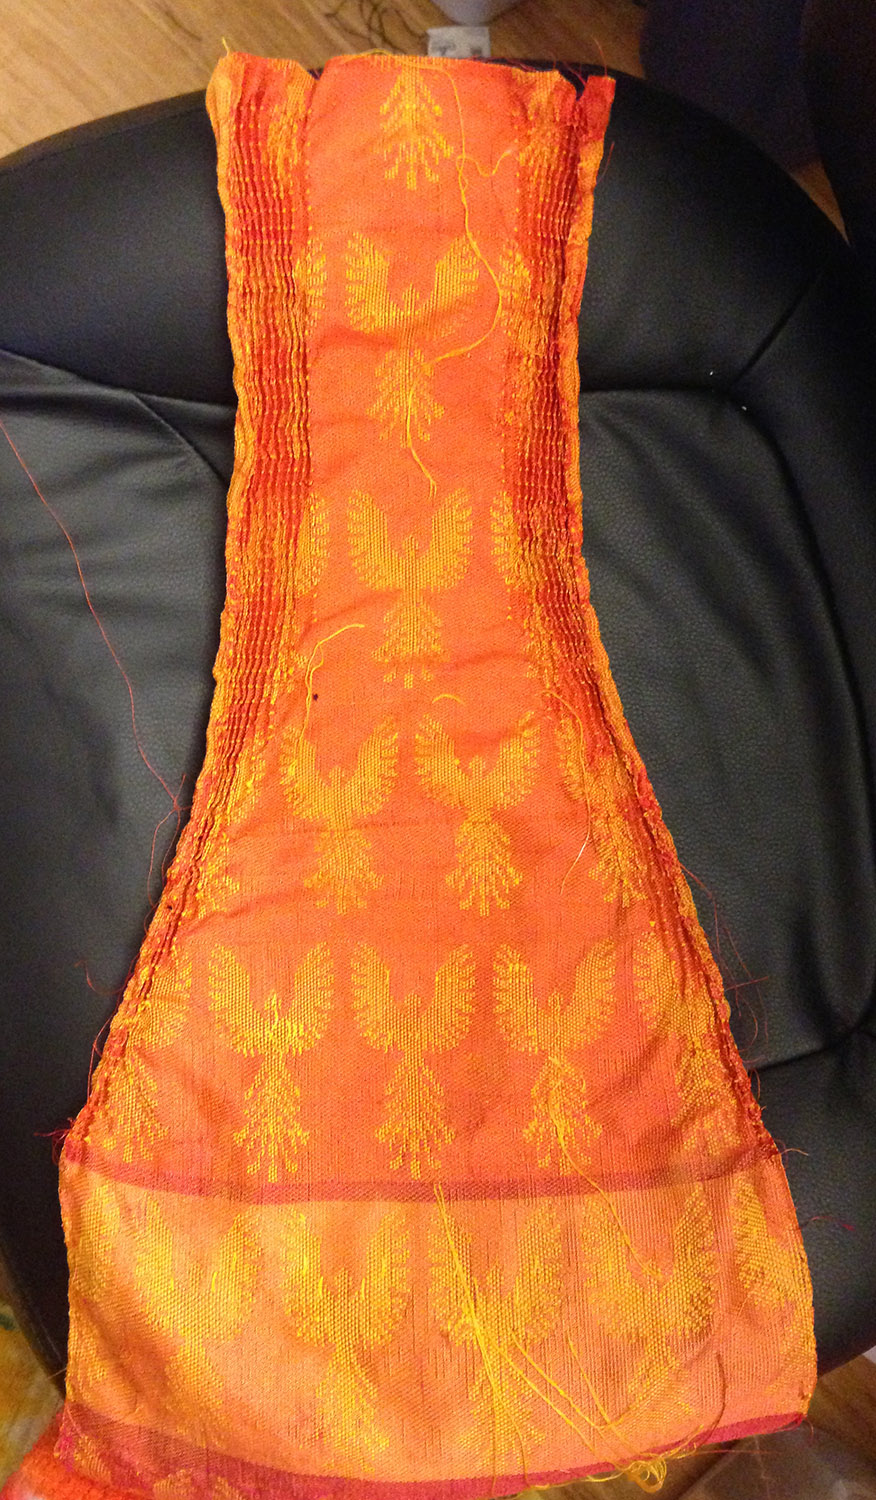
My conclusion from this sample is that I don’t want to use the phoenix crimped cloth in the dress design I’ve chosen; the crimped parts are coming out wider than I’d like, and the crimp distorts the flat portions fabric. Also, the polyester isn’t as drapey as the silk, and it feels like, well, polyester.

Still, the result is pretty, and I might use it if I make a scarf or something, to add visual interest to the scarf. I may use it in my entry for the Pikes Peak Weavers’ Firestorm show.

I also want to play more with airbrushing on warps – it was fun to try (and I got to try out my new airbrush!) but I need more warp showing if I want to get good results. Something to try on another warp, I guess!

Filed Under: All blog posts, textiles, weaving Tagged With: crimp cloth, phoenix rising, woven shibori

February 4, 2013 by Tien Chiu

Crimp cloth

Many thanks to everyone for the comments on my last post – it’s been a tough few days, but we’re getting through. I loved that cat so much! and it’s so hard to say goodbye, even when you know it’s the best thing you can do for him. I wish cats lived as long as humans (though if they did, there would be more orphaned cats, so maybe not…).

Anyway, life goes on despite our grief, and we go with it. In this particular case, it goes to Diane Totten’s crimp cloth workshop, where yesterday I wove two lovely samples on my metallic gold polyester thread warp, and finished another sample today.

I stupidly forgot to take photos of the first two samples, and left them at the workshop site, but here is the third sample:

3rd sample from crimp cloth workshop

And here is a closeup of the green section, stretched out:

3rd crimp cloth sample, stretched out to show pleating

This sample is weft shibori on a metallic gold polyester thread warp, using a polyester embroidery thread as weft (green and black). The ties are pulled tight and the piece is steamed, which permanently sets the polyester into pleats.

So what was I trying to accomplish with this sample?

Mainly, I wanted to see if I could get godets (triangular inserts into a garment, producing a flared ruffle) without sewing. So I wove the temporary threads (used for pulling the garment into pleats) into either side, gradually decreasing the center, until I had a triangular insert of un-compressed fabric inside a large rectangular piece that was pulled into folds. Then I pulled the threads tight, steamed, and voila! A triangular ruffle, of sorts.

The sample is too stiff for what I have in mind, but the concept seems to work well enough to be worth further exploration. If I use a silk warp and a very fine polyester embroidery thread as weft, I could make a much more supple version, for possible use in Phoenix Rising.

And just what am I planning for Phoenix Rising?

Well, you may recall that Our Heroine was smitten by a really cool dress by Jean-Paul Gaultier a few blog posts ago. Here’s a stylized version of the dress:

Diagonally striped dress by Jean-Paul Gaultier

You’ll notice that the light gray stripes flare dramatically into the skirt at bottom, while the black stripes flare only slightly. I could do that with flat fabric, of course, but…what if I created the flare with crimp cloth?

…and, what if I wove the phoenixes into the crimp cloth, so they appeared and disappeared depending on how the fabric was pleated?

I’m not sure how this all plays out yet, but there are tons of interesting ideas to play with here – enough to keep me busy for quite awhile. I definitely need to explore this further!

Filed Under: All blog posts, textiles, sewing, weaving Tagged With: phoenix rising, woven shibori

March 18, 2011 by Tien Chiu

Mokume shibori

I’m doing a five-week workshop on shibori, and have finally gotten caught up to the current lesson, which is on stitched shibori.  So far all I’ve done is mokume shibori, which is parallel lines of stitching.  Why so much time on one technique?  Because all woven shibori is variants on mokume shibori!  So doing a small number of exercises in hand-stitched mokume shibori will teach me the principles of woven shibori.   Then I can take those concepts back to the loom and work on bigger pieces in woven shibori, confident in my designs.

Here are some of my before-and-after photos:

Long stitches, spaced identically
Long stitches, spaced identically. The fabric is pulled up into parallel (and quite boring) pleats; furthermore, the compression is so good that very little dye gets into the fabric.
mokume shibori - long stitches, staggered
mokume shibori - long stitches, spaced in parallel rows 1" apart and staggered so the stitches lie precisely opposite each other. Notice the complex texturing and the diagonal lines!
mokume shibori - long stitches vs. short stitches
mokume shibori - long stitches (outer rectangle) vs. short stitches (inner rectangle).
A heart, in mokume shibori
mokume shibori heart - long stitches on outside, floats on outside heart, small stitches in inner heart.

I’ve learned a tremendous amount about how woven shibori works just from these few exercises, and will continue stitching samplers until I understand the principles of mokume shibori a little better.  Then it will be back to the loom!

Meanwhile, Kodachrome is completed except for the snaps (which need to be sewn down firmly) and the lining, which needs to be re-hemmed.  For some reason, the lining is too short near the center back, so I’ll need to redo the hem, dropping it by about 3/4″.  Fortunately I have enough length that I can do this!  After that, all that will be left is sewing in the label.

Sunday is the photo shoot, and it should be fun!  A friend is coming over to help me do my hair, and I have a makeup artist coming over to “do me up” for the shoot.  First she’s going to do “the natural look” (that’s for Handwoven) and then she’s going to do a much more theatrical look (that’s for HGA/Convergence, if it doesn’t get published in Handwoven).  I’m rather looking forward to the theatrical look – I have, as you know, a penchant for body paint, and I think it would be really cool to have my face painted up with rainbow colors.  Sort of like body paint, only slightly more localized.  🙂

Filed Under: All blog posts, textiles, dyeing Tagged With: shibori, woven shibori

November 9, 2010 by Tien Chiu

Woven shibori – diamonds

This time I wove up a set of diamonds in various types of grid, combining it with a dye pattern of blocks:

woven shibori experiment - diamonds, white on one side (and thus black on the other), superimposed on a two-color square "grid".
woven shibori experiment - diamonds, alternating white and black, superimposed on a two-color square "grid".
woven shibori experiment - diamonds, alternating between white and black in rows of 3, superimposed on a pattern of solid color and halftone, also alternating in rows of three.

I’m not especially thrilled with the results of this experiment, as the diamonds really aren’t very visible in real life (the camera flash makes them stand out a LOT more than they do in natural light), and also because I feel they’re disruptive when they do.  The stark grid of the diamonds, and the strong geometric shape of the diamonds, clashes with the irregular and soft “lines” of the dye pattern.

Nonetheless I am learning things from this warp.  After looking through my dye samples again, I’m concluding the following:

  • It’s better if the pattern woven into the cloth is more fluid than geometric – because otherwise the irregular, shaded borders from shibori will clash with the clean, sharp edges of the woven pattern.
  • The more complex the shibori pattern, the simpler the pattern woven into the cloth should be.  And vice versa.  Otherwise there’s simply too  much going on at once.
  • Subtle shading with less contrast is more restful to the eye than high-contrast combinations.

As an illustration of all three principles, see this earlier sample, which I thought was more successful than the current batch:

woven shibori sample - previously done - bottom side
woven shibori sample - previously done - top side

I would say that the top photo (the “bottom” side) is the most successful of the samples I’ve done.  The low contrast is restful to the eye and prevents the “busy” pattern from overwhelming the design.  (The second photo of the sample has much higher contrast and hence looks busier.)  The slightly curvy edge of the diamond pattern works well with the diffuse edges of the shibori pattern, and the shibori pattern is both simple and gradual in shading, complementing the woven pattern without competing with it.

Now, where next?  That’s a complex question.  I am rapidly coming to the end of my warp, and am battling between the urge to get an actual finished piece out of this 11-yard warp and the desire to keep on experimenting.  (Yes, I have just about used up an entire 11-yard warp in sampling!)  Compounding things is my guild challenge for this year, which (if I’m going to enter) needs to be woven up this month for the December meeting.  Since chocolate season officially starts on Saturday, that gives me four days to weave it, if I’m going to.  Which in turn means it must be woven on this warp, since there’s no way I’ll get another warp wound, threaded, etc. in time  for the challenge.  So I am torn between “weaving something” and continuing to sample.

Unfortunately, I don’t feel any of my woven shibori experiments have been successful enough to weave up into an actual project, so unless I abandon woven shibori, I won’t have a piece I’m satisfied with for the guild challenge.  And somehow it feels like cheating to abandon woven shibori for something safer and more familiar.

I think the eventual outcome of all this is that I will not enter the guild challenge, or else will figure out how to convert one of my samples to an “actual project” for entry.  I’m so interested in how this woven shibori stuff turns out that I really hate to stop what I’m doing and do something else!

But, you never know.

Off to design class!

Filed Under: All blog posts, textiles, dyeing, weaving Tagged With: woven shibori

November 6, 2010 by Tien Chiu

Crazy about citrus

Citrus peels, that is.  I woke up from a mad citrus-candying rampage today to realize that I have not one, not two, not three, but four kinds of citrus peels candying in small vats in my kitchen.  And not just garden-variety citrus, but exotics like kaffir lime, Meyer lemon, yuzu, and grapefruit with rose geranium.  (OK, grapefruit is pretty garden-variety, but mixed with rose geranium syrup it’s both exotic and very yummy.)

And that doesn’t count the 1.5 quarts of candied citron that I put up in jars today.  I think that once all the shouting is done, I’ll have about two gallons of freshly candied citrus peel.  What does one DO with all that?  Well, let’s see, there are the neighbors, the neighbors’ friends, the coworkers, the coworkers’ friends, that houseful of drug addicts down the street…surely some of them would appreciate some candied citrus?  Sort of like zucchini?

No, seriously, most of it will go either into chocolates or fruitcakes, since I don’t typically eat much sugary stuff.  The stuff keeps indefinitely, so I can use it over the course of the next 2 years without worrying much about deterioration of quality.  And, of course, it will make the occasional Christmas present to friends who are equally crazy about candied citrus.  (But not too many.  You have to be on Santa’s very good list to get some of this stuff!)

Anyway, the next week will basically be about completing the candying process.  Every day, raise the sugar content of the syrup a little bit more (usually by boiling it down), then pour the boiling syrup over the peels and let them soak for a day or two, to equalize the amount of sugar in the peels.  This is a slow process, and can’t be hurried; if you try, you get leathery peels as the sugar dehydrates the top layer without penetrating to the center of the peels.  It will take a week to a week and a half to finish candying them, during which all four vats must be reboiled daily.  (I never said this stuff was easy!)

Once that’s done, next weekend will be fudge time.  This year I’m shaking things up a little bit.  I’m going to keep the white chocolate lavender Meyer lemon fudge, because that’s my personal favorite, and I’m going to keep the coconut tequila lime fudge and the chocolate-dipped coconut almond fudge, because those are Mike’s favorites.  (There are advantages to sleeping with the chef! 🙂 )  However, the chocolate macadamia fudge is going bye-bye for this year, to be replaced by chocolate cherry fudge with almonds.  It’s an adaptation of one of my all-time favorite chocolate confections, cherry almond clusters.  I came up with the formulation shortly after graduating college – it’s very simple, just mix dried sour cherries and almonds with tempered chocolate and drop onto trays in spoonfuls.  It’s simultaneously tart, sweet, chewy, crunchy, and chocolaty – heavens, what’s not to like?

Alas, the clusters are too big to fit into today’s chocolate boxes (a single cluster takes up the space of 2-3 bonbons), but I’m hoping to reincarnate them in a fudge recipe.   If nothing else, it will be a pleasant break from chocolate macadamia fudge, which has also been a mainstay for several years.

The last of the fudges is going to be maple walnut or maple pecan fudge, which I realize is practically a cliche, but I’ve never made it before, and I’m the chef, so I get to do what I want.  (Insert a cheerful “nyah, nyah, nyah nyah nyah!” here.)  I’ve been trying to think of a “twist” to make it more original, but then, there’s a reason that things get traditional.  They work!! So I may just make it “straight up”, without edits.

After that, which will occupy me most if not all next weekend, I will go to work on the caramels, toffees, and candied citrus peels.  This is where the chocolate tempering machine comes out.  For caramels, I’m only planning the traditional chocolate covered jasmine – vanilla – orange blossom honey caramels.  These have appeared in every chocolate box since time immemorial, and probably always will, because they are my favorite item in every box.  I love these.  I could eat entire buckets of these.  You couldn’t pay me enough to not make them.  Yum!

The citrus peels…now that will be tough.  I have seven types and can only fit three.  Seville orange, yuzu, bergamot, citron, rose geranium grapefruit, kaffir lime, Meyer lemon.  I think it will be yuzu, bergamot, and Meyer lemon – but the kaffir lime is tempting, too!  It all depends on what they taste like when they come out of the sugar syrup.  Clearly I will have to do some sampling.  🙂

And, just in case you thought I’d totally forgotten about weaving amidst all this food porn, here are  two woven shibori drafts that I came up with today:

new woven shibori pattern, diamonds in squares

Here there are diamonds in the center of each of the squares that will be a solid color once the cloth is dyed.

I plan to get started on this tomorrow, but am not entirely sure whether I will get around to it.  A friend from Colorado is visiting family in Sacramento, so I’m going to drive over there tomorrow and visit her.  It’s a 5-hour round trip, so I might be too tired to weave by the time I get back.  But I hope not – I’m dying to see how this new draft weaves up!

Filed Under: All blog posts, food, chocolate, weaving Tagged With: woven shibori

Next Page »

Subscribe to Blog via Email

Information resources

  • Dye samples
    • Procion MX fiber-reactive dye samples on cotton
    • How to "read" the dye sample sets
    • Dye sample strategy - the "Cube" method
  • How-Tos
    • Dyeing and surface design
    • Weaving
    • Designing handwoven cloth
    • Sewing

Blog posts

  • All blog posts
    • food
      • chocolate
    • musings
    • textiles
      • dyeing
      • knitting
      • sewing
      • surface design
      • weaving
    • writing

Archives

Photos from my travels

  • Dye samples
    • Procion MX fiber-reactive dye samples on cotton
    • How to "read" the dye sample sets
    • Dye sample strategy - the "Cube" method
  • Travels
    • Thailand
    • Cambodia
    • Vietnam
    • Laos
    • India
    • Ghana
    • China

Travel Blog

Entertaining miscellanies

© Copyright 2016 Tien Chiu · All Rights Reserved ·


Loading Comments...