Tien Chiu

  • Home
  • About Tien
    • Honors, Awards, and Publications
  • Online Teaching
  • Gallery
  • Essays
  • Book
  • Blog
  • Dye samples
You are here: Home / All blog posts / Almost done
Previous post: Hard at work
Next post: Heading into the wilderness

March 6, 2009 by Tien Chiu

Almost done

I figured out the bust dart, made a few other adjustments, and am just about satisfied with the new muslin:
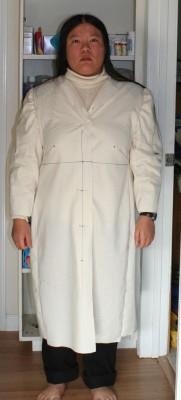
Front of the muslin.  The waist still hikes a bit but I think that's because I mis-pinned the top "button".  When Mike gets home tonight I'll get him to help pin me, and check again.
Front of the muslin. The waist still hikes a bit but I think that's because I mis-pinned the top "button". When Mike gets home tonight I'll get him to help pin me, and check again.
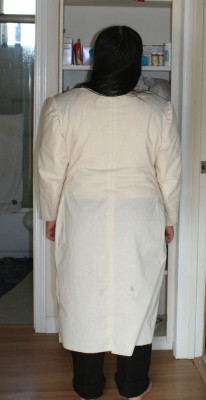
Back view,  same muslin.  There are a few wrinkles in the back which suggest that I'll need to add more hip allowance near the waist.
Back view, same muslin. There are a few wrinkles in the back which suggest that I'll need to add more hip allowance near the waist.
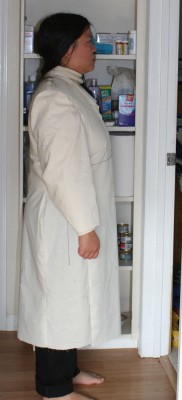
Side view.  I'm not entirely happy with the way the sleeves hang, but can't tell whether it's a design flaw or the sleeve catching on the sweater underneath.  I may also reduce the cap ease, it looks a little "puffy" when I want a smooth, tailored look.
Side view. I'm not entirely happy with the way the sleeves hang, but can't tell whether it's a design flaw or the sleeve catching on the sweater underneath. I may also reduce the cap ease, it looks a little "puffy" when I want a smooth, tailored look.

By and large, things are falling in the right places.  I will take a closer look at the sleeves tonight, but I think (hallelujah!) that this will be the last muslin.  Tonight, assuming the sleeves are acceptable, I will move on to the “practice” fabric.  Woo hoo!

Share this post!

  • Tweet
  • More
  • Reddit
  • Email
  • Share on Tumblr
  • Print

Filed Under: All blog posts, textiles, sewing Tagged With: cashmere coat

Previous post: Hard at work
Next post: Heading into the wilderness

Comments

  1. Frida says

    March 6, 2009 at 11:06 am

    This looks so much better! Just remove some of the cap ease and perhaps try to move the sleeves forward. The grain line should be vertical, but it’s tilted tight now. When we sewed jackets at the sewing and pattern construction course I took, our teacher had us try on the jacket body and the sleeve before sewing on the sleeve, to make sure it would hang correctly.

  2. Cynthia says

    March 7, 2009 at 4:43 pm

    Your attention to detail is inspirational. The difference between this muslin and the first couple is astonishing!

  3. Joanie says

    March 7, 2009 at 9:02 pm

    Oh, this looks much better – very nice line in the side profile. I think you’re right about adding just a bit more ease at the back waist to eliminate the few wrinkles that are left. You might want to think about making the wrist opening a bit larger (to allow for turned cuffs in sweaters and ease) which will also give the arm more of a tube and less of a cone shape (if that makes sense). I love your attention to detail!

Subscribe to Blog via Email

Information resources

  • Dye samples
    • Procion MX fiber-reactive dye samples on cotton
    • How to "read" the dye sample sets
    • Dye sample strategy - the "Cube" method
  • How-Tos
    • Dyeing and surface design
    • Weaving
    • Designing handwoven cloth
    • Sewing

Blog posts

  • All blog posts
    • food
      • chocolate
    • musings
    • textiles
      • dyeing
      • knitting
      • sewing
      • surface design
      • weaving
    • writing

Archives

Photos from my travels

  • Dye samples
    • Procion MX fiber-reactive dye samples on cotton
    • How to "read" the dye sample sets
    • Dye sample strategy - the "Cube" method
  • Travels
    • Thailand
    • Cambodia
    • Vietnam
    • Laos
    • India
    • Ghana
    • China

Travel Blog

Entertaining miscellanies

© Copyright 2016 Tien Chiu · All Rights Reserved ·


Loading Comments...