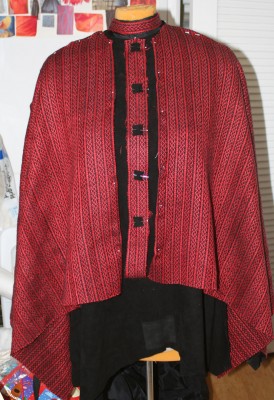
Laura commented on my last post, “Why not use vertical buttonholes?”, which, DUH!, was the solution. Or half of the solution – the other half being how to align the buttons and the buttonholes gracefully. I’ll spare you the gory details of my attempts – which involved round, triangular, and bar-shaped buttons, hand-dyed maroon silk for buttonholes, and lots of progressively more desperate ideas – but I finally settled on this:

I haven’t yet decided whether these are square buttons with inconspicuous hand-worked buttonholes, or a square bound buttonhole with matching (i.e. essentially invisible) buttons. I am leaning towards the square bound buttonhole, both because I think it will be more stable (the fabric is quite coarsely woven) and because square buttons are prone to twisting. If I put a medium size, round button covered in black suede against a larger square buttonhole, the button should be more or less invisible, so from a distance, all you’d see is the square.
As you can see in the photo, I think I like having it with less of the vest showing – this way I get a thin black stripe that emphasizes the vertical striping and echoes the thin red stripes separating the Celtic braids. It also keeps the emphasis on the handwoven fabric. With more black showing, the black gets more attention, and it doesn’t echo the stripes in the fabric.
Having decided all this, I now need to alter the pattern for the vest to include the central panel of Celtic braid fabric. I may also change the front facing from leather to a woven fabric, so making the bound buttonhole will be easier – but I need to make some practice buttonholes, to see if I need to do that.
Whew! Funny, isn’t it? that something “simple” can get so complicated so quickly…

What about “fake”‘ buttonholes, with some other sort of inside closure – snaps, hooks, zipper? depending on if you ever want to wear it open or not.