I finished weaving and dyeing the white-on-white sample today. I realized that overdyeing with fiber-reactive dyes was mostly going to be a lost cause, as the darker colors wouldn’t shift much. So I only did an acid dye dyebath.
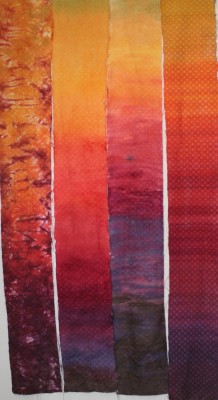
Here, left to right, are the three samples plus the “winning” sample from the last round:

The left-hand piece was made by using low-water immersion type techniques (they called it “scrunch-dyeing” when I learned it in college). I had intended to make it shade more gradually from one color to another, but the purples “bled” across the bottom of the container and popped up in the yellow and orange sections. It does add considerable visual interest to the piece, and as a piece of dyed fabric I like it – but it doesn’t reflect my vision for autumn colors, and the woven maple leaves are almost invisible. I could have started with a commercial fabric and gotten very similar results.
The second-from-left piece is painted-on acid dyes, shading evenly in hue. To me it lacks character, and the maple leaves aren’t especially visible.
The second-from-right piece is painted-on acid dyes, with horizontal brush strokes and less color blending. This is more interesting than the leftmost piece, but still doesn’t do much for me, and the maple leaves are not really visible.
The rightmost piece, of course, is my favorite sample from the knitted-blank batch of samples, and it is still my favorite. The color gradation looks right, the irregular stripes add interest, the maple leaves are visible, and it just “feels” more like a handwoven piece to me.
So no shortcuts: I’ll do this the slow-but-best way, which will take about ten hours per panel – two hours to knit, 1-2 hours to dye, two hours to unravel, five hours to weave and wet-finish. So it will most likely take me 8-12 weeks to weave twelve panels – possibly longer, since November is Chocolate Month.
What next? I’m debating between updating the jacket muslin and playing some more with surface design. I’m envisioning smallish falling leaves on the panels, screen printed or embroidered (or both!), in shades of green, yellow, and bright red, with metallic gold veining. I also want to try out my new thermofax machine! I lucked into a thermofax (a thermal screen printer) about two weeks ago – a tattoo parlor was moving and had posted it on Craigslist at half the “going rate”. I spotted the ad fifteen minutes after it was posted, and immediately hopped in the car. Miraculously, no one else got there before I did, so I paid for it and carted my booty home.
(Thermofaxes were popular about 30-40 years ago as a way of making transparencies. Since then they have basically fallen into disuse – most were thrown away when they became obsolete – but the prices for a working thermofax are astronomical because tattoo shops have found they’re a great way to print out masters for their designs! A few new ones are being made but they are about $1500 – prohibitively expensive!)
Anyway, the advantage of thermofaxes is that you can make and use a screen immediately, instead of the lengthy process required for silk screening. Also, the thermal screen can be placed into a small, thin frame instead of the fairly bulky frame needed for screen printing, which enables you to (a) print both sides of the screen, and (b) print motifs closer together without waiting for the previous motif to dry.
The final advantage of a thermofax is that the screen is more transparent than a silk screen, making it easier to see what you’re doing.
Enough typing! On to the next thing!
