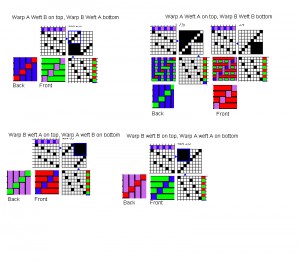
I spent part of this morning fiddling around with doubleweave drafts, with limited success. Finally, in exasperation, I created this diagram using Photoshop and a screen capture tool:
(Click on the image for the larger version, otherwise it won’t make sense.)
This is doubleweave on a divided parallel threading, as Bonnie Inouye showed me. The advantage of doing it this way is that the tie-up is easier to “read” ““ here both layers are 1/3 twills (but if you actually look at the backside of the cloth, you’ll see a 1/3 twill on one side and a 3/1 twill on the other. That’s because you’re looking at the back of the bottom layer, not the top!)
Anyway, I was staring and staring at the diagram, trying to make sense of it, and finally it dawned on me: the black sections in the tie-up show where the warp is raised. Therefore, if a weft pick occurs on a treadle with all black across one block of warp threads, those warp threads are ALWAYS weaving on top of that weft, and that weft pick therefore must be weaving on the back side. If it occurs on a treadle with all white across one block of warp threads, those warp threads are ALWAYS passing underneath that weft, and so that weft weaves on the top.
I didn’t quite leap naked out of the bath shouting EUREKA!!!! (primarily because I didn’t make my realization in the bathtub! 🙂 ), but I came pretty close.
I still don’t have a deep intuitive grasp of it, but I feel like I’ve made a great first step, both in understanding how to read drafts generally and in learning to design doubleweave. I’m going to play with it a bit more today and tomorrow, creating more diagrams and trying to “think deeply” about it, and then I think I’m going to set up the loom with a doubleweave sample in blocks. I think I will make the blocks 8 shafts each (so four shafts for each layer), which will give me three blocks on 24 shafts. I think that will be more interesting than 6 blocks of 4 shafts each (6 ways of doing plainweave!), but I’m not entirely sure, so I will think about it tomorrow before I start to set up the loom.
Once I understand the basics of doubleweave blocks, I’m going to move over to what Pat was showing me earlier and start designing doubleweave in the liftplan, using Photoshop presets.
Meanwhile, a few snippets on other things:
- Dyeing: I’ve been playing around with different color mixes, and think I’ve settled on dyeing most of my samples at 3% weight of goods. This seems a nice compromise between slightly-too-somber at 4% and a somewhat-too-light (to my tastes) at 2%. It looks like a deep jewel tone indoors and a bright saturated color outdoors. So now I’m settling in to dye all my samples.
- Invitations! The wedding invitations are back from the printers. They’re perfect. So now I’m making up the guest list, getting addresses, and trying to find a hotel near the ceremony location that I can recommend to out-of-town guests. I hope to send out invitations mid next week.


Hi Tien,
Another way of looking at doubleweave: since you are weaving two layers – design two layers of cloth. Just like you would if you were designing one layer.
My non-technical way of designing double weave: 1. decide if/how I want the layers to interact (exchange threads, make a doublewide cloth, look like two scarves joined together, exchange blocks etc) and figure out how many shafts that will take. 2. Divide up the remaining shafts between the layers (so if you are weaving a tube you could have 2 shafts on one layer and 22 on the other). 3. Design each layer separately (if the layers are exchanging blocks, I find it easer to ‘consider’ each layer separately) 4. interlace the two liftplans (not always but usually you will alternate the picks for each layer: pick 1 -layer one; pick two layer 2; pick three layer 1 etc ).
The tedious part is integrating the two drafts in the final liftplan (my program might do it automatically but I don’t know how to do that).
this method allows me to design each layer without constraints. With planning you do not need to: have the same number of shafts on each layer, have each layer be the same width or length, use the same sett or picks per inch in each layer, althernate the threading or the picks.
HAve Fun.
Stephanie S
that diagram is way cool! A great way to show exactly what is happening. I will hold the process in the back of my mind for the time when I hopefully get to playing with crackle and double weave. You will have saved me figuring out a couple of the steps in the process. Thanks!