Tien Chiu

  • Home
  • About
    • Honors, Awards, and Publications
  • Online Teaching
  • Gallery
  • Essays
  • Book
  • Blog
  • Dye samples
You are here: Home / Archives for dye samples

January 25, 2018 by Tien Chiu

Adventures in color

After picking up the wound sample cards (and visiting my relatives) in Maryland, Mike and I flew to Chicago to visit his family. It was cold in Chicago. -6F, with a wind chill of -22F.

Now, I’ve lived in California for the past 30 years, so I can confidently tell you that there is no such thing as a negative temperature. I have no idea what temperature it actually is when they stick a minus sign in front of the number, but it can’t possibly be real. It’s probably more like the temperature of outer space, which I estimate to be somewhere around 15F (well beyond the point where your avocado and lemon trees die, and also the coldest temperature ever recorded in my hometown). So I spent pretty much the entire time indoors, looking at the thermometer in disbelief. If the gods had intended people to live in places that cold, they would never have created California.

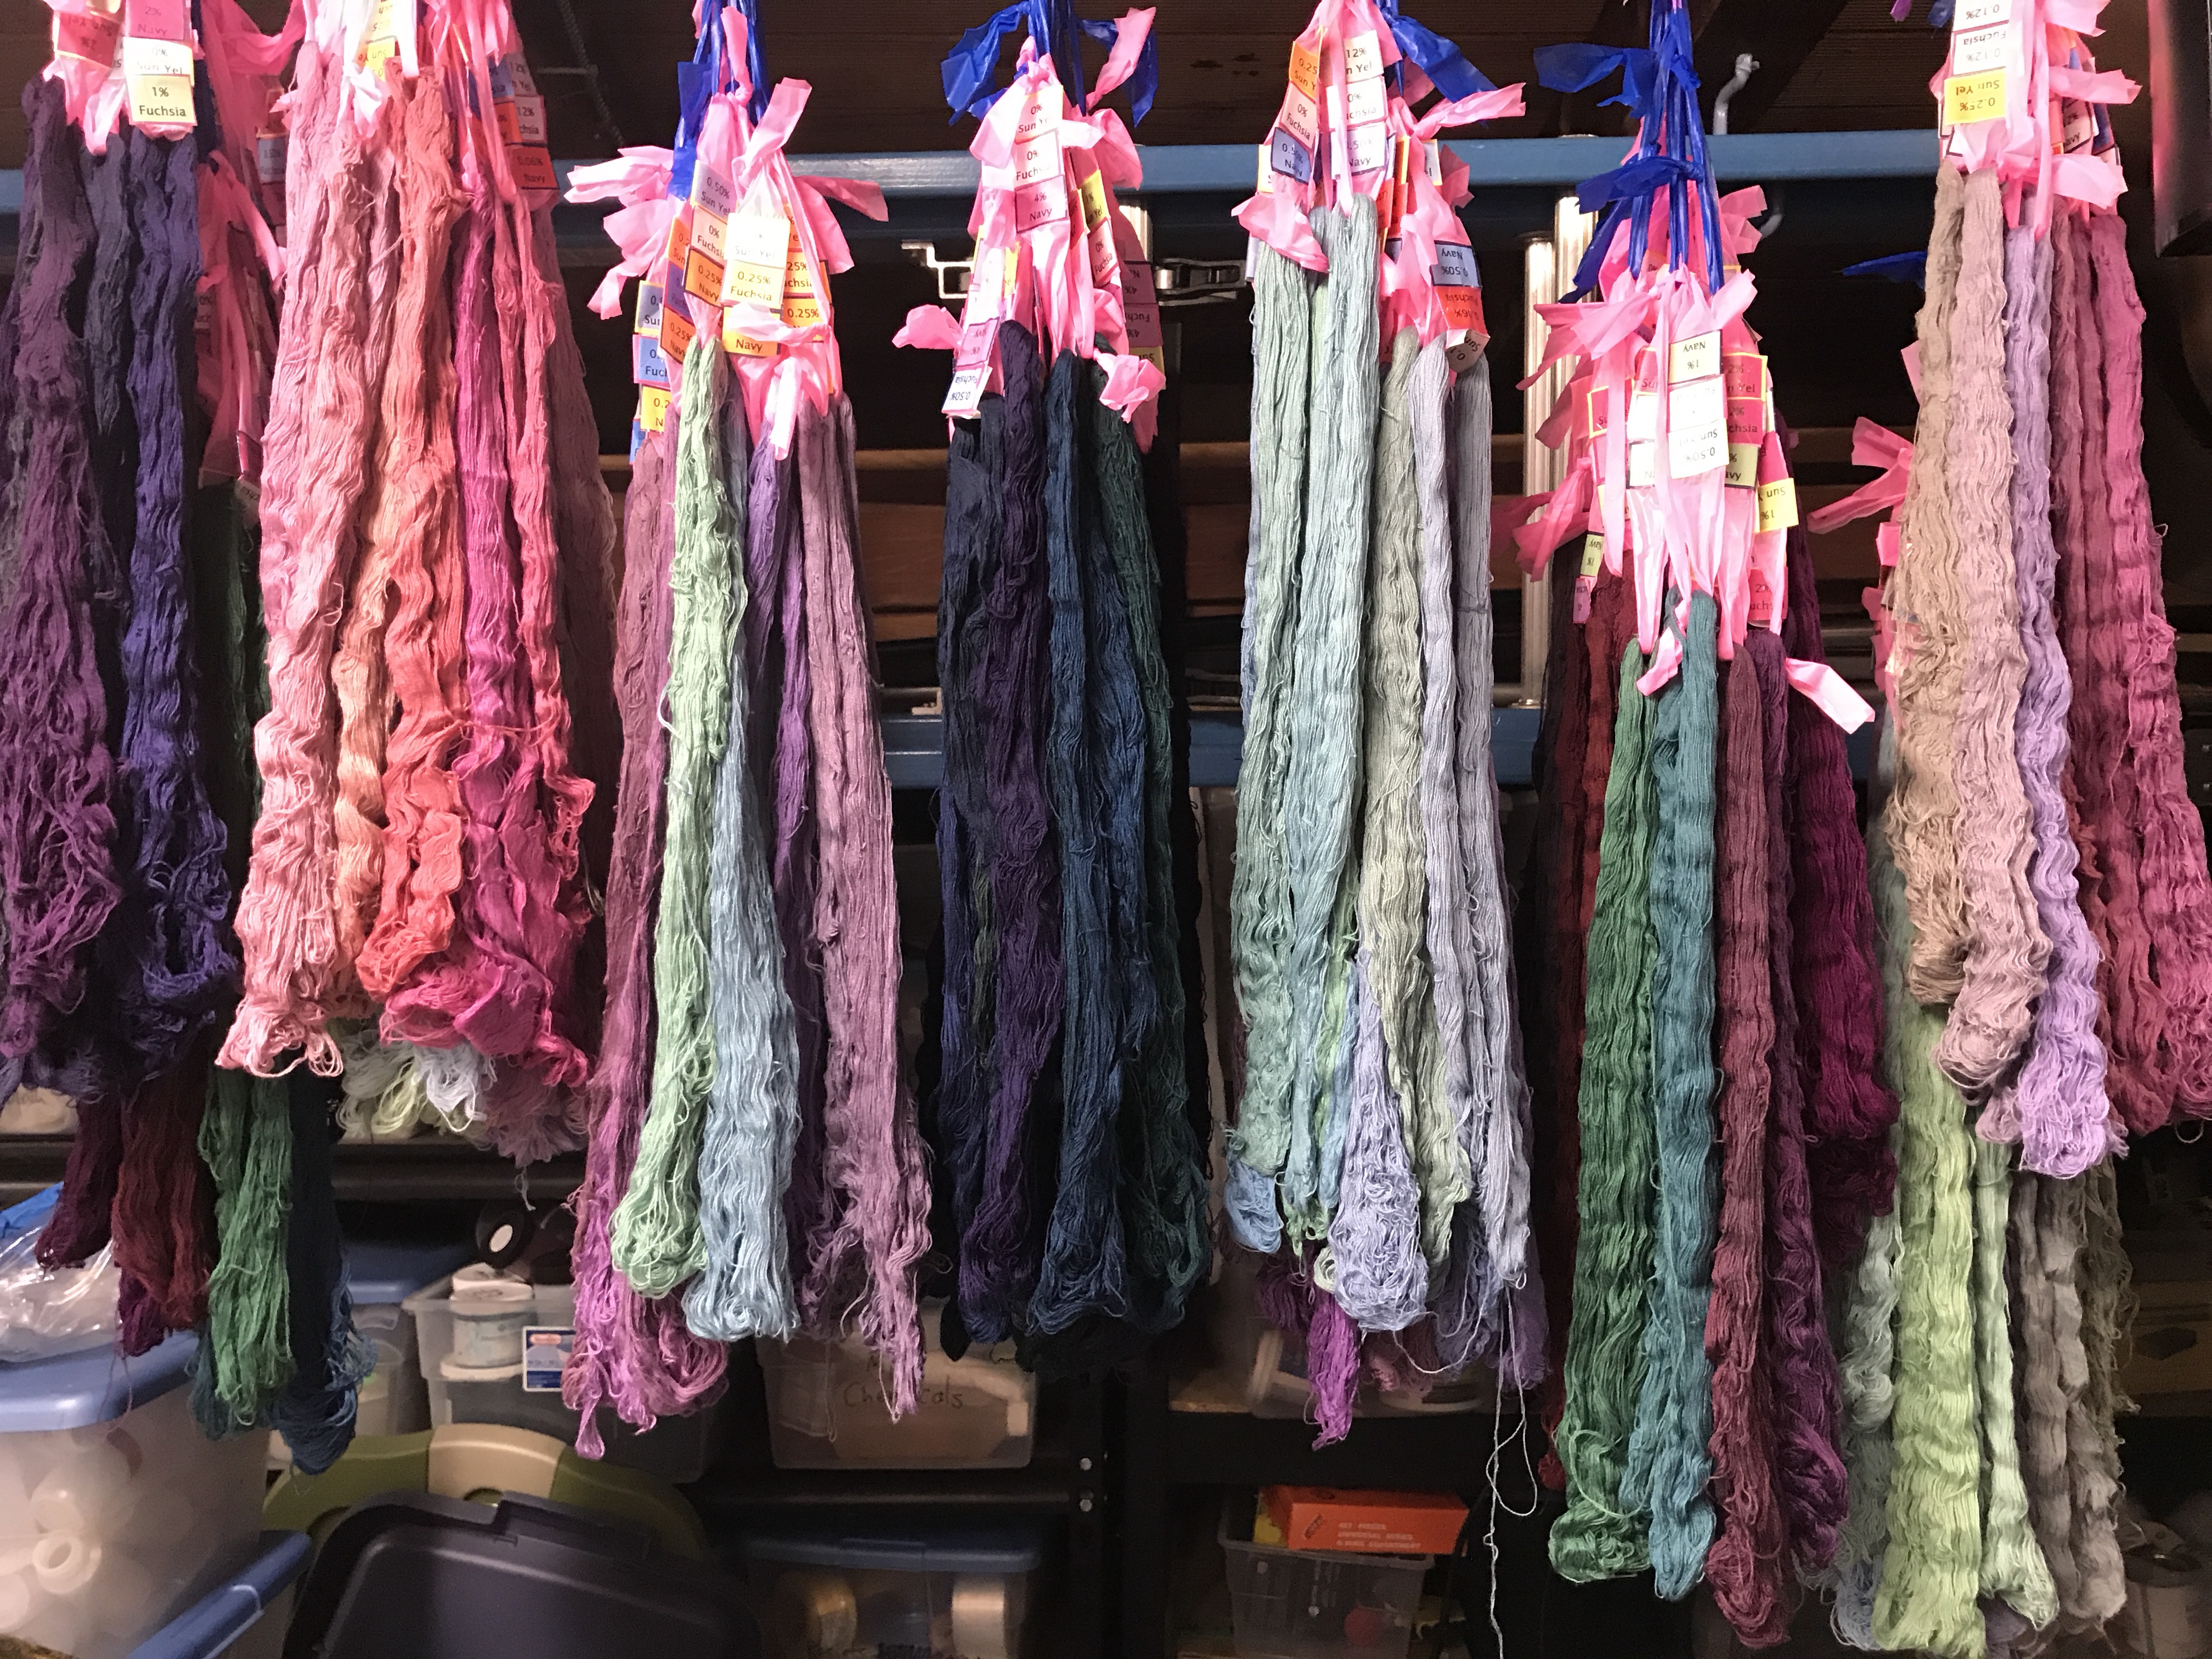
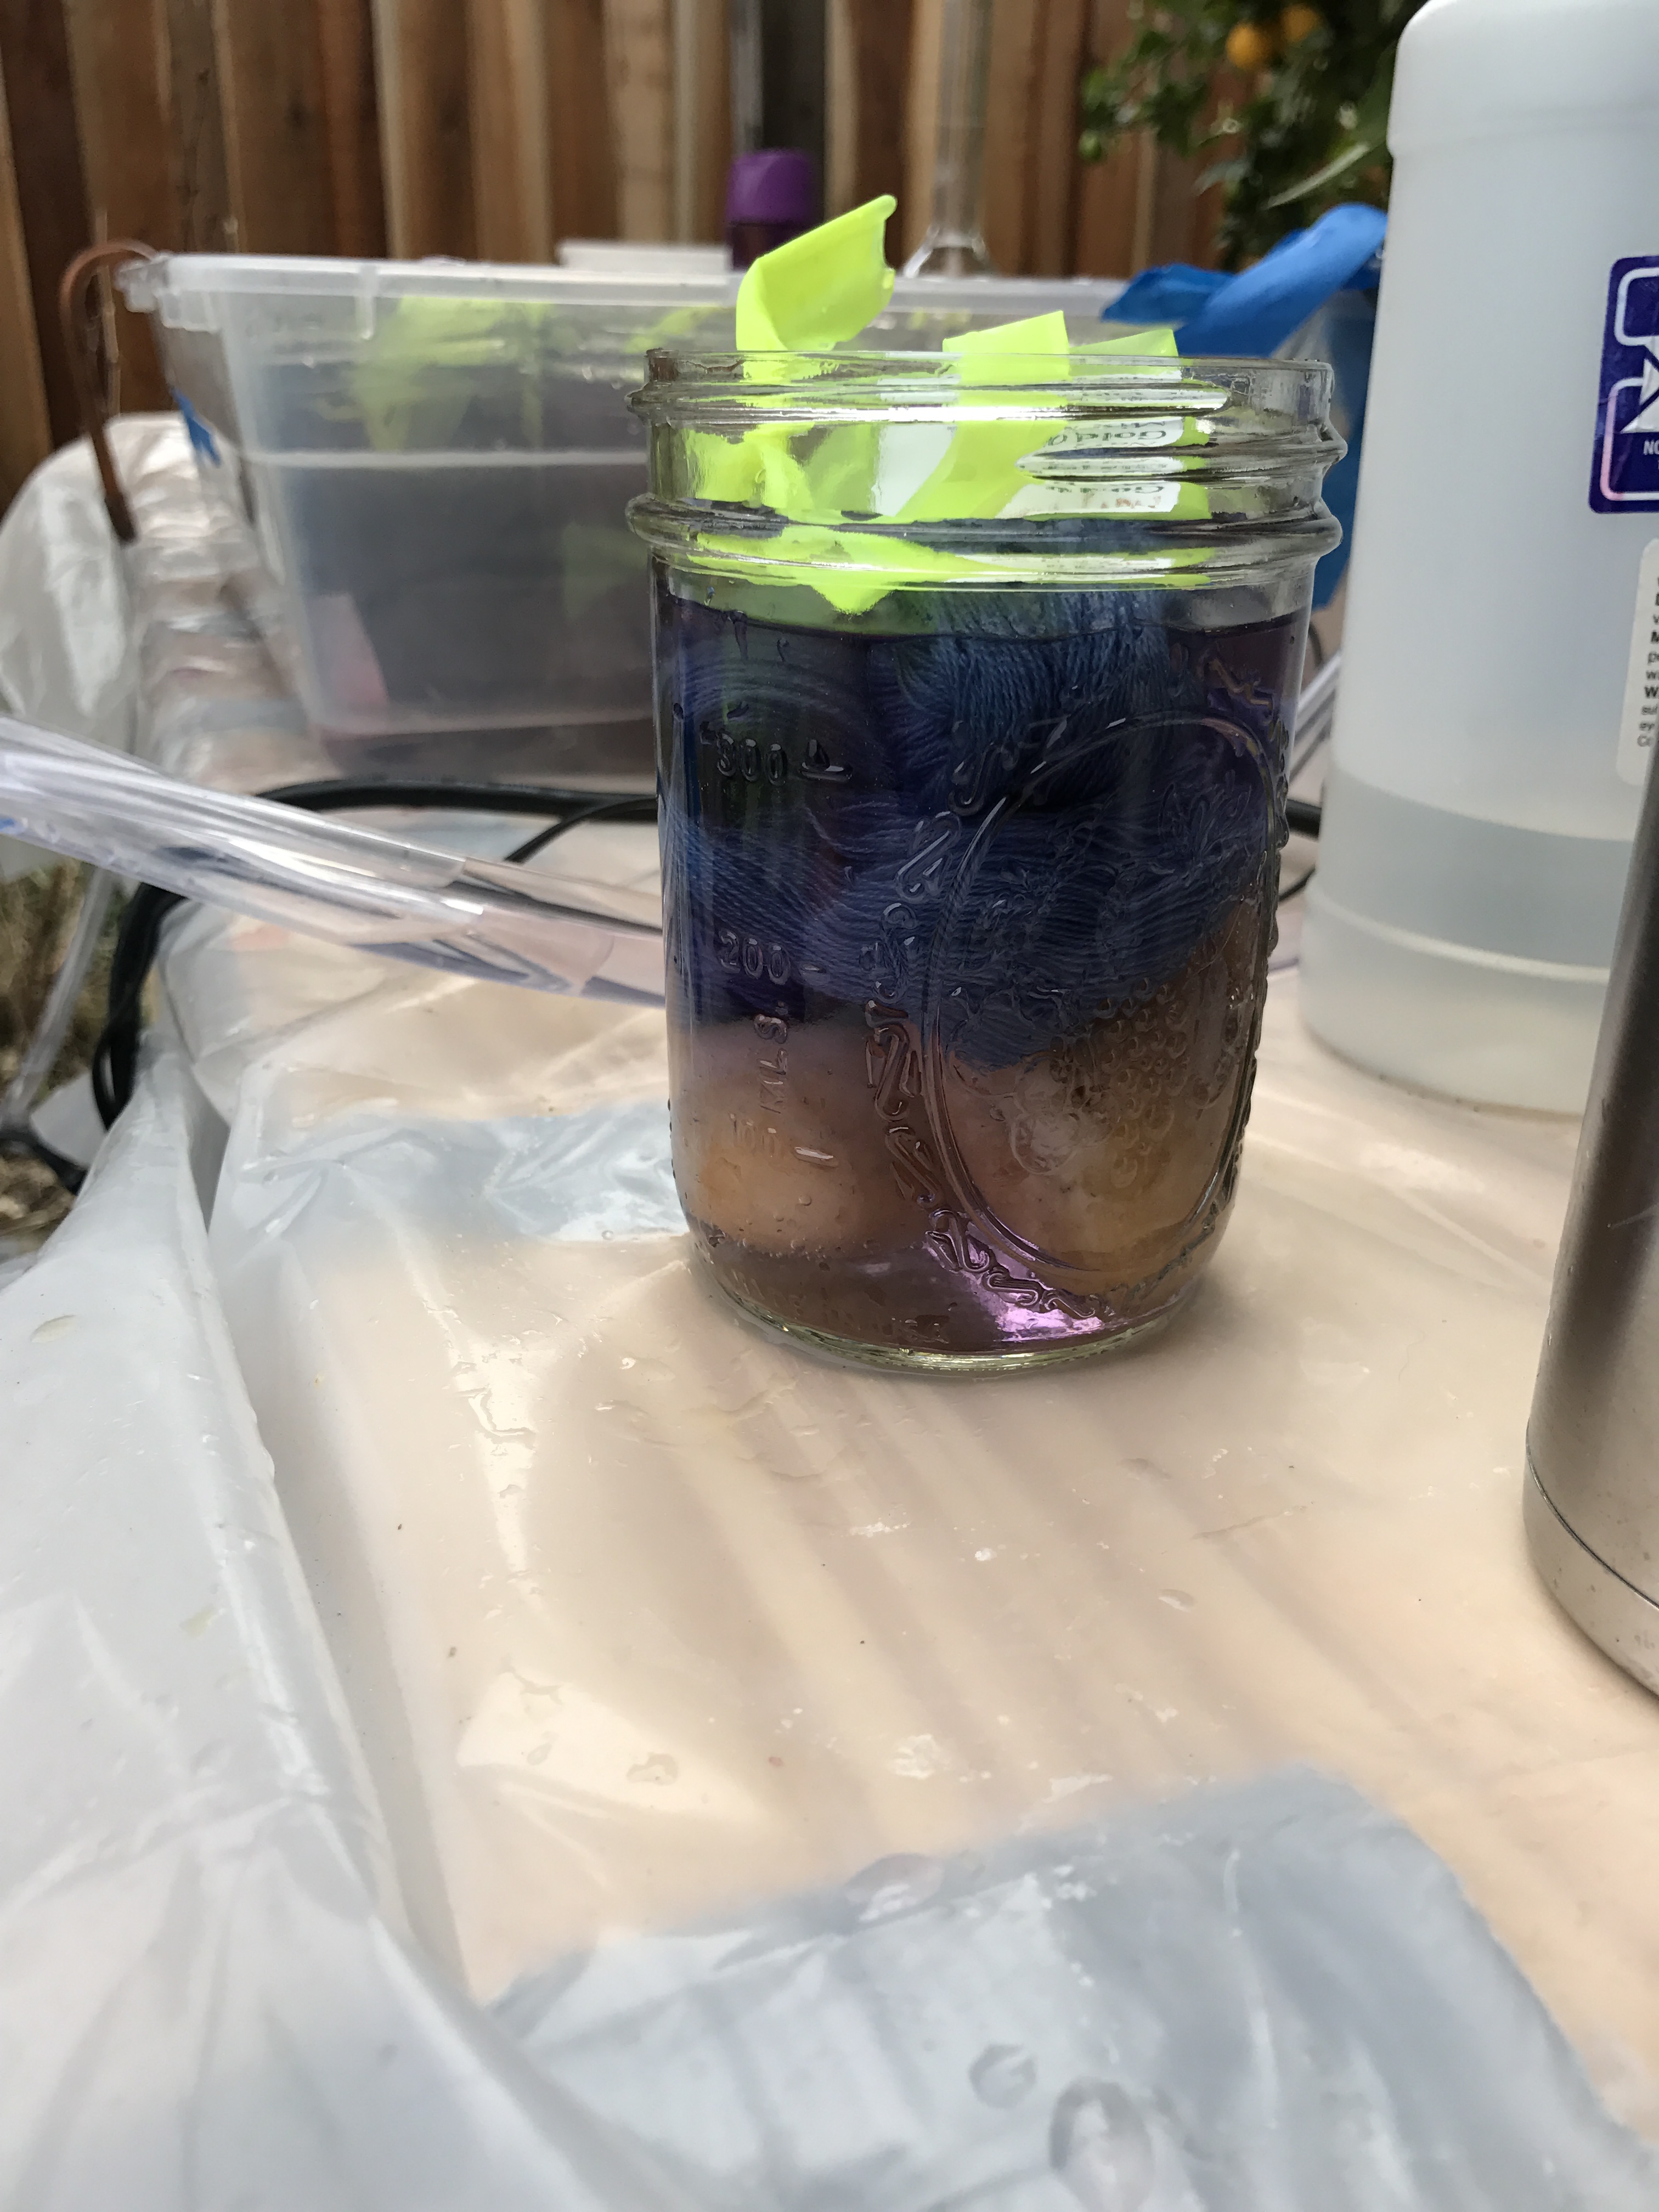
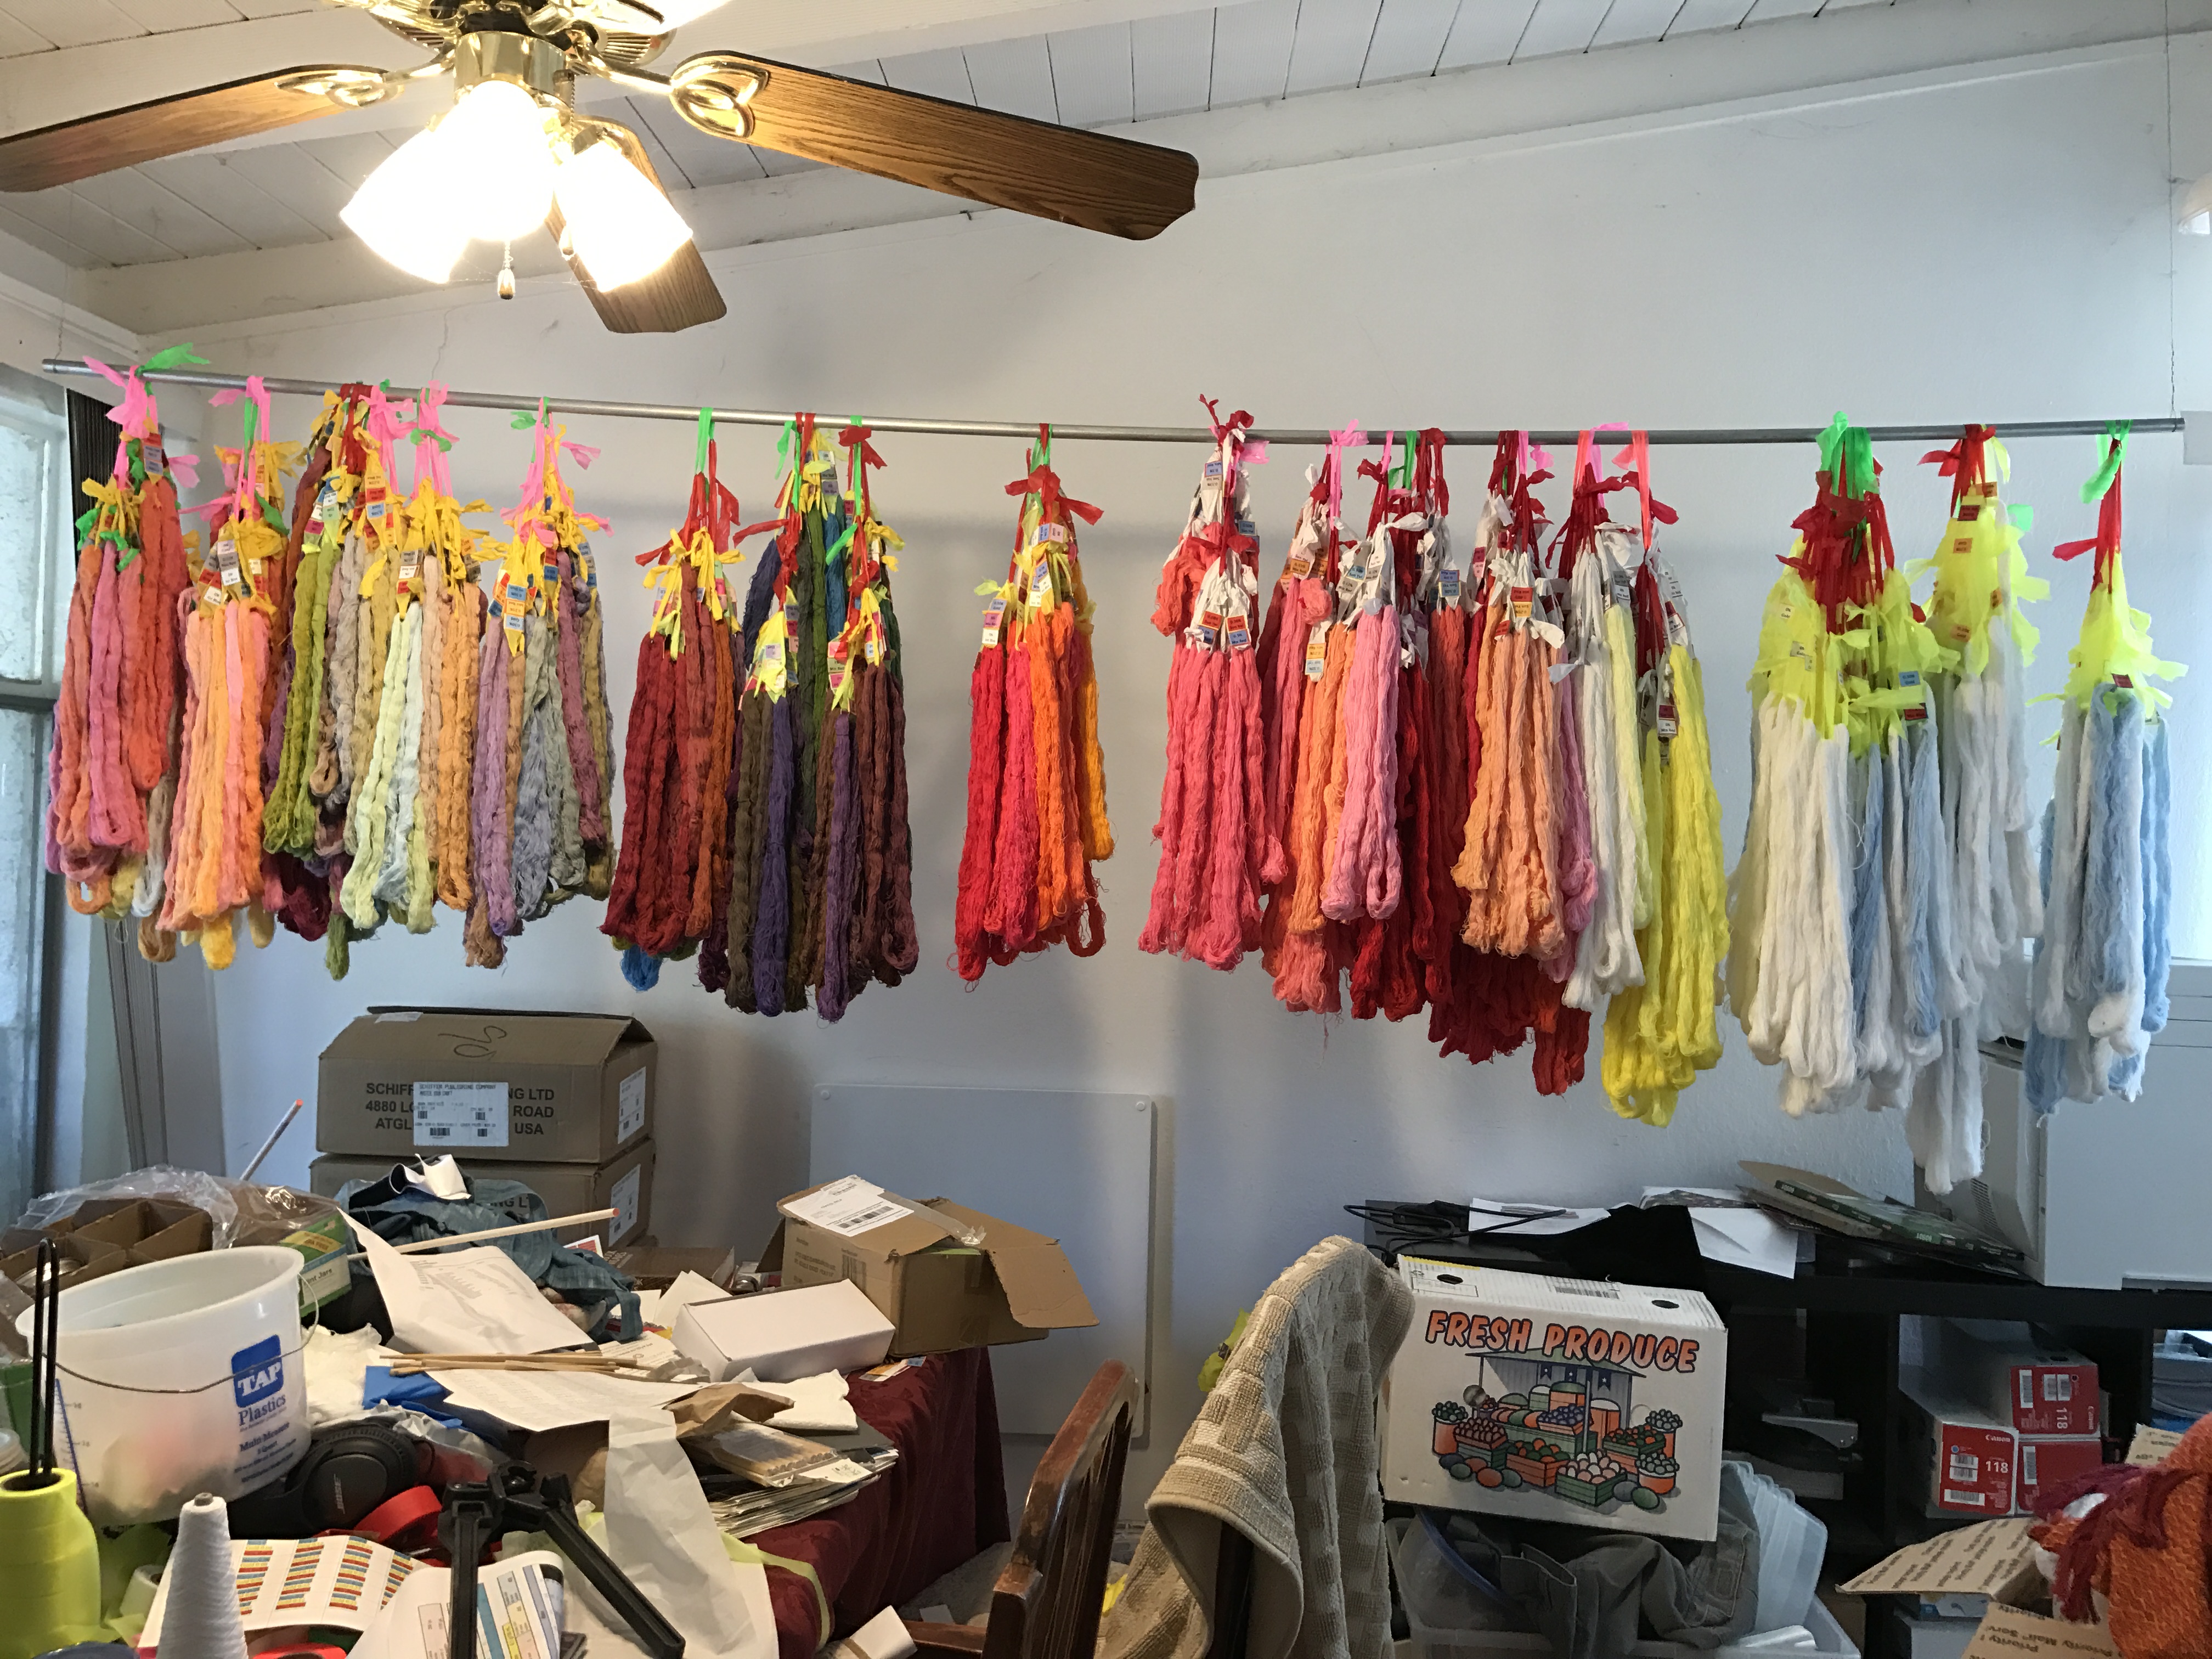
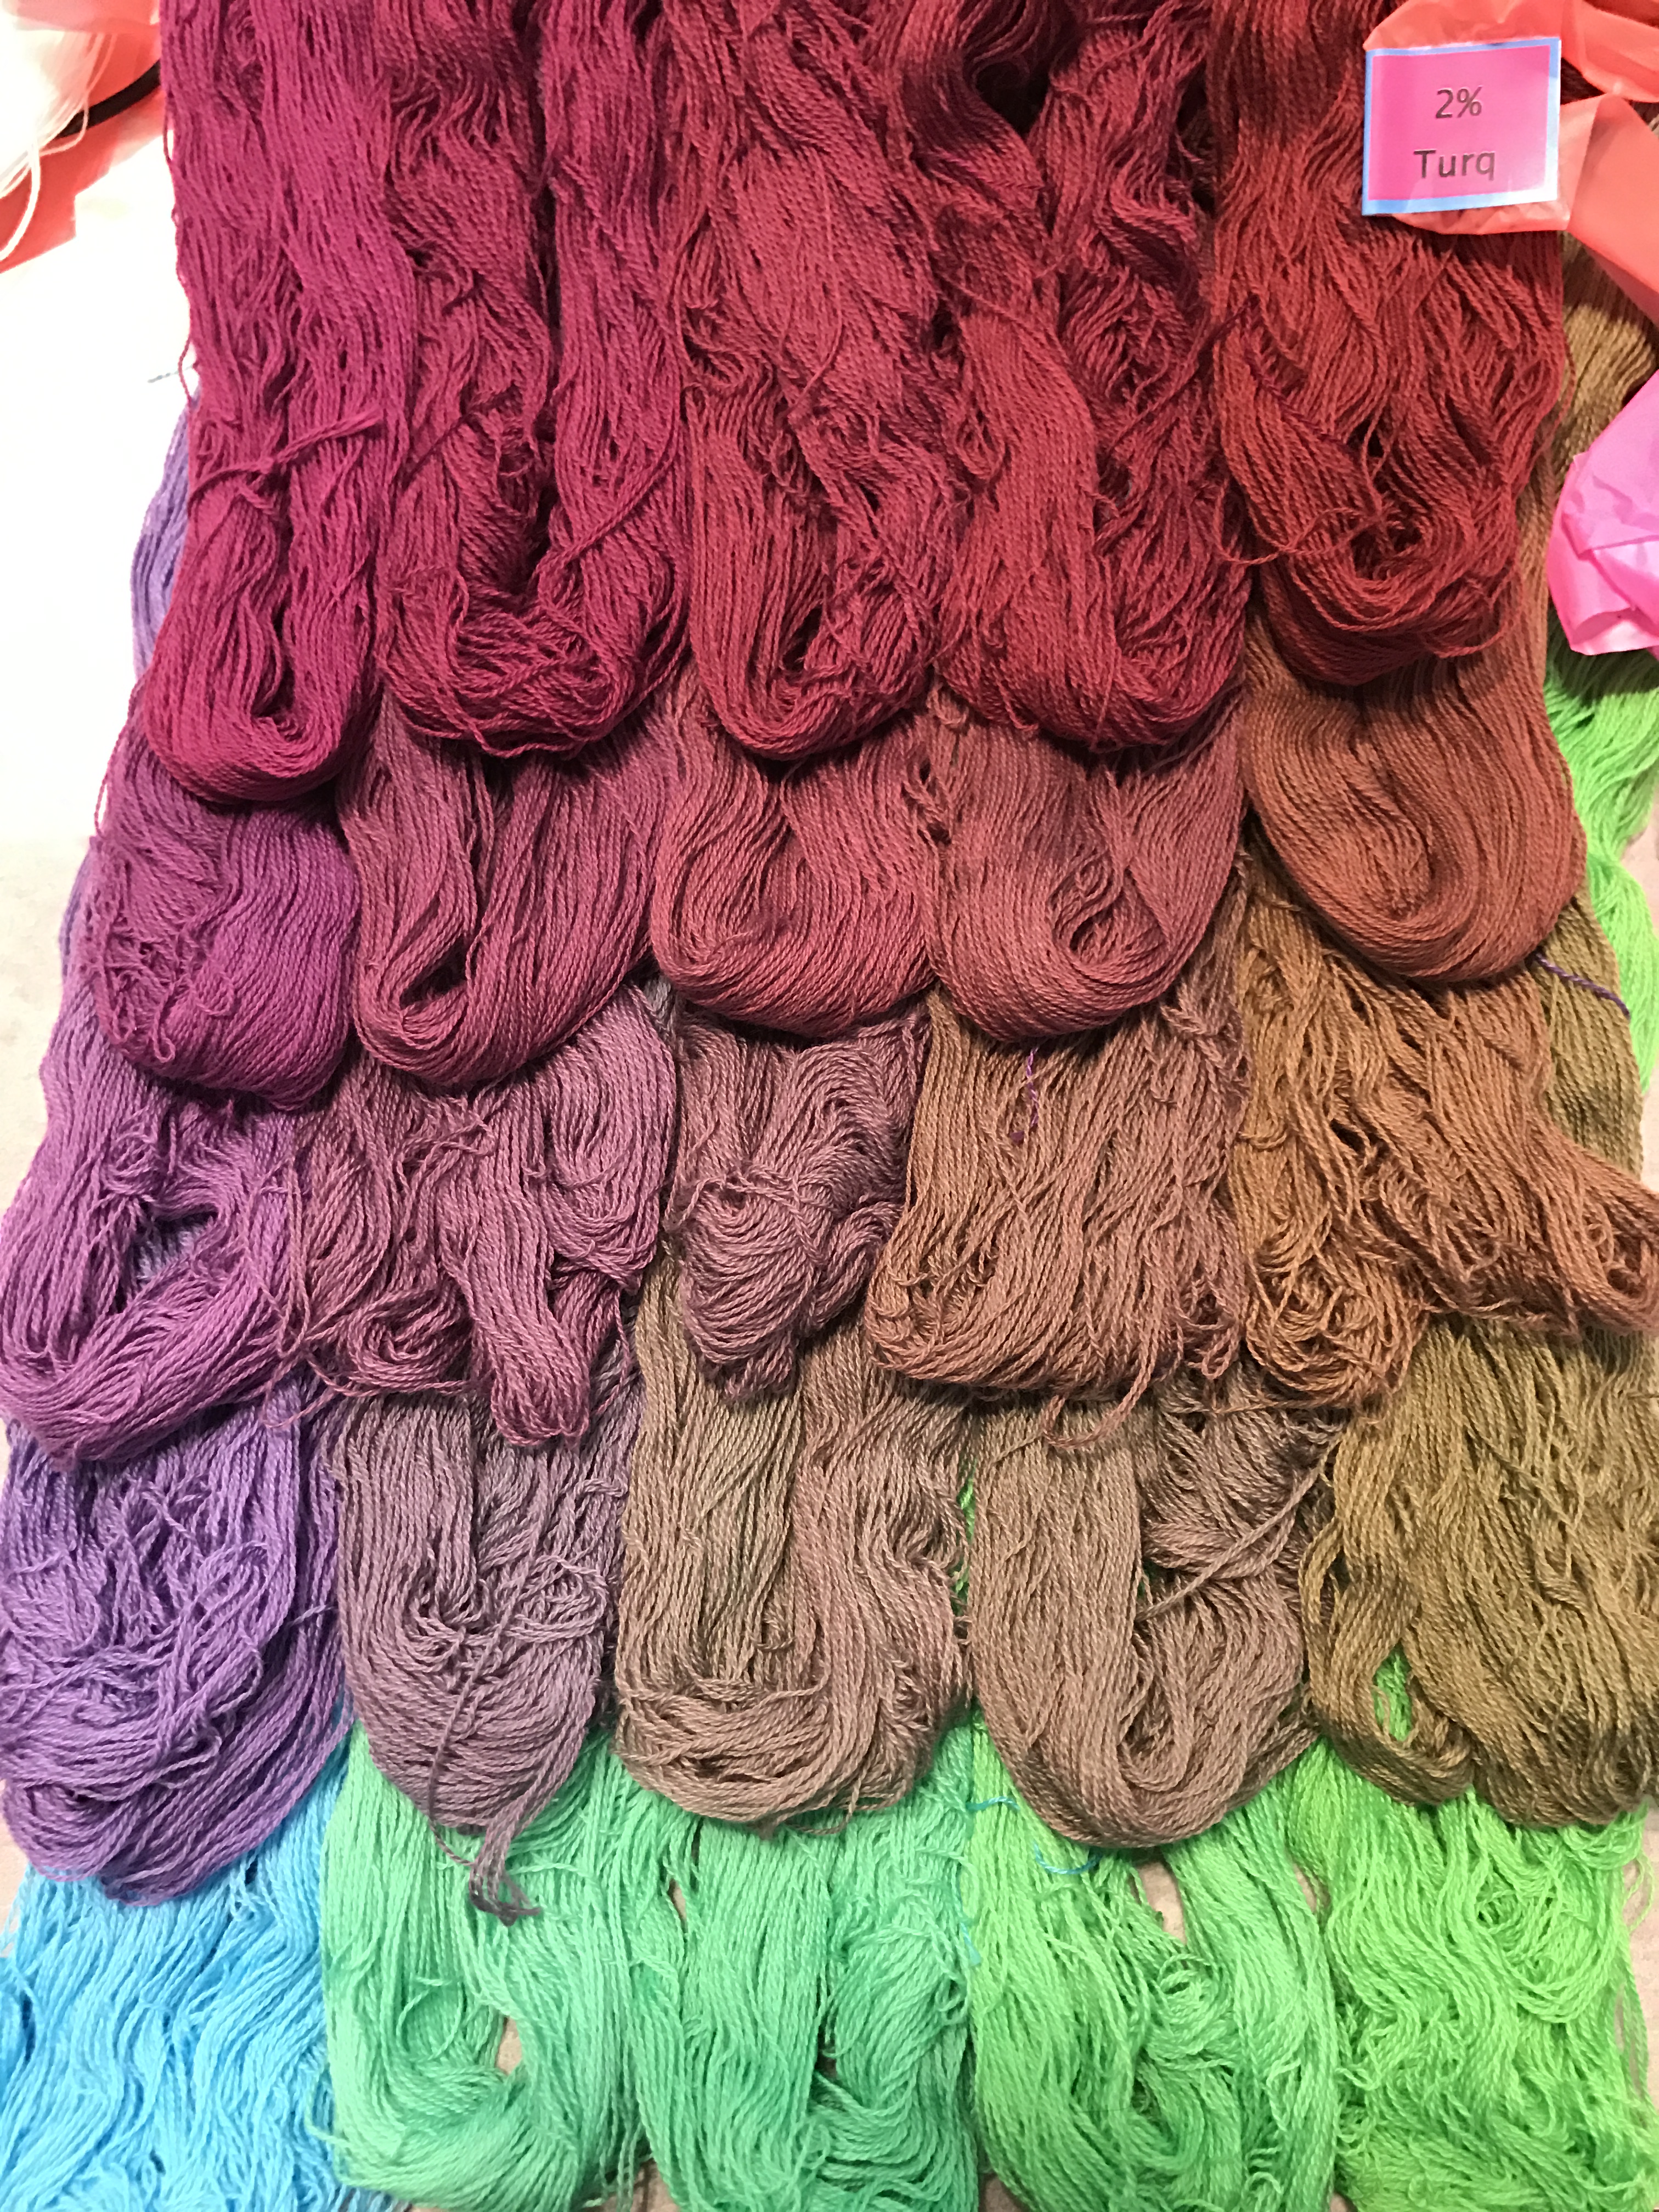
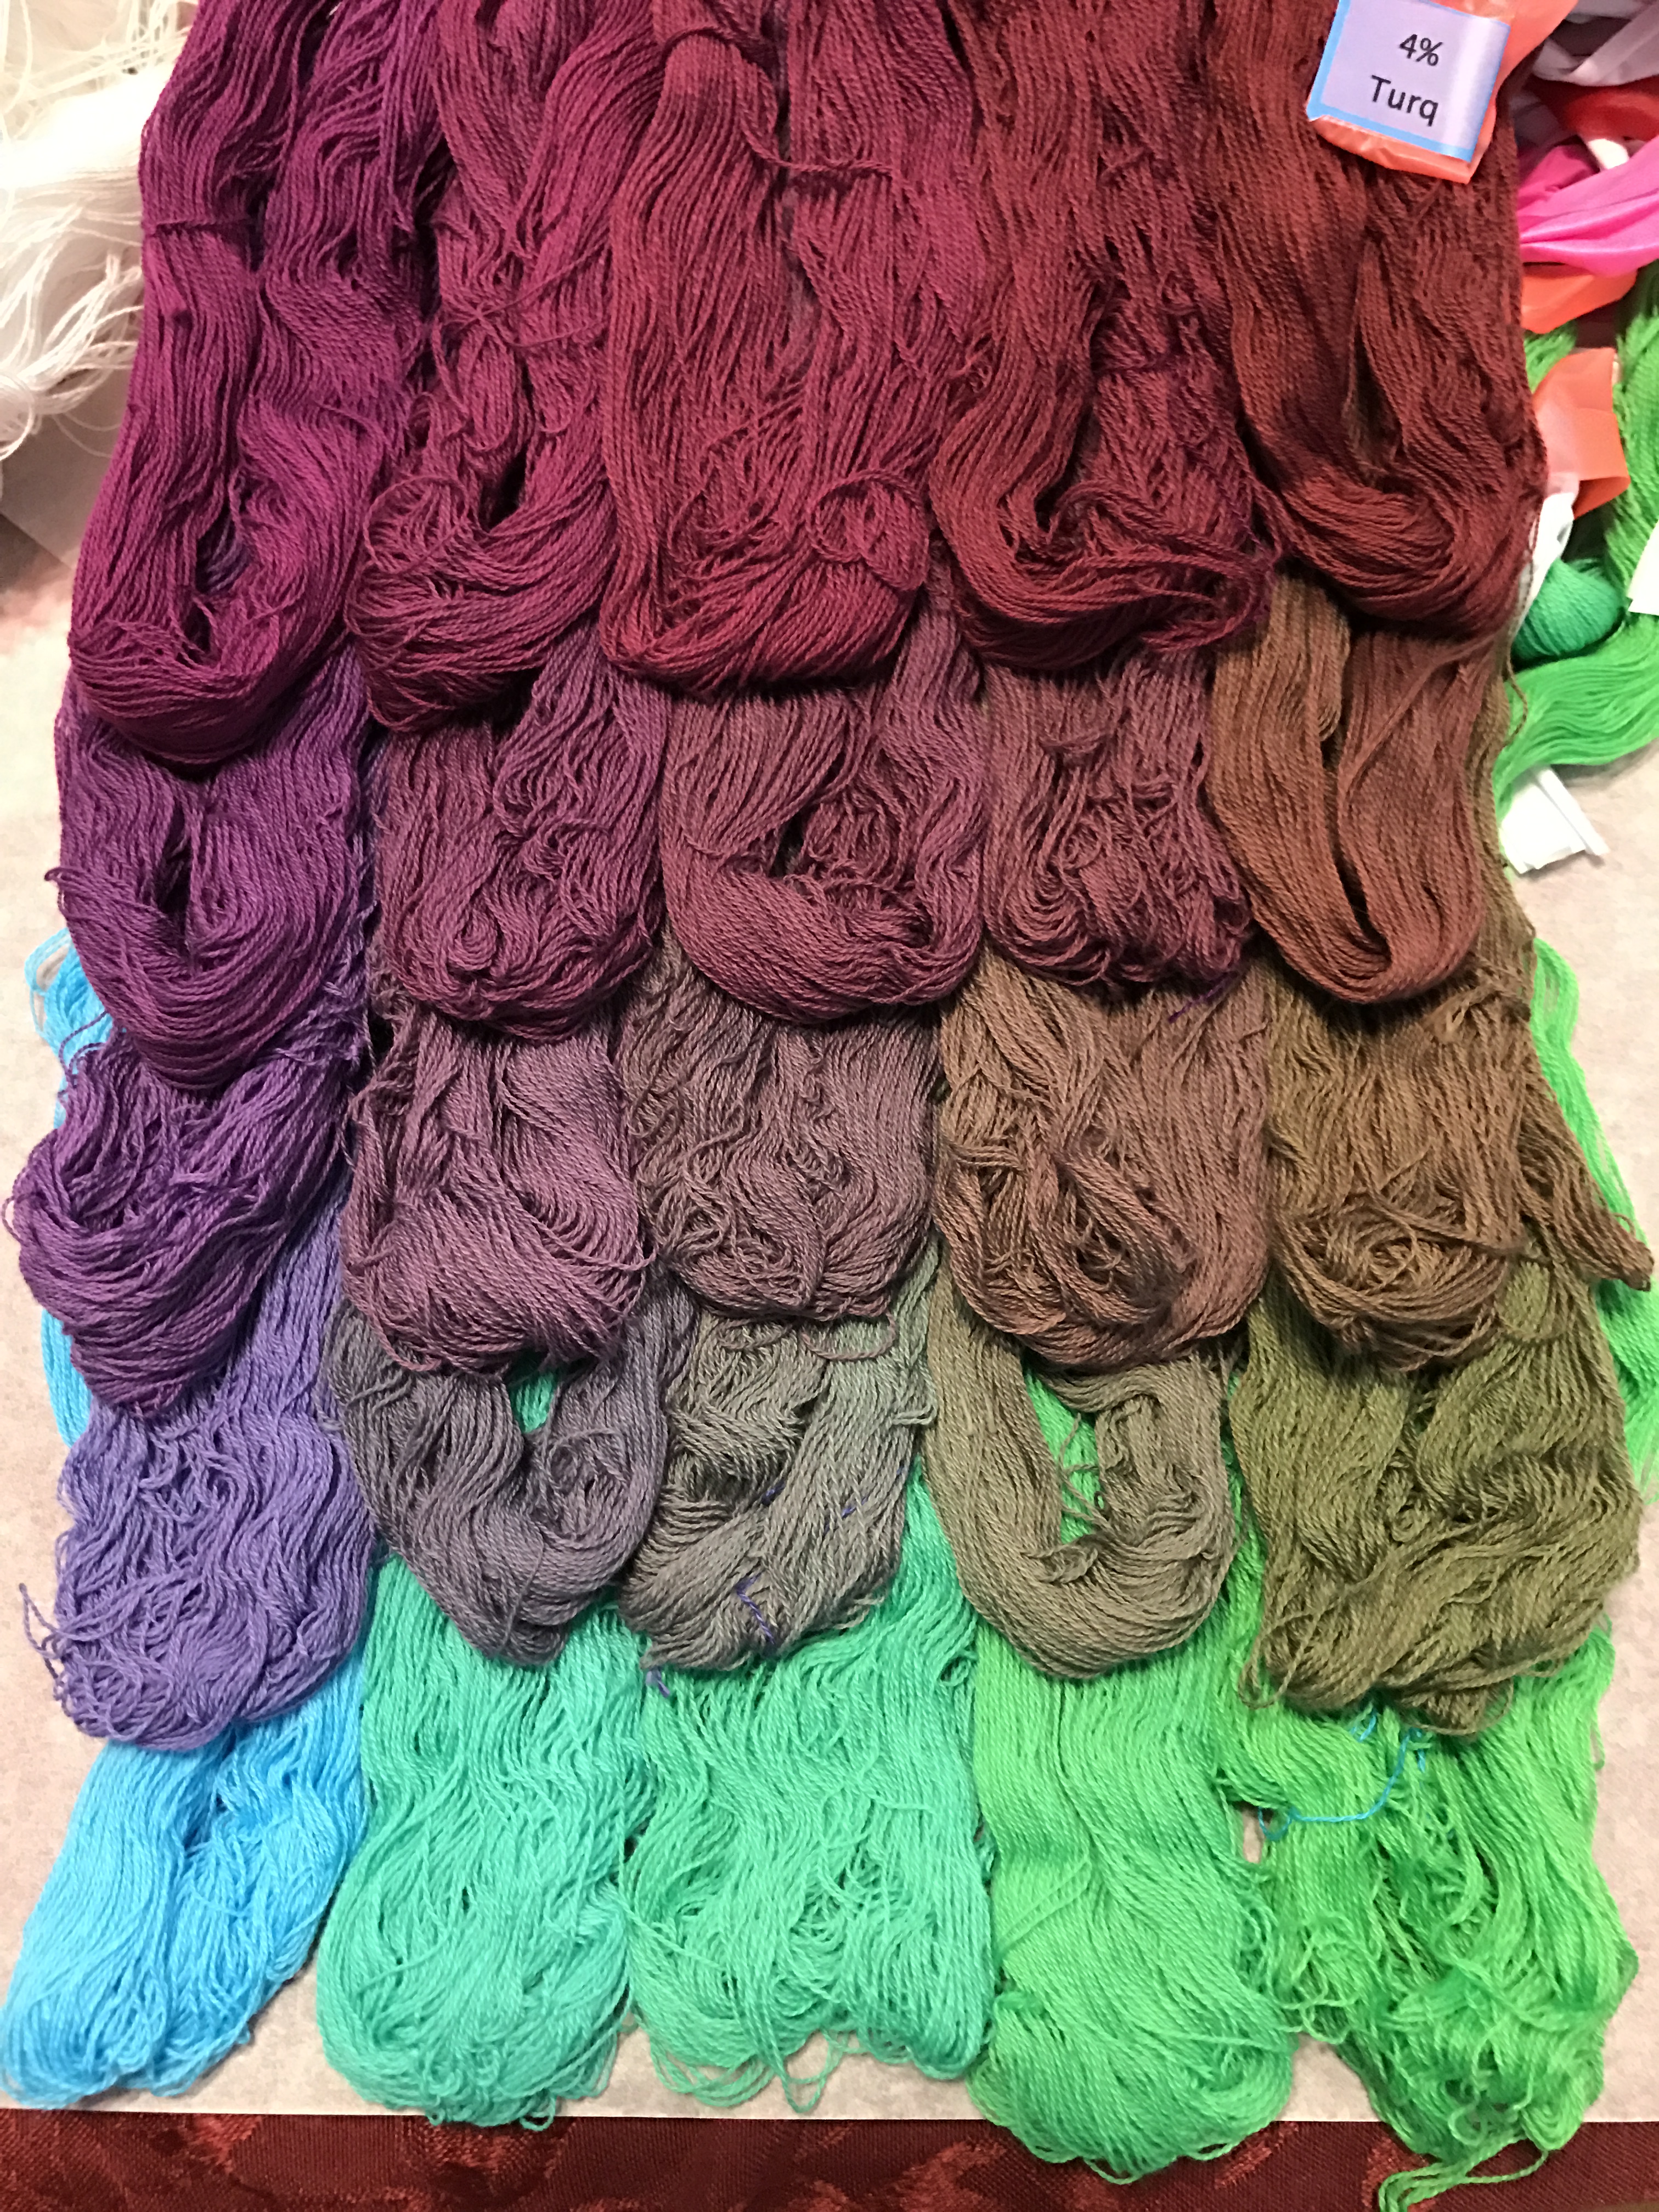
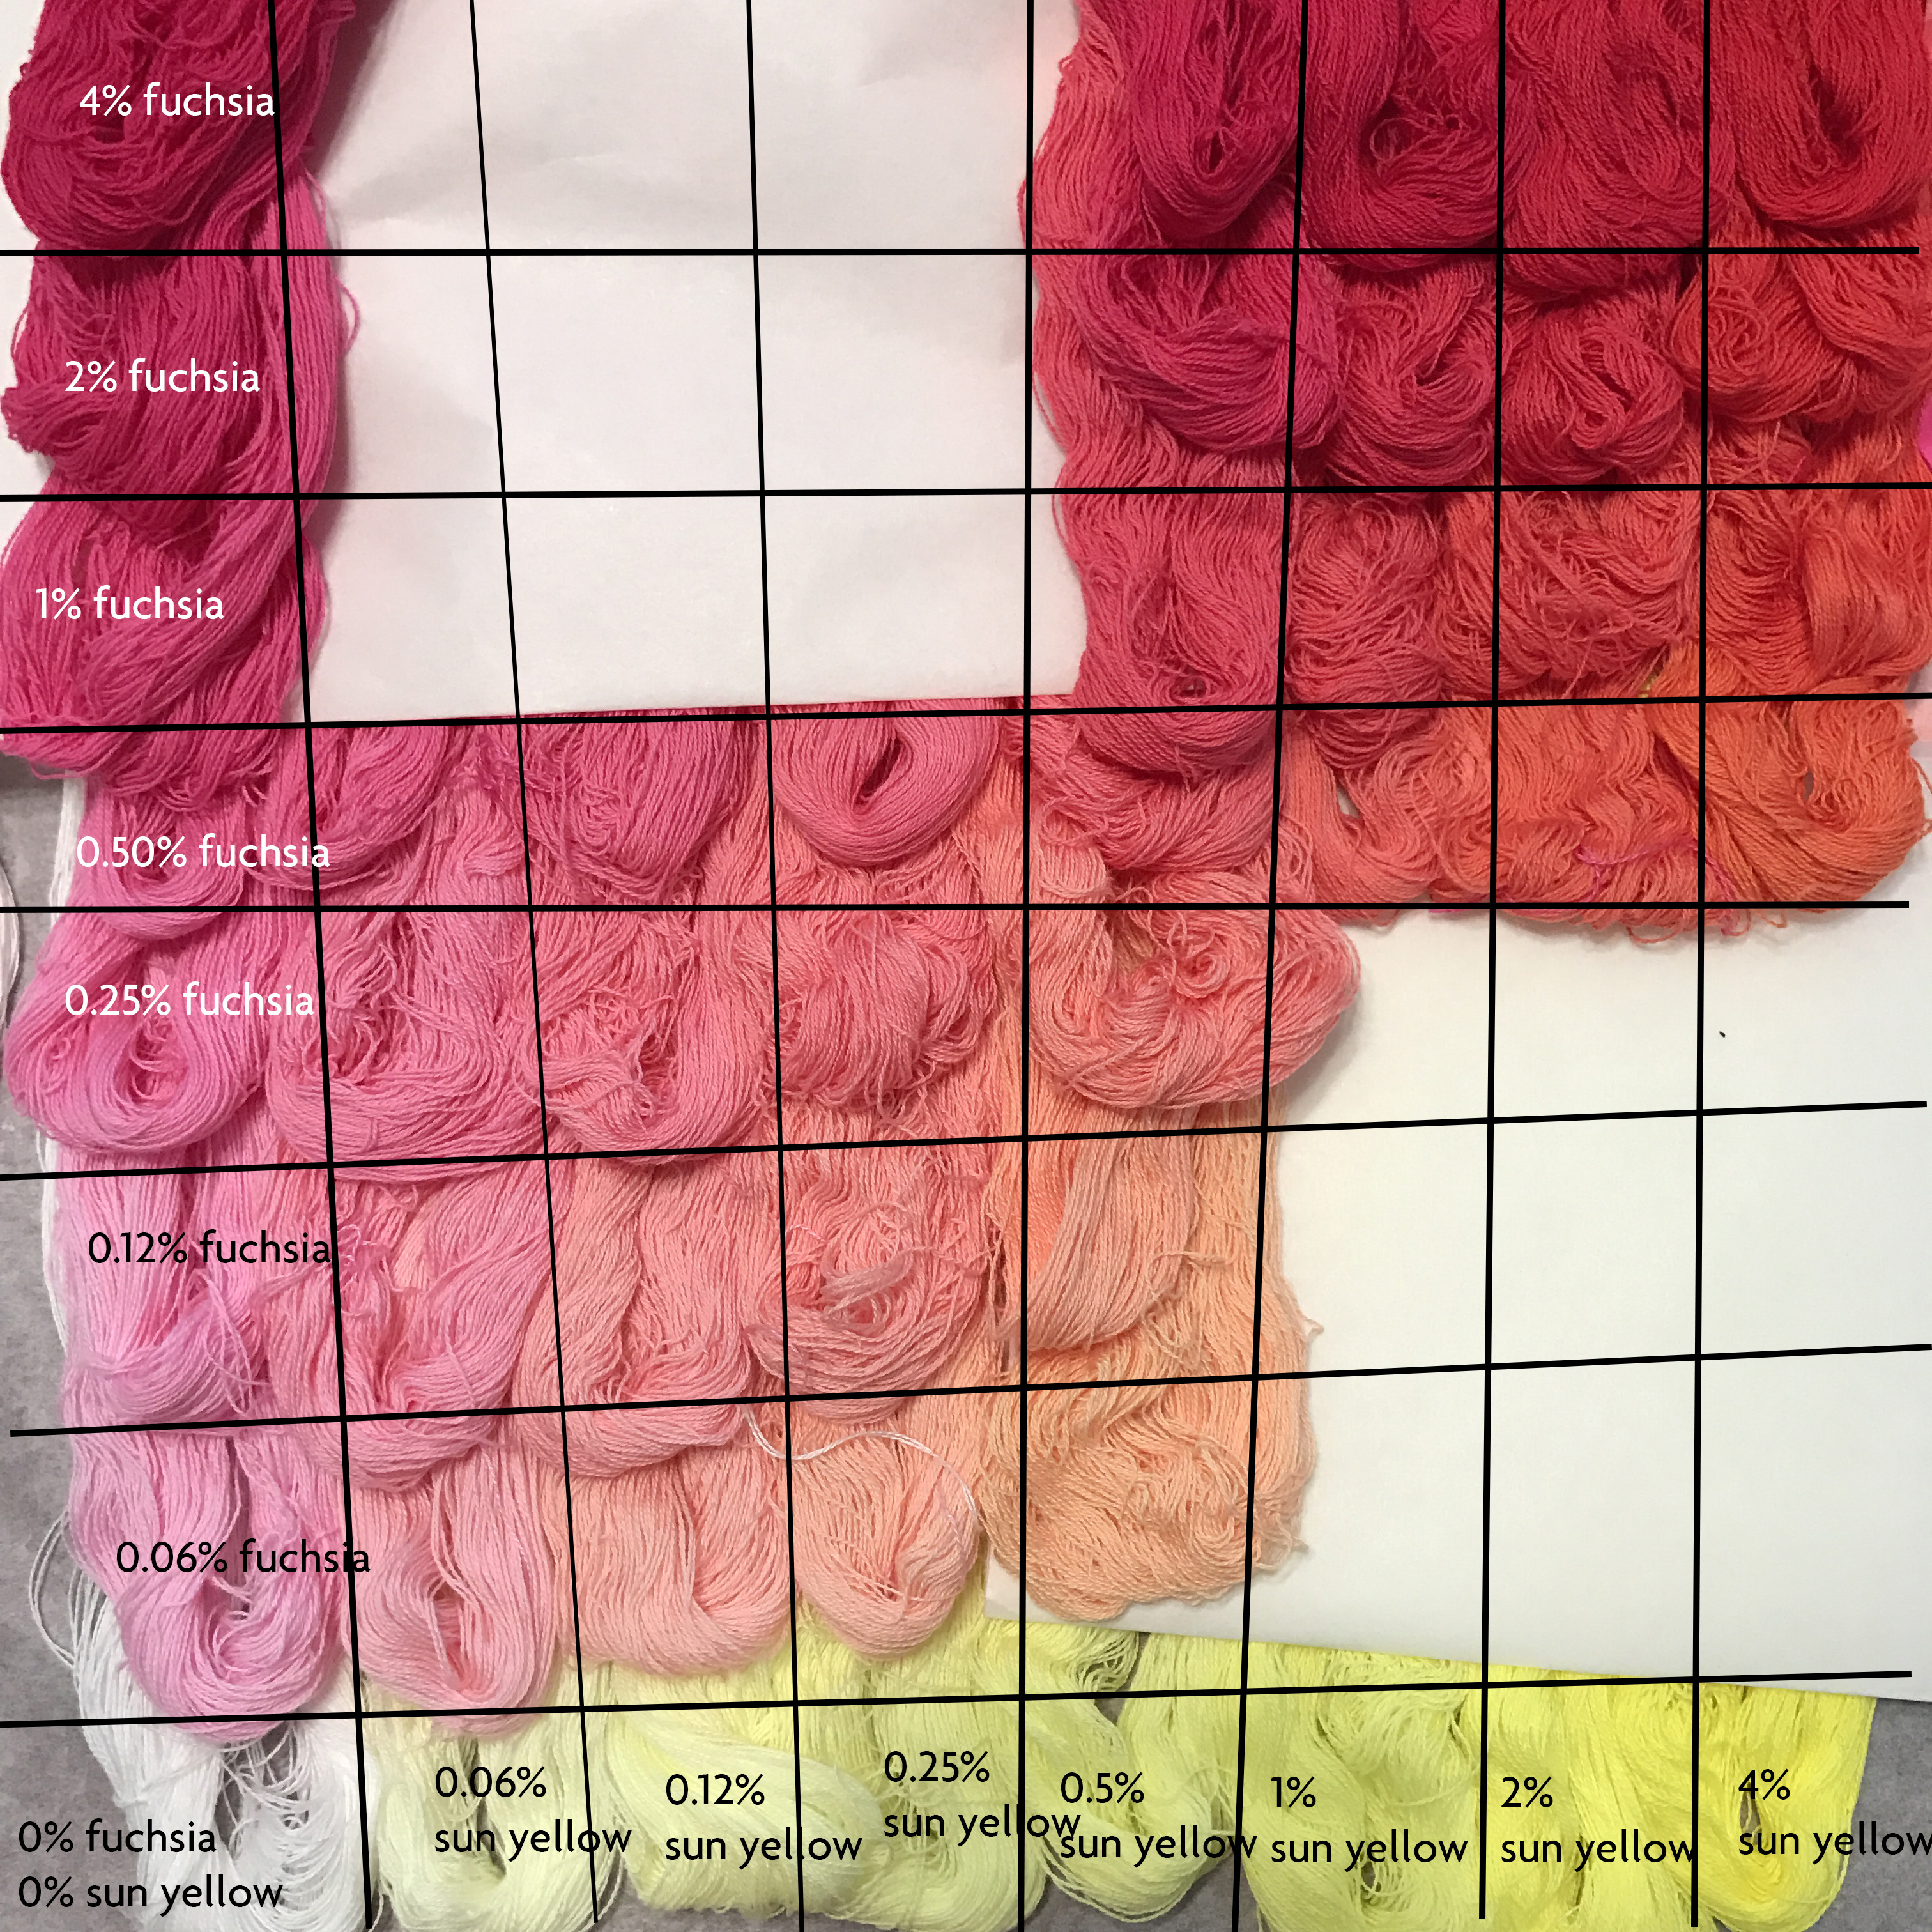
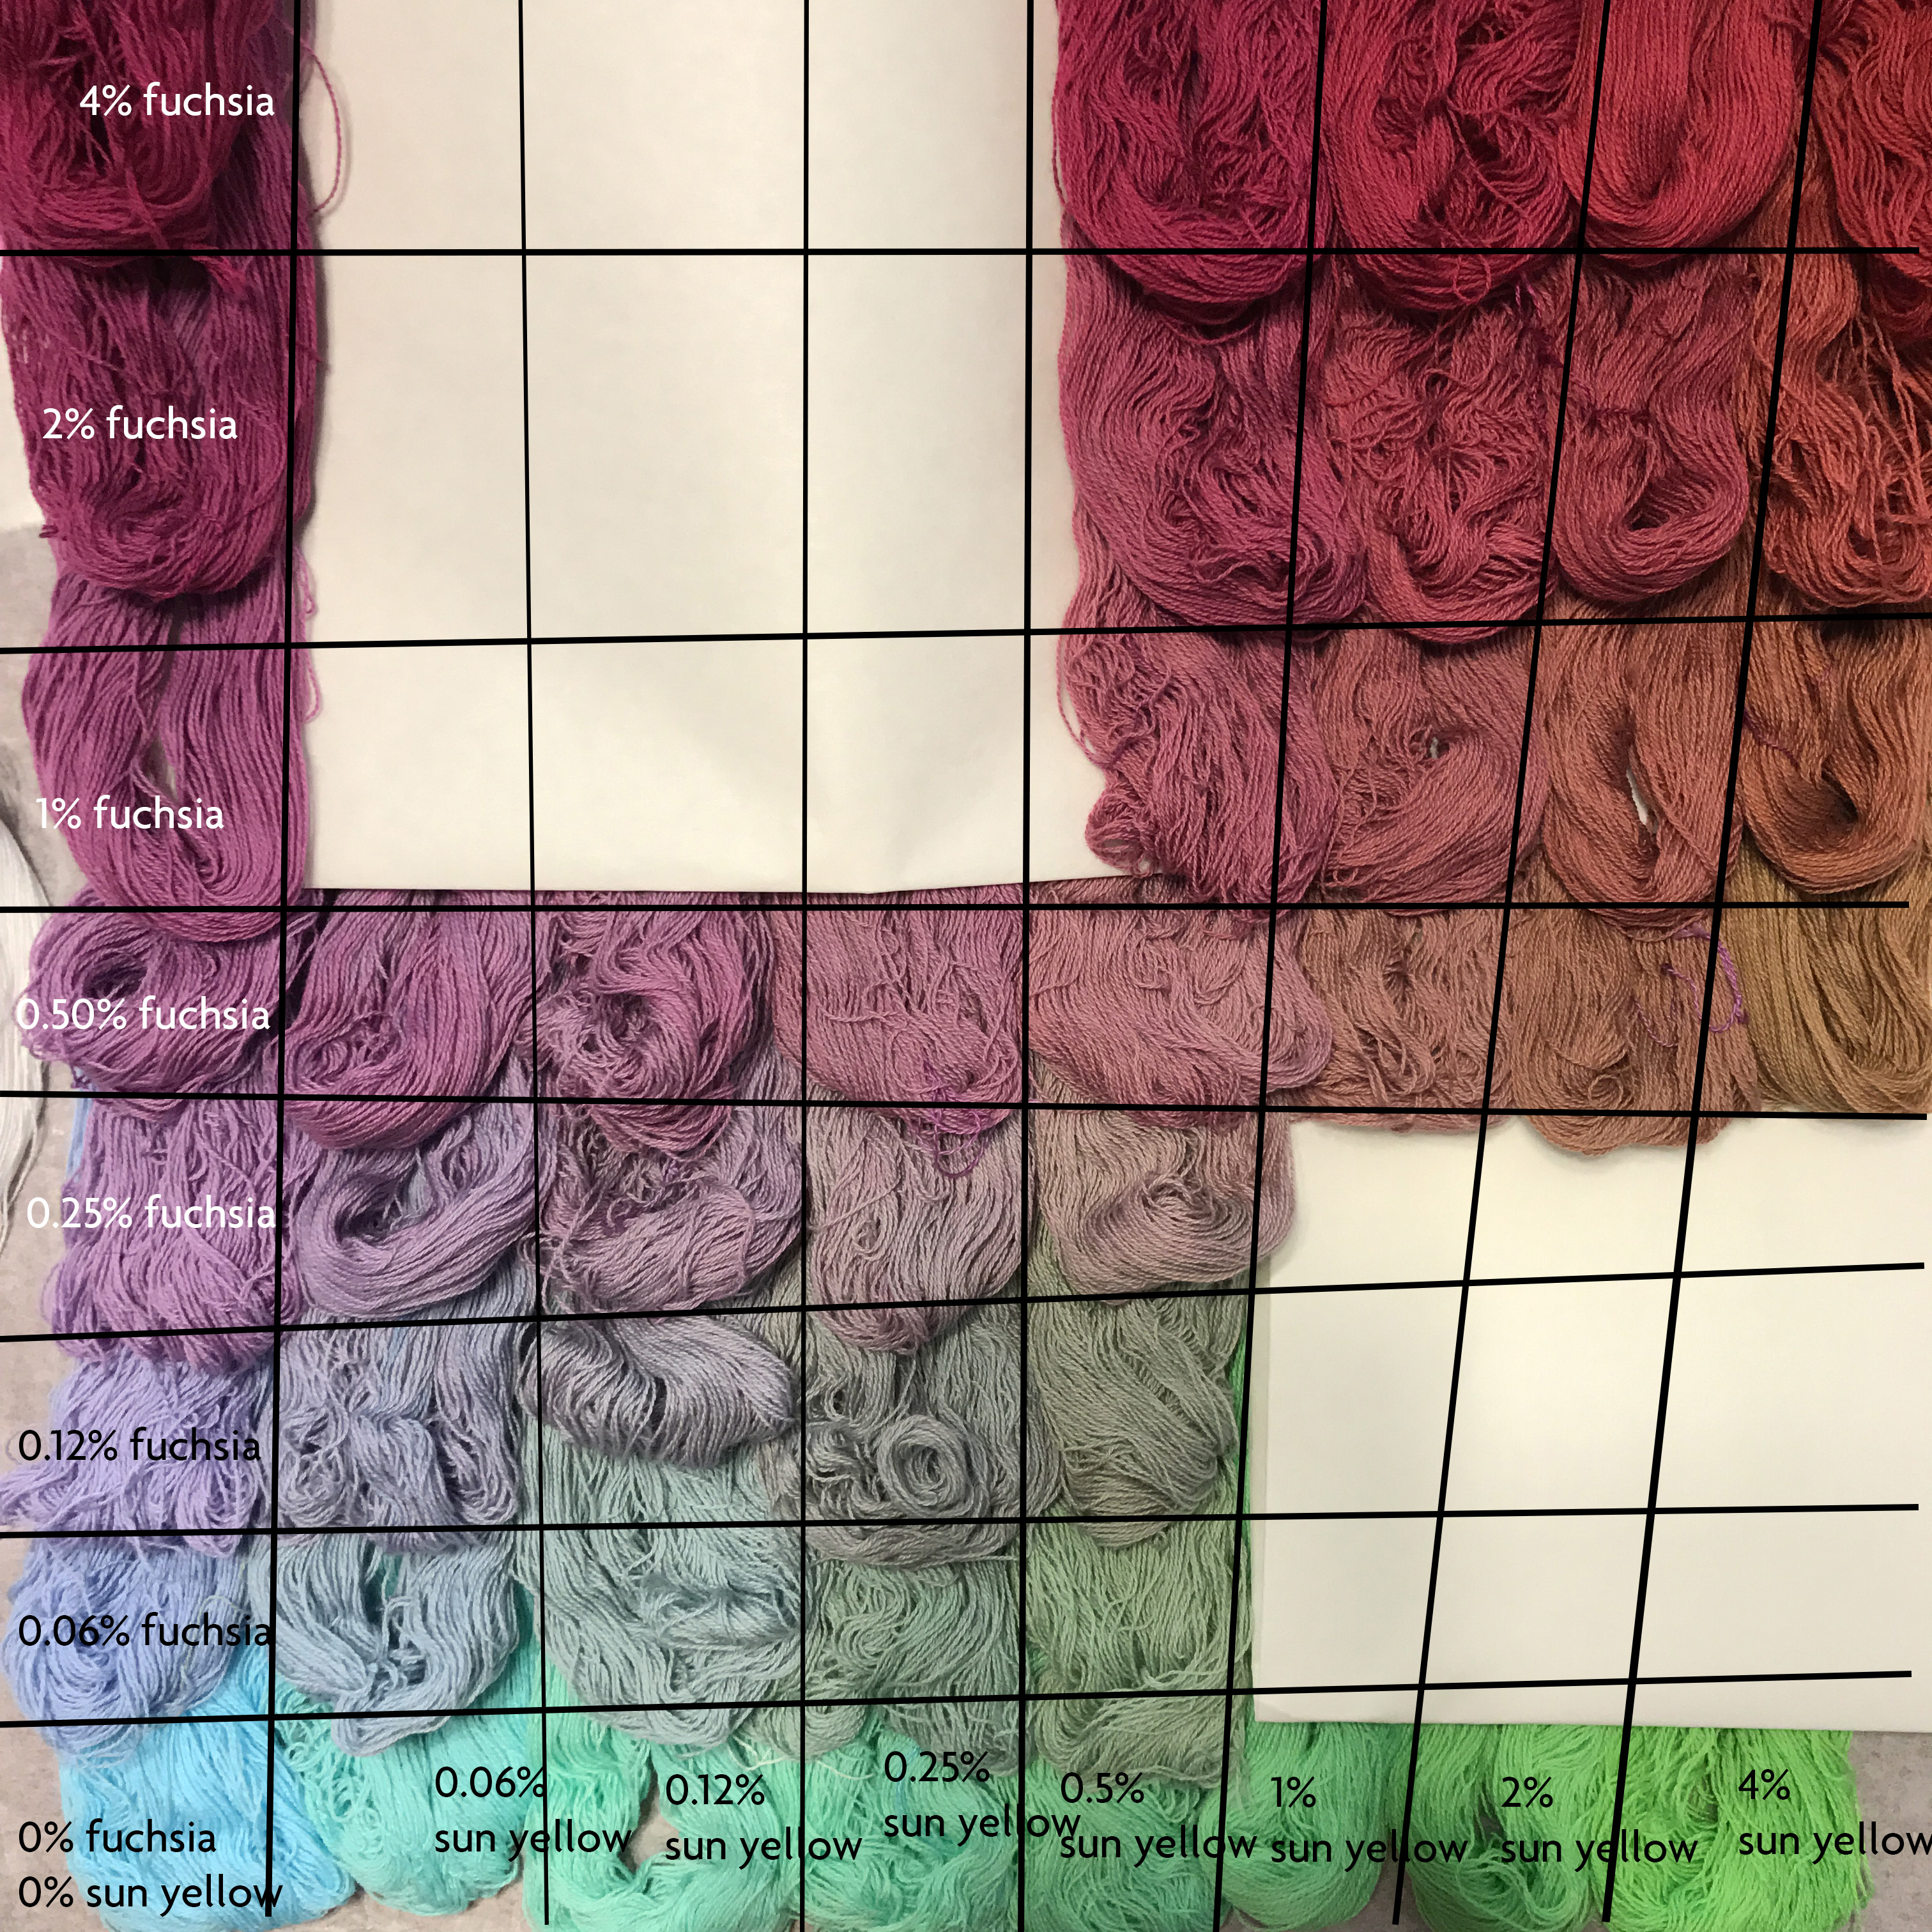
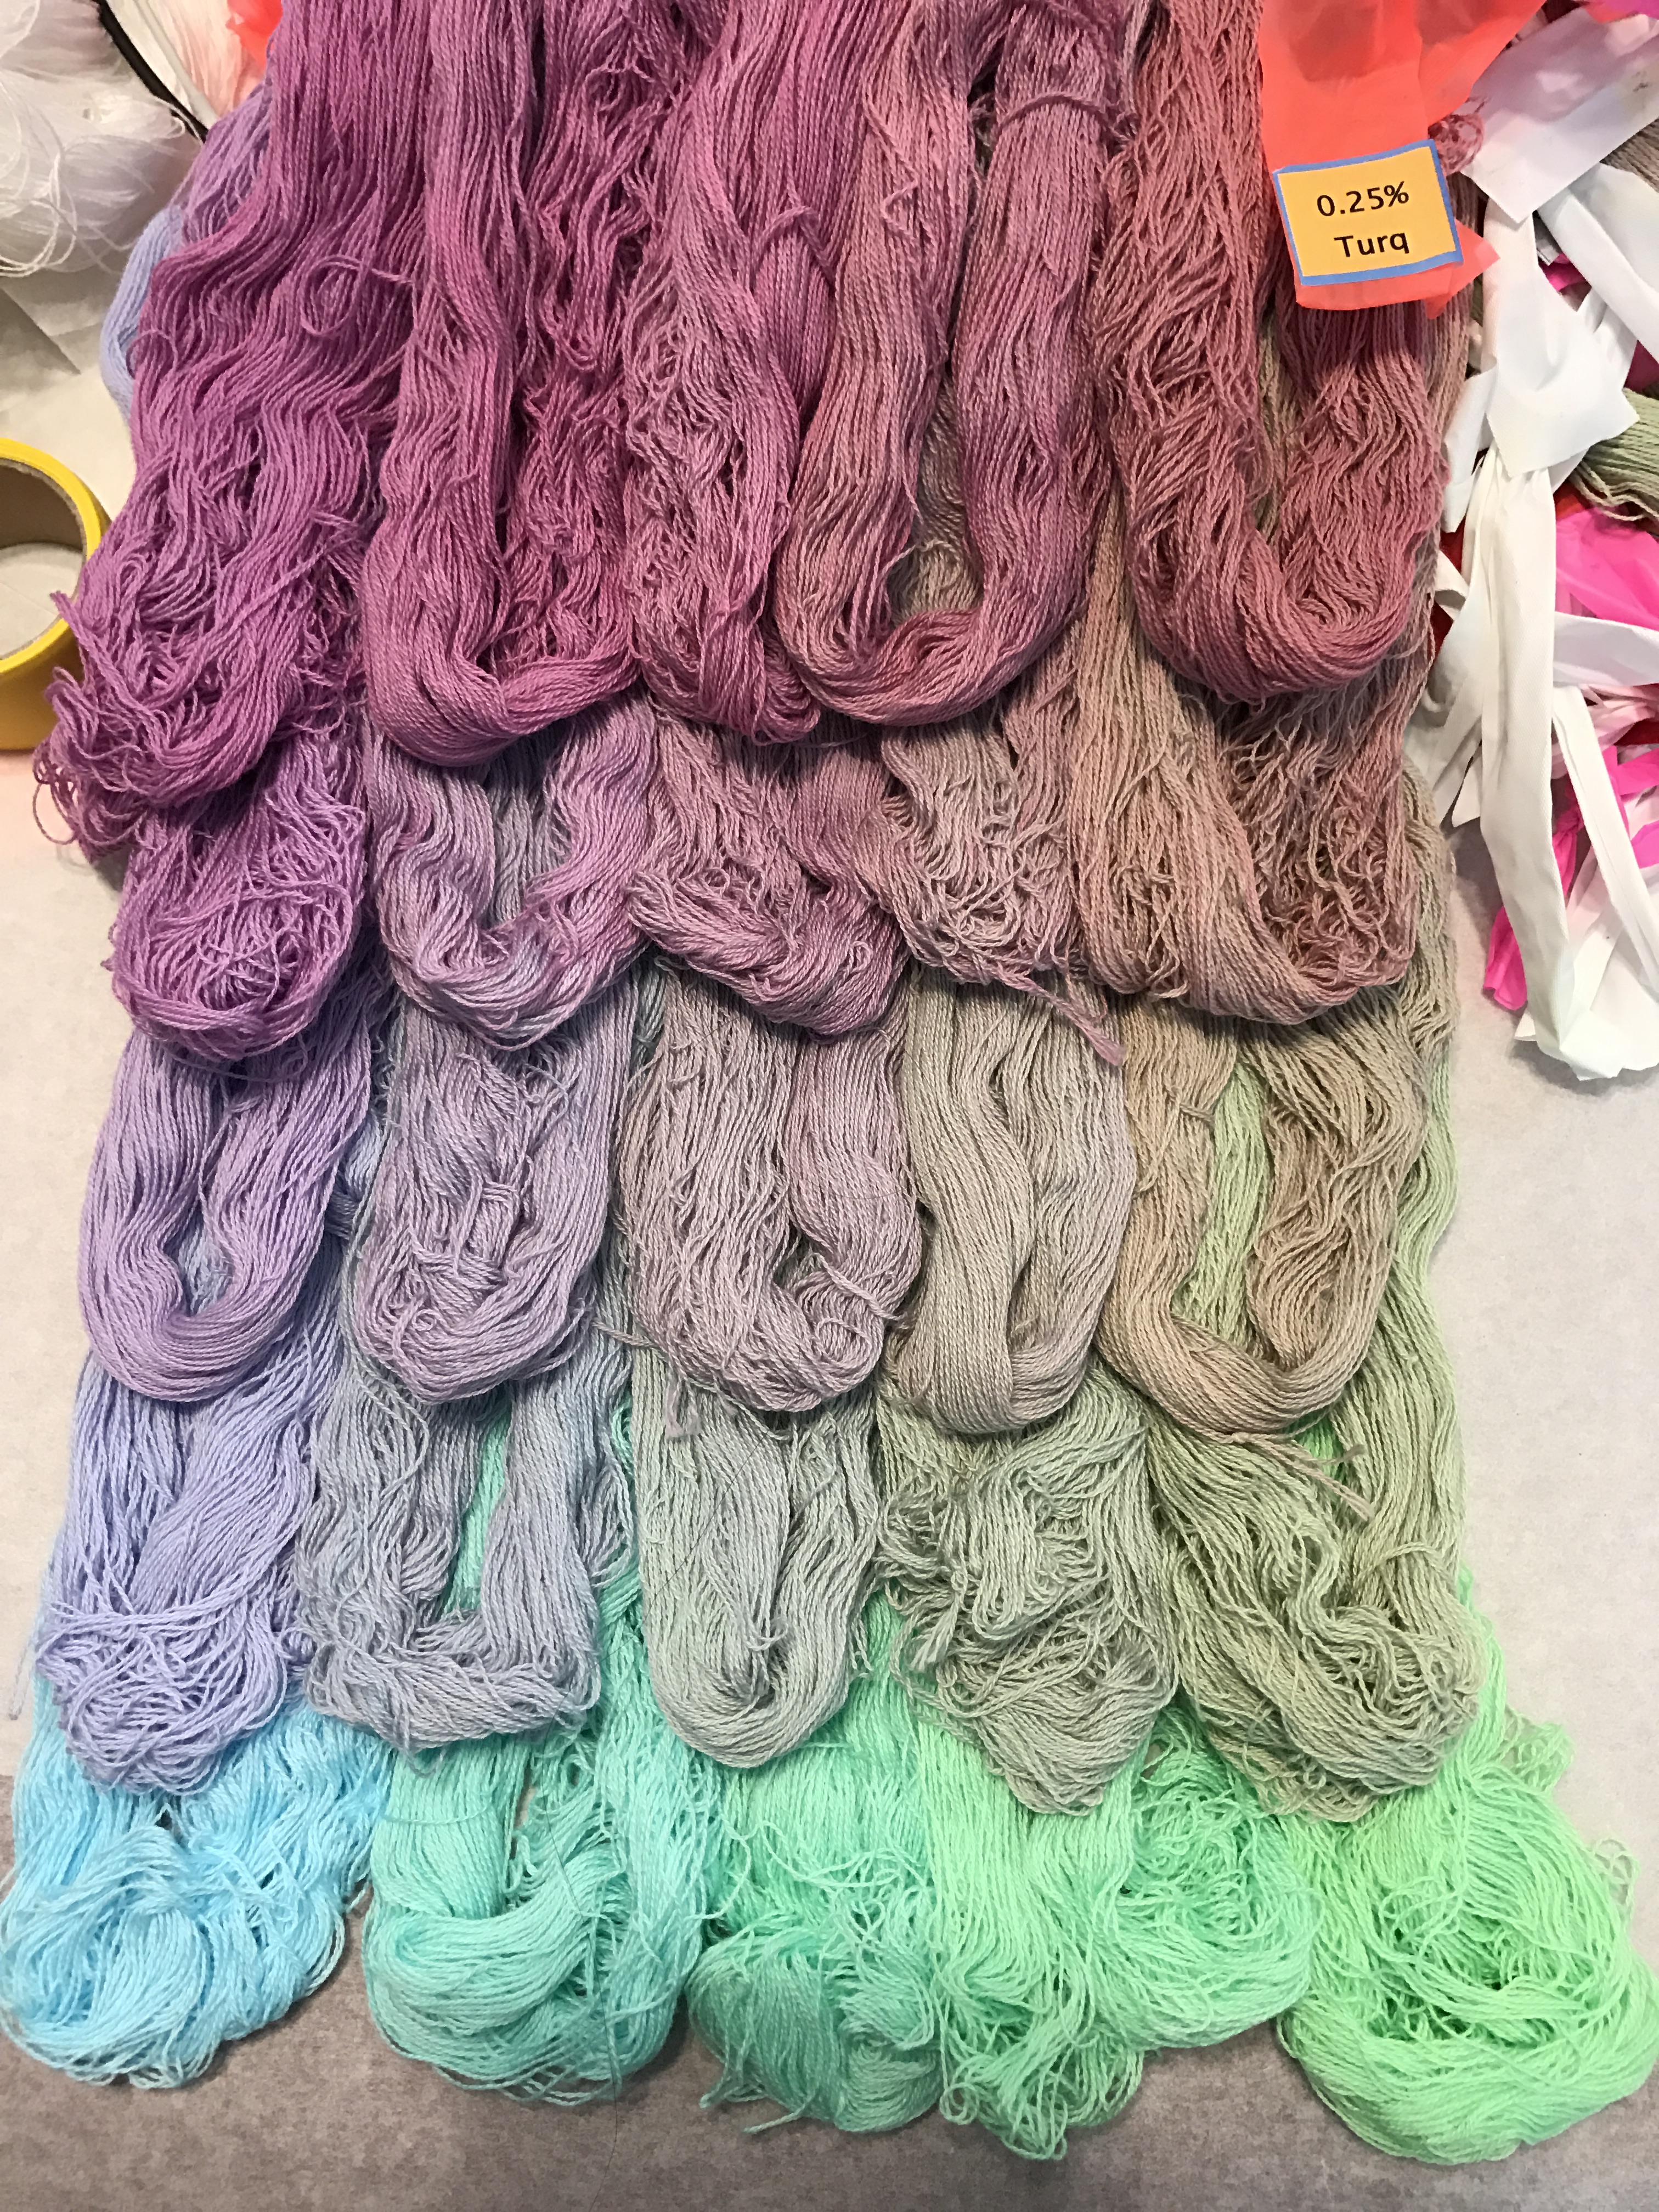
While trapped inside by our sudden transportation into the interstellar void, I decided to try photographing my samples. I already knew that the standard iPhone camera app would be insufficient, so I had gotten the ProCamera app for my iPhone, and used it to adjust the white balance of the image. Then I shot photos of all the samples. Here’s an example photo:

Procion MX dye sample sheet - cube method
Procion MX dye sample sheet – Gold, Mixing Red, Navy

Then I checked it on my laptop monitor, which I had color calibrated using equipment borrowed from a professional photographer friend (Joe Decker, who shoots unbelievably beautiful Arctic landscapes). Alas, the app had not captured the colors correctly.

This started a long chain of progressively more desperate attempts to get color-accurate photos of the samples. Even assistance from a trained professional didn’t help:

Fritz helping with sample photos

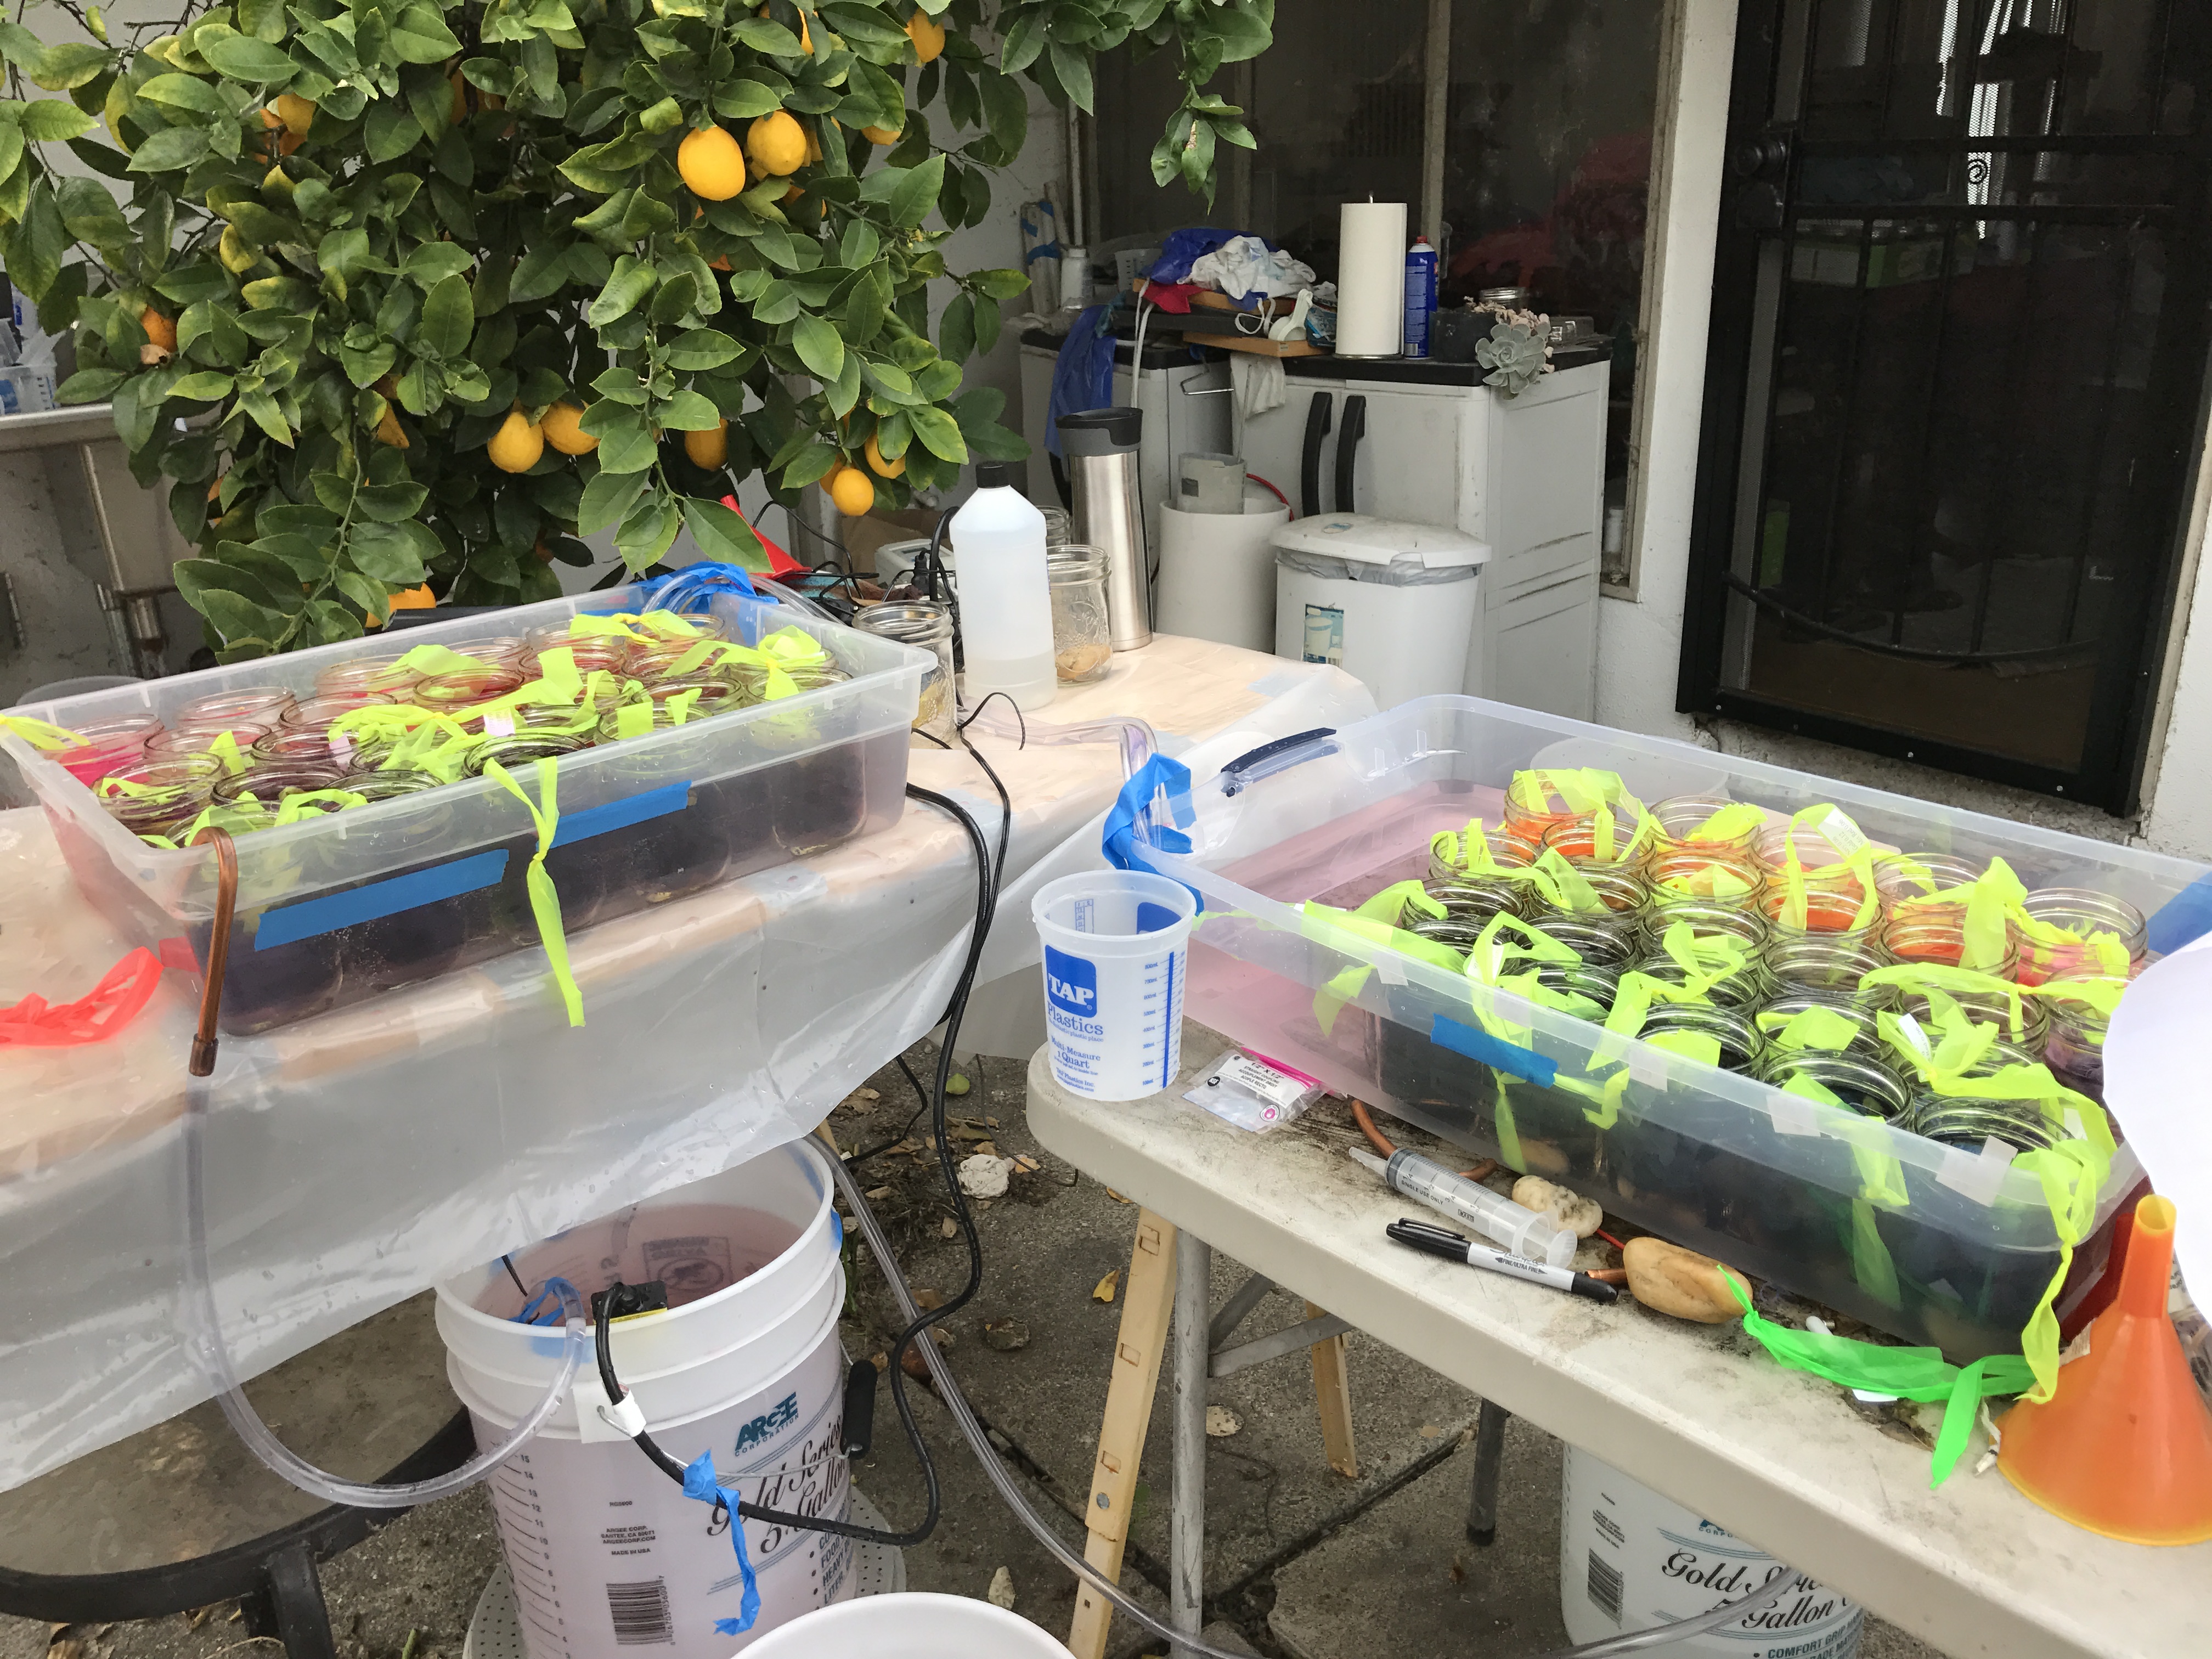
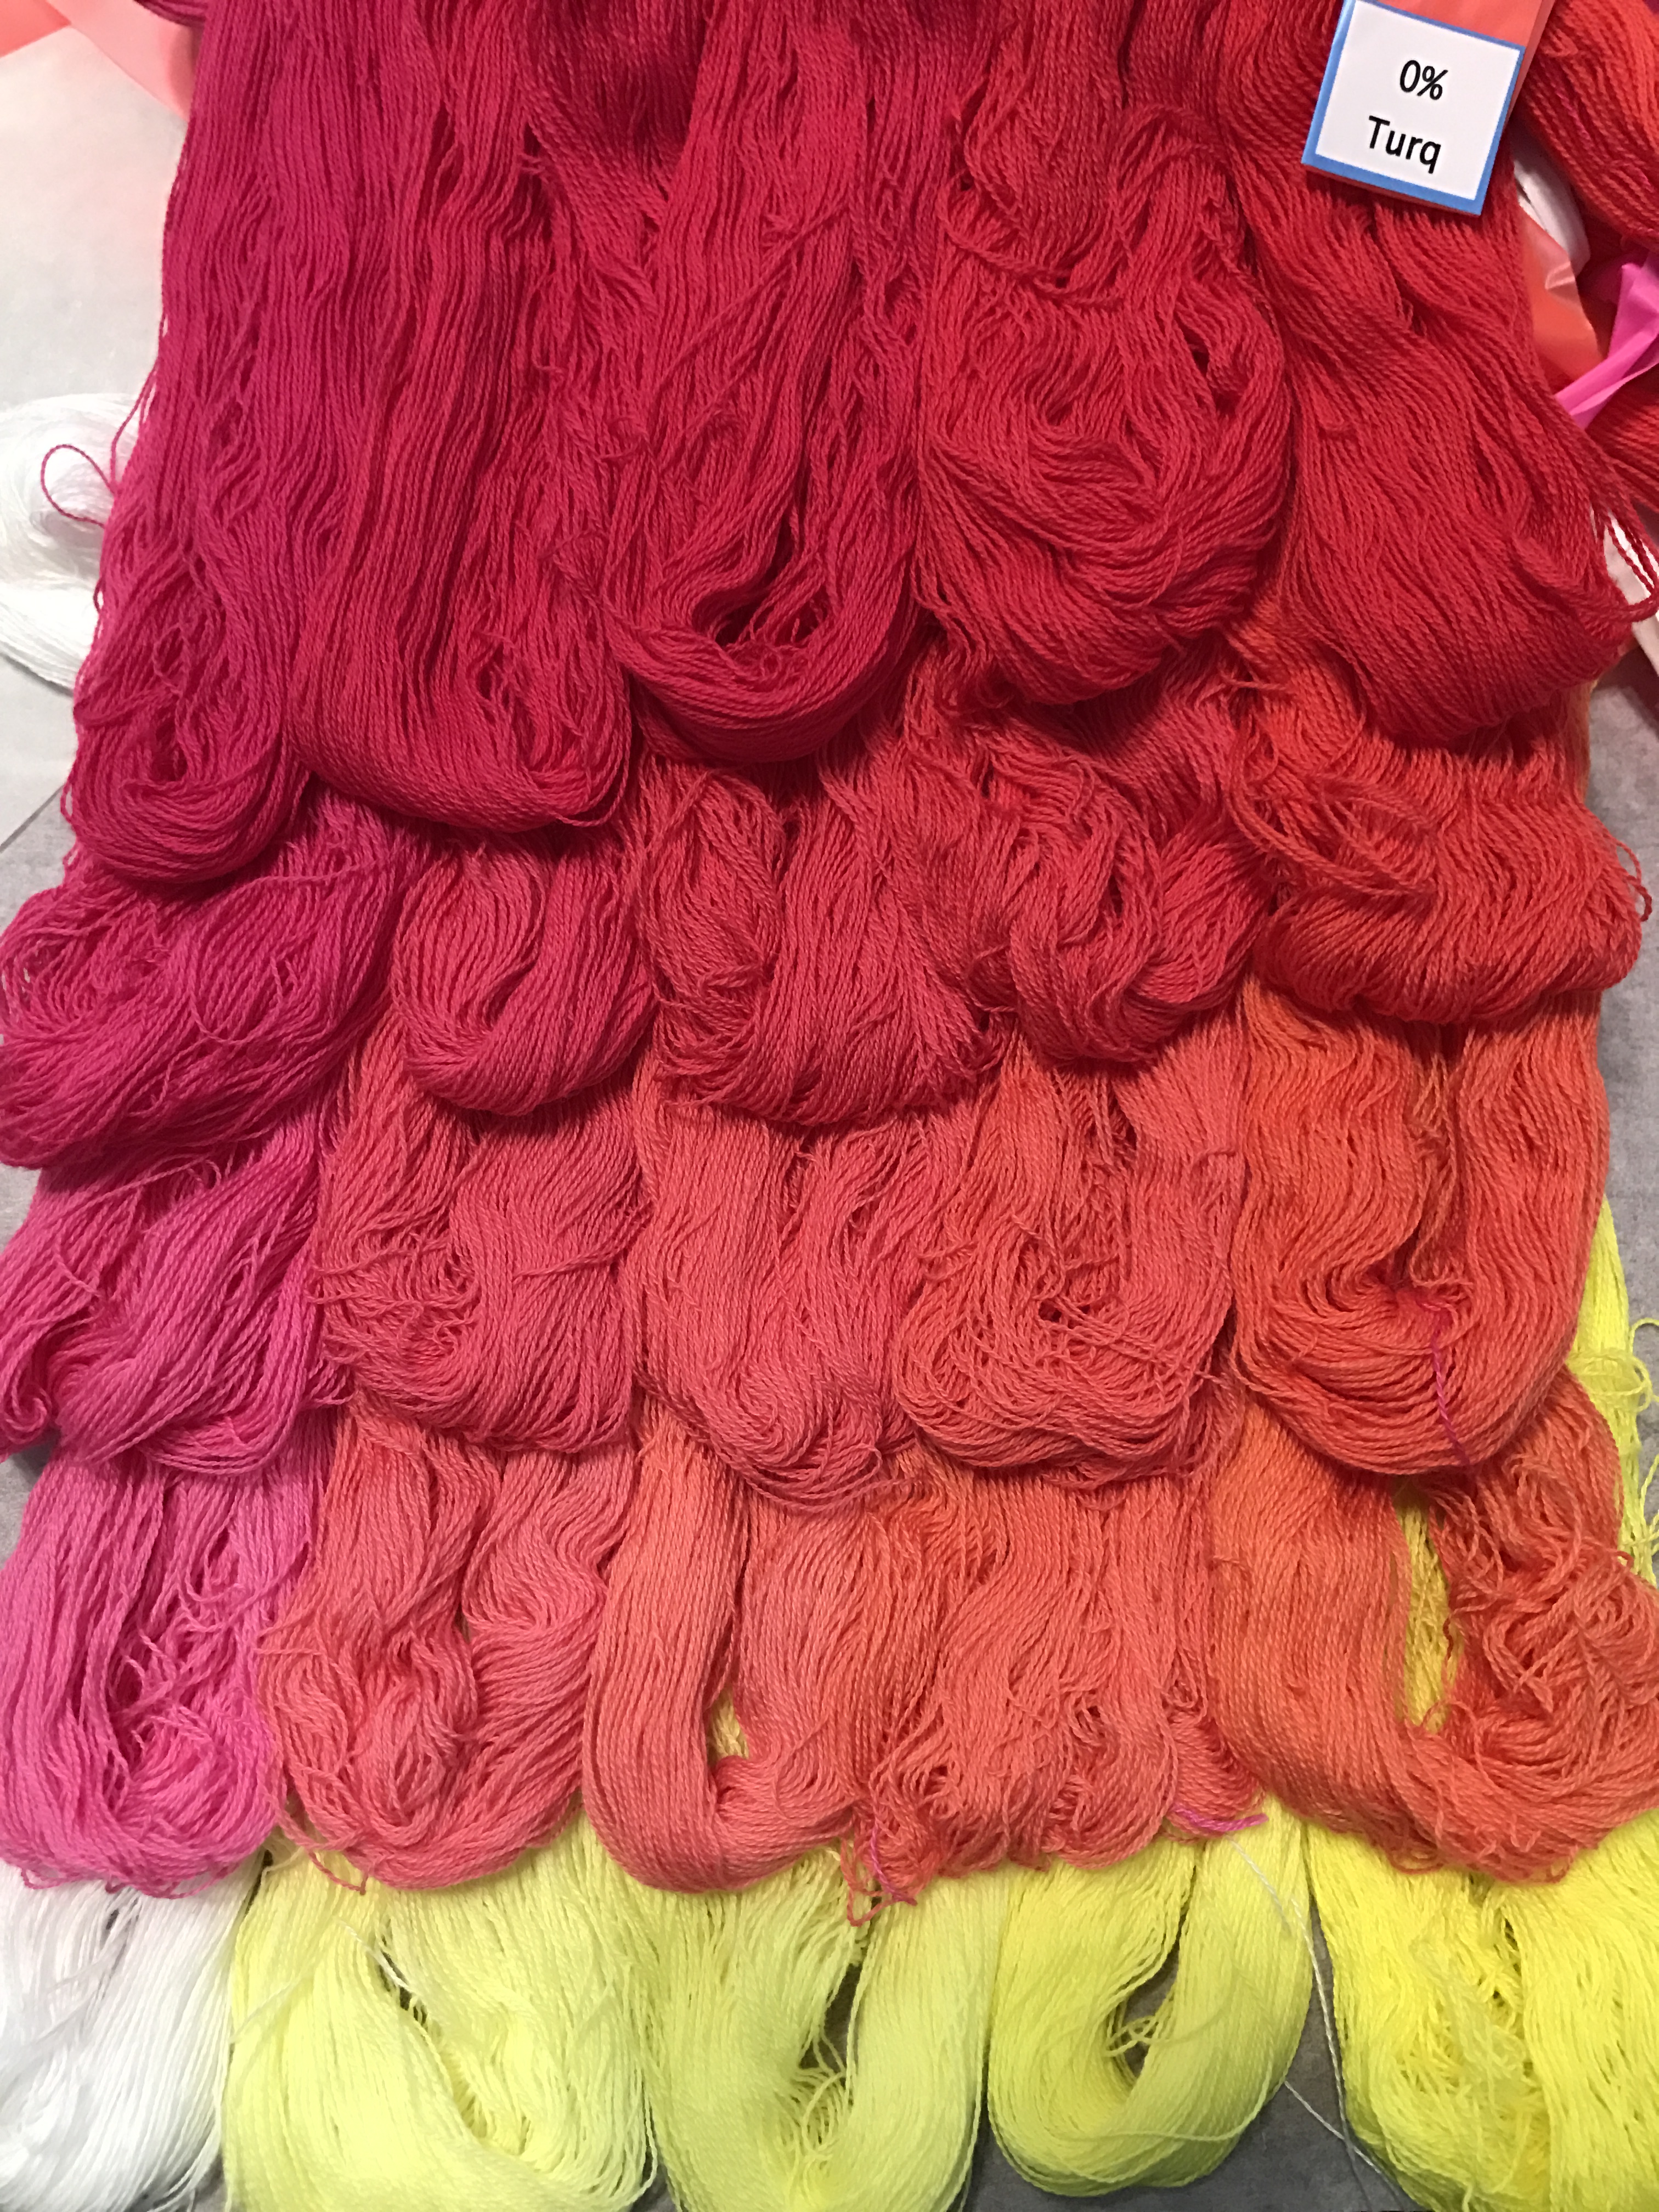
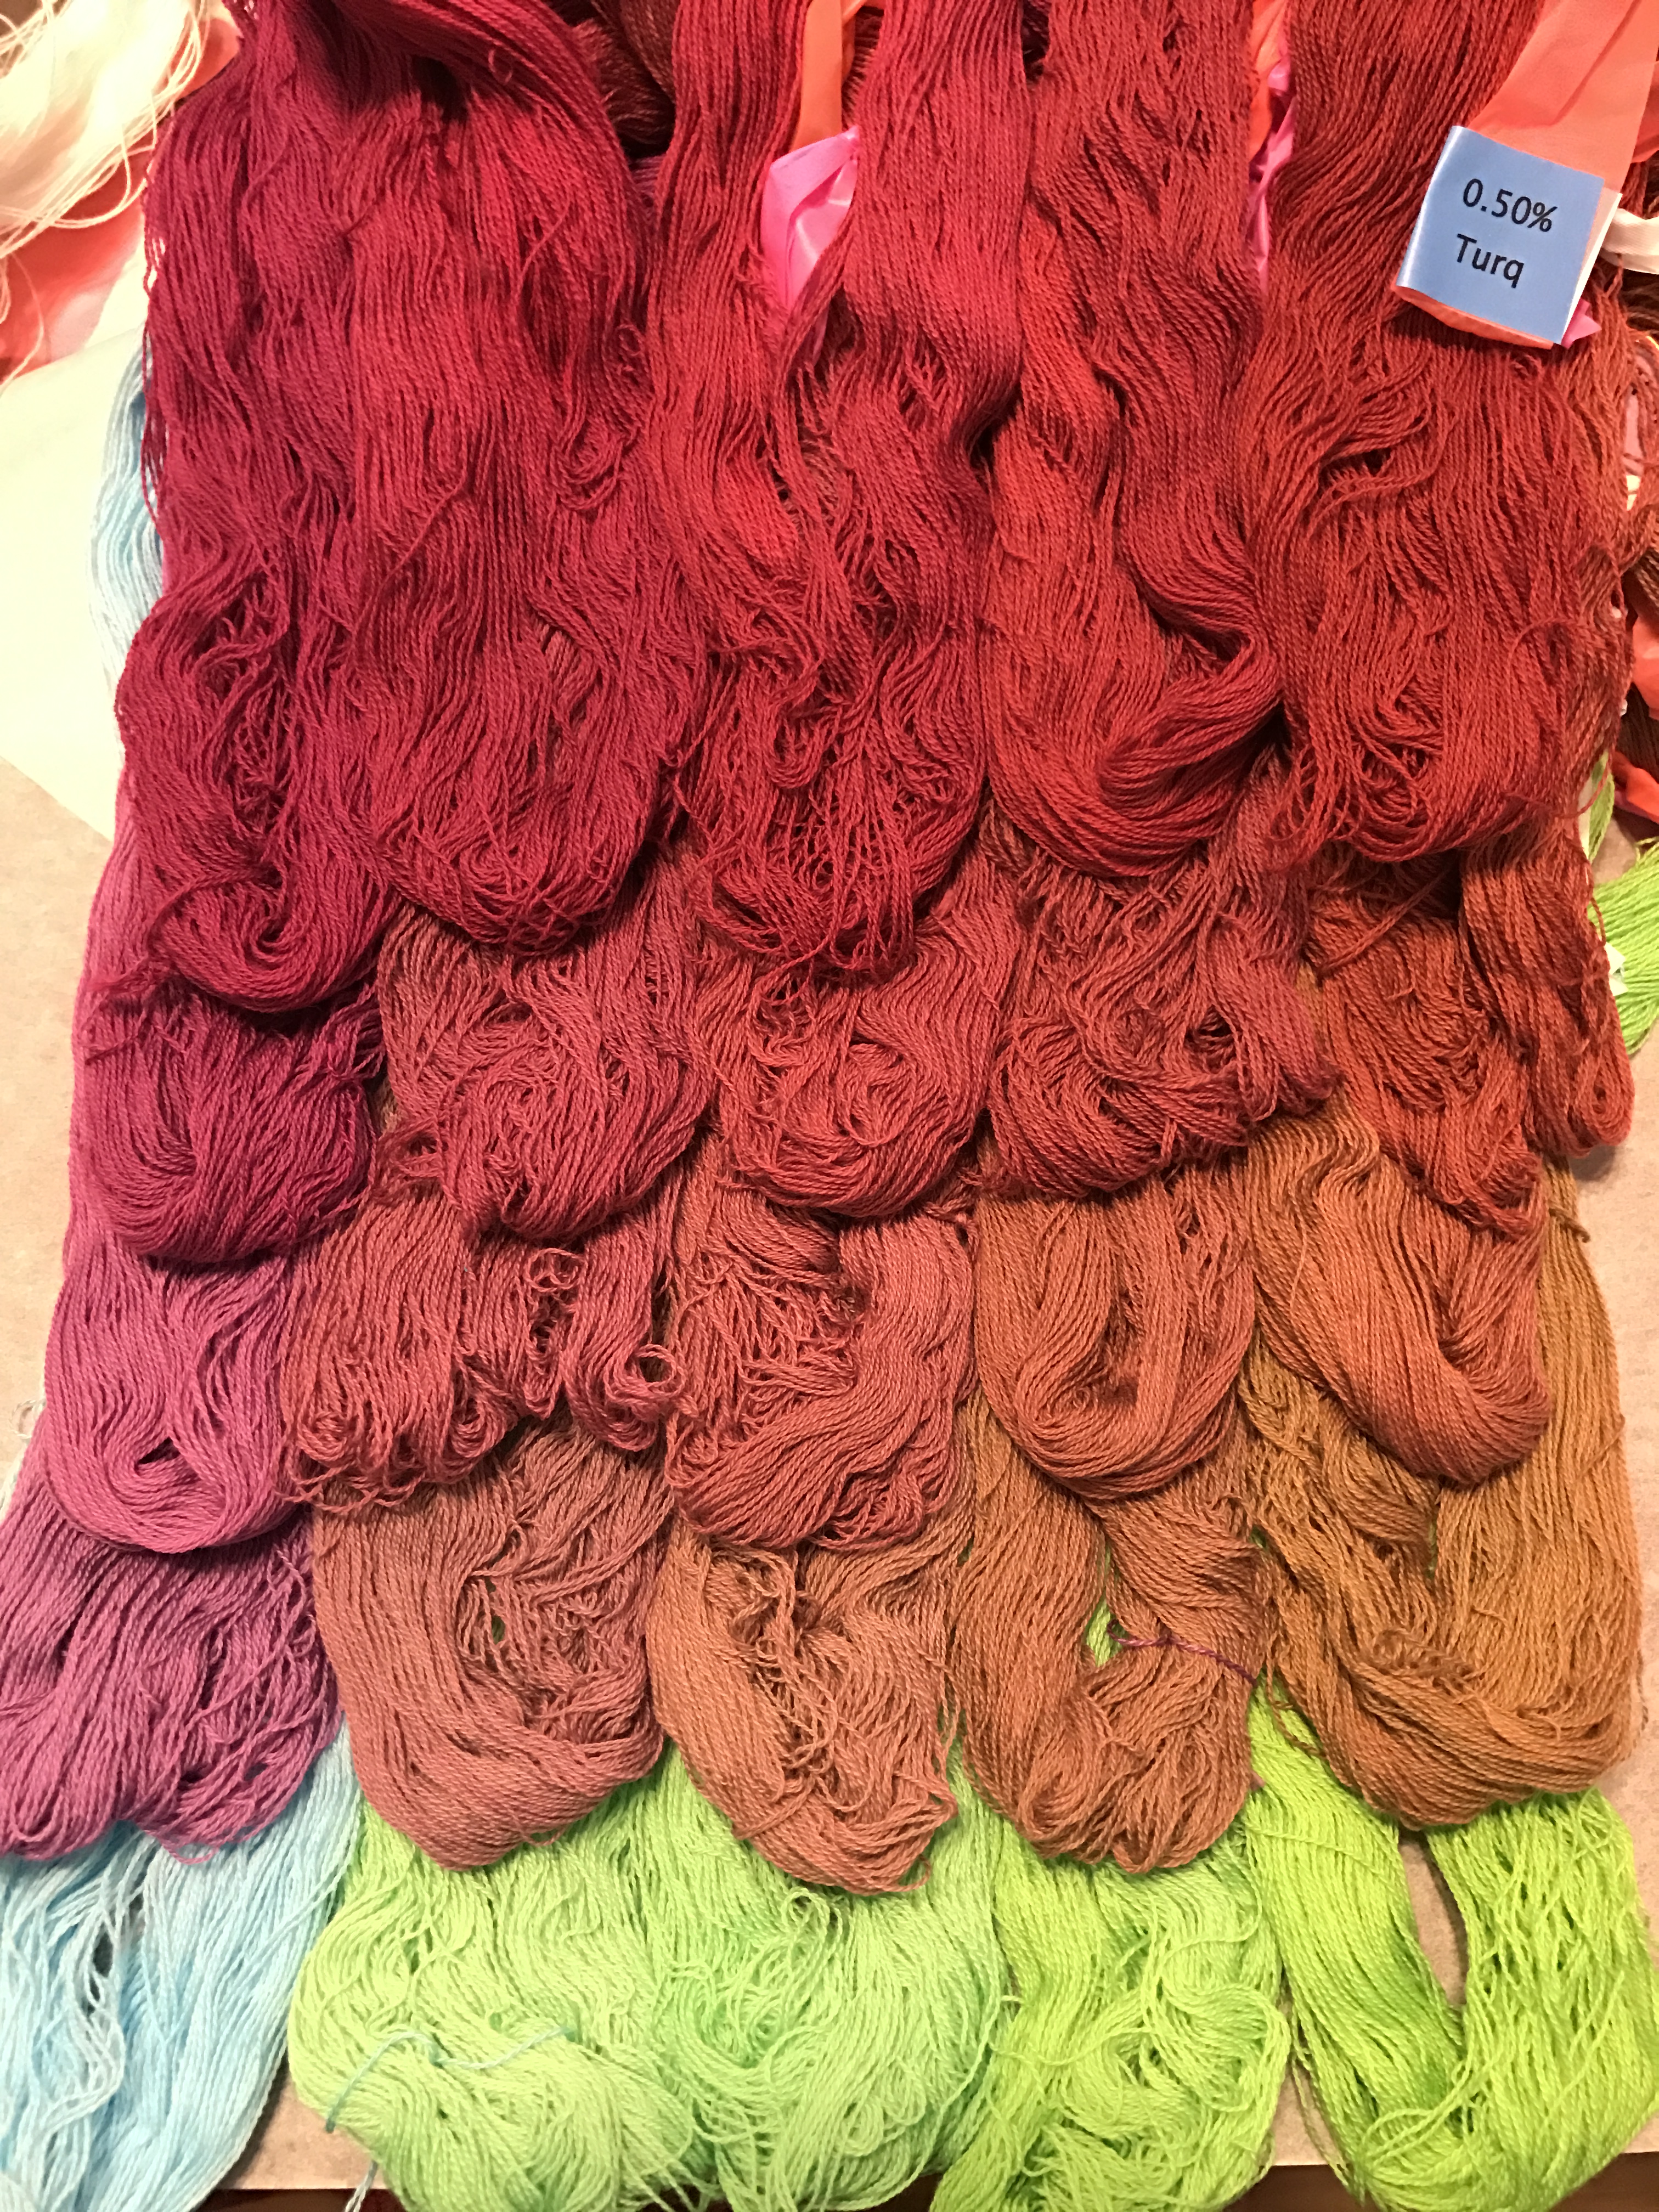
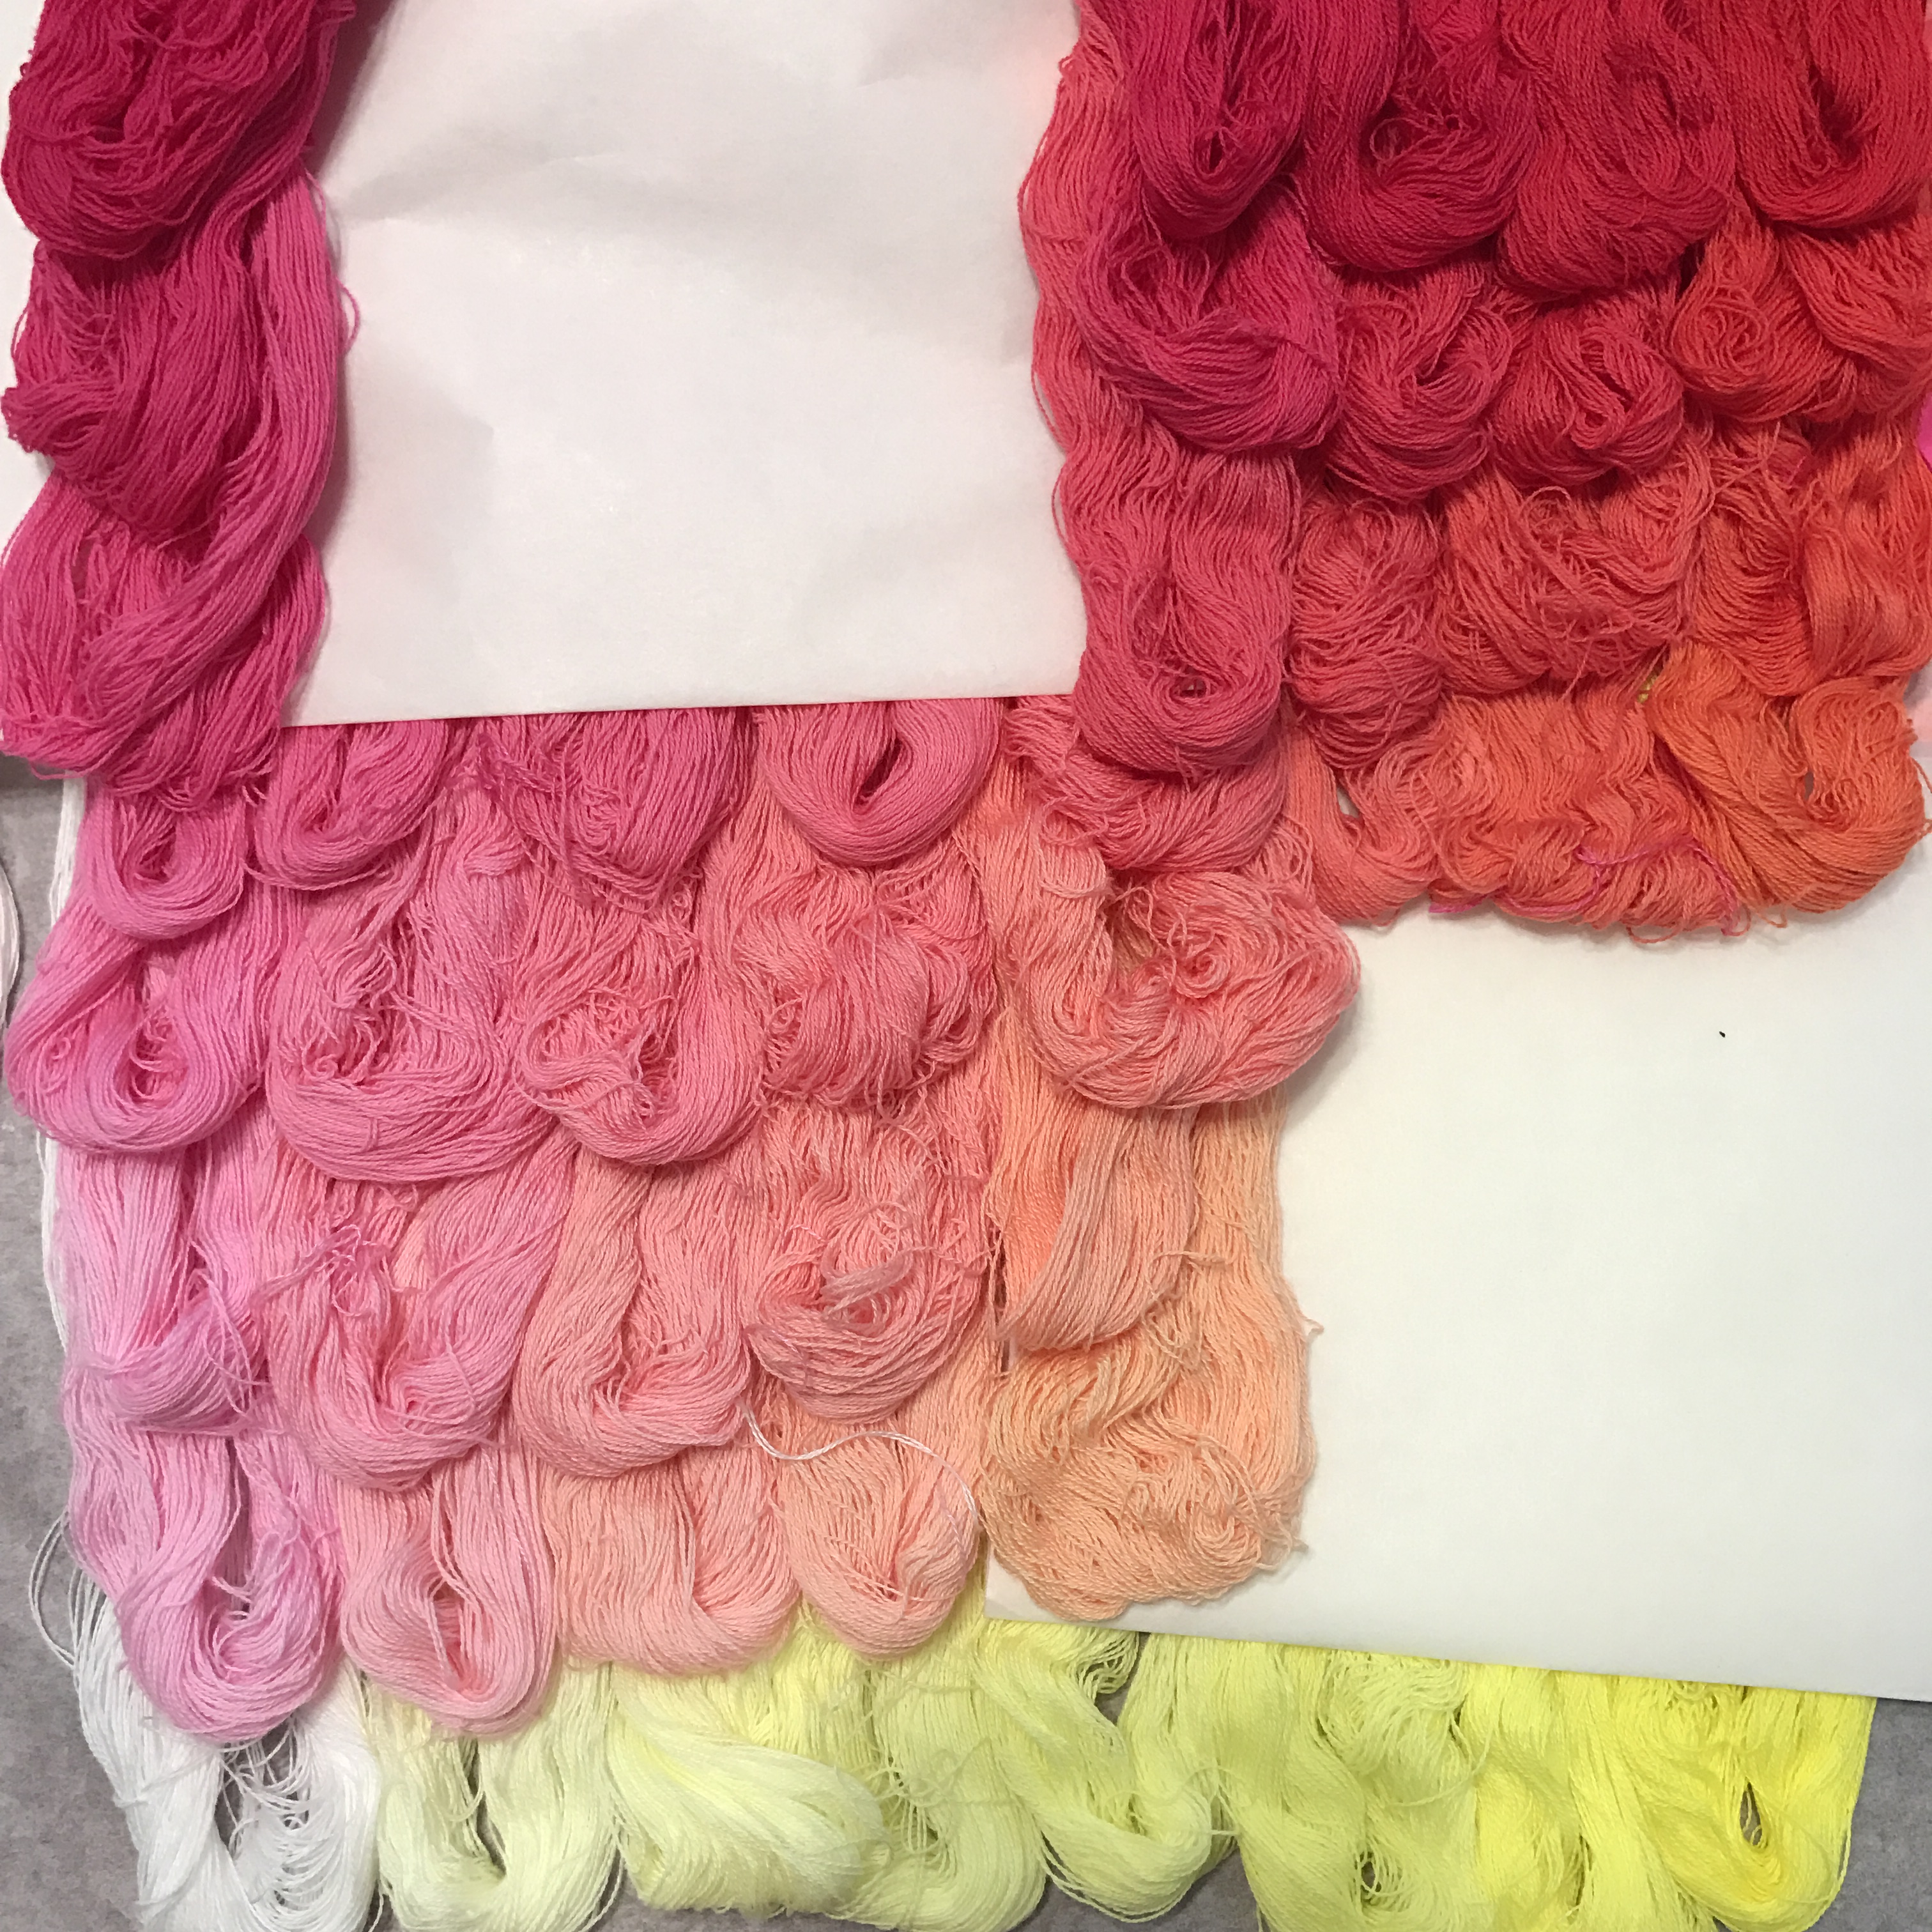
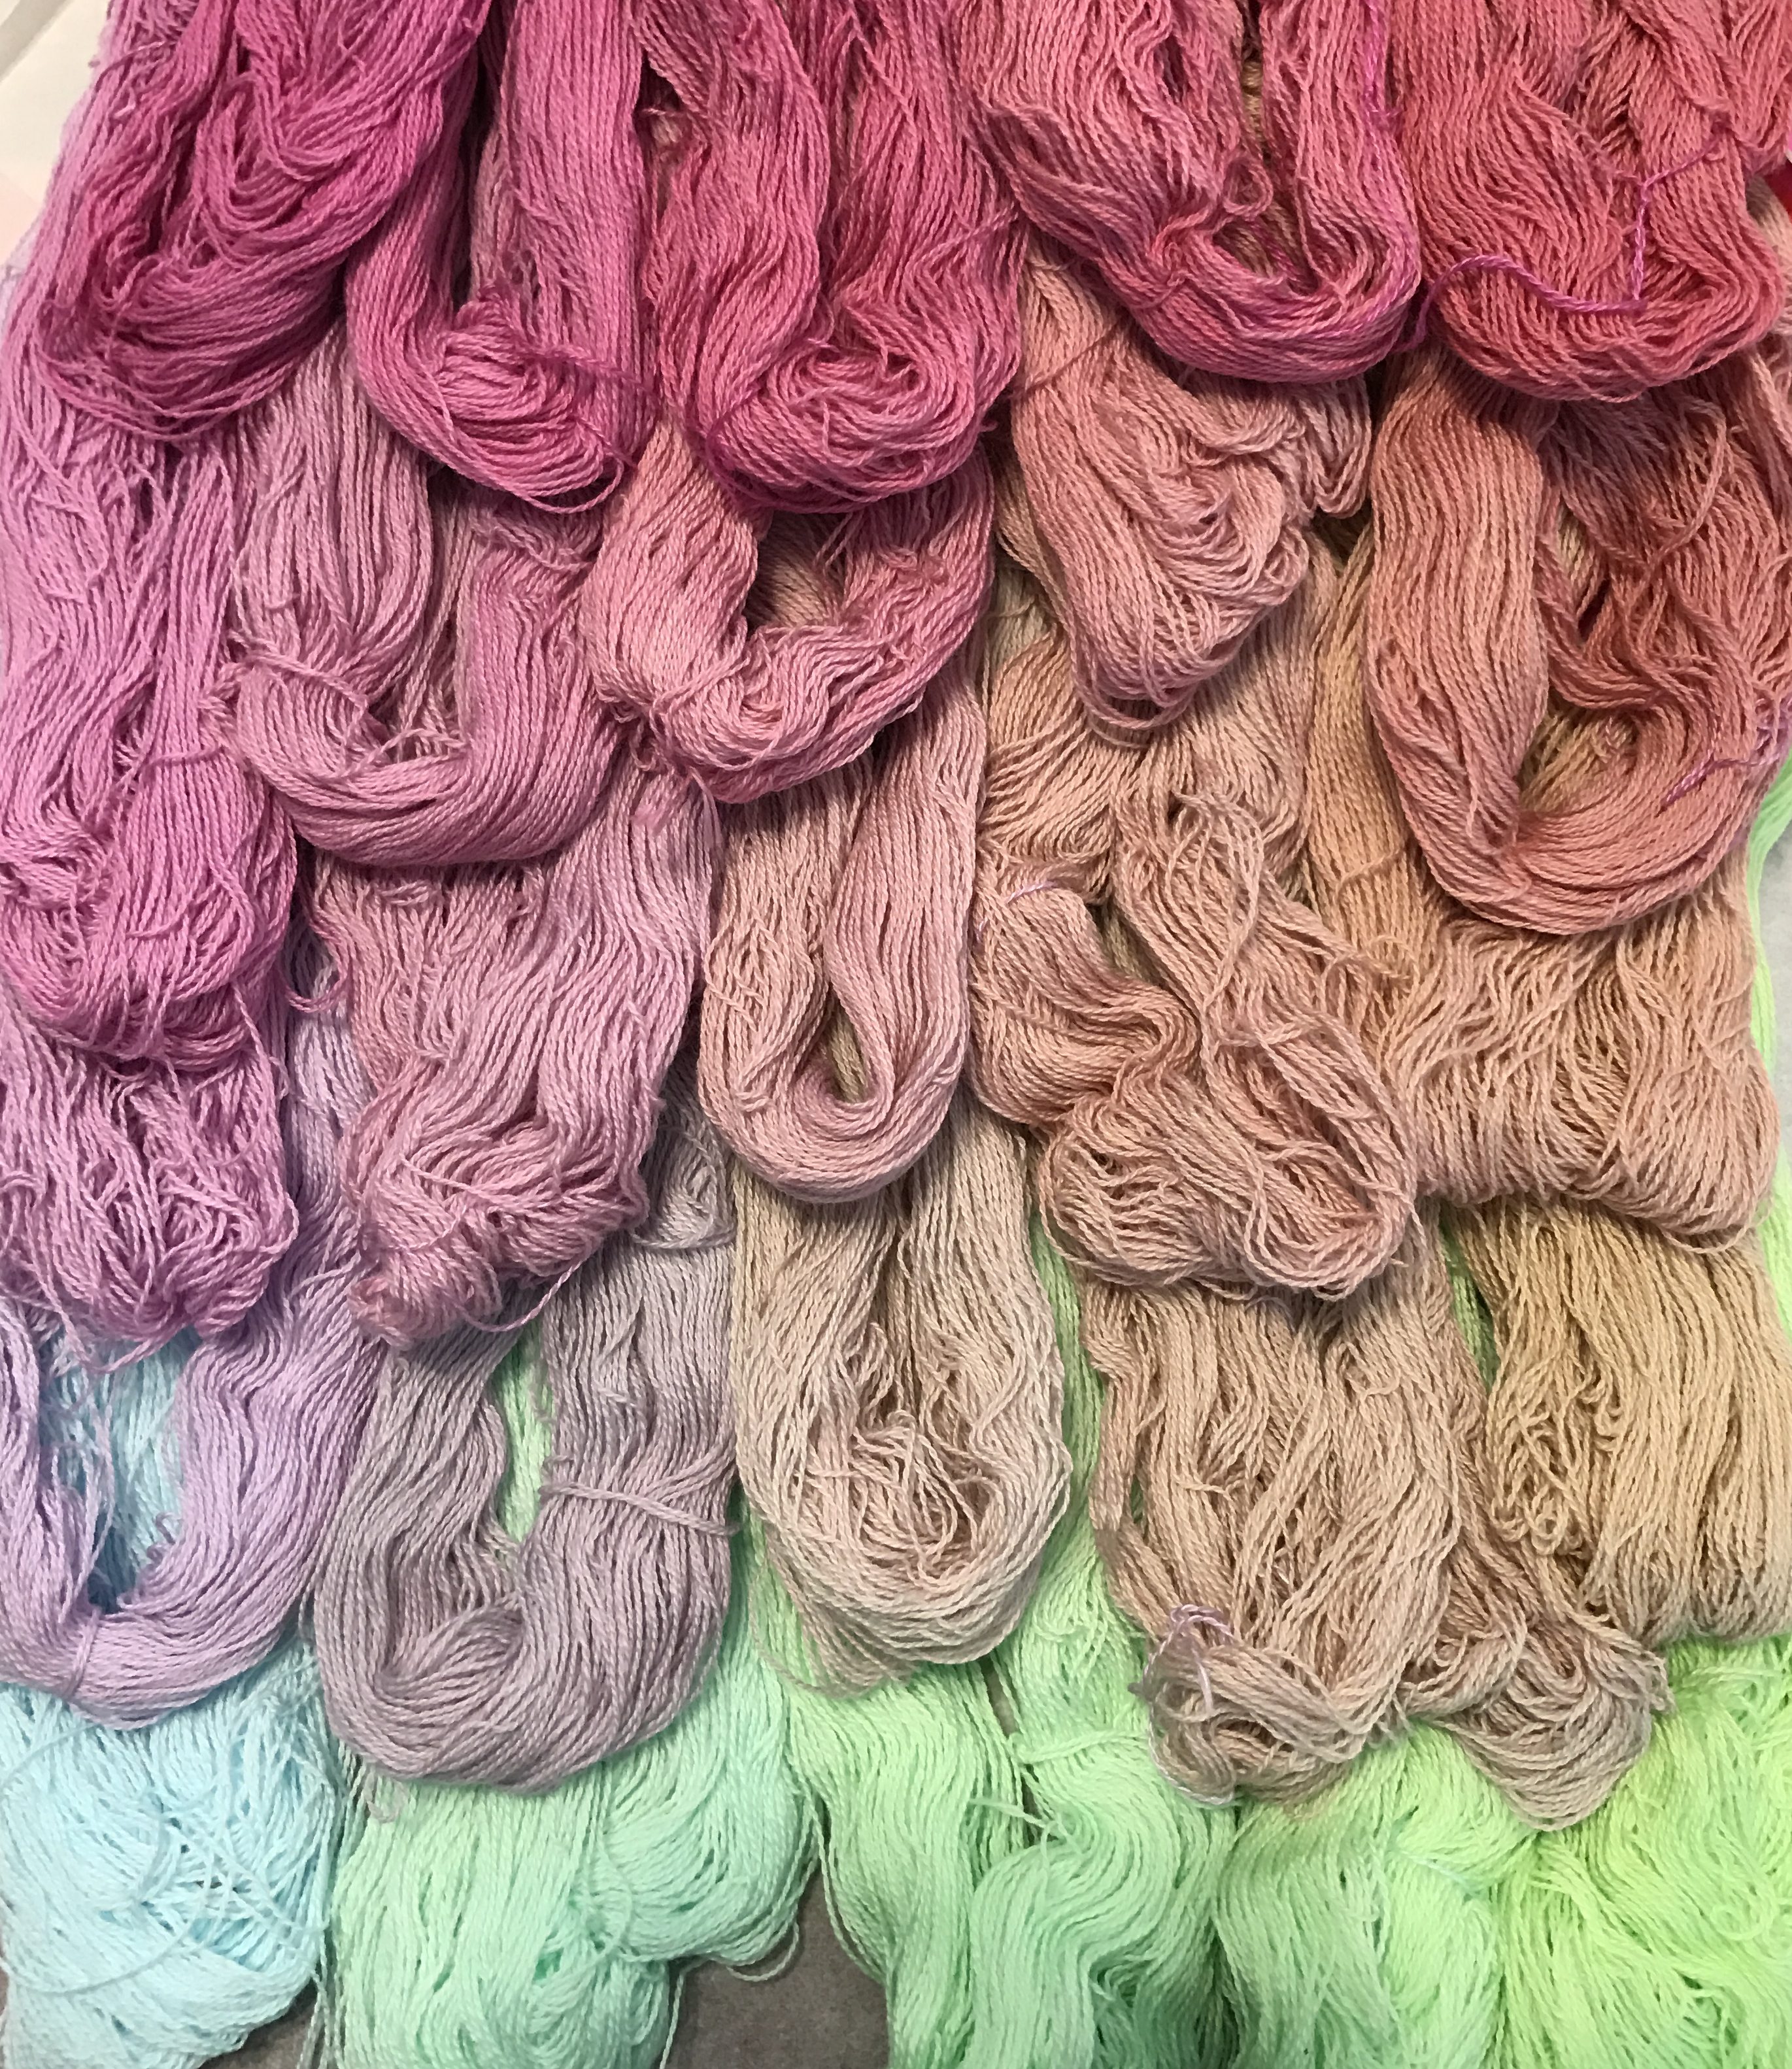
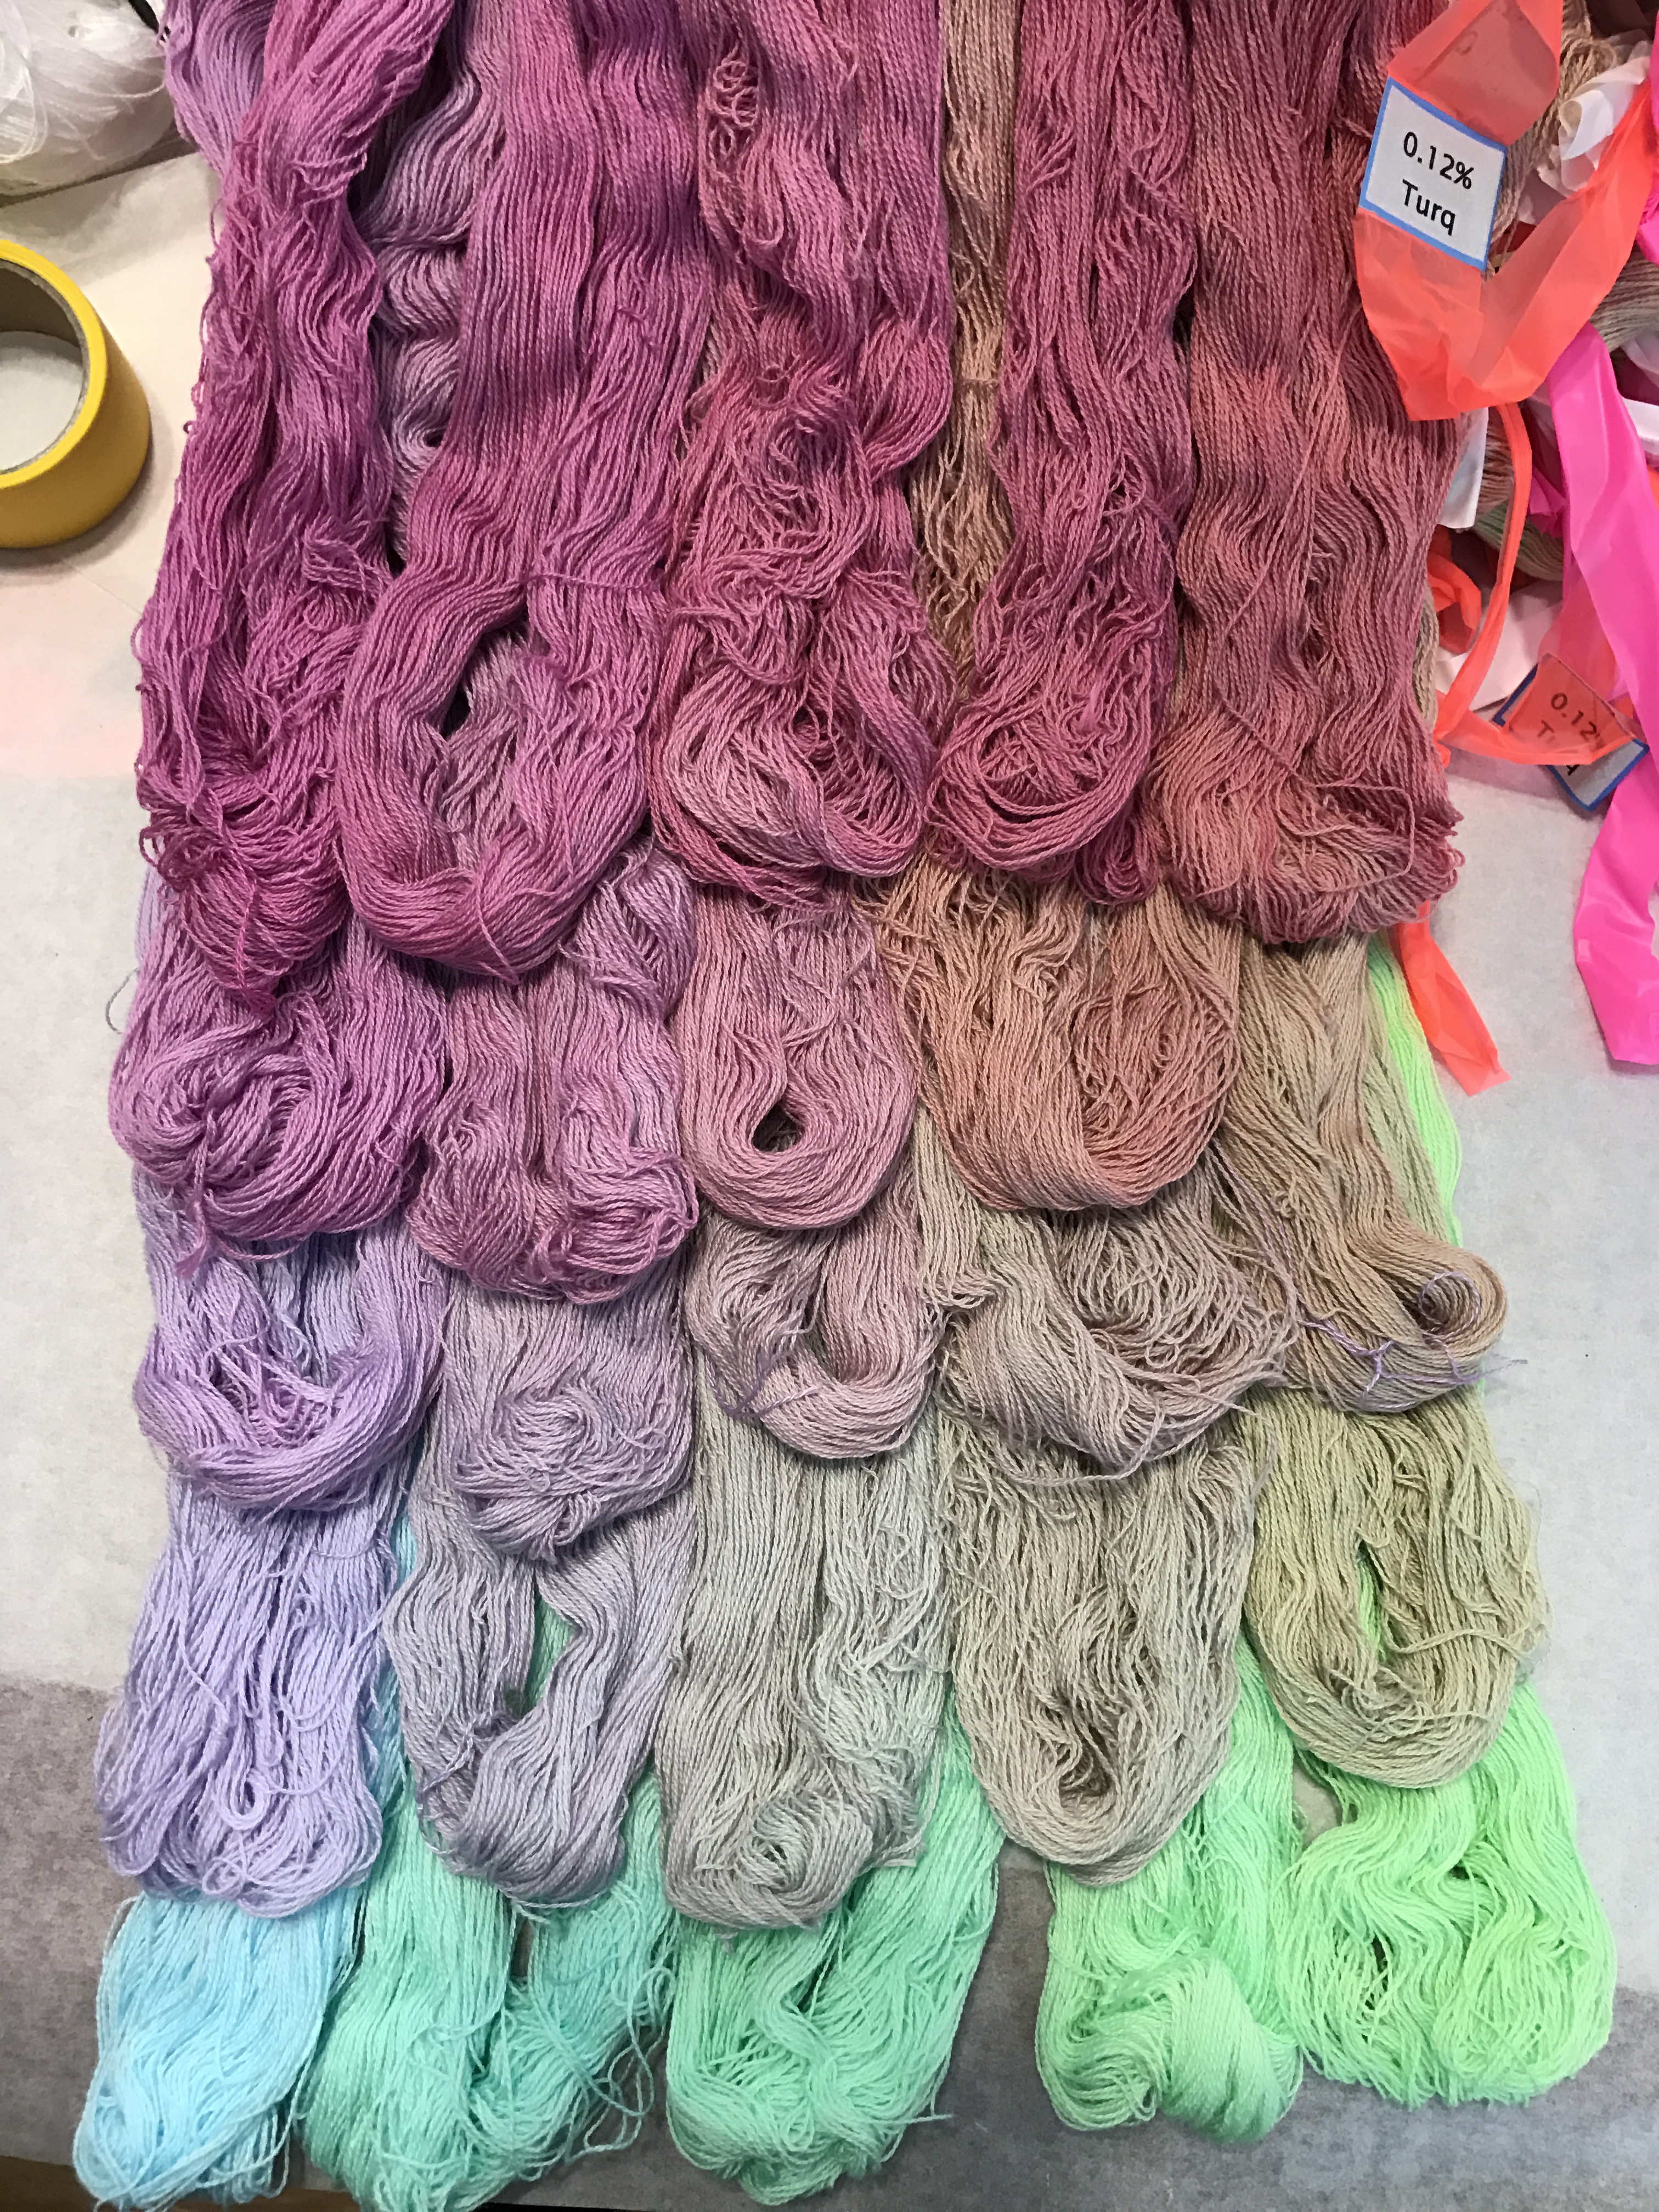
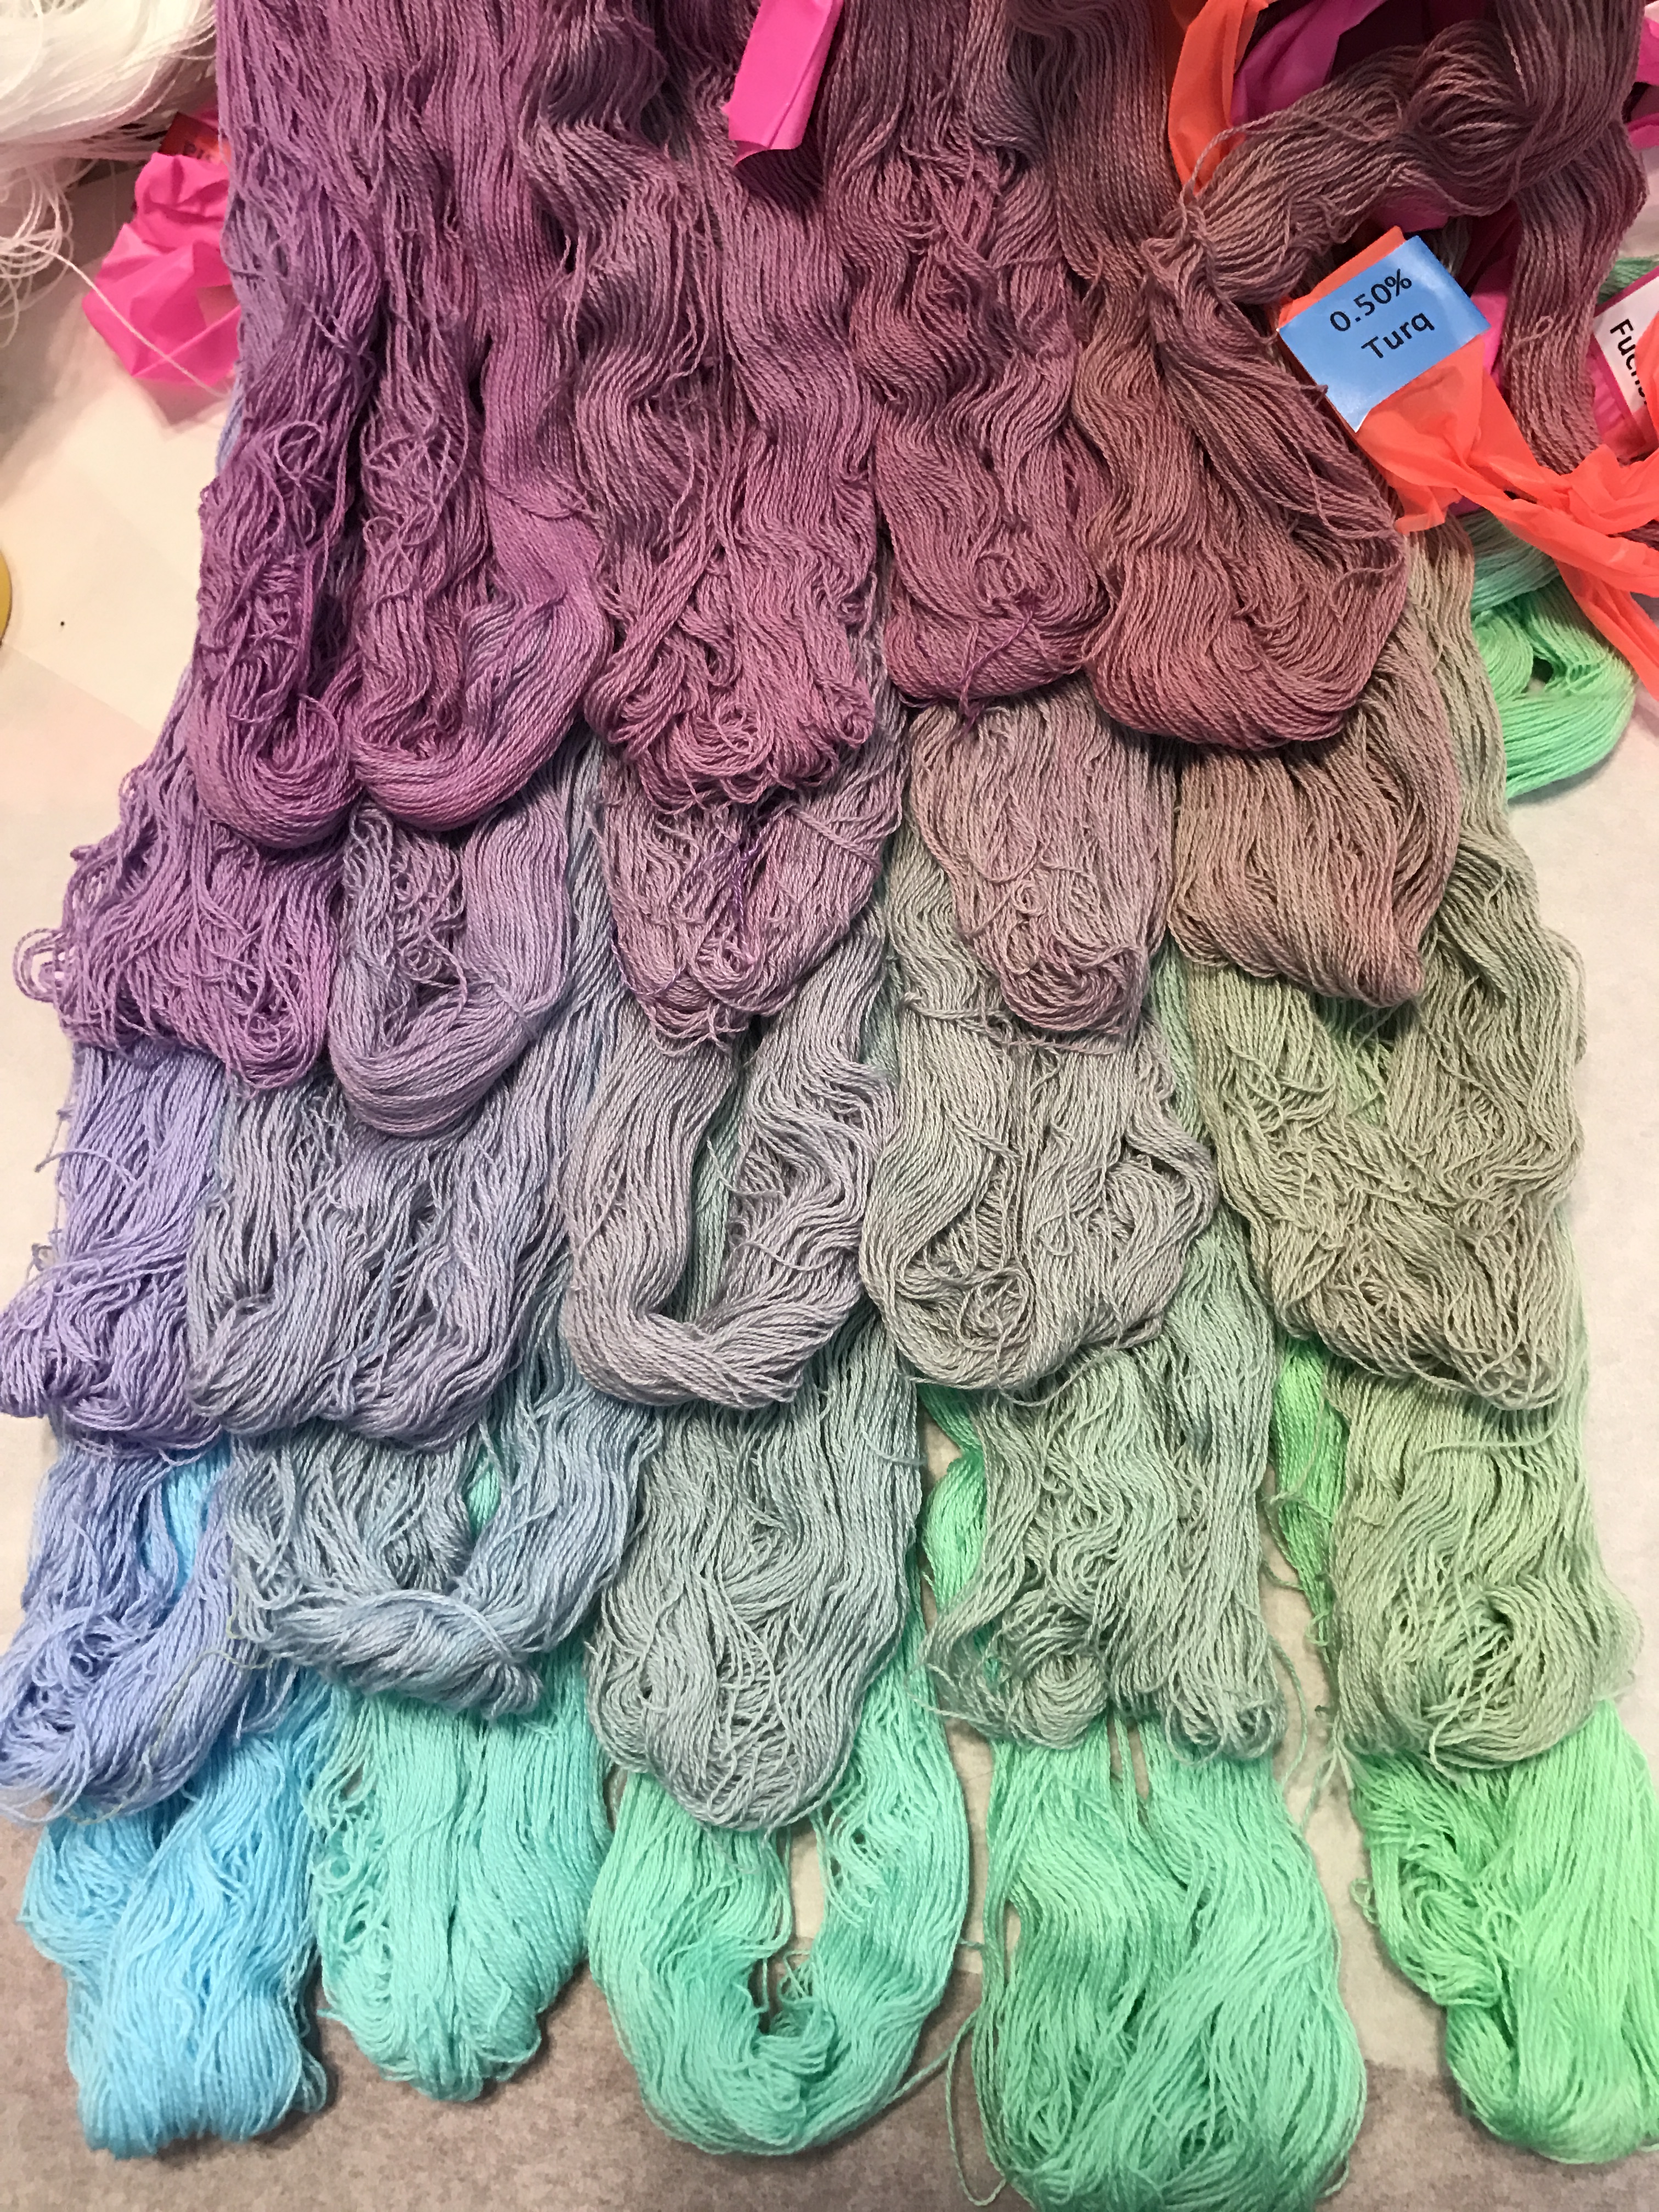
Here’s a composite photo showing some of my attempts. Unbelievably, all these photos are of the same two sample cards – just with different apps, color correction, and lighting. (They are all shot with my iPhone 7, but that wasn’t the problem – I tested it against the camera of a semipro photographer friend, and – surprisingly – the iPhone rendered pretty much the same colors as his much more expensive camera.)

various photography attempts

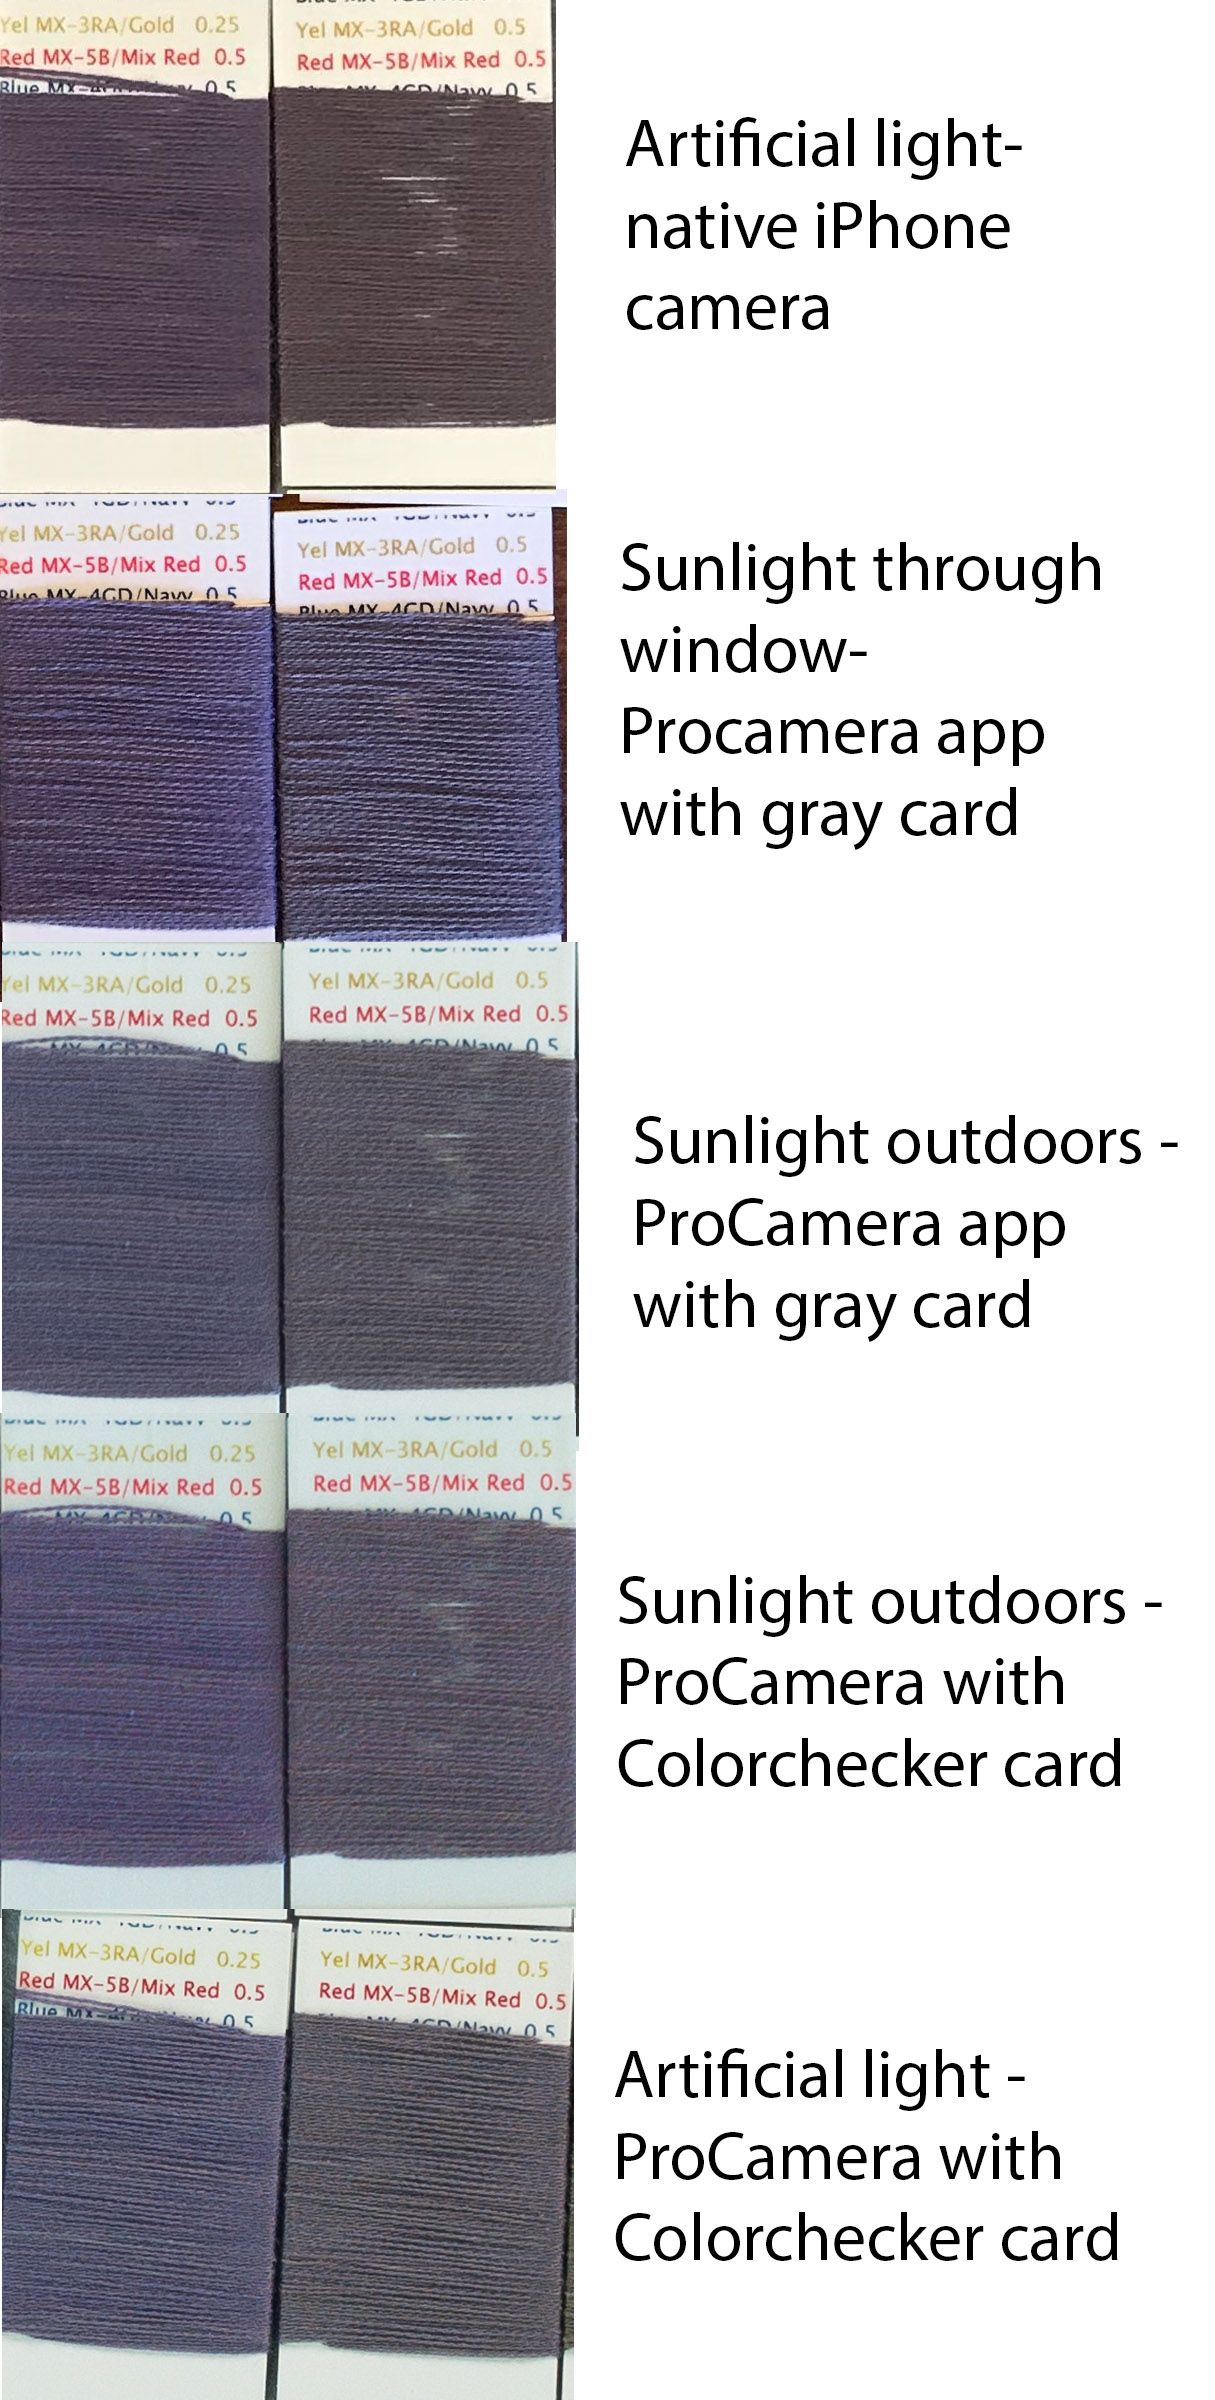
As you can see, the colors are similar, but not the same. And when I tell you that none of these is exactly the same color as the real-life sample cards (even under the same lighting), you will begin to understand the depths of my existential despair.

Well, at least I can take some comfort in the knowledge that my inability to capture the colors accurately is largely irrelevant – unless your monitor has been calibrated using professional-grade equipment, the colors you are seeing won’t be accurate anyway. (Monitors are notorious for distorting colors.)

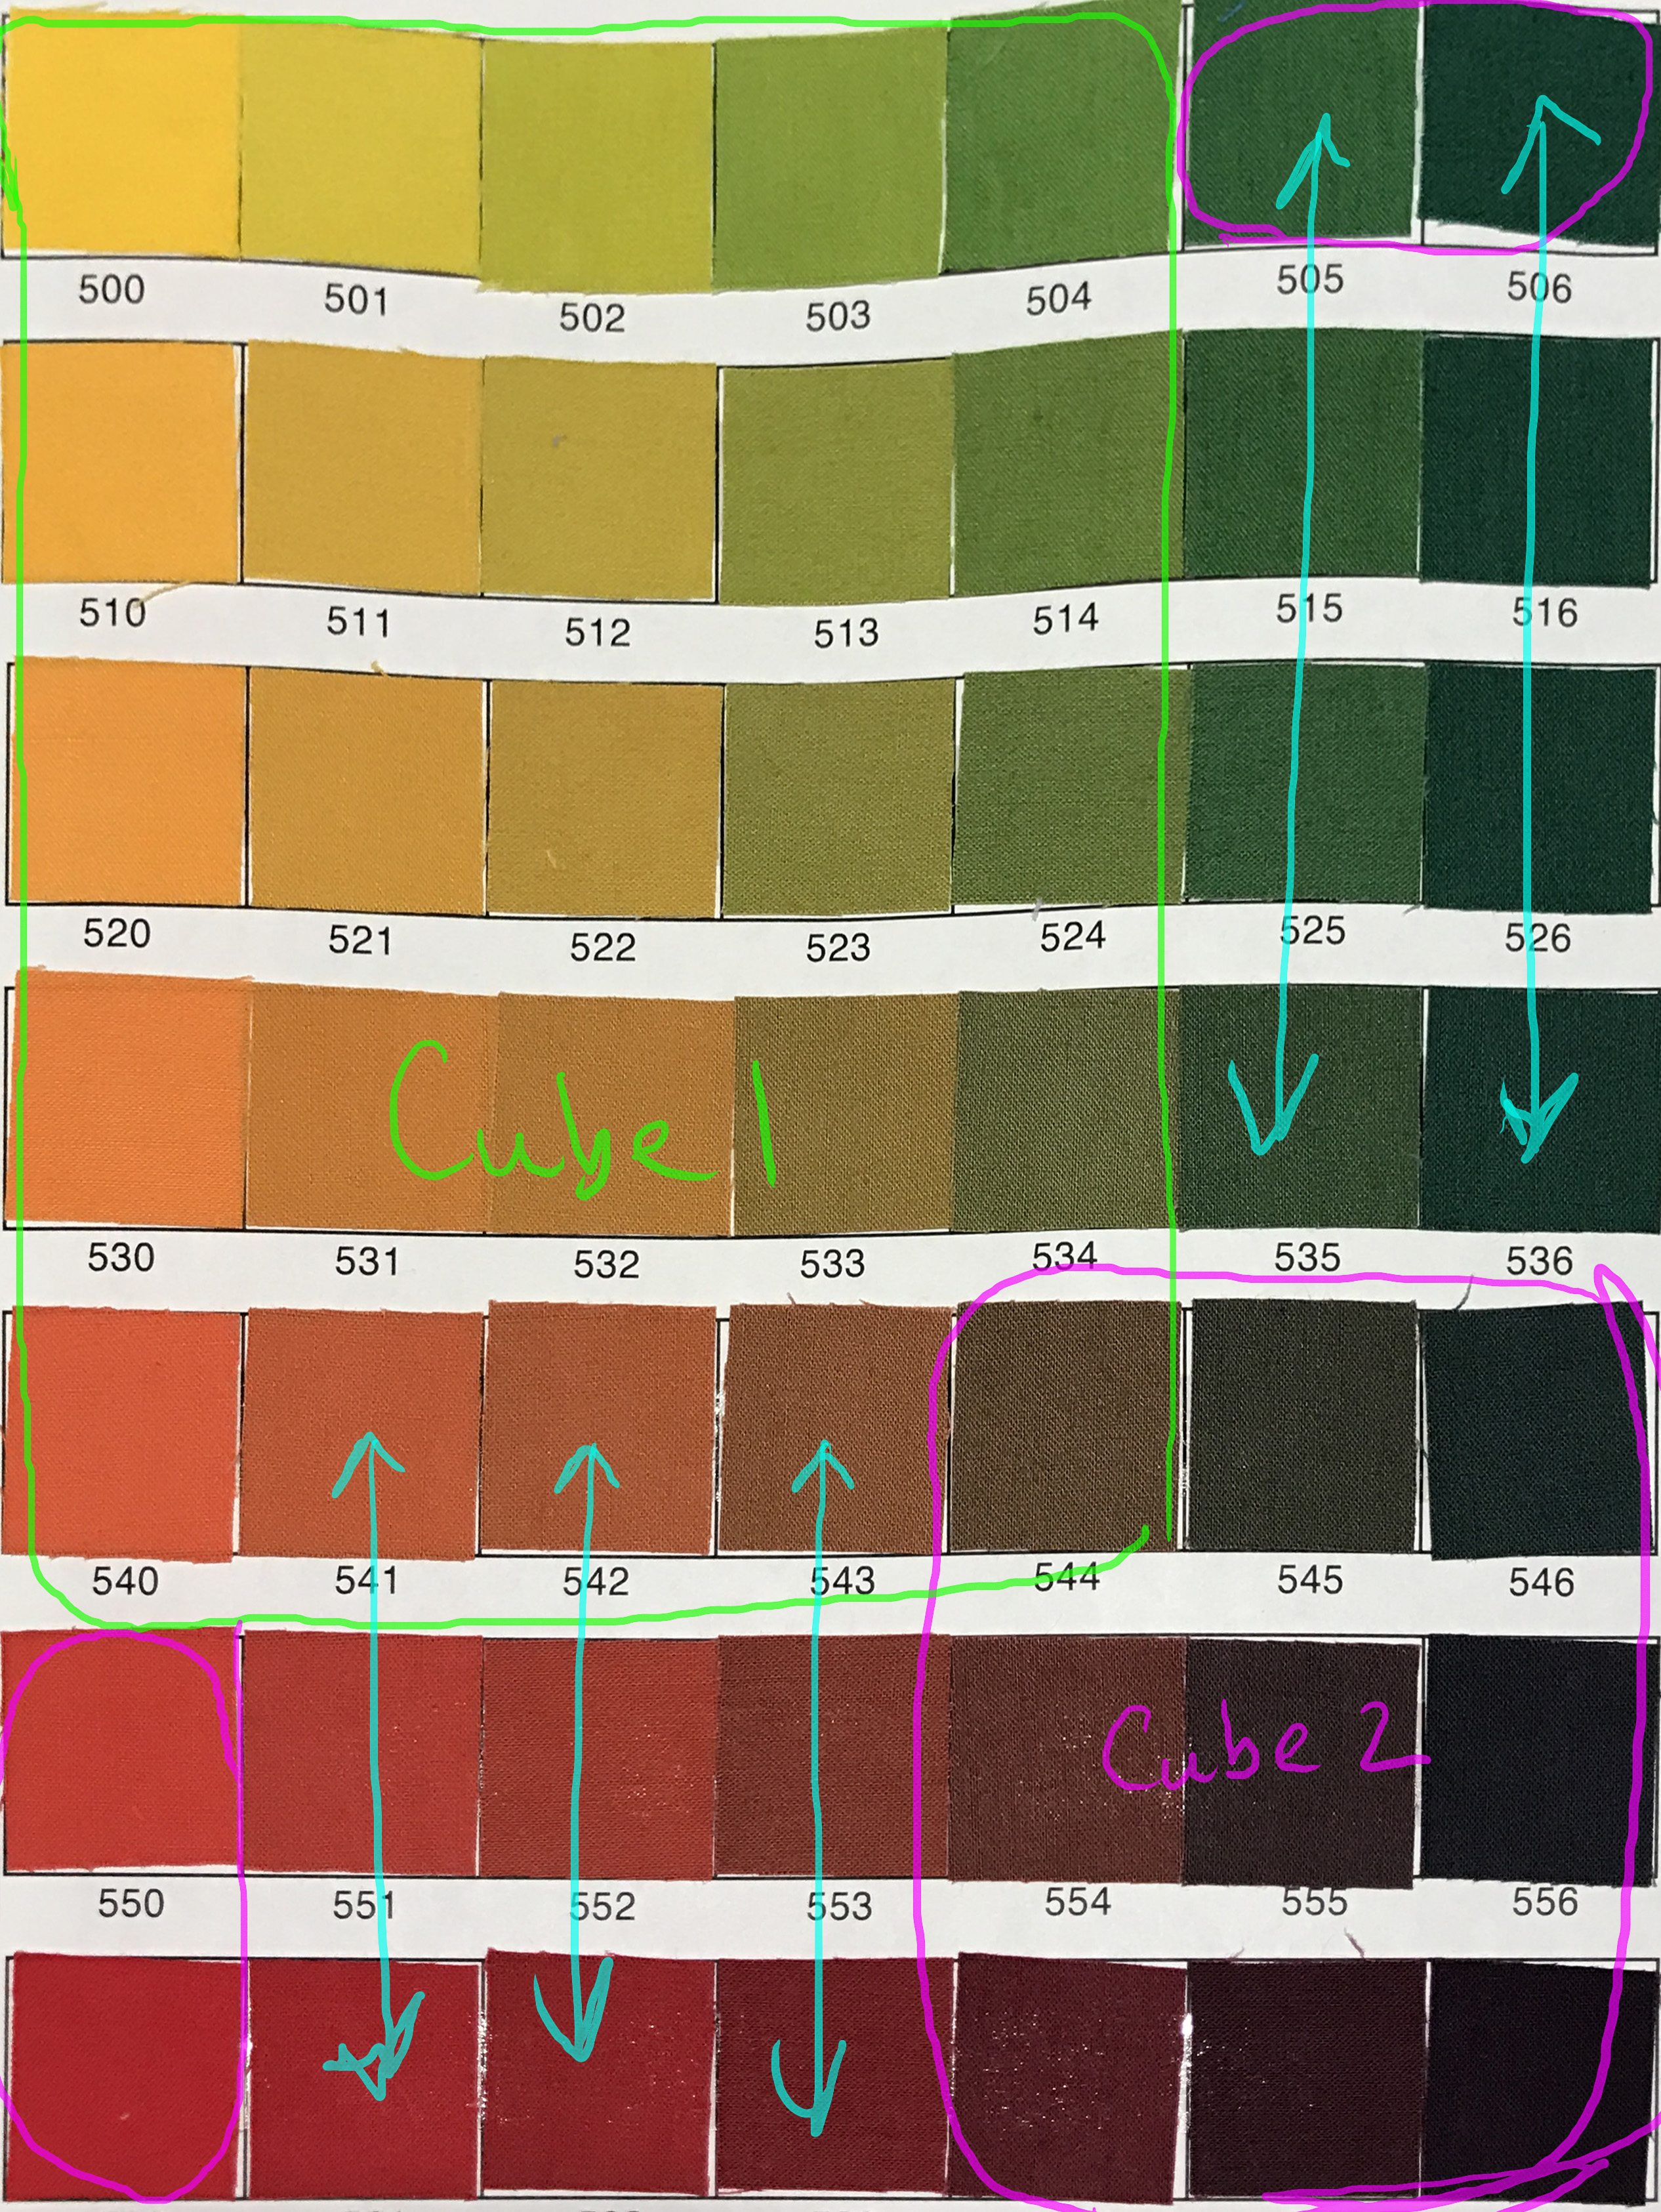
I’m still planning to photograph and post the samples on my website, though. Even with shifted colors there’s a lot of information in the samples that will be helpful to other dyers. I hope to post the samples I have within the next month or two.

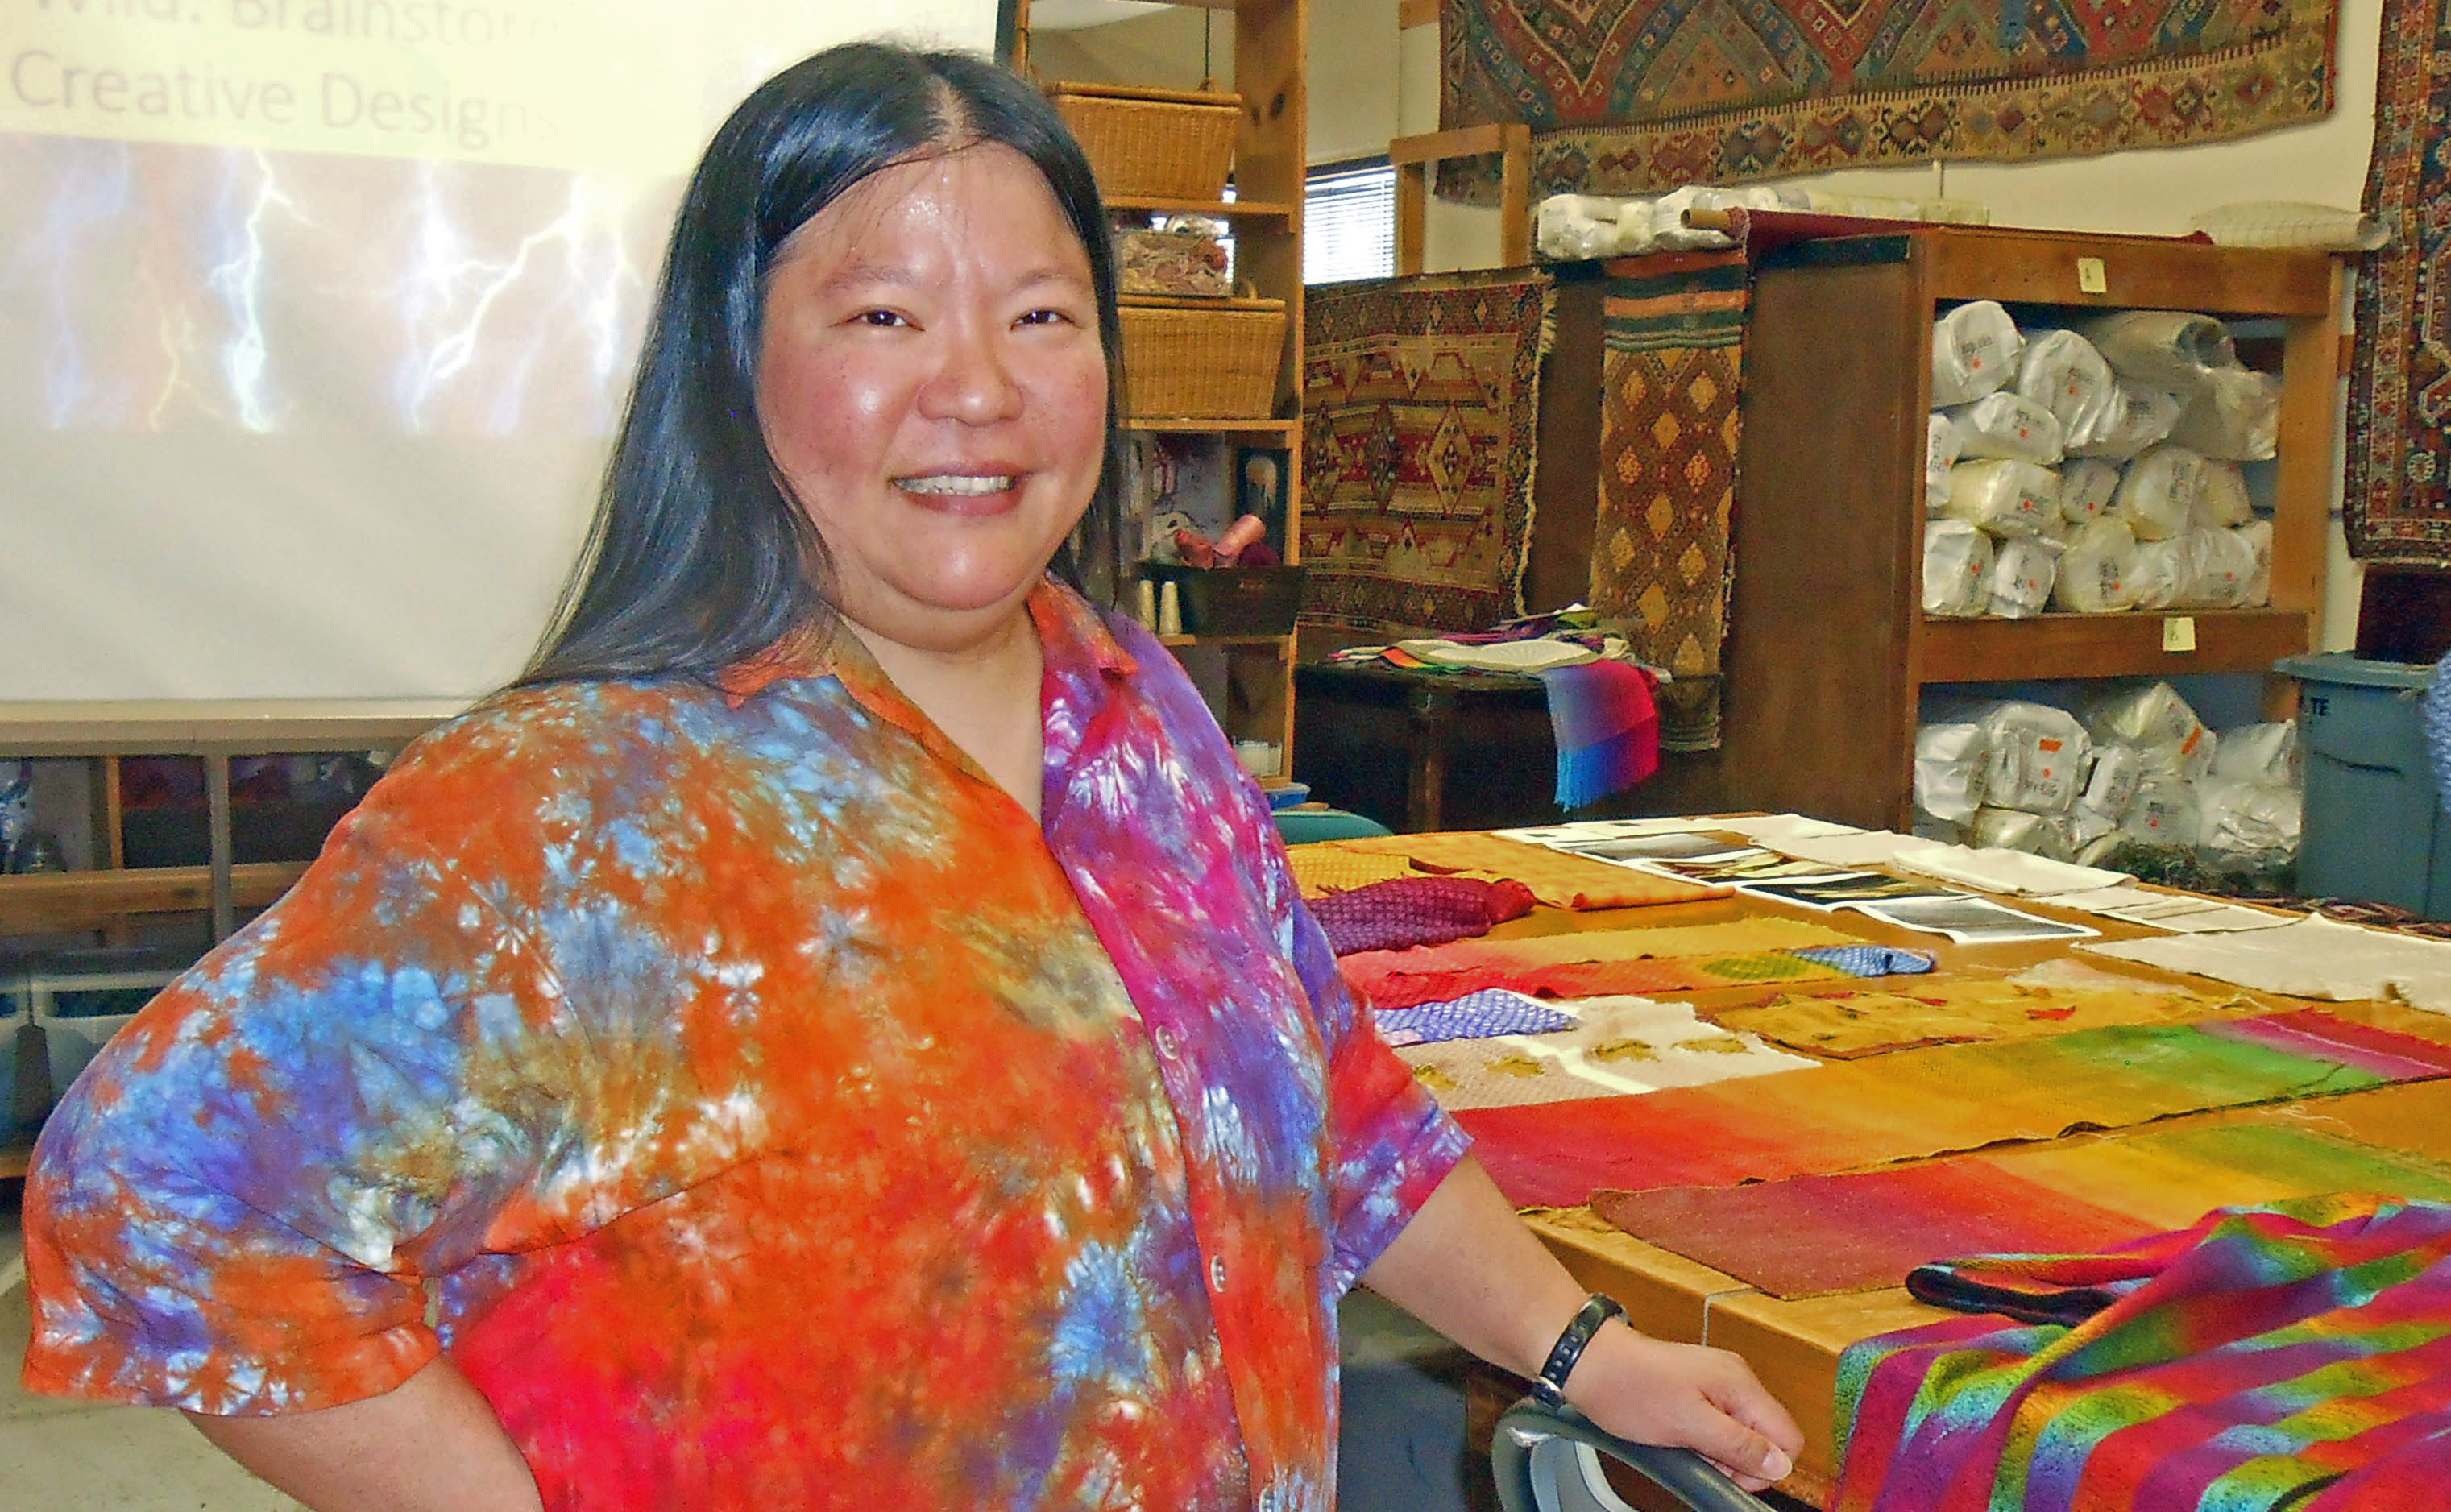
After returning from our 10-day holiday trip, I had 36 hours at home before flying out again to San Diego to give a program and a workshop for the San Diego Weavers Guild. Here’s a photo of me giving my talk about brainstorming:

Tien talking at the San Diego Weavers Guild

This was one of my last in-person workshops. I’ve decided that it makes more sense for me to focus on developing my online classes, so I’m no longer booking any in-person teaching. I will be giving one talk at Convergence (about critiquing your work) and will be teaching at ANWG 2019, but that’s basically it.

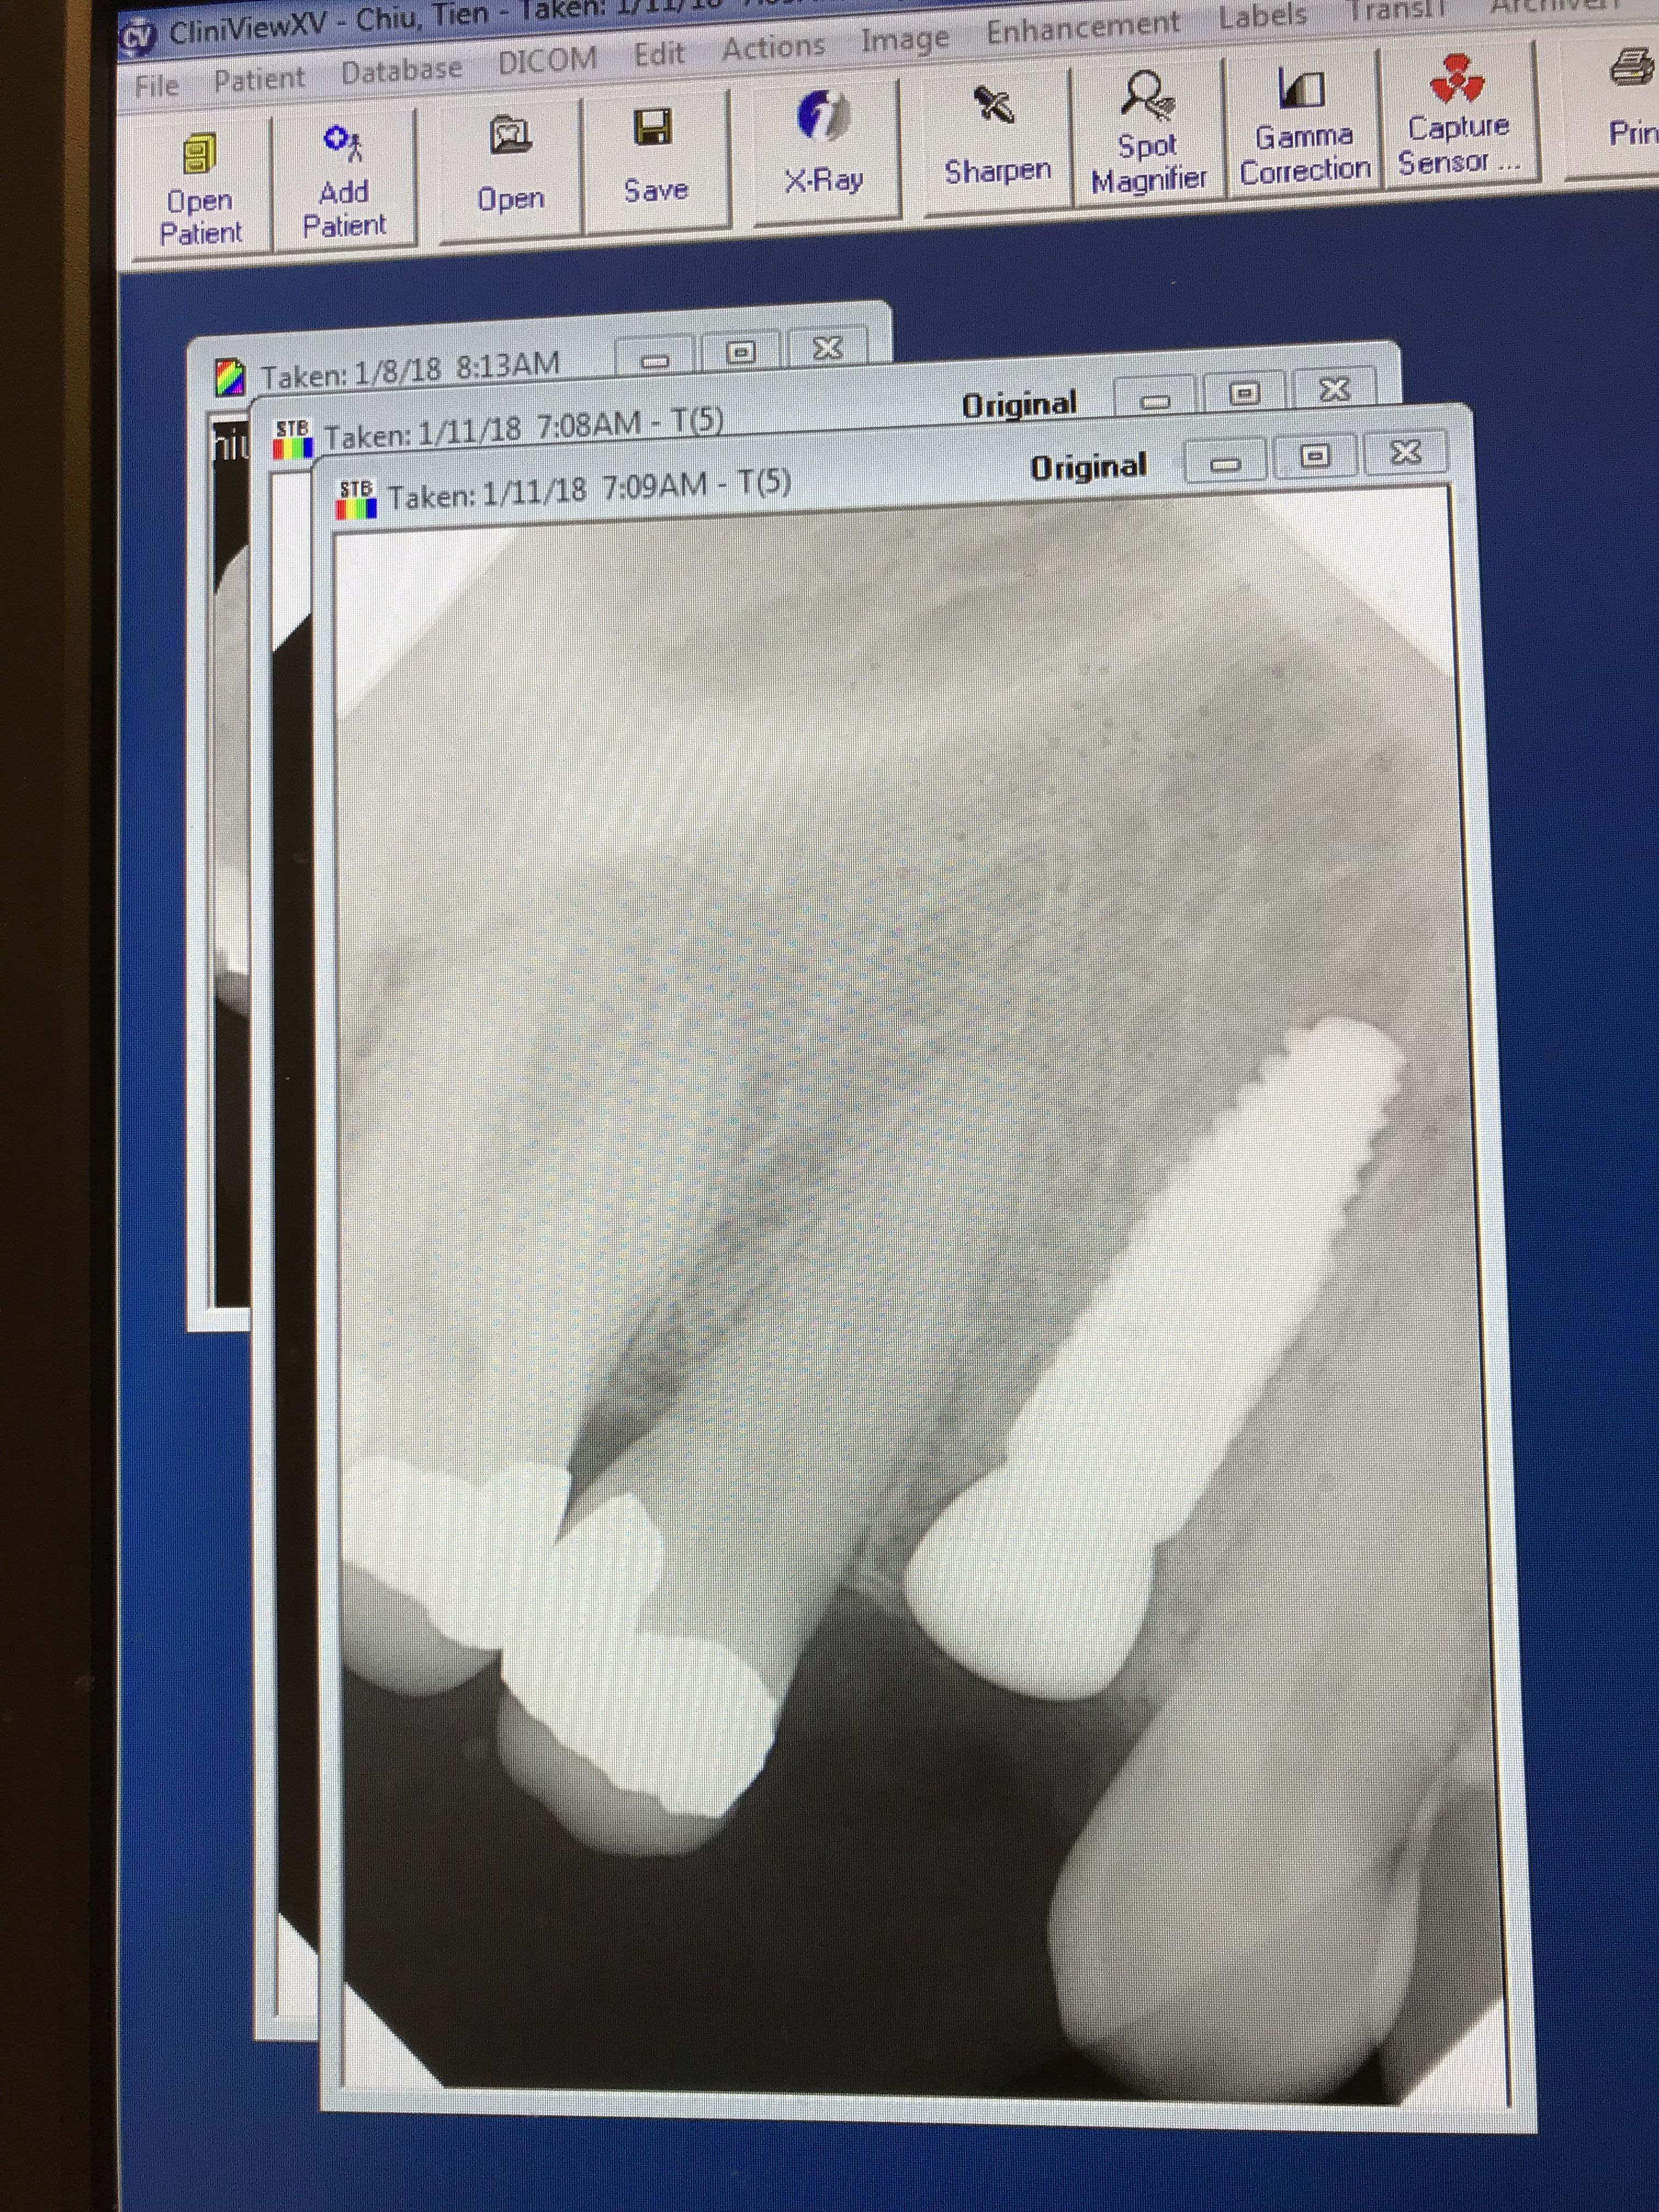
I had planned to stay in San Diego for a few extra days to visit some friends, but felt like I was coming down sick, so I decided to cut my trip short and fly home on Monday. This turned out to be an excellent decision, because I broke a tooth Monday morning at breakfast. Being an overachiever, I didn’t just crack it a little – I split it clean in half, right down to the root. I grabbed the next flight home; Mike picked me up at the airport and ferried me straight to the dentist. Who was quite impressed by the swath of destruction:

an impressively broken tooth

Since there was nothing left to save, the next step (two days later) was a hot date with an oral surgeon, which ended like this:

dental implant
dental implant

Now I have a titanium peg in my jaw. In another four months or so, after the titanium implant has bonded to the bone, I’ll get a crown on the implant and will finally look normal again.

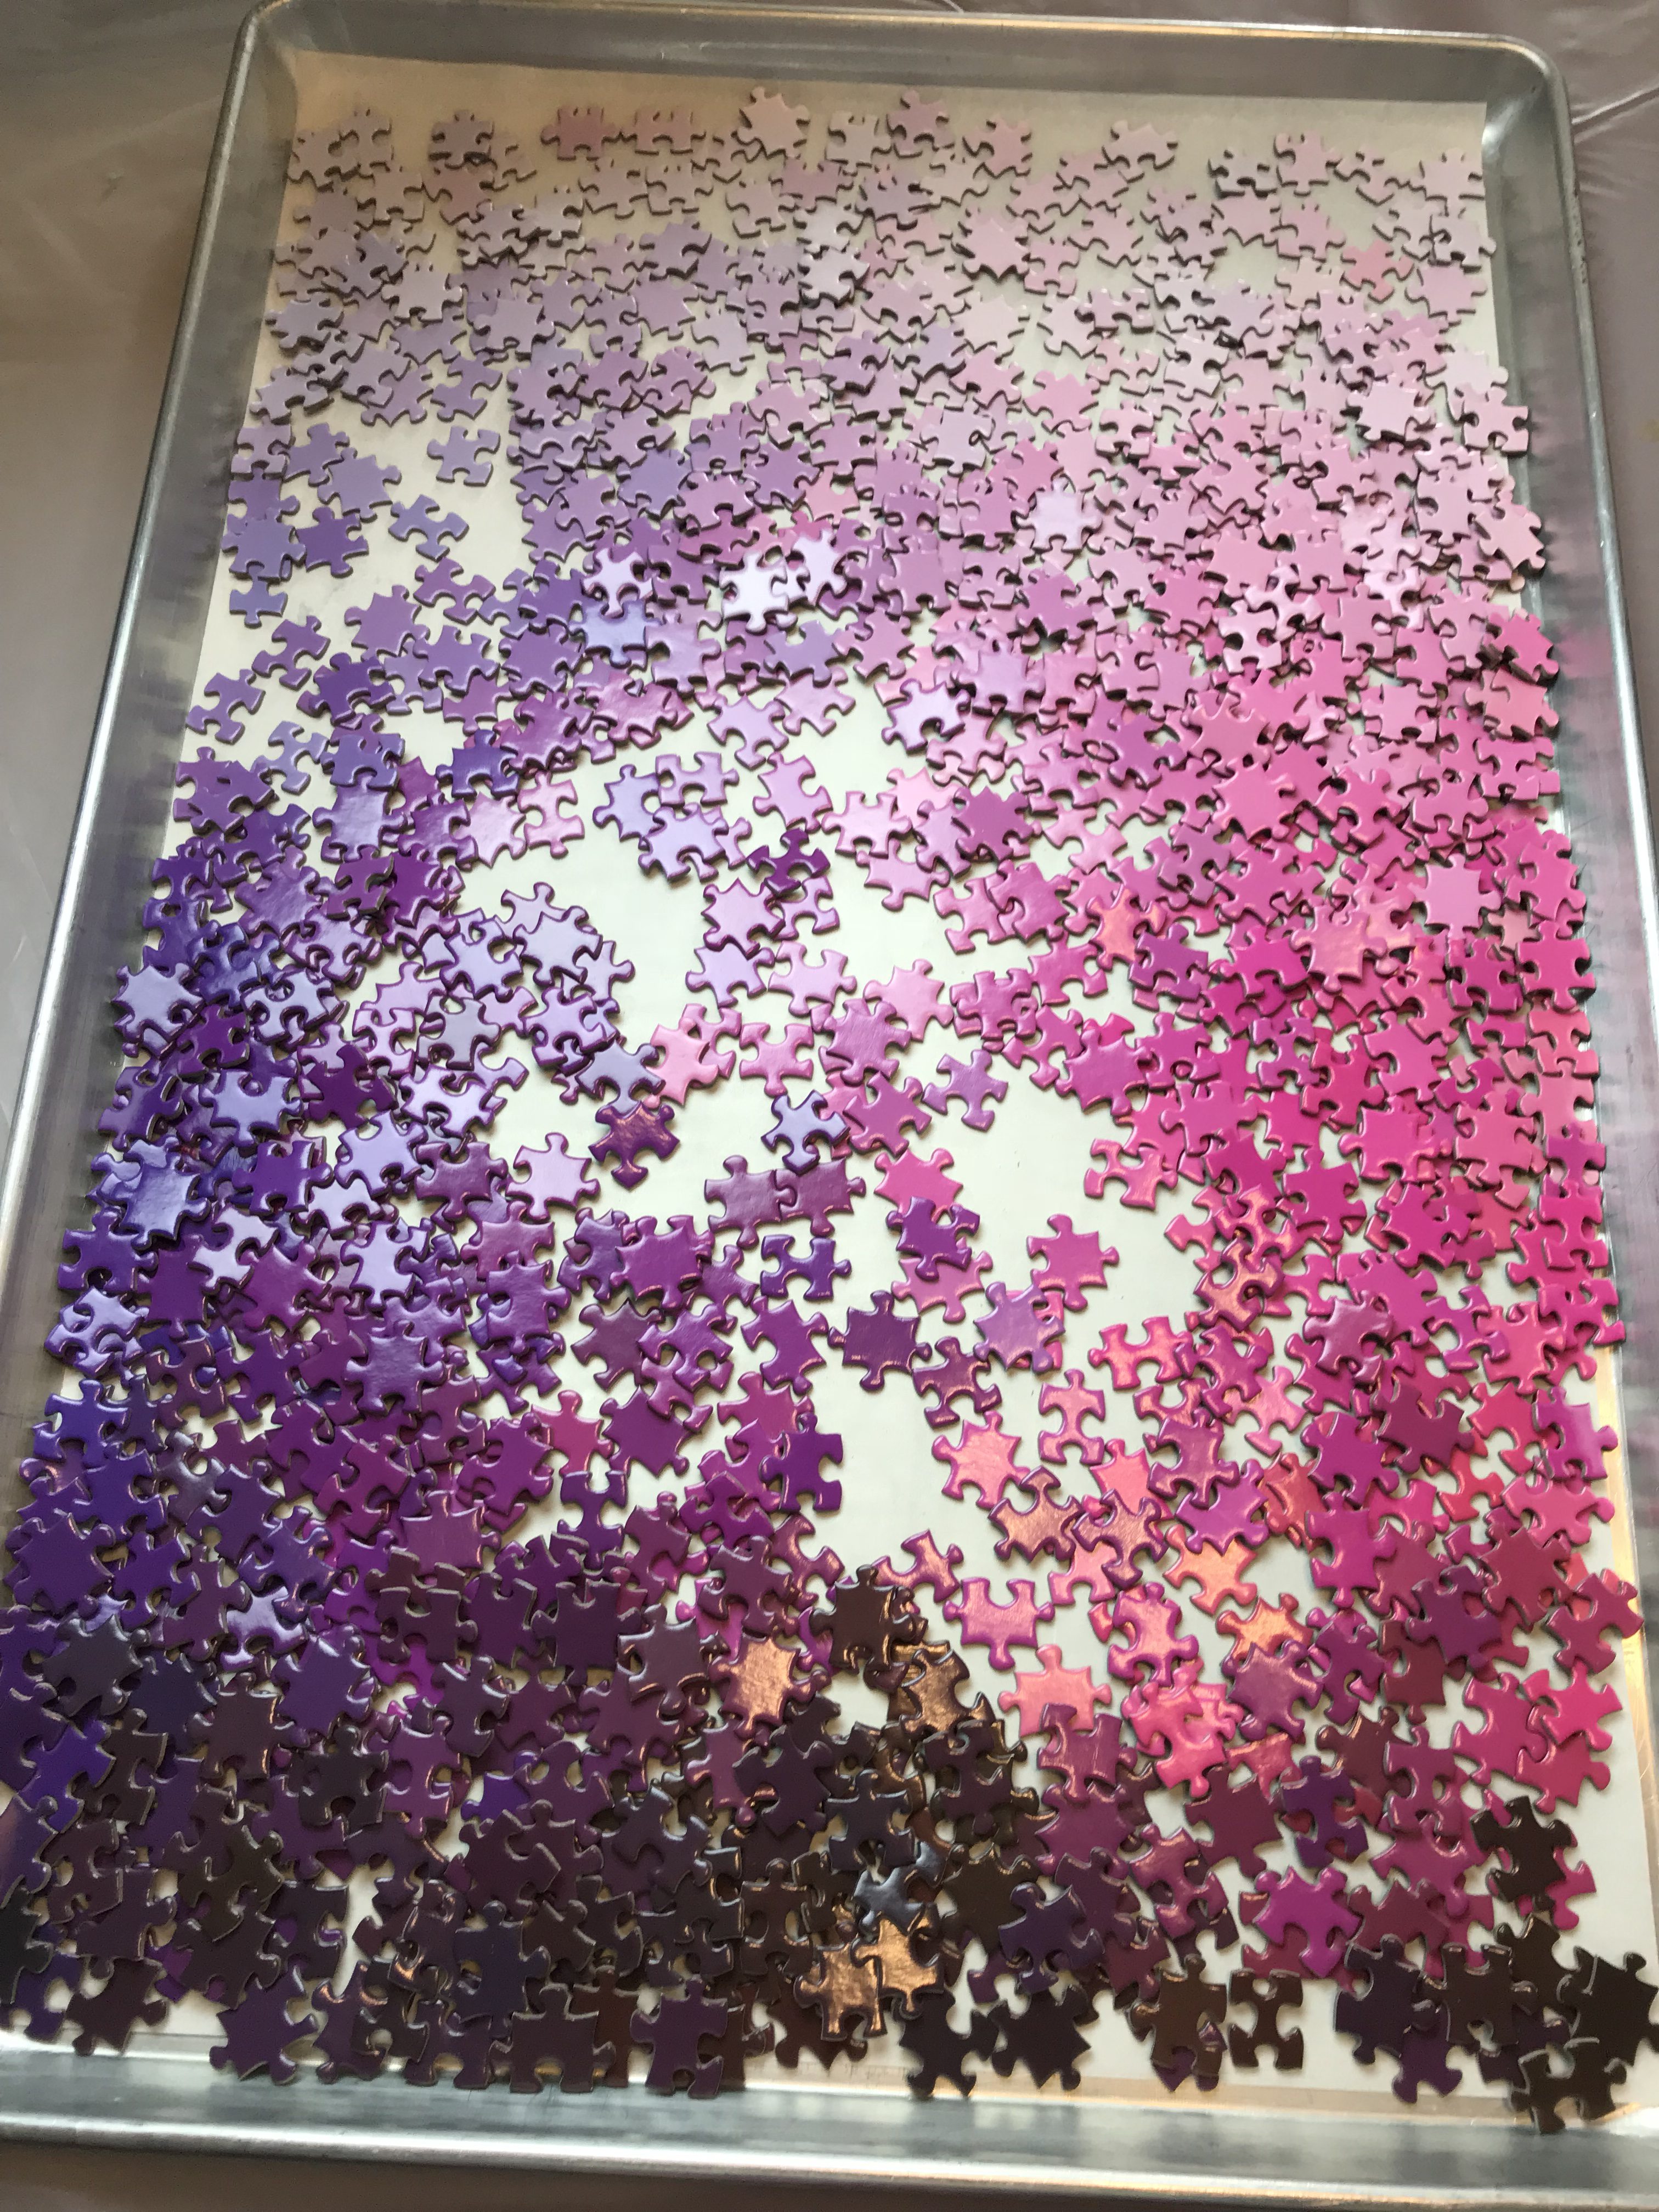
Meanwhile, for those wondering about the puzzle, I finally started it! I decided to begin with this tray:

purple and fuchsia tray

And after about 2.5 hours, here’s what I had assembled:

puzzle progress - 2.5 hours
puzzle progress – 2.5 hours

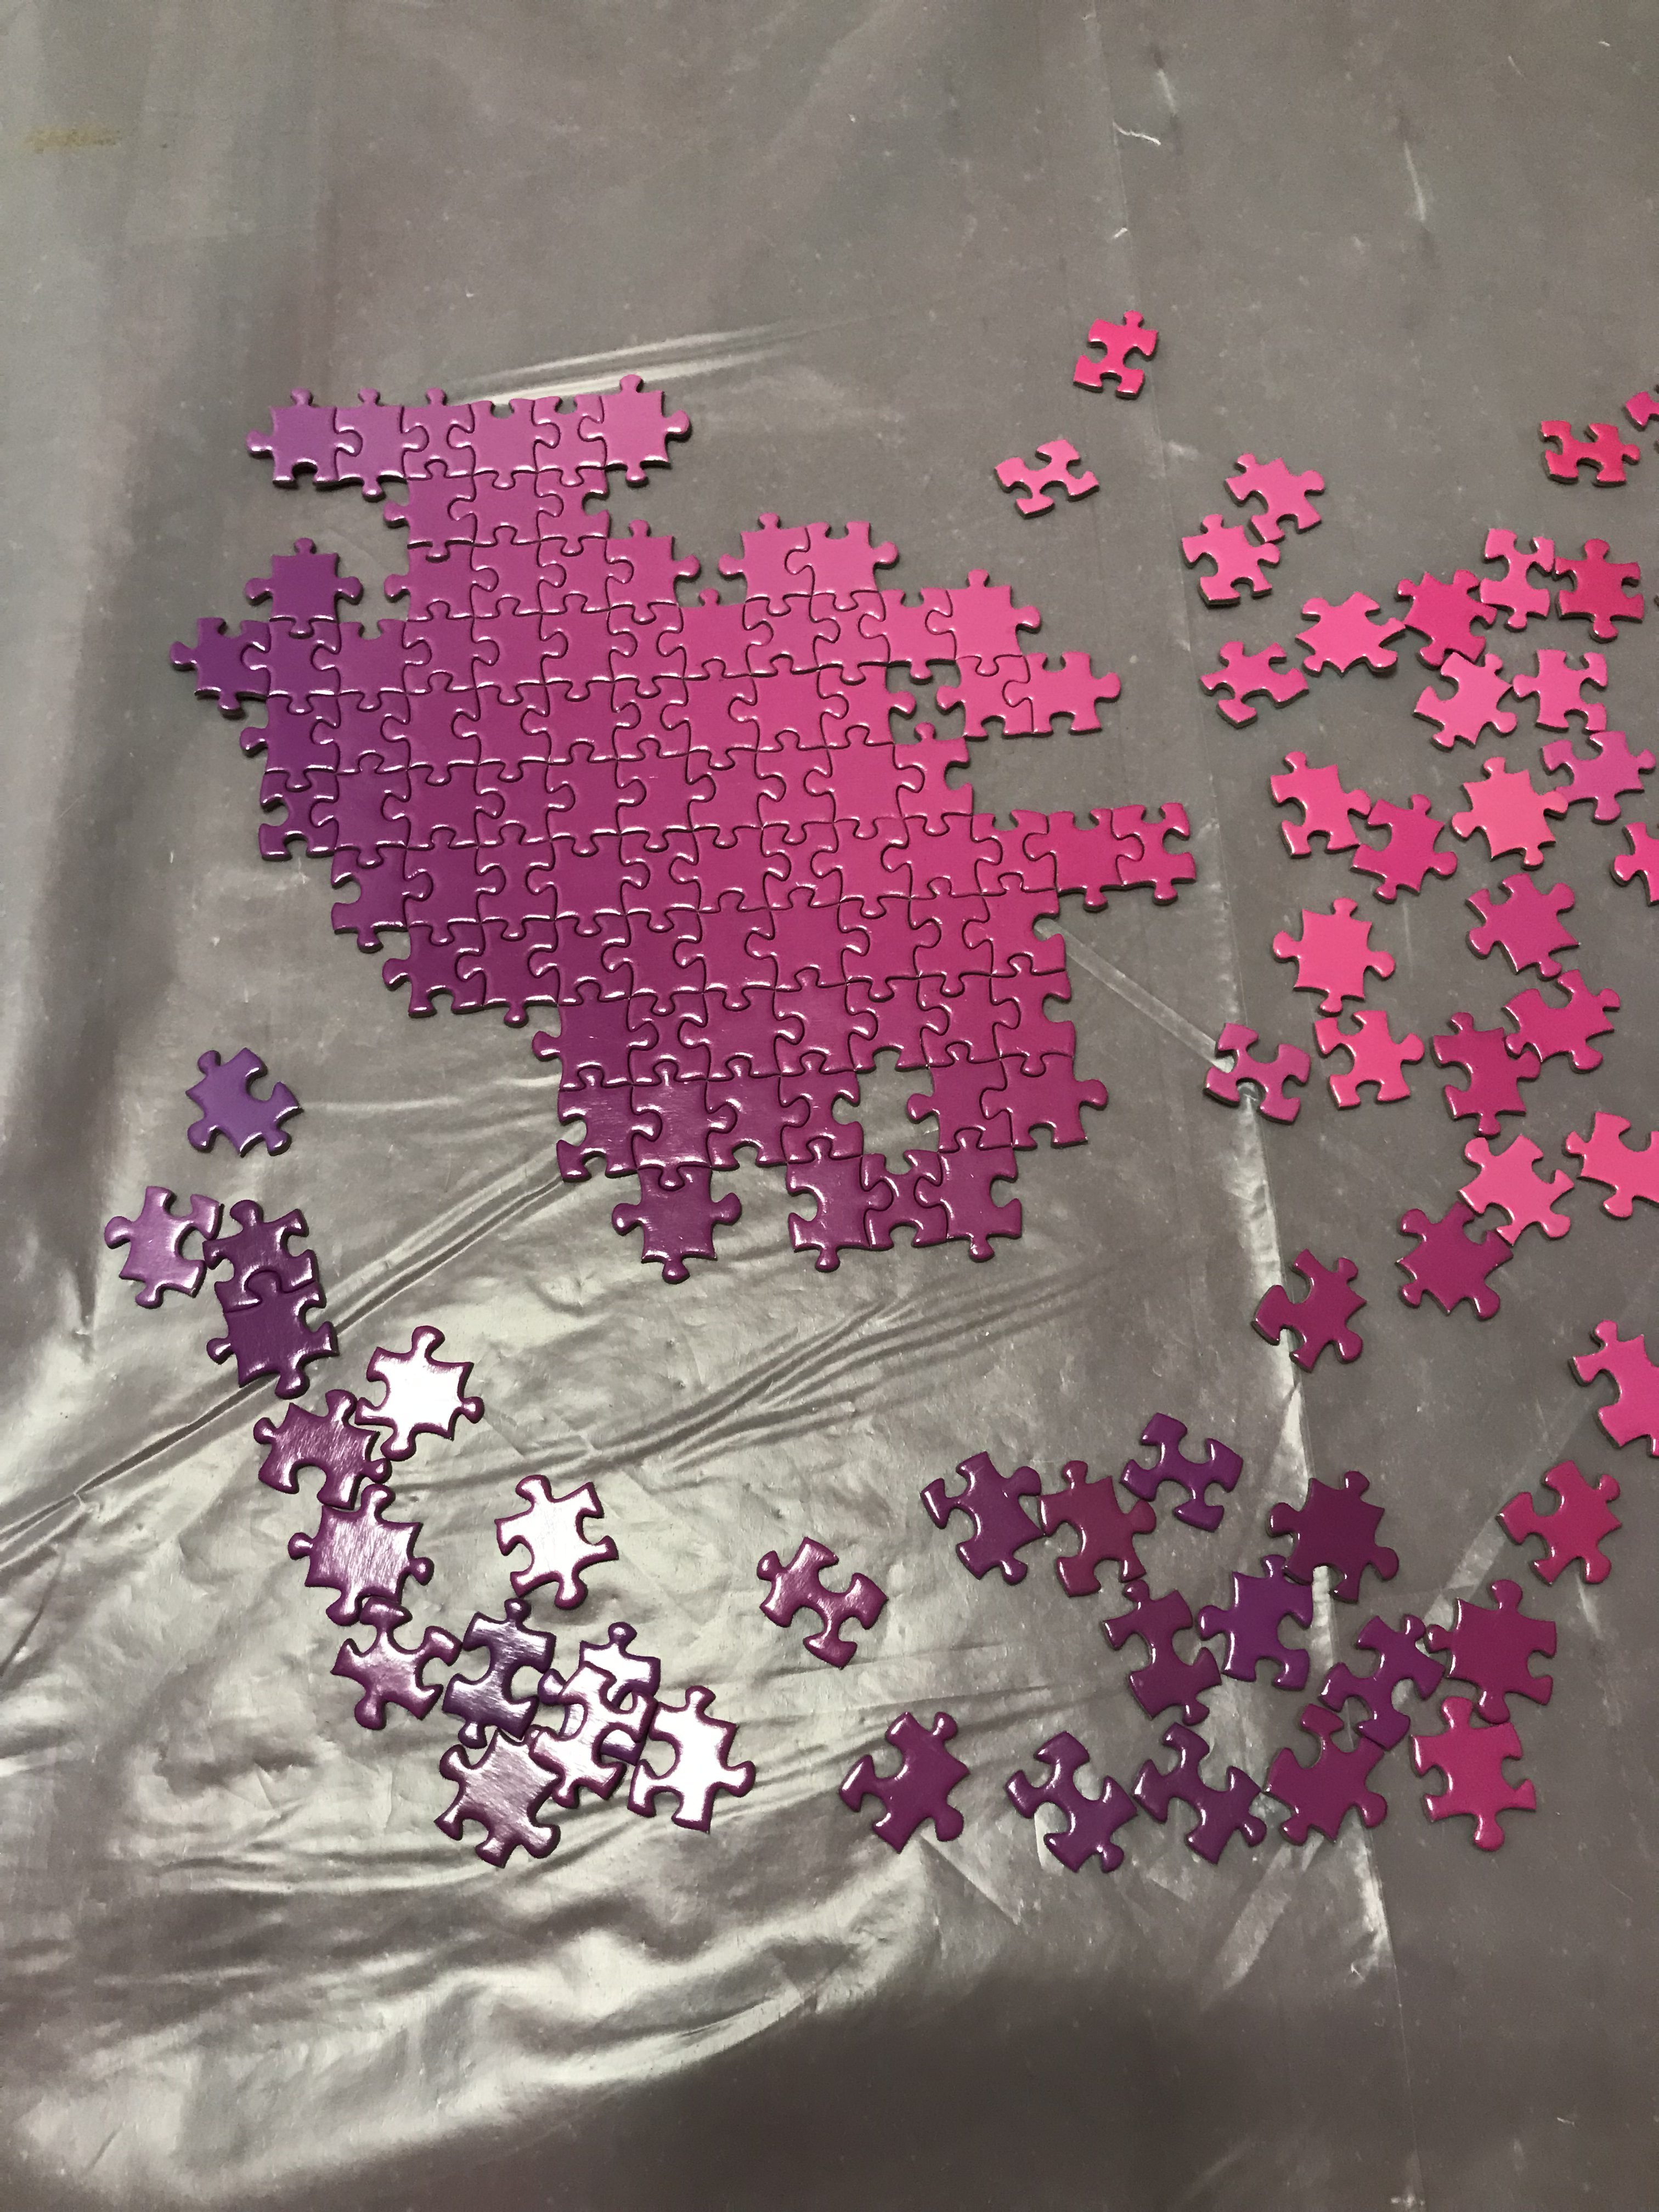
It’s proving quite difficult – partly because the pieces are so featureless, but also because the pieces are designed to be ambiguous about fit – so it’s not just finding the right color pieces, but also about making sure they actually fit. Usually I don’t find out about misplaced pieces until considerably later in the puzzle. It’s frustrating, because I prefer puzzles in which a piece that appears to fit actually does.

And so far, I think I’ve foiled the puzzle gods by covering up the puzzle when not in use. But of course it is a bad idea to underestimate the mighty powers and fiendish cleverness of the puzzle gods, so we’ll just have to wait and see.

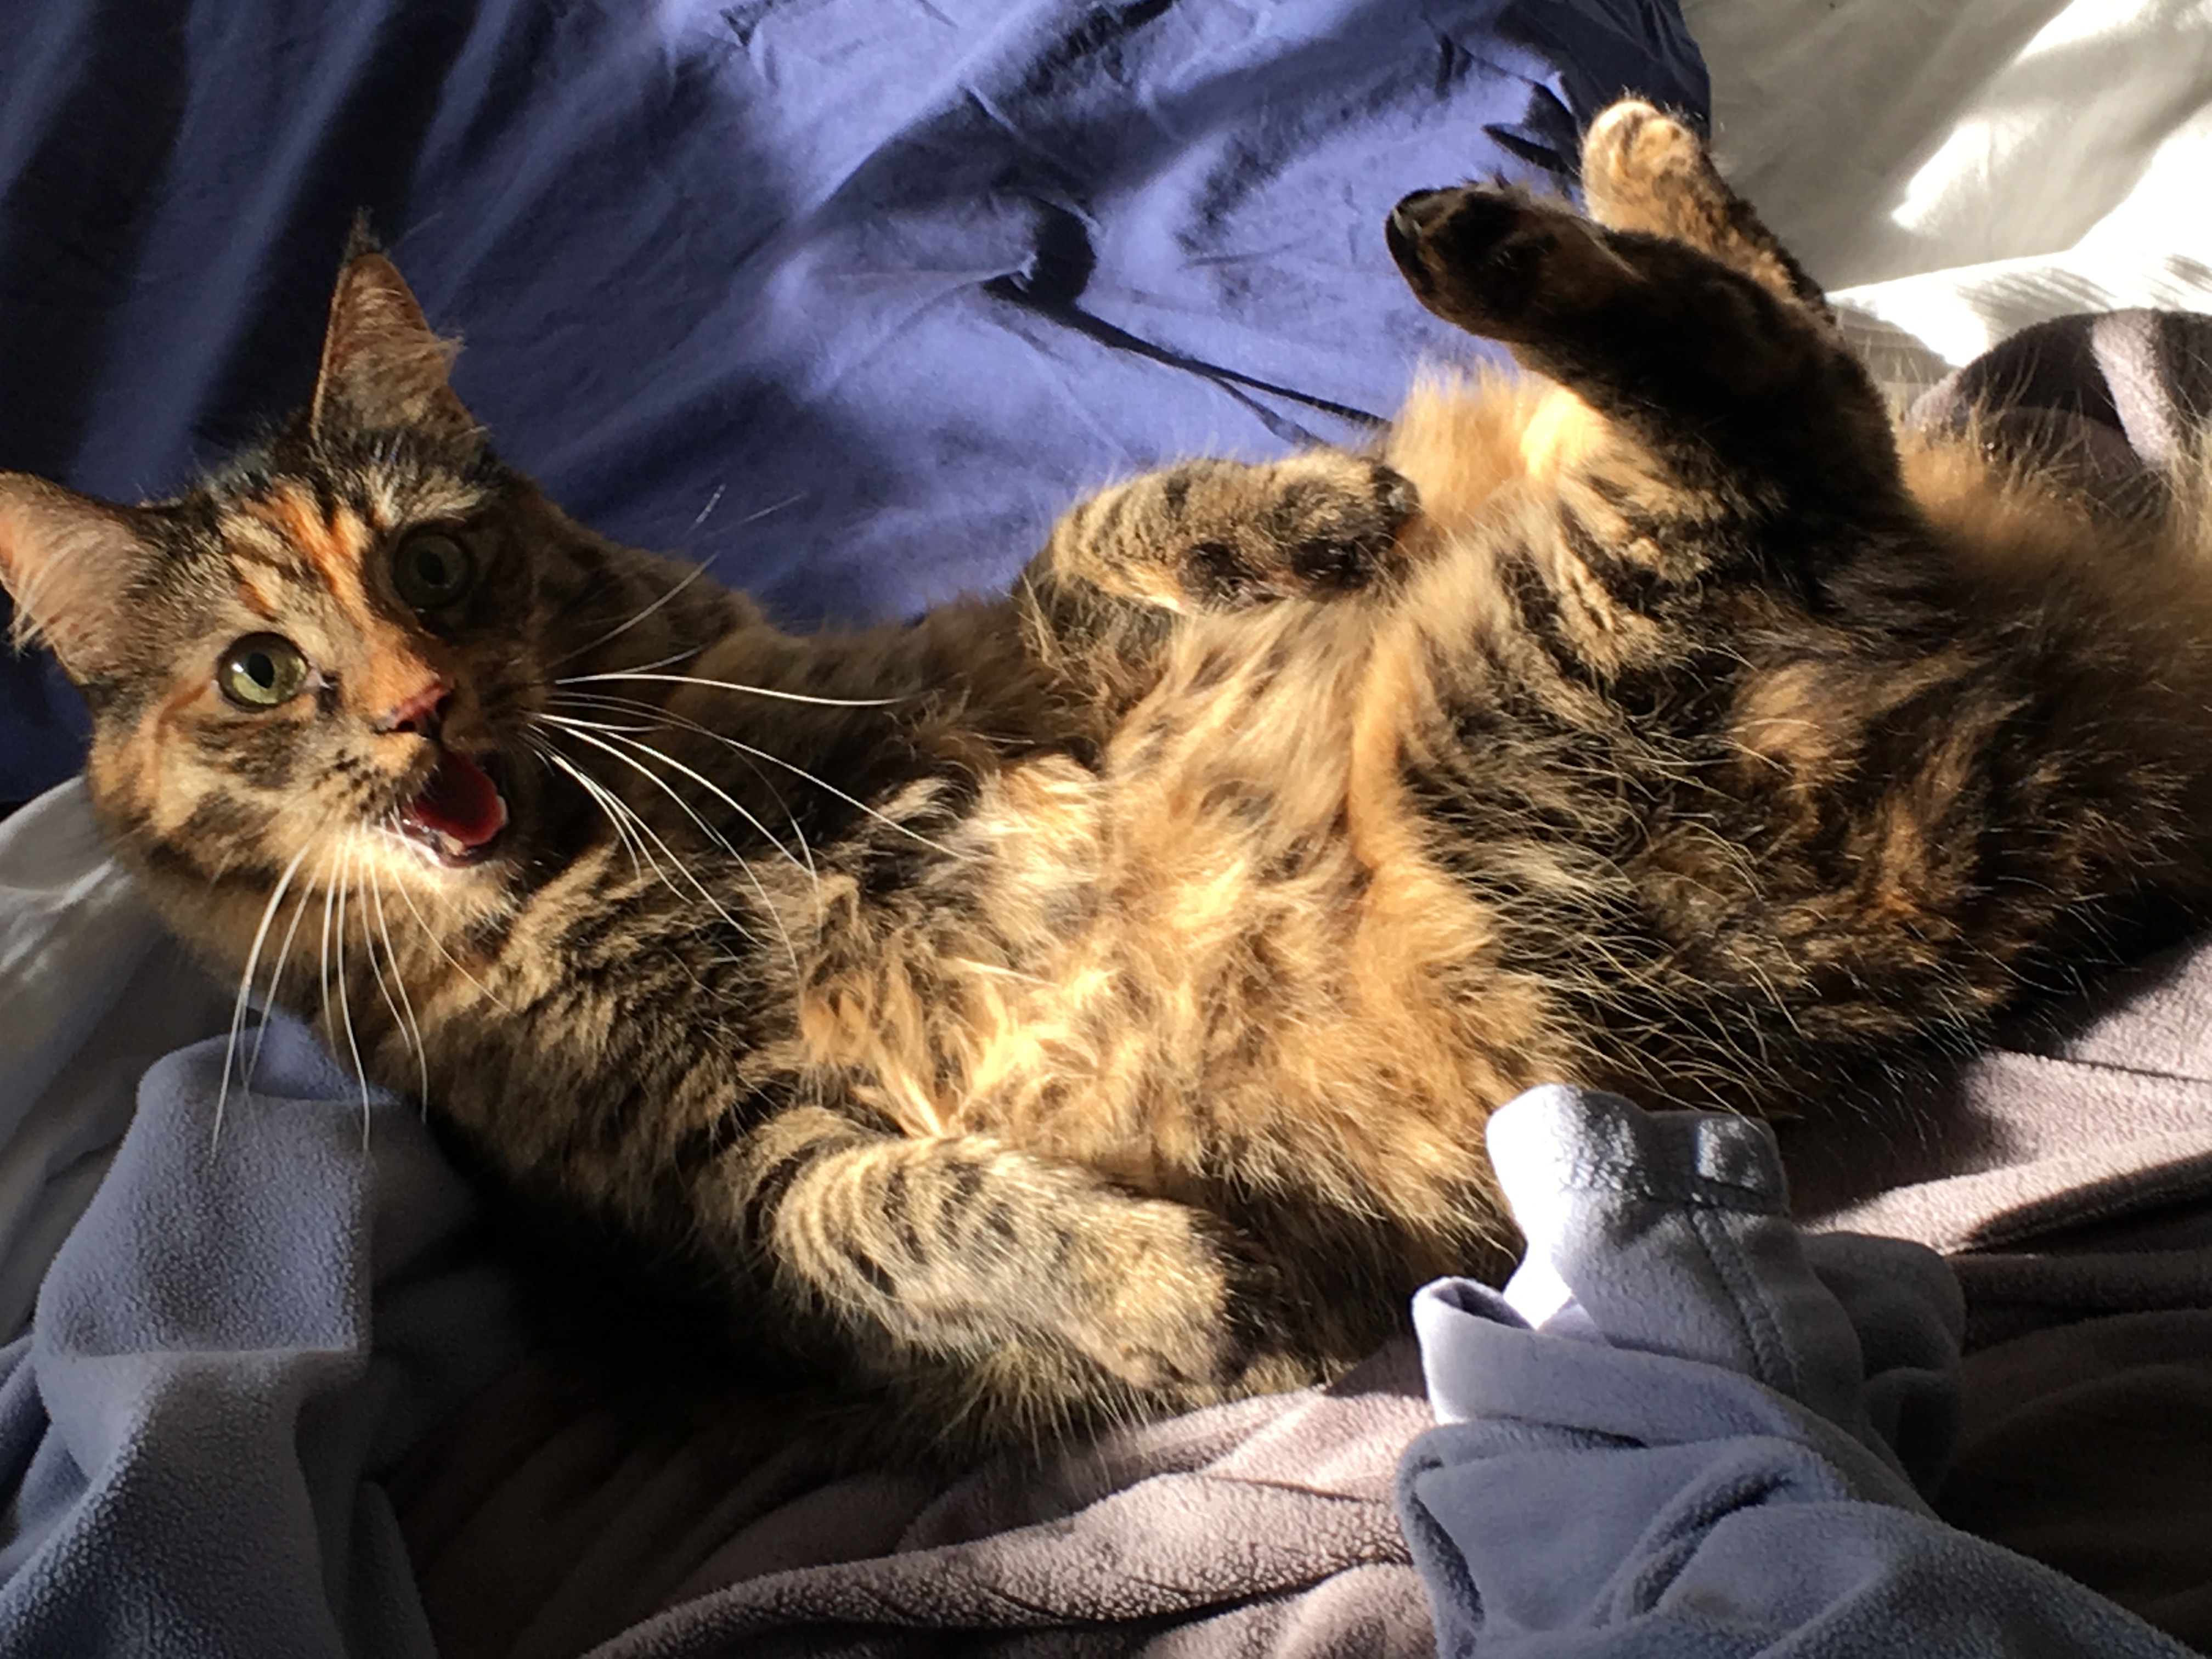
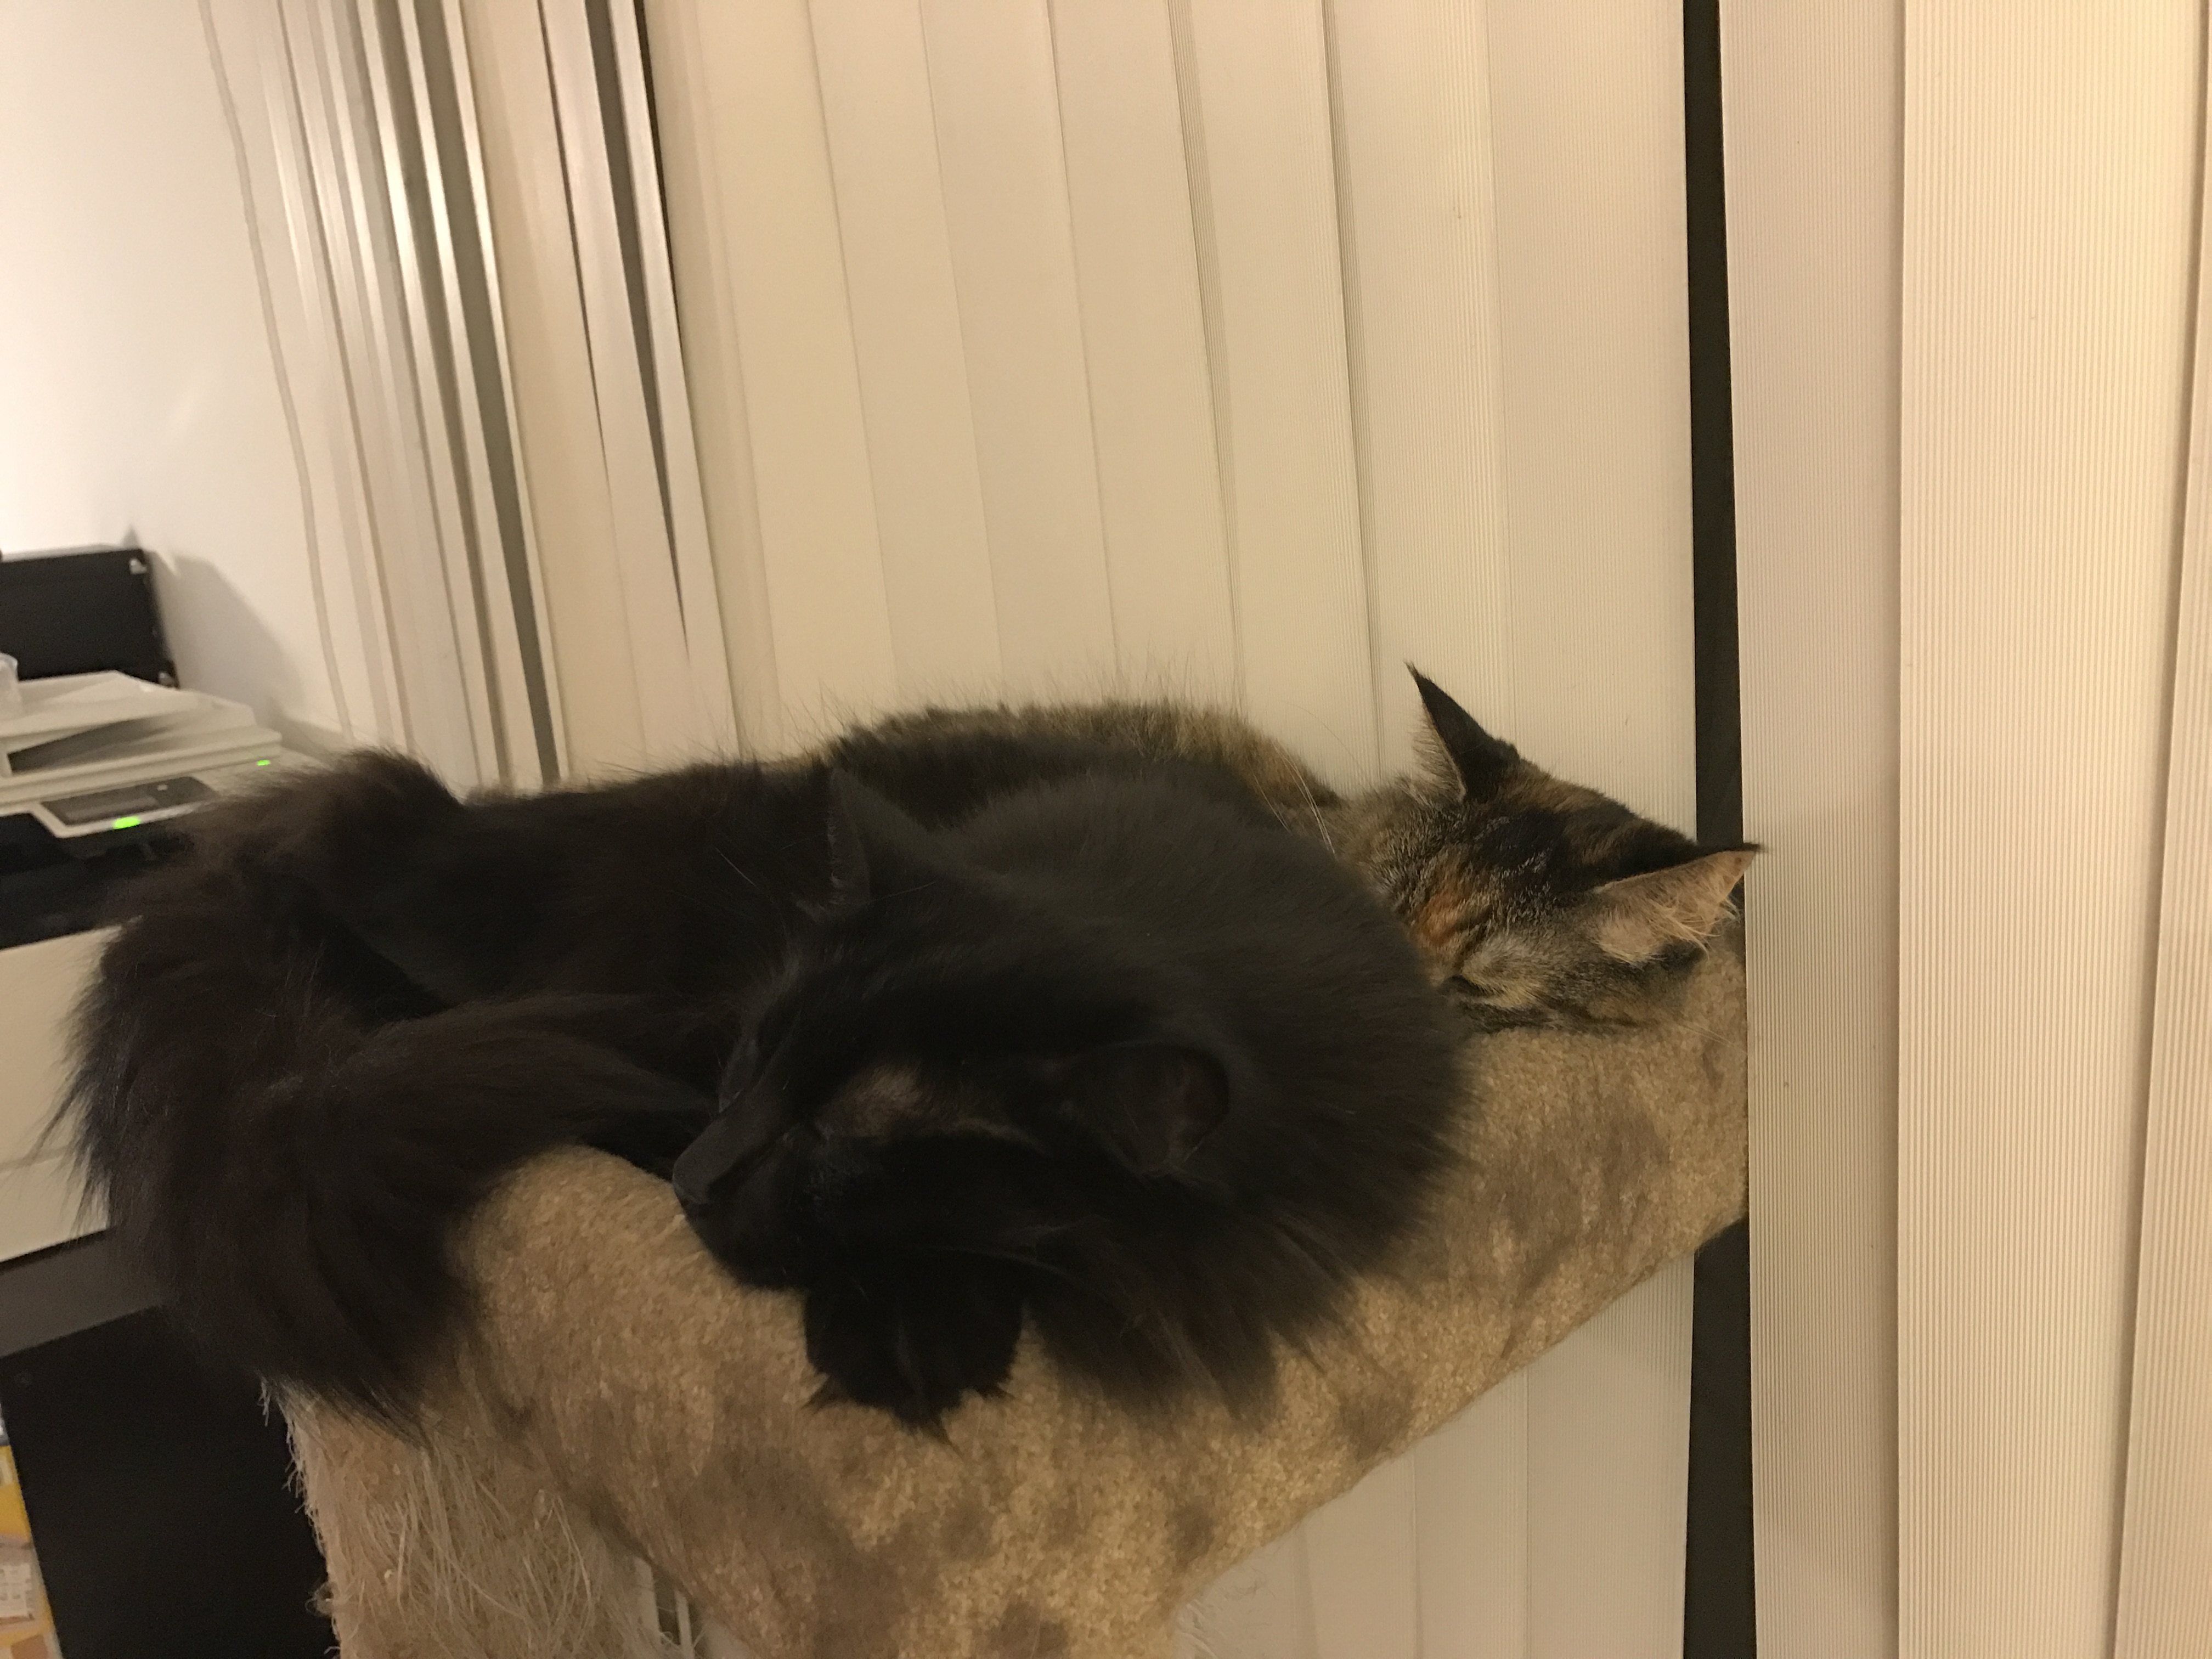
I’m still not quite caught up to my present-day adventures, but this is getting long again, so I’ll end here. But I’ll leave you with one of the marvelous photos captured by our cat-sitter while we were away. Somehow she manages to get better photos of Tigress and Fritz in ten days than I do all year – and she sends us twenty or thirty photos every day we’re away, so we get to see our “kids” having fun with her. (It helps with the shakes – “cold turkey” cat withdrawal can be seriously dangerous.)

Anyway, here is the best one of the lot. I’m going to save it to blackmail Tigress with after she becomes rich and famous.

Tigress blackmail photo

Filed Under: All blog posts, dyeing, textiles Tagged With: dye samples, procion mx dye samples

August 23, 2017 by Tien Chiu

End of a (dyeing) era

Yes, the 1500-skein Procion MX dyeing project is FINALLY at an end! Here are the last 250 skeins hanging up to dry:

Sun Yellow, Fuchsia, Navy Blue dyed skeins hanging up to dry

It took a bit over eight months start to finish, but all the dyeing is finally done. (Many thanks to my friend Kaye, who has been helping out!)

The project, however, is not quite done. My friend Carla is still winding the skeins onto cards – two sets of cards, one for me and one for her, plus two sets of mini-skeins for the other people who offered to split costs. She is making amazingly fast progress – she’ll be finishing up the 1000th skein sometime in the next few days. After that we’ll go on hiatus until I fly out to Maryland to visit family, and can bring the two final sets of skeins for her to work on. (On my last trip, I brought 750 skeins – which meant two large suitcases full of yarn! My family was wondering why I needed two suitcases and a carryon for a three-day trip…)

This reminds me of a poem by the second-greatest sage of the 20th century, aka Shel Silverstein:


Shel Silverstein was one of my best-loved writers as a kid…this poem is from Where the Sidewalk Ends. My copy is more than a little ratty, but then, it’s been read countless times since my mother gave it to me at the tender age of seven. (It was my favorite book for most of my childhood – superseded only by Lord of the Rings, years later.) 

And I just found out that more books of his poetry and illustrations were published after his death! I’m so excited – just ordered my copies from Amazon. Yes, his poems are silly, but there’s great wisdom in silliness, too.

And – speaking of wisdom – are you wondering who the greatest sage of the 20th century might be? Why, isn’t it obvious? It’s none other than Mr. Theodor Geisel, who wrote my personal motto:

If you never did, you should!
These things are fun, and fun is good.

– Dr. Seuss, One Fish Two Fish Red Fish Blue Fish

We now end this outburst of poetry and return you to your usual creative-mischief channel. 🙂

Filed Under: All blog posts, dyeing, musings Tagged With: dye samples, procion mx dye samples

March 19, 2017 by Tien Chiu

New dyeing setup

I’m considering changing my dye methodology for my 1500+ samples. I timed some steps, did some calculations, and discovered that the rearranging and relabeling of skeins between dyebaths takes a lot more time than expected. The total amount of time required for each skein comes out to almost 10 minutes a skein! That is, at least in theory, pretty close to the amount of time required for individual dyebaths. And individual dyebaths would be of more practical use since I wouldn’t have to do three dyebaths to replicate the color in the sample.

So I have been working on developing and refining my methodology for individual samples. It’s been…complicated. Here’s my basic setup:

basic setup for individual dyebaths

The dyebath needs to be kept at about 90F, which is difficult to do when working with small jars for individual dyebaths. So I am putting glass pint canning jars into a pair of circulating water baths. (The right-hand water bath has no jars in this photo – I was still setting up.)

A bucket below the jars contains a pump and a bucket heater (to maintain the temperature).

pump and heater for circulating dyebaths

The pump (meant for a small fountain) pushes the water up the tube on the left, into the first water bath:

first circulating water bath

Water is coming up from the bucket through the left-hand tube. A clear tube on the right side siphons water out of the bath and into the next circulating water bath. Because the pump and siphon are on opposite sides of the container, water moves through the entire container, keeping the temperature even. A temperature probe (the cord taped to the back right corner of the water bath) controls the heater in the bucket and keeps the temperature of the bath at 90F.

The second circulating water bath is a bit simpler. It’s located a few inches below the first water bath, so gravity pulls water through the siphon in the first water bath down into the second bath. A second siphon at the opposite end of the container pulls the water down and into the bucket, to be pumped up again. (Here the inlet hose is in top right, and the siphon to the bucket is in the bottom left corner.

second water bath
second water bath

It’s an elegant solution, but also quite fussy. The siphons have to remove water from each circulating bath at the same rate that the pump is pumping it in, which is a bit tricky. I accidentally flooded my first set of skeins when I made a small adjustment, walked away to check my email for a few minutes, and came back to find the water bath overflowing! Lesson learned: if you’re doing something for the first time, for heaven’s sake don’t walk away from it and assume it will work!

I found initially that the jars, when empty, tended to float. So I stuck rocks into them to weigh them down. (No, those are not potatoes in the bottom!) It worked, but I have some better ideas for next time.

individual dyebath - single jar
individual dyebath – single jar

Here’s what it looks like with 50 individual dyebaths going:

fifty individual dyebaths

Each dyebath has a different concentration of Gold, Mixing Red, and Navy Blue.

Because of the difficulty of measuring small amounts of dye and other dyebath additives, I made up stock solutions of dye, salt, and soda ash, and measured out the amounts with syringes (tested for accuracy). Here is Kaye (my dyeing buddy) adding soda ash solution to one of the dyebaths. She’s holding the skein up above the dyebath as she adds the soda ash solution with the syringe.

individual dyebath - adding soda ash with a syringe
individual dyebath – adding soda ash with a syringe

As you can see, this method is much fussier and more error-prone than the sequential-dyebath method. However, it will enable me to reproduce the results with a single dyebath. And, if I decide to sell color plates of my samples, they will be much more useful to buyers if they don’t have to do three dyebaths to achieve the same results. So I am continuing to experiment and refine the process, to see if I can make individual dyebaths work. So far I’ve botched three sets of skeins, but I’m learning something with every dyebath, and I’m confident I can figure it out, though it may take me a few more weeks. When you’re doing something new, you’ll inevitably run into snags – this is just giving me more snags than most.

Meanwhile, Mike has very kindly put together a skein-drying and storage rack in the dining room, turning an untidy pile of skeins into a beautiful curtain of color.

sample drying rack and storage

Thankfully, this is what the cats think of it:

Fritz and Tigress expressing their enthusiasm

And that’s it for now! I’m hoping to have pretty pictures of a successful batch soon. Stay tuned!

Filed Under: All blog posts, dyeing, textiles Tagged With: dye samples, procion mx dye samples

February 19, 2017 by Tien Chiu

Dye cube #2: Sun yellow, fuchsia, turquoise in dark colors

I’ve now completed the second “cube” of Procion MX fiber-reactive dye samples on cotton: dark shades of sun yellow, fuchsia, and turquoise. The dye concentrations I’m using are 0, 0.5, 1, 2, and 4%. The results are of course pretty:

sun yellow, fuchsia, and turquoise - 0.5% turquoise
sun yellow, fuchsia, and turquoise – 0.5% turquoise
sun yellow, fuchsia, and turquoise - 0.5% turquoise
sun yellow, fuchsia, and turquoise – 0.5% turquoise
sun yellow, fuchsia, and turquoise - 1% turquoise
sun yellow, fuchsia, and turquoise – 1% turquoise
sun yellow, fuchsia, and turquoise - 2% turquoise
sun yellow, fuchsia, and turquoise – 2% turquoise
sun yellow, fuchsia, and turquoise - 4% turquoise
sun yellow, fuchsia, and turquoise – 4% turquoise

Why am I doing two independent dye cubes rather than one that covers the entire gamut? Because dye cubes over a certain size are inefficient. They produce a lot of samples too similar to be distinguished. Since each skein costs $0.40, wasted skeins are wasted money.

(Warning: technical discussion ahead.)

You can see this in the sample book that a friend created in Carol Soderlund’s class (where I got the idea for this particular methodology). Here’s an (annotated) page from my friend’s sample book, showing my overlapping-cube strategy:

annotated sample page


Carol Soderlund uses seven concentrations going up to 3% for her classes. That requires 7^3 or 343 samples. But as you can see, the samples in some sections, as indicated by the turquoise arrows, are very similar. That’s because if you add a very small dye concentration to a very large concentration, you’re likely to see only very small changes. So 0.06% sun yellow + 4% fuchsia is unlikely to look very different from 0.12% sun yellow + 4% fuchsia – the higher concentration of fuchsia overpowers the pale yellows. Based on what I learned looking through my friend’s sample book, once one concentration “outweighs” another by more than 16x, the change in color is pretty close to negligible. So if you look at the sample page, you can see that you can get more-or-less the full set of colors by doing two smaller cubes – the one outlined in green, and the one outlined in magenta. You do have to include the two samples in bottom left and the two samples at top right (the ones circled in magenta) to get a full set of colors, so the second “cube” actually has four concentrations, since you have to include 0 as one of the concentrations to get the primaries.

This doesn’t look like a substantial savings, but it is. At the seven concentrations that Soderlund uses, the double-cube method requires only 5^3 + 4^3 =125+64 = 189 skeins, vs. 343 for the full cube. That almost halves the number of samples, without changing the overall palette much. A much more efficient way of developing a palette. That doesn’t matter much when you’re using small squares of fabric, but with the skeins, which are much more expensive both in $ and time, efficiency becomes important.

So I’m doing a double-cube in eight concentrations: (0, 0.06, 0.12, 0.25, 0.50, 1, 2, 4) with two concentrations overlapping between the cubes:

(0, 0.06, 0.12, 0.25, 0.5)

(0, 0.5, 1, 2, 4)

The choice of concentrations for each cube is based on analysis of my friend’s sample book, looking for the biggest assortment of colors in the smallest number of samples.

So…all that said…here is what the two dye cubes look like when placed together, at the two overlapping concentrations:

double cube, 0% turquoise layer

Here is the annotated version showing the various concentrations:

double cube, 0% turquoise layer, annotated

Here’s what things look like on the layer of the cube with 0.5% turquoise:

double cube, 0.50% turquoise layer, annotated

While some colors are missing from the palette, you can see – looking across the rows from left to right – that there is not much difference between 4% fuchsia/0% sun yellow and 4% fuchsia/0.5% sun yellow. So the samples in between don’t really add much to the palette, and can be safely removed. 

The “missing colors” at bottom right are a little more complex to evaluate, since the difference between the bottom row and the 0.50% row are substantial, but because sun yellow is a really weak mixing color (there’s not a huge difference between 1% and 4%), I’m guessing I didn’t lose a great deal by eliminating those colors as well. If at the end I feel that the palette is incomplete, I can always go back and “fill in” the missing colors. But I’m happy with the results so far.

This double-cube method with eight concentrations requires 250 samples (two 125-sample cubes) for each triplet of primary colors. Since my “budget” is 1600 skeins, that means I’m limited to 6 combinations of primary colors (1500 skeins). So far I’ve completed one, so five more to go! Next up will be a set of warm primaries: golden yellow, “mixing red,” and cerulean blue. I’ll start those as soon as it stops raining, hopefully later this week.

(If you’re just now coming into this series of dye posts, these samples are being made with Procion MX fiber-reactive dyes on 20/2 mercerized cotton yarn. You can read about the methods/protocol used for dyeing the skeins here.)

Filed Under: All blog posts, dyeing, textiles Tagged With: dye samples, procion mx dye samples

February 17, 2017 by Tien Chiu

First dye cube complete!

I finished dyeing my first “cube” yesterday. This one covered light to medium shades of the color combination sun yellow/fuchsia/turquoise. It includes every possible combination of these concentrations: 0, 0.06%, 0.12%, 0.25%, and 0.5%, in all three colors.

Here’s what the first level looks like:

yellow/fuchsia/turquoise dye "cube" in Procion MX fiber-reactive dyes, 0% turquoise
yellow/fuchsia/turquoise dye “cube” in Procion MX fiber-reactive dyes, 0% turquoise

This “level” of the cube is all mixes of yellow/fuchsia/turquoise with 0% turquoise in the mix – i.e. all combinations of sun yellow and fuchsia at the five dye concentrations (0, 0.06%, 0.12%, 0.25%, 0.5%). Each row has a single concentration of fuchsia, starting from 0% at the bottom and going to 0.5%. Each column has a single concentration of yellow, starting from 0% in the leftmost column and going to 0.5% in the right-hand column.

Here’s an annotated example:

yellow/fuchsia/turquoise dye cube, level 1 0 turquoise), annotated
yellow/fuchsia/turquoise dye cube, level 1 (0% turquoise), annotated

Each row/column of this set of samples (except 0.06%, obviously) doubles the amount of dye in the solution. I find this interesting because the visual effect is a linear progression (that is, the colors look about equally far apart from each other), but the dye amount is increasing exponentially. So dyes are very much nonlinear in their effect on fiber.

The second thing that interests me is the big color jump between 0 and 0.06% in the fuchsia. 0% is dead white, but even at 0.06%, the fuchsia is a light-to-medium pink. The jump is highly visible across that entire row – the bottom row is shades of pure yellow, and suddenly – bam! – the next row is clearly orange. If I want a smooth color progression I’d have to insert an 0.03% row and maybe even an 0.015% one between the first and second rows. That is an amazingly small amount of dye to have such impact. 

The third interesting thing is that the fuchsia is a stronger mixing color than the sun yellow. If you look at the diagonal from bottom left to top right, where the amounts of dye are equal, you can see that the result leans strongly towards fuchsia – and this becomes more pronounced as the concentration of fuchsia goes up. In fact, you don’t really get orange unless the amount of sun yellow is 4-8 times greater than the amount of fuchsia. This fits with my experience – it takes very little red to turn a yellow dye bath orange – but it’s interesting to see it play out in a systematic way.

The next level of the cube shows what happens when you add 0.06% turquoise to the mix. The rows and columns have the same amount of fuchsia and yellow as in the first level, but all the skeins are dyed using 0.06% turquoise.

yellow/fuchsia/turquoise dye "cube" in Procion MX fiber-reactive dyes, 0.06% turquoise
yellow/fuchsia/turquoise dye “cube” in Procion MX fiber-reactive dyes, 0.06% turquoise

As you can see, there’s a strong and immediate change from yellow to green, though not as strong (I think) as the change from 0 to 0.06% in fuchsia. This suggests that turquoise is stronger in mixes than yellow, but not as strong as fuchsia. Also, neutral colors are starting to appear – there’s a gray (leaning towards purple) in the intersection of the second row and second column.

Here’s level 3, with 0.12% turquoise:

yellow/fuchsia/turquoise dye "cube" in Procion MX fiber-reactive dyes, 0.25% turquoise
yellow/fuchsia/turquoise dye “cube” in Procion MX fiber-reactive dyes, 0.12% turquoise

The colors have shifted noticeably towards blue, but the (now slightly cooler) gray remains in the second row/second column, rather than moving towards the top right, as you’d expect. The fact that you don’t find a good gray in the third column shows that the fuchsia is much stronger than either the turquoise or the sun yellow.

Here’s what it looks like on Level 4, 0.25% turquoise:

yellow/fuchsia/turquoise dye "cube" in Procion MX fiber-reactive dyes, 0.25% turquoise
yellow/fuchsia/turquoise dye “cube” in Procion MX fiber-reactive dyes, 0.25% turquoise

Astonishingly, the gray is still in the second row/second column.

And here’s how it looks at 0.5% turquoise:

yellow/fuchsia/turquoise dye "cube" in Procion MX fiber-reactive dyes, 0.5% turquoise
yellow/fuchsia/turquoise dye “cube” in Procion MX fiber-reactive dyes, 0.5% turquoise

Now the grays are starting to shift to the next level up, though the gray in the third row/third column still looks distinctly pink.

Another interesting thing is that, at a casual glance, the adjacent levels of the cube are the same color. But in reality they are progressing towards a colder and bluer version, which is more obvious if you put non-adjacent levels together. To illustrate this, here is Level 2 (0.06% turquoise again. If you look from it to the above photo of Level 5 (0.50% turquoise), you can see the difference distinctly.

yellow/fuchsia/turquoise dye "cube" in Procion MX fiber-reactive dyes, 0.06% turquoise
yellow/fuchsia/turquoise dye “cube” in Procion MX fiber-reactive dyes, 0.06% turquoise

And that’s it for today! I have the sun yellow/fuchsia/turquoise dark colors dyed and in the rinse bucket now…I’ll post those once I have them done and dry, probably tomorrow.

It’s been fascinating looking at these 125 samples, and I’ve already learned a lot. I can’t wait to see the next batch!

Filed Under: All blog posts, dyeing, textiles Tagged With: dye samples

Next Page »

Subscribe to Blog via Email

Information resources

  • Dye samples
    • Procion MX fiber-reactive dye samples on cotton
    • How to "read" the dye sample sets
    • Dye sample strategy - the "Cube" method
  • How-Tos
    • Dyeing and surface design
    • Weaving
    • Designing handwoven cloth
    • Sewing

Blog posts

  • All blog posts
    • food
      • chocolate
    • musings
    • textiles
      • dyeing
      • knitting
      • sewing
      • surface design
      • weaving
    • writing

Archives

Photos from my travels

  • Dye samples
    • Procion MX fiber-reactive dye samples on cotton
    • How to "read" the dye sample sets
    • Dye sample strategy - the "Cube" method
  • Travels
    • Thailand
    • Cambodia
    • Vietnam
    • Laos
    • India
    • Ghana
    • China

Travel Blog

Entertaining miscellanies

© Copyright 2016 Tien Chiu · All Rights Reserved ·


Loading Comments...