(Warning: long and technical post. If you aren’t into Photoshop liftplans, feel free to skip.)
I spent this morning fiddling with the weave structure for the sample. What I wanted was a minor change that would put the gold threads on separate shafts, so I could separate them out easily from the painted warp when adjusting the warp between panels. What I got was a complete revamp of the weave structure. (It’s amazing how things can get out of hand!)
Here’s what I did:
I needed a minimum of 2 shafts for the interlacement of the gold threads (because the gold warp and gold weft need to interlace in plain weave). I was going to use 2 shafts, to conserve shafts for the main pattern, but then realized that would leave me with 22 shafts, which is a difficult number to use with pattern overlays because it doesn’t divide evenly into much of anything (22 = 2 x 11, both rather extreme numbers for weaving). I mulled over using two shafts to improve my selvages, then realized that the selvages in this piece don’t matter since it’s being cut up for clothing. So I decided to spread out the gold threads over four shafts, and use 20 shafts for the tencel warp. 20 shafts = 4*5, which would allow me to do either a four-end broken twill overlay or a 5-end satin. I debated awhile, but finally opted for a 5-end satin, with a gold warp thread between every four tencel threads.
Then I created the pattern in Photoshop. The one I had originally was 24 pixels wide by 56 pixels long. I needed something that would intersperse neatly with a five-end repeat and a four-end repeat (keeping my options open between a 4-end twill and a 5-end satin for the overlay). I resized the image to 20 pixels wide (since I was using 20 shafts for the tencel pattern) by 40 pixels long, then fiddled with it until I arrived at a result I liked.
Here is the pattern image I started with:

Next, I added a 5-shaft satin “risers and sinkers” overlay, as documented by Alice Schlein in this blog entry:

The purpose of this overlay is to ensure that no floats are longer than 4 shafts. The black portions are 4/1 satin, the white portions 1/4 satin.
So far, so good. But these were the tencel threads only; I needed to add the gold warp and weft. How to do this in Photoshop?
Well, first I resized the image from 40 pixels to 50 pixels, using “nearest neighbor”. This duplicates every 4th pixel, producing this:

Having made space for the gold weft, I now needed to add the correct interlacements. I decided I wanted the gold wefts to interlace with the tencel threads in a basketweave pattern – this would show the gold in short floats, but keep it relatively subtle. (It would also provide a good structure of interlacements to tie down the burned-out ends post-devore.) So I created an over-2, under-2 pattern for the gold weft threads on the 20 tencel-warp shafts:

This was done using the paint bucket with pattern fill, something Alice Schlein and Bhakti Ziek covered in their book The Woven Pixel, and which is also covered in Alice Schlein’s The Liftplan Connection.
(The red is just a background so you can see the black and white pixels clearly. In the real file they are transparent pixels.)
Next, I had to create the interlacement of gold warp with gold weft. This would be plain weave:

I could only have used two shafts for this, but since I had four shafts available, I decided to spread them over four shafts.
Finally, I created the interlacement of gold warp with tencel weft:

And put it all together:
Here’s the .psd file for the final liftplan, for those who want to look “under the hood”.
Then I cut and pasted the liftplan into Weavepoint, and added a threading with gold threads on shafts 1-4 alternating with tencel on shafts 5-24:
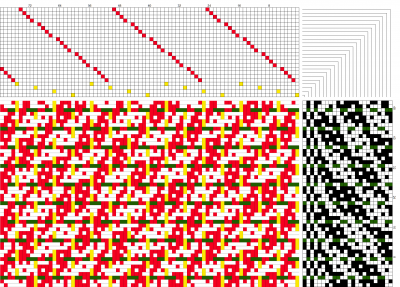
(In this drawdown, the gold warp threads are yellow, and the gold weft threads are green. Click to view the larger version – the white and yellow tend to merge in the smaller image.)
And voila! A mere 2.5 hours of fiddling later, a “slightly modified” (aka totally revamped) draft for the sample.
I still need to figure out the correct sett for this draft – but I think 50 epi will work, at least for a starting point. (That’s 40 epi for the tencel and 10 epi for the gold – basically setting it for a 5-shaft satin in tencel and ignoring the existence of the gold threads.) I’ll adjust it up or down later, once I’ve woven a sample.
The warp is now rinsed, dried, and ready to put on the loom, so my next step will be winding the gold warp. I’m hoping to get it beamed on today, and start threading tomorrow.


Very good! It would have taken me just as long, probably longer, as I would waste a lot of time looking for an easier way.