Tien Chiu

  • Home
  • About Tien
    • Honors, Awards, and Publications
  • Online Teaching
  • Gallery
  • Essays
  • Travels
  • Book
  • Blog
  • Dye samples
You are here: Home / Archives for digital painting

December 9, 2015 by Tien Chiu

Second draft of phoenix design

Here is the second draft of the digital painting for my mom’s memorial piece:

memorial piece for my mom - a phoenix rising from a cremation urn
memorial piece for my mom – a phoenix rising from a cremation urn

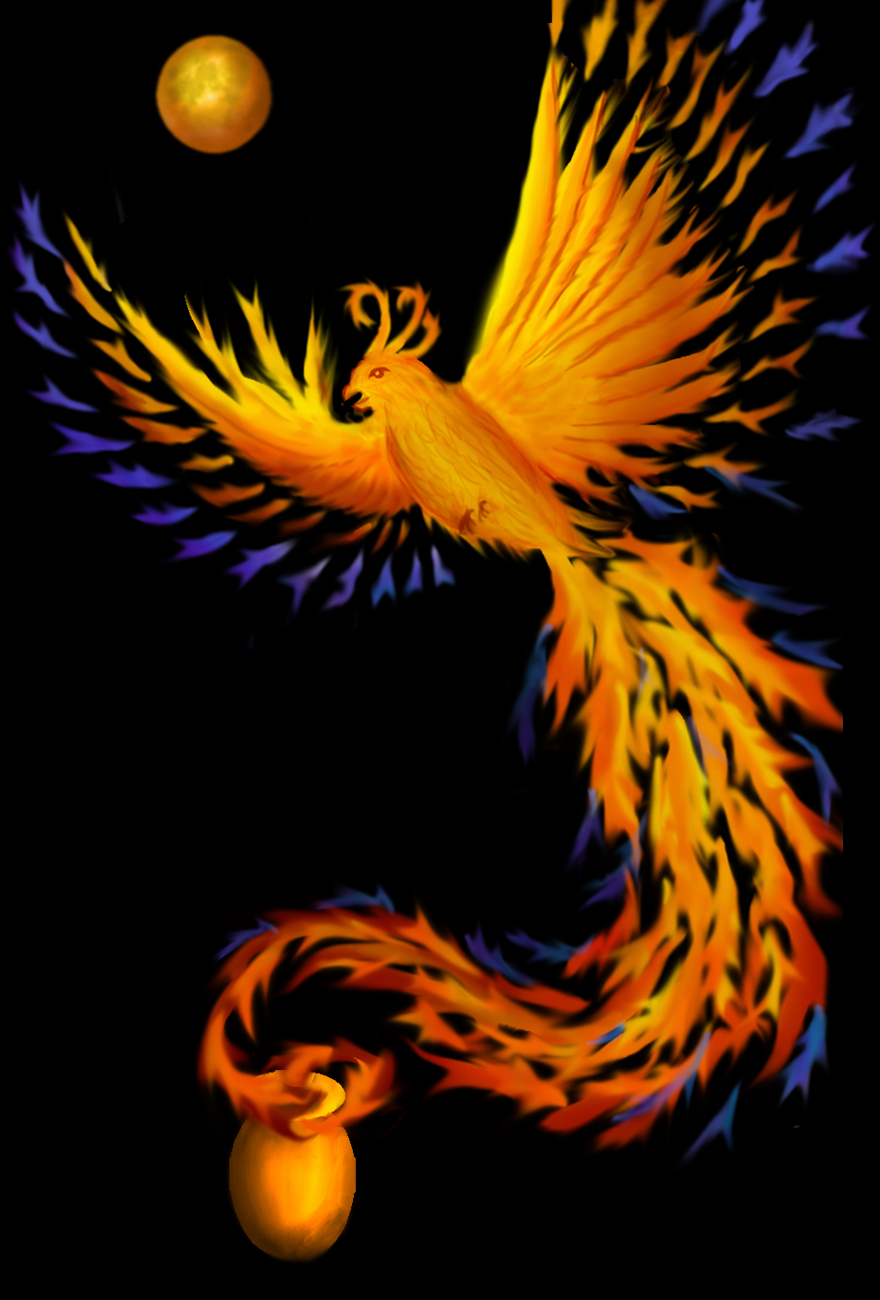
I think it’s much better than the first draft I posted a few days ago:

phoenix rising from a (not yet drawn) cremation urn
Beginnings of my mom’s memorial piece

I thought you might be interested in what I changed and why, so here is a summary of the changes.

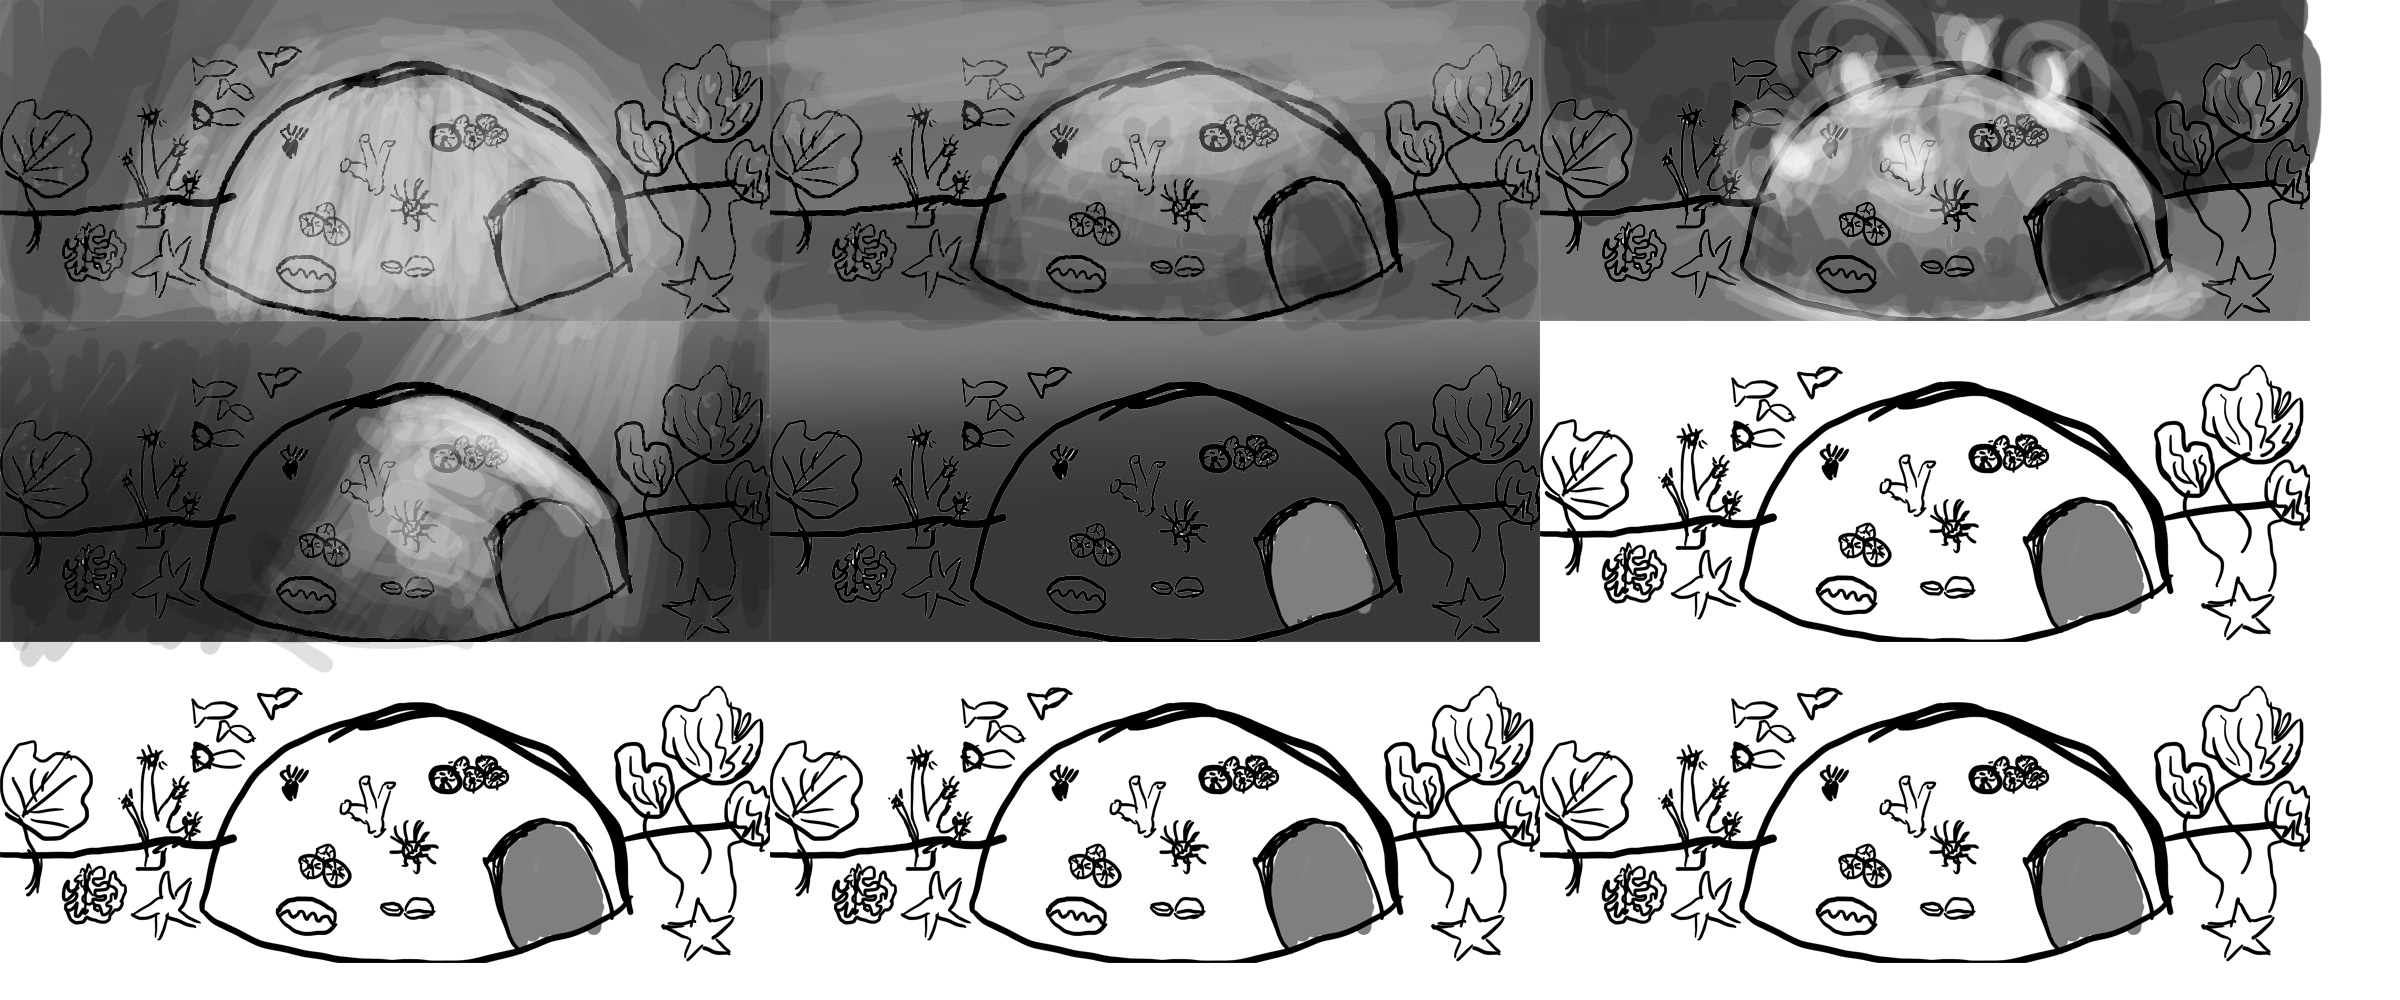
First, I added the red-orange moon to fill in the “dead space” at top left. I put it roughly in line with the diagonal of the bird’s body and the first part of the tail, to emphasize the diagonal flow of the piece. (Had I put the moon dead center between the wings – the natural temptation – it would have disrupted the flow of the piece, as well as looking overly rigid.)

I chose to make the moon red-orange rather than white for two reasons. First, a white moon would have stuck out like a sore thumb because white appears nowhere else in the piece. It would have been visually jarring and would have drawn attention to the moon (rather than the phoenix) because of the high color contrast. Second, a white moon would either have required that I use five wefts rather than four when weaving, or else do some fancy-dancing to bring the white warp up from the bottom in just that one area. So for visual and technical design reasons, red-orange made more sense than white.

I added a tiny bit more yellow to the bottom of the bird, and (on my friend Carolyn’s suggestion) added a bit more yellow in the feathers, especially toward the end of the tail. The focal point for this piece is the bird’s head – all the elements, especially the high-contrast wings, point at the head. From the head, the line of yellow along the body draws the eye down to the tail, and the yellow and bright orange draws the eye through the tail to the cremation urn. I had originally made the urn dark brown, but Carolyn also suggested that I brighten it up and add some yellow to make it more visible. I also altered the last few feathers of the tail to make the bird appear to be rising out of the urn.

The most obvious changes are in the feathers/flames radiating out from the wing. I wasn’t satisfied with the “feel” of the original, rather jerky flames. They looked almost electric, like lightning, rather than like fire. They also clashed with the style of the rest of the piece. So I replaced them with “flames” that are stylistically very similar to the tail feathers. I had initially felt that the spacing of the feathers was too rigid, but (after playing with different spacing) decided that the very regular, formal spacing worked the best. It does two things: First, it has a peaceful, calming feel, which I thought was better suited for the piece than the more jazzy lightning effect. I wanted the idea of a spirit at peace, not an angry or overly energetic one. Second, it radiates outward, so the phoenix feels like it’s expanding. I wanted to convey the idea of a phoenix bursting forth from its physical body (the ashes) – I think these wing feathers do that very nicely.

I chose blue for the outer edges of the wing and the tail to add some color contrast. The dominant color of the piece is orange, with some yellows and reds. Blue is the complement of orange, and complementary colors tend to intensify each other. So outlining the orange in blue intensifies the orange. And because blue tends to recede while orange comes forward, the blue doesn’t distract from the orange phoenix.

Using a complementary color also adds to the energy of the piece by amping up the color contrast. Without the blue, the color scheme would be an analogous one, composed of colors adjacent on the color wheel (yellow, orange, red). Analogous color combinations are harmonious, but don’t have much visual tension. I wanted more energy in this piece. By adding a strongly contrasting hue, I increased the energy of the piece. (Try visualizing the piece without the blue – it’s much less emphatic.)

This painting is not the end of the story, of course – I will have to translate it to woven cloth and then add embellishments. An important part of the theme of this piece is the use of beads, embroidery floss, and ribbons from my mother’s stash. So I am thinking about where and how to add some of the things she left me.

I will probably continue to noodle on the image until early next week. Before I can translate the image to weave structures, I need to finish dyeing the weft yarns. Then, to get my color palette, I’ll need to create a weave blanket, photograph it, and translate it into a set of colors. That will take me a couple more days. So I don’t expect to be weaving until Monday at earliest.

Filed Under: All blog posts, textiles, weaving Tagged With: digital painting, ma's memorial

July 31, 2015 by Tien Chiu

Finished my digital painting class!

Yesterday I finished and turned in the final project for my digital painting class. Remember the seascape with glowing coral? Well, it made a right angle turn and turned into a dragon’s cave. No, really! The finished painting looks like this:

dragon's lair - digital painting
digital painting of a dragon’s lair

Now how, you might ask, did I get to the dragon’s cave from this original sketch?

revised sketch for painting project

Well, I was zipping happily along for a couple of days, using a sea-urchin shell as the dome, painting glowing coral, and some brightly colored sea anemones. Then I went to sleep Monday night, woke up on Tuesday, and realized I had painted the most horrifyingly kitschy scene imaginable – almost as bad as those cutesy “collectible figurines”.

Here’s what it looked like on Tuesday morning:

half finished seascape painting

This clearly would not do. So I tossed out everything except the concept and placement of the dome. I decided to do a sea cave, so I grabbed a photo of some lava rock, made a Photoshop brush out of it, changed the color scheme a bit, and painted this rough sketch:

rough sketch of dragon's lair
rough sketch of dragon’s lair

I was quite pleased with my Photoshop brush – it reminded me of a coral reef. I was trying to figure who might live inside the dome, and then I thought, “Pirates!” So I made it a treasure cave:

treasure cave
treasure cave

After looking at it a bit, though, I decided that the cave blended into the background too much. Also, the pearls looked very contrived. So I dug back through my lessons to find the handout on drawing crystals, and I created a crystal cave:

almost completed crystal cave

I showed this to Lieven, my critique partner, and he commented that the crystal looked rather opaque, and perhaps I should reduce the opacity a bit. So I turned down the opacity and made a few more tweaks to arrive at the finished version:

dragon's lair - digital painting
finished painting of dragon’s lair

You can see that in the finished painting, the dome looks more translucent (though not as much as I would like).

Anyway, the last class was yesterday afternoon. I’m sad it’s over – not only did I learn tons, but the class really pushed me to step outside of my artistic boundaries and get over the “But I can’t draw!” mindset. And, of course, the drawing was lots of fun too, and I’m definitely planning to continue.

To celebrate the ending of the class, I’ve just bought myself a fantastic new digital painting tool. It’s a Wacom 22HD drawing tablet – it acts as both a monitor and a drawing tablet, so you can “draw” directly onto the surface of the tablet. They are unspeakably expensive if purchased new, but I lucked into a used one on Craigslist for literally pennies on the dollar (from a failing startup). It’s got a big scratch down the far right side, but I think it should still be usable. Assuming it’s working or repairable, I’ll have a really nice tablet to use for my digital designs. I’ll know for sure once a replacement power cable arrives.

Meanwhile, Mike left yesterday to attend a family reunion in Illinois. Of course, since he was going to be gone for a couple of days, he needed to pack. Which, in turn, gave our noble cats the opportunity to protect his luggage. Here’s Tigress, trying to decide whether to continue defending his luggage against all comers, or to go chase a moth. Sometimes life presents us with tough choices!

Tigress guarding Mike's luggage
Tigress guarding Mike’s luggage

Filed Under: All blog posts, drawing Tagged With: digital painting

July 26, 2015 by Tien Chiu

Value sketches

I’ve diligently been working on my digital painting homework, and have revised the initial sketch to a much stronger one. I’ve also mapped out the values (lightness/darkness) of each feature, so I have some idea of how the finished painting will “read”.

I thought you might find my reasoning for the revisions interesting, so here are the original sketch and the revised sketch:

original sketch for painting project
revised sketch for painting project

The most obvious change is that I’ve moved the dome to the left. That’s because the center is the least interesting place to put your focal point; the eye gets stuck there and doesn’t really take in the rest of the scene. By putting the focal point off-center, I get a more active, dynamic feel.

I’ve also moved the dome up slightly. That’s because in general, you don’t want to put objects with their edges just barely touching the edge of the image; it catches the eye in unhealthy ways. Instead, either put them squarely within the edges or solidly overlapping the edge, as in the glowing rock in the bottom right. I didn’t want to cut off the dome, since it’s the main feature, so I moved it up to sit solidly within the frame.

I added a “path” of glowing brain corals (the “rocks” with dots) to help lead the eye through the rest of the painting. It doesn’t really make sense to have a path underwater, but it’s compositionally useful and my (twisted reasoning) says it’s useful to have something glowing outside the door so you can see well enough to go in. If I think of a more imaginative thing to do with it I’ll probably change it.

The dots of light on the dome are branched coral with glowing ends. Think of them as underwater torches, illuminating the various sea life clinging to the dome. I’m probably going to rearrange the anemones, barnacles, giant clams, etc. to be a bit more decorative, and to cover the dome completely.

I chose a “night-time” setting for this composition because I felt the high contrast between the dark background and the glowing dome made for a much more dramatic composition. I may even punch up the contrast a bit more in the finished version.

I changed the tree-like sea fans to a rock formation in the background because I felt that the sea fans were “flat”. Adding the rock formation to the background allows me to shade the rocks, giving more depth to the image. It also makes the dome look bigger in comparison.

And that’s it for now! I’ll post more as I develop the actual painting – I think you might enjoy seeing the intermediate steps.

Meanwhile, in cat-land, shelling beans have arrived in the farmer’s market, sending Tigress into bursts of ecstasy. Mature bean pods are one of her favorite toys, and she’ll play with them until the pods split apart and the beans fall out. After that, it’s off for another one!

Here’s a video of Tigress going crazy with a bean pod.

Filed Under: All blog posts, drawing Tagged With: digital painting

July 21, 2015 by Tien Chiu

Digital painting, process and progress

Today I turned in the third major project in my digital painting class, the Technical Challenge. This challenge was to draw nine spheres, five in specified materials (wood, metal, rock, glass, fur), four in materials of your choice. Here’s what I painted:

Final version of the Technical Challenge for my digital painting class

I’m really proud of my work on this assignment. I think I did a pretty good job of rendering each of the materials, some of which were really challenging. (The tiger eye gemstone, for example, had me going in circles for quite a while.) And, more importantly, I felt really comfortable painting with Photoshop for the first time. Not that I know everything (quite the opposite!), but I knew enough that I could develop a strategy/series of steps for painting each material. At the beginning of the class, I would have been totally stumped.
So now, on to the next assignment, which is due in a week and a half. For this assignment, we need to paint a dwelling for a small group of people. I did five sketches, and felt the most interesting one was the undersea dome:

undersea dome, black and white sketch

It’s basically a mermaid cave, only it’s a dome built under the sea. It’s covered with barnacles, coral, anemones, and other sea life (think “coral reef”), and is placed among other ocean life – fish, sea fans, starfish, and brain coral, among others.

So the next step was to do some short studies to figure out the lighting. I cloned the sketch in miniature, and started filling in some colors:

color versions of the undersea dome

In the top left, the dome is supposed to be glowing; in the top middle, it’s medium light with some glowing coral. In the top right, it’s dark except for some glowing coral that lights up the house, and a bit of bioluminescence in the sea fans. And in the middle left, the dome is lit up with a spotlight, perhaps from a submarine, or perhaps just a burst of sunlight from above.

I was having trouble working out which version to run with, so I checked with the instructor. She suggested desaturating the image, since color can be confusing, and painting a grayscale version just to visualize the lighting. This proved immensely helpful, and here is the result:

value studies of the undersea dome

Of these, I like the top right and middle left best (the spotlight and the glowing coral). I like the top left as well, but I think the backlighting would make it hard to paint any details like sea fans, barnacles, etc. on the dome.

I’m fascinated by the process of designing and developing a digital painting. It basically follows the creative process laid out in my book, but with specific steps (black and white sketch, value study, etc.) for developing two-dimensional fine art. I’m feeling much more comfortable with the entire process than I was two months ago. I’m very glad I signed up for this class!

I’m looking forward to painting the undersea dome. It’s considerably more challenging than anything I’ve attempted so far, but I finally feel like I have enough skills to tackle something complex. And since the manuscript is already done, I have a week or two to devote to the project. It’s due the last day of class – Thursday, July 30.

And the cats? I’m going back into the archives for this one. About a month ago, Mike got a set of cubbyholes to store all his ham radio equipment. Of course, as Fritz so aptly demonstrates, it’s also great for storing cats. Especially curious ones.

Fritz, neatly filed away for storage

Filed Under: All blog posts Tagged With: digital painting

July 10, 2015 by Tien Chiu

Finished my digital painting!

I finished my digital painting last night, a couple hours before the midnight deadline. Here it is:

completed digital painting of a flying bathtub

It took me a total of about 15-20 hours to finish, and was quite a challenge! It would have taken me far longer if I’d been painting with traditional media, though, so I’m feeling good about my choice of Photoshop/digital painting. It lets me make changes with impunity, and makes things like applying textures and duplicating items a lot easier.

(For example, there are really only three balloons in that huge cluster of balloons. There’s one oval balloon, one spherical balloon, and one lumpy-shaped balloon. The rest was done in about fifteen minutes, by changing colors and copy/pasting the balloon shapes onto separate layers. Then I just needed to resize, rotate, and move the balloons around a bit, and presto! A huge cloud of “unique” balloons, each with proper lighting. As an added bonus, I could simply lower the opacity of each balloon to give the see-through effect. If I’d been painting in traditional media, I’d have had to figure out all that complexity myself.)

Now that that project is done, I can take a breather of a day or two from my digital painting class, and catch up on other things. Like the book. I had planned to complete the captions this weekend, but because I’m still missing a lot of information, that will have to happen next weekend. This weekend I’ll work on organizing photos, send out all my caption information requests, write the Bibliography, and get a head start on writing the marketing material. Then I’ll make sure the footnotes are correct, start work on the Index, and all that other unsexy stuff. I’m also hoping to make the final corrections to the manuscript, so I can begin reformatting it for the publisher.

I’ve also got homework for an online visual composition class I’m taking, but I’m thinking I may defer that for a couple weeks, and play catch-up once the book and digital painting class is done. It’s not ideal, but it’s OK with the instructor, and I’ve got my hands full already.

Which, of course, does not explain why huge boxes of fruit keep insisting on coming home from the farmer’s market with me. Last weekend, despite my huge and growing to-do list, an entire lug of apricots (about 22 lbs!) appeared in my market bags, to be converted to 15 jars of apricot jam (in three flavors: apricot-rose, apricot-honey, and just plain apricot). Here’s a pic of one batch of jam, bubbling away:

apricot jam on the stove

The week before that, it was 20+ lbs of peaches and nectarines, plus two flats of strawberries. The strawberries got made into sun-cooked strawberry jam:

sun-cooked strawberry jam

The sun-cooked strawberry jam is one of my favorite jams – you toss de-stemmed strawberries with sugar and lemon juice, wait for the juices to come out, then boil the mixture very briefly to sterilize it and help the sugar penetrate the berries. Then, instead of boiling it, you spread it in large sheet pans, cover with netting, and put it out in the sun for several days (taking it in at night, of course). The excess moisture evaporates in the sun, “cooking” the jam without destroying the intense strawberry flavor. Then you boil it briefly to sterilize it and put it into jars. The result is a very concentrated strawberry jam with the essence of fresh strawberries. 24 baskets of strawberries made eight pints of jam, so each jar contains three pints of strawberries!

Somewhere in there, I also got into my head that making nocino would be a good idea. Nocino is a walnut liqueur made with “green” (immature) walnuts. You take the immature walnuts, chop them into quarters (husks and all), add a little vanilla and a little lemon or orange peel, and soak them in vodka for a couple months. Then you add sugar and let the mixture age for another couple months. The result is said to be a wonderfully complex and nutty liqueur. I, of course, have no interest in drinking it (I’m basically allergic to alcohol), but I was thinking it might be interesting in chocolates.

Here are the walnuts and the proto-nocino:

black walnuts for making nocino
the beginnings of nocino

Despite knowing that walnut hulls produce a strong brown stain, I didn’t bother wearing gloves as I chopped up the walnuts. I figured that the stains would only last a day or two. Boy, was I wrong! My hands were brown for almost a week. Lesson learned!

But really, I have to stop making jams for the rest of the month. I simply don’t have time! So I will have to exercise some self-control at the farmer’s markets. My self-control has obviously become quite flabby, so it’s time to get it lifting weights again. 🙂

Along the lines of self-control, I really should stop spending time surfing the Internet. However, it does lead to discoveries. A buddy of mine (who is working on a book about the great wheel and how to spin with it) has just started a spinning blog, Cetacea’s Stuff, with a lot of information about history, tools, and process of spinning. Well worth reading if you have an interest in handspinning.

And, finally, here’s a pic of Fritz, who has apparently never heard of feline dignity. 🙂 He likes to hang out by the front door, flopped over on his back with his hind feet in the air, prior to a lengthy bout of shoe-sniffing. A very silly, but thoroughly lovable, cat.

Fritz preparing to sniff some shoes

Filed Under: All blog posts, food Tagged With: digital painting

Next Page »

Subscribe to Blog via Email

Archives

Tags

aids lifecycle outfits autumn splendor book cashmere coat cats celtic braid coat color study cross dyeing design design class devore doubleweave doubleweave shawls drawing dye samples dye study group gradient colors house infinite warp jacquard loom katazome knitted blanks kodachrome jacket ma's memorial mohair coat network drafted jacket/shawl project network drafting painted warp phoenix rising phoenix rising dress phoenix rising kimono phoenix rising reloaded pre-weavolution project sea turtles taquete tie-dye tied weaves tomatoes velvet weaving drafts web design website redesign wedding wedding dress woven shibori

Categories

  • Africa
  • aids lifecycle
  • All blog posts
  • All travel posts
  • Asia
  • Bangkok
  • Belize
  • Cambodia
  • Central America
  • Chai Ya (Wat Suon Mok)
  • Chiang Mai
  • Chiang Rai (Akha)
  • China
  • chocolate
  • computer stuff
  • creating craft
  • Creative works
  • cycling
  • Delhi
  • Dharamsala
  • drawing
  • dyeing
  • Fiber Arts
  • finished
  • food
  • garden
  • Ghana
  • Guatemala
  • Hanoi
  • Ho Chi Minh City
  • Hoi An
  • India
  • Khao Lak
  • Knitting
  • knitting
  • Ko Chang
  • Laos
  • Luang Namtha
  • Luang Prabang
  • markleeville death ride
  • meditations on craft
  • mental illness
  • musings
  • Phnom Penh
  • powerlifting
  • Rewalsar (Tso Pema)
  • sewing
  • Siem Reap (Angkor Wat)
  • Southeast Asia
  • surface design
  • textiles
  • Thailand
  • travel
  • Vangvieng
  • Vientiane
  • Vietnam
  • Warp & Weave
  • weaving
  • Weaving
  • weavolution
  • writing

© Copyright 2025 Tien Chiu · All Rights Reserved ·


Loading Comments...